

Beastman of Farum Azula |
||
|---|---|---|
 |
||
| Locations & Drops | ||
| Groveside Cave: (NG) Flamedrake Talisman Dragonbarrow Cave: Flamedrake Talisman +2 |
||
| Strong VS |
Weak to |
|
Beastman of Farum Azula is a Boss in Elden Ring. The Beastmen are said to have come from a doomed city in the sky, and attack with the ferocity of a wild beast on the hunt. These are optional bosses, as players are not required to defeat them to advance in Elden Ring.
Beastmen from the doomed Farum Azula, the slowly crumbling ruins in the skies. These ruins are said to be the remains of a giant mausoleum enshrining an ancient dragon, guarded by chosen beastmen who wield weapons clad in lightning.
Where to find Beastman of Farum Azula in Elden Ring
Beastman of Farum Azula can be found in:
Beastman of Farum Azula Combat information
- Parriable: Yes
- Is vulnerable to a critical hit after being stance broken or parried
Negations (or Absorptions)
The negation numbers are the % of your damage that gets blocked. For example, if a negation is 60, 40% of that damage by that type will go through and 60% will be negated. Bigger number = less damage. A negation of 100 means no damage goes through, and a negation of -100 means the enemy takes 2x damage from that source. 0 means damage goes pretty much as is.
Beastman of Farum Azula Boss Guide for Elden Ring
Beastman of Farum Azula Fight Strategy
The Best Tips for Beastman of Farum Azula:
- Bait its long attack combos and counterattack once it's finished.
- Try to avoid blocking since its attacks drain so much stamina.
- Use Rotten Stray Ashes to take advantage of its relatively low resistance to Scarlet Rot.
Melee Strategy
Bait and Punish: Bait the Beastman's attacks until it completes a full combo before attacking a couple of times and then backing away. Its weapon drains a lot of stamina if you block it, so after you land a few hits it's better to dodge back far enough that you're out of range of its swings. When in doubt, stay as far away as you can. This boss doesn't have a ton of stance, so charged or jumping heavy attacks will stance-break it easily.
Parrying: Most of the Beastman's attacks can be parried, except for the Two-Hand Slam and the last two attacks of the 6-Hit Combo (the uppercut and the overhead attack).
Magic and Ranged Strategy
Keep Your Distance: This fight is considerably easier at range. You can bait out its combos the same way you would in melee, but you can punish them from range rather than running into danger. Just keep your distance when it begins attacking and only block if you absolutely have to.
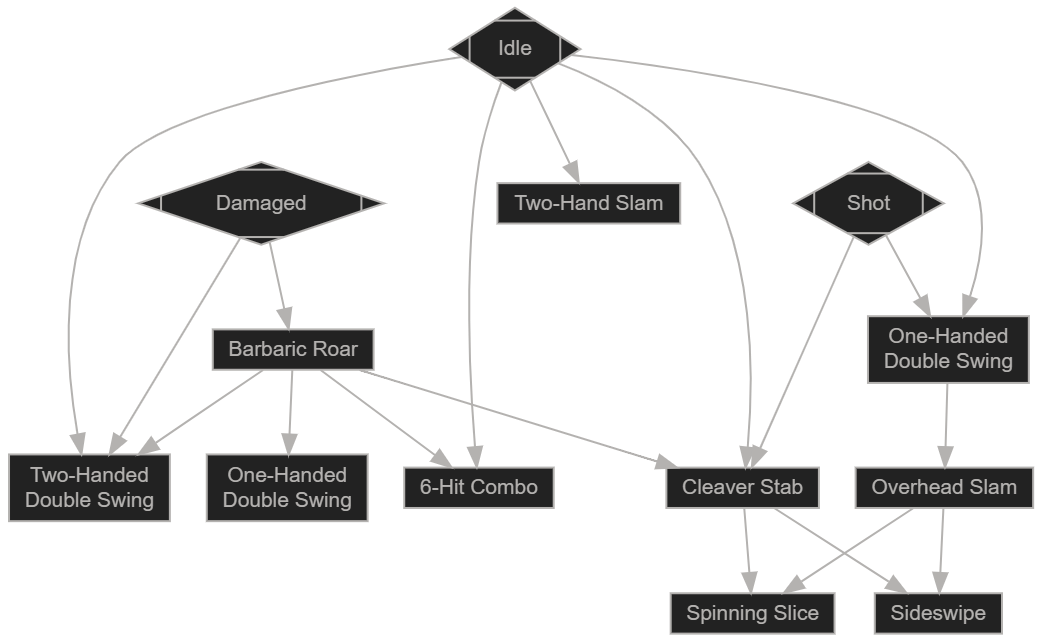
Attacks & Counters
| Attack | Description | Counter |
| One-Handed Double Swing | Parry the first swing or roll away. Avoid blocking, since it will lose you a lot of stamina. | |
| Two-Handed Double Swing | Parry the first swing or roll away. Avoid blocking, since it will lose you a lot of stamina. | |
| Cleaver Stab | Roll to your right to avoid the follow-up | |
| Overhead Slam | Roll to your right to avoid the follow-up | |
| Sideswipe | Roll right and get in a hit while it recovers | |
| Spinning Slice | Roll right, since the hitbox is mostly towards the end of the attack | |
| Barbaric Roar | Cleaver: Lets loose a fearsome roar dealing damage in a small area of effect | Roll backwards and prepare to dodge the follow-up combo |
| 6-Hit Combo | Dodge away and keep your distance during most of the combo, then roll in during the final slam and attack during its recovery animation. | |
| Two-Hand Slam | Cleaver: Grabs its cleaver with two hands, jumps forward, and slams it into the ground. | There's a long delay before it jumps, so be careful not to roll too soon. Once you successfully dodge, you have time to get in a few attacks of your own. |
![]() : Attack can be parried
: Attack can be parried
Beastman of Farum Azula (Cleaver) Combo Chart
Beastman of Farum AzulaGroveside Cave |
|
|---|---|
 |
|
| Drops | Flamedrake Talisman |
| HP | 1,417 |
Beastman of Farum Azula (Groveside Cave)
- Optional boss
- Closest Site of Grace: Groveside Cave
- Multiplayer allowed for this boss
- You can summon Spirit Ashes for this boss
Beastman of Farum Azula Combat information
- Health: 1,417 HP
- Defense: 101.3
- Stance: 65
- Drops
 1,000, Flamedrake Talisman
Resistances
 Poison: 226 / 268 / 366 / 656
 Scarlet Rot: 226 / 268 / 366 / 656
 Hemorrhage: 310 / 408 / 698 / 1155
 Frostbite: 310 / 408 / 698 / 1155
The resistance numbers are the buildup amount to trigger it. For example, if a resistance is 100 you must deal 100 points of the given buildup to trigger it. Note that these go down over time, and increase each time the effect procs. The values after the "/"s indicate the increased resistances after each successive proc.
NG+ and Beyond (click to reveal)
| NG | NG+ | NG+2 | NG+3 | NG+4 | NG+5 | NG+6 | NG+7 | |
|---|---|---|---|---|---|---|---|---|
| HP | 1,417 | 4,424 | 4,866 | 5,087 | 5,308 | 5,751 | 5,972 | 6,193 |
| Defense | 101 | 117 | 120 | 123 | 129 | 134 | 140 | 152 |
| 1,000 | 5,000 | 5,500 | 5,625 | 6,000 | 6,125 | 6,250 | 6,375 | |
Resistances |
||||||||
| 226 / 268 / 366 / 656 | 247 / 289 / 387 / 677 | 250 / 292 / 390 / 680 | 254 / 296 / 394 / 684 | 258 / 300 / 398 / 688 | 261 / 303 / 401 / 691 | 265 / 307 / 405 / 695 | 269 / 311 / 409 / 699 | |
| 226 / 268 / 366 / 656 | 247 / 289 / 387 / 677 | 250 / 292 / 390 / 680 | 254 / 296 / 394 / 684 | 258 / 300 / 398 / 688 | 261 / 303 / 401 / 691 | 265 / 307 / 405 / 695 | 269 / 311 / 409 / 699 | |
| 310 / 408 / 698 / 1155 | 339 / 437 / 727 / 1184 | 344 / 442 / 732 / 1189 | 349 / 447 / 737 / 1194 | 354 / 452 / 742 / 1199 | 359 / 457 / 747 / 1204 | 364 / 462 / 752 / 1209 | 369 / 467 / 757 / 1214 | |
| 310 / 408 / 698 / 1155 | 339 / 437 / 727 / 1184 | 344 / 442 / 732 / 1189 | 349 / 447 / 737 / 1194 | 354 / 452 / 742 / 1199 | 359 / 457 / 747 / 1204 | 364 / 462 / 752 / 1209 | 369 / 467 / 757 / 1214 | |
| 169 / 197 / 239 / 337 | 185 / 213 / 255 / 353 | 187 / 215 / 257 / 355 | 190 / 218 / 260 / 358 | 193 / 221 / 263 / 361 | 196 / 224 / 266 / 364 | 198 / 226 / 268 / 366 | 201 / 229 / 271 / 369 | |
| Immune | ||||||||
Beastmen of Farum AzulaDragonbarrow Cave |
|
|---|---|
 |
|
| Drops | Flamedrake Talisman +2 |
| HP | 8,306 (Greatsword) 3,344 (Throwing Knife) |
Beastmen of Farum Azula (Dragonbarrow Cave)
- This fight features two Beastmen, one with a cleaver and the attacks described above and another with throwing knives and a different set of attacks.
- Optional boss
- Closest Site of Grace: Dragonbarrow Cave
- Multiplayer allowed for this boss
- You can summon Spirit Ashes for this boss
- Both Beastmen must be defeated to win the fight
Beastman of Farum Azula Location
The boss of Dragonbarrow Cave. Head north from the room with the Lesser Runebear, Drop down some ledges, head east and then south, and drop down another pit to reach the bosses.
Beastmen of Farum Azula Combat information
- Health: 8,306 HP (Cleaver), 3,344 HP (Dagger).
- Defense: 120 (Both).
- Stance: 65 (Cleaver), 30 (Dagger).
- Use a Sleep Pot to put the cleaver-wielding Beastman to sleep and focus on the knife-thrower, since it has much less HP and can probably be killed before the other one wakes up.
- The shrubs in the boss arena allow you to sneak up on the Beastmen and backstab one of them before you're noticed.
- Use Spirit Ashes to distract one Beastman while you focus on the other.
- Use a shield with high Guard Boost to block both the cleaver attacks and the throwing knives, then Guard Counter to stagger and then critical the cleaver-wielder. Since the cleaver still does considerable stamina damage, this should only be attempted with high Endurance.
- The knife-thrower has extremely low stance, so a single charged heavy attack from almost any weapon will be enough to stance-break it. Use the invulnerability frames from a critical hit to take it out without getting killed by the cleaver-wielder.
- Drops 65,000, Flamedrake Talisman +2
Resistances
- Poison: 255 / 297 / 395 / 685
- Scarlet Rot: 255 / 297 / 395 / 685
- Hemorrhage: 351 / 449 / 739 / 1196
- Frostbite: 351 / 449 / 739 / 1196
The resistance numbers are the buildup amount to trigger it. For example, if a resistance is 100 you must deal 100 points of the given buildup to trigger it. Note that these go down over time, and increase each time the effect procs. The values after the "/"s indicate the increased resistances after each successive proc.
Additional Attacks & Counters
| Attack | Description | Counter |
| Double Throw | Knife: Throws two knives in an arc towards you, one after the other. Always uses this move if you're at a distance. | Block with a shield or dodge forward. |
| Quick Slice | Knife: Slashes once at close range. Only uses this when being attacked at close range. | Block and guard counter, or roll left or right. |
NG+ and Beyond (click to reveal)
| NG | NG+ | NG+2 | NG+3 | NG+4 | NG+5 | NG+6 | NG+7 | |
|---|---|---|---|---|---|---|---|---|
| HP (Cleaver) | 8,306 | 8,314 | 9,145 | 9,561 | 9,976 | 10,808 | 11,223 | 11,639 |
| HP (Dagger) | 3,344 | 3,347 | 3,681 | 3,849 | 4,016 | 4,351 | 4,518 | 4,685 |
| Defense | 120 | 120 | 123 | 126 | 132 | 138 | 144 | 156 |
| 1,000 | 5,000 | 5,500 | 5,625 | 6,000 | 6,125 | 6,250 | 6,375 | |
Resistances |
||||||||
| 255 / 297 / 395 / 685 | 272 / 314 / 412 / 702 | 276 / 318 / 416 / 706 | 280 / 322 / 420 / 710 | 284 / 326 / 424 / 714 | 288 / 330 / 428 / 718 | 292 / 334 / 432 / 722 | 296 / 338 / 436 / 726 | |
| 255 / 297 / 395 / 685 | 272 / 314 / 412 / 702 | 276 / 318 / 416 / 706 | 280 / 322 / 420 / 710 | 284 / 326 / 424 / 714 | 288 / 330 / 428 / 718 | 292 / 334 / 432 / 722 | 296 / 338 / 436 / 726 | |
| 351 / 449 / 739 / 1196 | 375 / 473 / 763 / 1220 | 380 / 478 / 768 / 1225 | 386 / 484 / 774 / 1231 | 391 / 489 / 779 / 1236 | 397 / 495 / 785 / 1242 | 403 / 501 / 791 / 1248 | 408 / 506 / 796 / 1253 | |
| 351 / 449 / 739 / 1196 | 375 / 473 / 763 / 1220 | 380 / 478 / 768 / 1225 | 386 / 484 / 774 / 1231 | 391 / 489 / 779 / 1236 | 397 / 495 / 785 / 1242 | 403 / 501 / 791 / 1248 | 408 / 506 / 796 / 1253 | |
| 191 / 219 / 261 / 359 | 204 / 232 / 274 / 372 | 207 / 235 / 277 / 375 | 210 / 238 / 280 / 378 | 213 / 241 / 283 / 381 | 216 / 244 / 286 / 384 | 219 / 247 / 289 / 387 | 222 / 250 / 292 / 390 | |
| Immune | ||||||||
Image Gallery for Beastman of Farum Azula in Elden Ring

These guys are staggered pretty easily, so hitting them with jumping heavies will interrupt most if not all of their attacks, even with daggers.

- Anonymous
The seamless transition between his combos can be quite frustrating, took me a couple attempts to bring him down. (Groveside cave edition.)
- Anonymous
Beasts all over the shop, you'll be one of them...sooner or later..
- Anonymous
This has to be the boss with the best Runes:Difficulty ratio in the game. Ekzykes who is 100x stronger only dropped 38k runes.
- Anonymous
- Anonymous
You can use the beastlure pot against these guys. Very helpful when co-oping. They do hella damage in Farum Azula. It can save a life lol.
- Anonymous
When fighting the two in Dragonbarrow Cave, focus on the throwing knive guy first and all should go smoothly
- Anonymous
does anyone know if the armor they wear is obtainable at all? im guessing not, but i wanna make sure
- Anonymous
For those wanting to lame ou- I mean cheese the duo version of it, you can sneak by them by staying crouched in the bushes found around the arena, and you can even use Poison Mist without getting the aggro, to some extent ...
For SOME REASON if the Cleaver Beastman's (the one lying down) health go below a certain threshold (after a little over one full poison duration), the ranged one begins another patrol that goes further into the arena, but most importantly he gains super laser vision and will see you the moment he looks in your general direction and start throwing stuff at you.
However that doesn't happen if you bring him down first with the poison mist, it's abit tricky since he walks around the place, but it's doable with some timing and alot of blue juice.
Clearly not the most fun way to do it, but still the safest RL1 strat
- Anonymous
For the Duo, I was able to crouch and sneak up on the blade thrower, which did not aggro cleaver beastman (his HP bar will appear, but he just stayed in his default pose) so you can fight a 1v1 with both of them
They should have made the Azula Beastman in Groveside cave do the minimal wind up 5-6 attack spinning slashing combo like the Beastmen do in Farum Azula, that would have been a great new player experience.
- Anonymous
Beat the duo in dragonbarrow at level 35 with a +8 crescent moon axe:
Use the three wolves spirit ash, backstab the one with the greatsword and let the wolves aggro him, then run to the one with the ranged attack and stunlock him to death (you have to be quick). If you manage to kill him before the three wolves die then it's easy since you just have to play safe with the other one and get your 65k runes
- Anonymous
- Anonymous
- Anonymous
I'd use the wolves before that rabid stray. Also, the barricade shield AoW cast on a medium shield will block any physical attack the game can throw at you, and with very little stamina damage.
- Anonymous
- Anonymous
St Trina's sword worked wonders for the pair: ambush the melee guy, put him to sleep for 60 seconds before either of them can react, kill his friend
- Anonymous
If anyone has trouble with the duo in Dragonbarrow, you can use long ranged spells (I used Frenzied Burst) to kill the throwing knife one without aggroing the melee one, makes it much easier.
- Anonymous
Horrible Bossfight. He has one ****ing move that can easily be walked away from.
The big wolf outside his boss fog is a better bossfight than this joke.
- Anonymous
- Anonymous
The one in the groveside cave is a complete joke. I was able to pretty much completely stun lock him (don't know what it's called in game) with a simple lordsworn greatsword.
Just hit him until you have just enough stamina to roll away, then keep your distance til you are back at full stamina. Rince repeat til dead
- Anonymous
**** the knife throwing one with it's bull**** hax tracking.
- Anonymous
- Anonymous
- Anonymous
who was gonna tell me this was not the actual tutorial boss....
- Anonymous
am I the only one who got reminded of bloodborne and father Gascoigne with this guy?
- Anonymous
- Anonymous
My first boss I've killed in elden ring! (Besides the tutorial boss)
It took me two tries
It helps alot to summon something to distract him while you attack him. Idk, it's just what worked for me
- Anonymous
- Anonymous
toss a sleep pot at the first, summon skeletal militiamen and destroy the walking one.
- Anonymous
Use the Gold-pickle fowl foot when u kill the duo in Dragonbarrow and get another 20k
- Anonymous
I do wish you could get this lad's weapon, probably my favourite looking "big nasty blade with an extra handle" weapons in the From games lineup.
- Anonymous
killed this boss after gitting to malenia,killed him in three hits lol.
- Anonymous
If you start as a Vagabond you can poke it to death with a Halberd. It gets stunlocked for the whole combo, backing away when you finish. And then comes back, to resume the poking.
- Anonymous
Am I the only one who spotted that he's literally a reskin of Gael?
- Anonymous
In the Dragonbarrow fight, kill the Throwing Knife variant first. The melee attacks are much easier to dodge.
- Anonymous
- Anonymous
- Anonymous
- Anonymous
1 shot him at level 9 just running jumping r2 attack and then running away from his combo / leap attack.
- Anonymous
Grab the Lordsworn Greatsword and bait out his 5 move attack, then as he's recovering, run in and use the WA uppercut. As soon as he hits the ground, buffer another one, and you should get a free riposte. Rinse and repeat until dead.
- Anonymous
Killed on level 11 with confessor after like 10 goes. Just wait for him to does his 5 hit combo when he jumps in the air in the final part run up and slash abs run like fook
- Anonymous
im lvl 45 and he is 1 shot me so recommended for 60 maybe 70
- Anonymous
- Anonymous
Also a duo boss in Dragonbarrow cave (where they're a huge pain because one has ranged with extremely good tracking...)
- Anonymous
- Anonymous
- Anonymous
stuns ez with heavy attacks and heavy attacks break his combo. u can even do quick heavy's
- Anonymous
He is very susceptible to jump attacks and stuns easily (at least with the club).
- Anonymous
Prophet level 0 took about 6 claw spell attacks to defeat him. Wait until the 4th attack finishes and then cast it.
- Anonymous

Normal enemy ahead
1
+10
-1