Nox Swordstress & Nox Monk |
|
|---|---|
 |
|
| Location | Sellia, Town of Sorcery |
| Drops | Nox Flowing Sword |
| HP | 1,631 each |
| Stronger VS |
Weaker to |
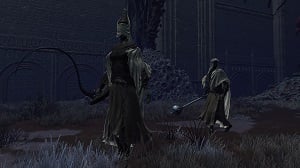
Nox Swordstress & Nox Monk are a Field Boss in Elden Ring. Nox Swordstress & Nox Monk are a duo boss comprised of two warriors from the eternal city of Nokstella. They are found in eastern Caelid. These are optional bosses as players are not required to defeat them to advance in Elden Ring, but they provide useful items and Runes upon defeat.
Nox Swordstress and Nox Monk are the normal enemy forms of this boss.
Long ago, the Nox invoked the ire of the Greater Will, and were banished deep underground. Now they live under a false night sky, in eternal anticipation of their liege. Of the coming age of the stars. And their Lord of Night.
Elden Ring Nox Swordstress & Nox Monk Boss
- This is an optional boss
- Closest Site of Grace: Sellia Backstreets
- Multiplayer is allowed for this boss
- You can summon Spirit Ashes for this boss
- Both Nox Swordstress and Nox Monk must be defeated to win this fight
Elden Ring Nox Swordstress & Nox Monk Location
In the very northwest of Sellia, Town of Sorcery in eastern Caelid. Their chamber is initially sealed with a barrier which can be dispelled by jumping across rooftops to light a brazier in northwest Sellia. [Map Link]
From the golden tree just south of the Sellia Backstreets Site of Grace [Map Link], face the southern edge of the platform and drop down onto the root below. Follow the root and jump onto the building on your right using the mutated growth as a stepping stone. There should be another ladder here that leads to the brazier that will remove the barrier.
Nox Swordstress & Nox Monk Combat information
- Health: 1,631 HP each
- Defense: 109
- Stance: 65
- Parryable: Yes
- Is vulnerable to a critical hit after being stance broken or parried
- This fight features a Nox Swordstress wielding a Nox Flowing Sword and a Nox Monk wielding a Nox Flowing Hammer
- Damage:
 Standard, (Swordstress),
  Standard,
  Strike (Monk)
 - Drops
 6,400, Nox Flowing Sword
Negations (or Absorptions)
The negation numbers are the % of your damage that gets blocked. For example, if a negation is 60, 40% of that damage by that type will go through and 60% will be negated. Bigger number = less damage. A negation of 100 means no damage goes through, and a negation of -100 mean the enemy takes 2x damage from that source. 0 means damage goes pretty much as is.
Resistances
 Poison: 326 / 424 / 714 / 1171
 Scarlet Rot: 326 / 424 / 714 / 1171
 Hemorrhage: 326 / 424 / 714 / 1171
 Frostbite: 326 / 424 / 714 / 1171
The resistance numbers are the buildup amount to trigger it. For example, if a resistance is 100 you must deal 100 points of the given buildup to trigger it. Note that these go down over time, and increase each time the effect procs. The values after the "/"s indicate the increased resistances after each successive proc.
NG+ and Beyond (click to reveal)
| NG | NG+ | NG+2 | NG+3 | NG+4 | NG+5 | NG+6 | NG+7 | |
|---|---|---|---|---|---|---|---|---|
| HP | 1,631 | 2,484 | 2,732 | 2,856 | 2,980 | 3,229 | 3,353 | 3,477 |
| Defense | 109 | 117 | 120 | 123 | 129 | 135 | 141 | 153 |
| 6,400 | 19,200 | 21,120 | 21,600 | 23,040 | 23,520 | 24,000 | 24,480 | |
Resistances |
||||||||
| 326 / 424 / 714 / 1171 | 353 / 451 / 741 / 1198 | 358 / 456 / 746 / 1203 | 363 / 461 / 751 / 1208 | 368 / 466 / 756 / 1213 | 374 / 472 / 762 / 1219 | 379 / 477 / 767 / 1224 | 384 / 482 / 772 / 1229 | |
| 326 / 424 / 714 / 1171 | 353 / 451 / 741 / 1198 | 358 / 456 / 746 / 1203 | 363 / 461 / 751 / 1208 | 368 / 466 / 756 / 1213 | 374 / 472 / 762 / 1219 | 379 / 477 / 767 / 1224 | 384 / 482 / 772 / 1229 | |
| 326 / 424 / 714 / 1171 | 353 / 451 / 741 / 1198 | 358 / 456 / 746 / 1203 | 363 / 461 / 751 / 1208 | 368 / 466 / 756 / 1213 | 374 / 472 / 762 / 1219 | 379 / 477 / 767 / 1224 | 384 / 482 / 772 / 1229 | |
| 326 / 424 / 714 / 1171 | 353 / 451 / 741 / 1198 | 358 / 456 / 746 / 1203 | 363 / 461 / 751 / 1208 | 368 / 466 / 756 / 1213 | 374 / 472 / 762 / 1219 | 379 / 477 / 767 / 1224 | 384 / 482 / 772 / 1229 | |
| 237 / 279 / 377 / 667 | 256 / 298 / 396 / 686 | 259 / 301 / 399 / 689 | 263 / 305 / 403 / 693 | 267 / 309 / 407 / 697 | 271 / 313 / 411 / 701 | 275 / 317 / 415 / 705 | 279 / 321 / 419 / 709 | |
| Immune | ||||||||
Elden Ring Nox Swordstress & Nox Monk Boss Guide
Nox Swordstress & Nox Monk Fight Strategy
The Best Tips for Nox Swordstress & Nox Monk:
- Use the Glintstone Arc Spell
Melee Strategy
- Avoid attacking one of the bosses while the other is nearby, as they both have very long range.
- Separate the bosses with ranged attacks – they are likely to dodge away, so if you attack them while they are close together, they may dodge in separate directions.
- Both stagger quite easily and will dodge right after. Heavy attacks are a good idea to do maximum damage in the short window available.
Divide & Conquer: Both bosses' Flowing Form attacks have very long range, so try to divide them up so you can attack one without the other harassing you. They'll dodge if you try to use a ranged attack, so use this to your advantage with Kukris or other ranged weapons to try to get them to dodge away from one another. Otherwise, run to a far side of the arena and try to get one to follow you while the other holds back—their slow walking speed will give you some time to fight solo before the other catches up. Try to attack the Monk first, since it's usually more aggressive.
Stagger & Stance: These bosses are lightweight and will stagger easily, but they'll often dodge away after recovering so use heavier weapons to maximize damage. They also have very low Stance, so focus on jump attacks and guard counters to stance break them. Take advantage of your invulnerability during a critical hit to avoid damage from the other boss.
Magic and Ranged Strategy
Go Wide: Both bosses will dodge when they see a projectile coming, so using spells like Glintstone Arc from maximum range will help land hits against them. You can also use Night Sorceries, which they won't see coming and won't be able to dodge.
Split Them Up: If both bosses are clustered together, their wide-reaching Flowing Form attacks will make it hard for you to find time to get damage in. Use single-shot spells to get them to dodge apart and move around the arena, taking advantage of their slow walking speed to keep them split up while focusing on whichever boss is closest to you.
Nox Swordstress & Nox Monk Attacks & Counters
| Attack | Description | Counter |
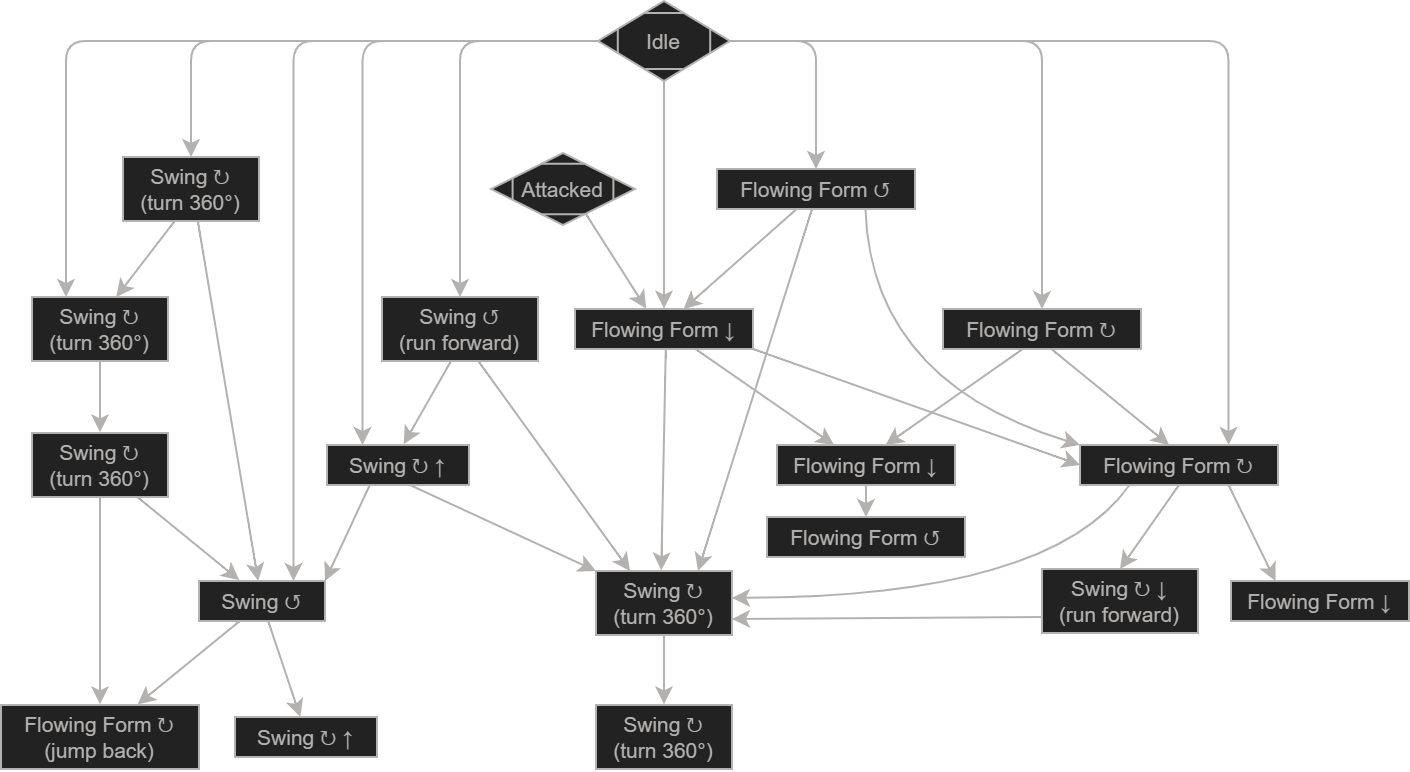
| Swordstress | ||
|---|---|---|
| Swing | Roll through this attack and try to end up behind her to get in a hit | |
| Flowing Form | Extends her sword into a whip and swings it in wide arcs in front of her | This has very long range, so try to roll through it rather than backing away |
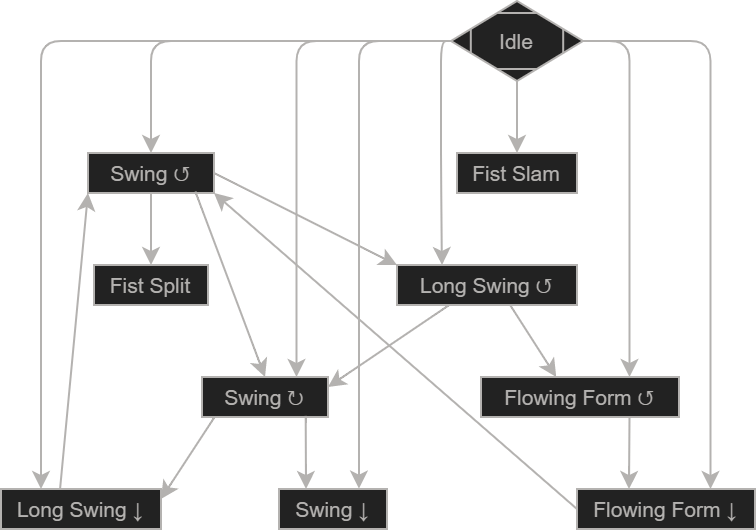
| Monk (Hammer Mode) | ||
| Swing | Roll through this attack and try to end up behind him to get in a hit | |
| Long Swing | Extends its hammer to medium range and swings it in various directions | Roll through this attack and try to end up behind him to get in a hit |
| Flowing Form | Extends his hammer into a long ball and chain and swings it in wide arcs in front of him | This has very long range, so try to roll through it rather than backing away |
| Fist Slam | Retracts his hammer to his fist, jumps into the air, hovers briefly, then slams his fist into the ground creating a medium shockwave. Used when you're very close. Does not switch to Fist Mode | Get in a hit during the windup, then roll forward when the fist starts to move forward |
| Fist Split | Retracts its hammer and splits it into two fist weapons, then winds up and looses a punch. Switches to Fist Mode | Roll left or right as he begins to step forward |
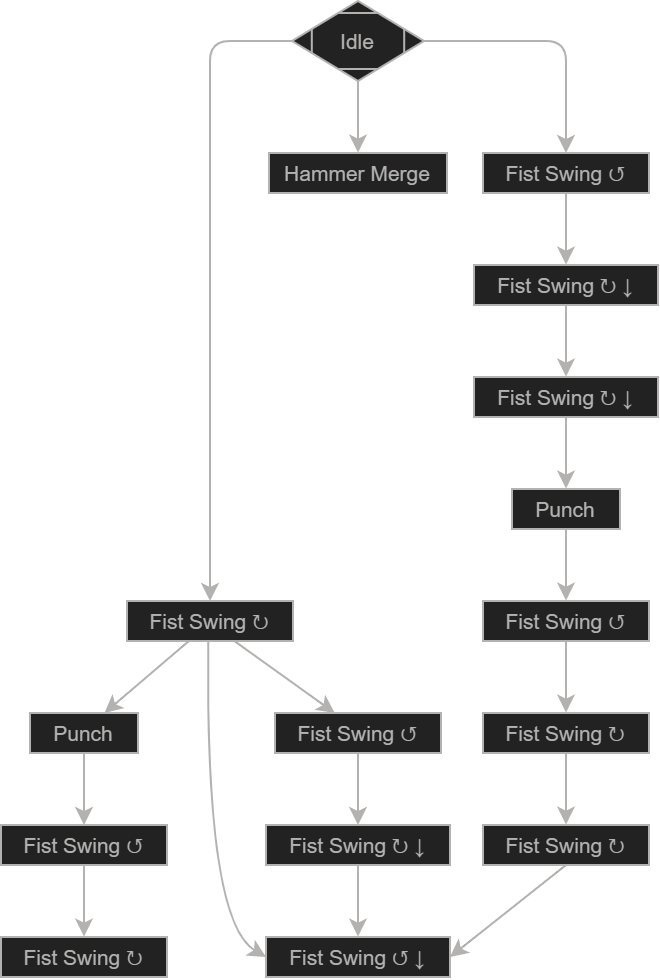
| Monk (Fist Mode) | ||
| Fist Swing | Roll backward and wait for the sequence to finish | |
| Punch | Roll left or right, back off, and wait for the sequence to finish | |
| Hammer Merge | Punches his two fists together to reform his hammer. Switches to Hammer Mode | This doesn't do damage, so use it to get in a hit |
![]() : Attack can be parried
: Attack can be parried
Nox Swordstress & Nox Monk Lore, Notes & Other Trivia
- Other Notes and Trivia Go Here
Nox Swordstress & Nox Monk Image Gallery
 Anonymous
 Anonymous
 Anonymous
 Anonymous
 Anonymous
Not worth being called a "boss" fight. Two useless enemies killed in less than 2 minutes without being hit once.

 Anonymous
Marionette Soldier Ashes make them perma-dodge and almost unable to attack.

 Anonymous
Marionette Soldier Ashes make them perma-dodge and almost unable to attack.

 Anonymous
magic glintblade works great they doge when you cast and then don't doge the actual blade

 Anonymous
They have no business being here? Why are they here and all the other nox are underground???

As the person below me pointed out, the boss has been renamed to Nox Monk. Unfortunately I have no idea how to rename the page & header so someone else gotta do it.

 Anonymous
 Anonymous
These jerks make me feel overleveled with how easy they were, but then I get 2-hit-killed by most enemies in Dragonbarrow. It's like the level designers expect you to be 50 levels higher before traveling slightly North.

 Anonymous
Is spaming fan daggers a good strat?
I feel like with animation reading build in mobs we can abuse this with some spirit ash
the bosses will be busying dogging daggers while sprites do their work
Use undead spook bois if they are not hit while in their down times, you can grind the bosses to dead plus a proper sheild
 Anonymous
 Anonymous
I've done several playthroughs now but I never realized how weak these guys are till the last one. I showed up there, popped my +5 Godrick Soldiers and stood back and watched. It was a neck and neck battle, where only one of my soldiers survived with an invisible health bar and the bosses were dead.

 Anonymous
 Anonymous
 Anonymous
 Anonymous
 Anonymous
When did Nox Priest get changed to Nox Monk? Feels like Mandela Effect

 Anonymous
I'm not all that keen on duo or trio boss fights, not taking into account Ornstein and Smough obviously. I get this is going to be really obvious to anyone who read the boss absorption and resistance info, but I still think it's worth saying. I've just beaten these two a little earlier, and they are a handful, but I was really surprised at how much damage holy cracked pots did to them. took a good chunk of health off. I'f anyone is having trouble with them I'd highly recommend crafting some holy cracked pots to use during the fight. These two do dodge around so it is a little tricky to hit one of them but well worth the effort.

 Anonymous
Something isn't right, I see a post from someone on 10th may 22 saying Latenna makes the fight a cake walk, but Ive just beaten this boss now and this boss room did not allow me to use spirit ashes. same thing in murkwater catacomb could not use spirit ashes for grave warden duelist but the wiki for that dungeon says you can, and it happened a couple of days ago with the burial watchdog that can use lightning. Obviously I wouldn't be saying this if I had forgot to top up my FP before crossing the fog gate, its the last thing I always do after buffing my weapon or myself.

 Anonymous
I felt like such a ****ing mastermind figuring out the cheese to jump in their arena on my own without a video. Pretty sure its patched tho

 Anonymous
Trivialized by Latenna summon. They spend all their time jumping away from her arrows, allowing you to bonk them easily while they are preoccupied.

 Anonymous
 Anonymous
 Anonymous
Seems as if their solution to fixing the AI bug is to straight up remove the roots on the cliff that allows you to get into the arena.

 Anonymous
 Anonymous
 Anonymous
Am i the only one who couldn't fight them because they haven't spawn ?

 Anonymous
Either a practice or skill check fight; if you can't defeat them reliably (1-2 try), you're not ready to explore Caelid. The only real threat is if they flank you and you can't see what the other is doing behind you. Even then, you'd just end up using 1-2 more flasks.

 Anonymous
anyone else didn’t know about these bosses existence or is it just me

the Nox Priest when low on HP will transform his mace into two fist weapons that look like piercing shields. his mace is definitely not the same as the Nox Flowing Hammer. anyone know if his weapon is in the game with a transform like that?

 Anonymous
Extremely weak to blood and frost. The wiki description at the start switched strong with weak on that.

 Anonymous
There's a path you can take by using Torrent to leap around the stone walls above them where you can safely drop in without activating the fog. The fight won't trigger and you can kill them for free. Too bad it's a negligible fight anyway, but could be useful for gearing up at a very early level.

 Anonymous
They are found behind a gate on GROUND level, next to the upper level gate. They are literally normal mobs, you can kill them in 1-2 hit.

 Anonymous
Was NOT able to summon anywhere in that whole room… But didn’t wind up needing it.

 Anonymous
 Anonymous
 Anonymous
There's a bug with the Grace trigger placement on at least PS4, you have to be a little south west a few steps to interact with the grace.

 Anonymous
Well, going off the various strats I've seen here, I've developed the master strat: just hit them.

 Anonymous
 Anonymous
+3 skeletons wiped the floor with these 2, very disappointing boss fight.

 Anonymous
What the ****, my godrick bois +4 obliterated the boss before I could even get a hit in.

 Anonymous
Super easy fight. Nothing to report here. After reading the comments it appears they are weak to absolutely everything.

 Anonymous
Rock Sling is incredibly useful for this boss fight. The bosses tend to dodge while the spell is casting, leaving then wide open to attack when it finally casts.

 Anonymous
well this boss is a bit of a joke, i think they went for a single attack between the two of them before dying.

 Anonymous
Night Maiden's Mist is a literal gameshark code for this fight.

 Anonymous
Are they weak to Holy perhaps? They died in two hits each to powerstanced +12 Nightrider Glaive buffed with Holy main hand and +4 Golden Halberd offhand. ~30 STR

 Anonymous
I was worried when I walk in and saw two bosses, that fear didn't last long. Summoned under leveled wolf pack who stun locked the male priest. Killed the female priest in one attack combo then finished off the male being passed around like a chew toy.

 Anonymous
 Anonymous
I noticed my mari summons picked on one of the NPC's and ignored the other, so i focused on the one they weren't hassling and then finished off the other after. EzPz. dex/faith using claws with bloodflame buff.

 Anonymous
Glintblade Phalanx ruins the AI. They will dodge the cast, but stand still when the projectiles go off. I just ran around casting it and won with no damage or missed spells.

 Anonymous
Easy cheese, get the Rot Dog ashes. It will usually go for the priestess. When it inflicts Scarlet Rot on her, you kite them both and wait for one to die.

 Anonymous
They don't dodge that phantom bolt spell that's supposed to be harder to see. Nice touch from the devs.

 Anonymous
As mentioned in another reply, its possibly to scale the cliffside to the west of the boss arena using Torrent & jump into the arena from above (it took me only 1 minute of fiddling with it to get into the arena). This does not activate their AI until they are attacked, meaning you can take them on separately & get a backstab off on both of them. You still receive all credit for the kill, including the "ENEMY FELLED" popping up, the grace site spawning, fogwall going away, & all rewards.

 Anonymous
charged up flame of frenzy messes them up pretty good. they'll try to dodge but still get caught in it

 Anonymous
 Anonymous
Me missing my incantations vs marionettes opening a 4 bow barrage

 Anonymous
Just you ashes to distract one while you kill the other one. Not too hard

 Anonymous
 Anonymous
 Anonymous
 Anonymous
Found a solid strategy for Melee:
The biggest challenge is keeping them separated. Using any kind of ranged attack (daggers, ranged weapons, etc.) causes them to dodge – and you can keep using ranged attacks to separate them.
Once isolated, I found it easy to focus on one and kill them.
 Anonymous
these two are proof that the DEVs are just cruel and sadistic, their names alone are deceptive, they dont actually use regular melee weapons THEYRE WHIPS with enough reach to slash you if your sitting in opposite corners from each other, this entire town is lazy and deceptive programming, summoning is not allowed, and you ahses will mostly be a distraction for one of them

 Anonymous
They are standing ducks against spells as they mostly just walk to you slowly until you're in their range.
I tried Rock Sling and it really did wonders: cut the sword one with one cerulean flask, 10 mind and 21 int. so you could really just allow some mana flasks and pepper them away if you have a bit of INT.
 Anonymous
Why does it drop the dex weapon fuuuu k the mace looked so cool

I've discovered a way to enter the arena and kill them without needing to go through the door or fight them, is it okay it I post it under the trivia section?

 Anonymous
Very easy for sorcery builds if you pick up the Rock Sling spell; they're staggered in a few casts and only one of the two is aggressive enough to pressure you (the swordstress), so finish them first and kiting the other is easy

 Anonymous


I love summoning Nightmaiden & Swordstress puppets for this and then watching nox duo fight nox duo
0
+10
-1