Deep Siofra Well

deep siofra well location elden ring wiki guide 300px min min

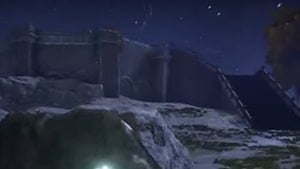
A second lift to the Siofra River

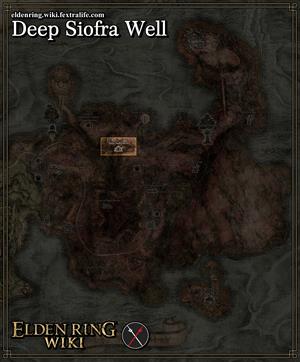
Deep Siofra Well is a Location in Elden Ring. The Deep Siofra Well is found in Dragonbarrow. You can reach it by heading up the lift in the north-eastern side of the Siofra River. From the Siofra River, this is found past the fire lit pillars and has its own platform that requires 2 Stonesword Keys to activate. This is different to the Siofra River Well in Limgrave.


Deep Siofra Well Map

[Elden Ring Map here]

deep siofra well map elden ring wiki guide 300px


All NPCs and Merchants in Deep Siofra Well

  • There are no NPCs or Merchants in this location


All Items in Elden Ring's Deep Siofra Well

Gather & Farm Items

  • There are no gatherable items on this location


Upgrade Materials

  • There are no upgrade materials in this location


Equipment and Magic

  • There are no equipment items in this location


Unique, Ashes and Keys

  • There are no key items in this location


Elden Ring Deep Siofra Well Creatures, Enemies, and Bosses

Regular Creatures and Enemies

  • There are no enemies in this location


Field Bosses and Bosses

  • There are no bosses in this location


Deep Siofra Well Walkthrough

This River Well can be accessed from the Siofra River. Make your way to the other side where Hallowhorn Grounds can be accessed and there is a platform with another lift that leads to Dragonbarrow rather than Limgrave. This requires 2 Stonesword Keys to activate. 

From torch pillar-lined stairs leading up to Hallowhorn Grounds, move past it on its left and go all the way to the end of Siofra River to reach this raised platform. 


Elden Ring Deep Siofra Well Gallery and Notes

[other images go here]


All Elden Ring Locations
Abandoned Cave  ♦  Academy Crystal Cave  ♦  Academy Gate Town  ♦  Aeonia Swamp  ♦  Ailing Village  ♦  Ainsel River  ♦  Ainsel River Main  ♦  Ainsel River Well  ♦  Albinauric Rise  ♦  Altus Plateau  ♦  Altus Tunnel  ♦  Apostate Derelict  ♦  Artist's Shack  ♦  Auriza Hero's Grave  ♦  Auriza Side Tomb  ♦  Bellum Church  ♦  Bellum Highway  ♦  Bestial Sanctum  ♦  Black Knife Catacombs  ♦  Boilprawn Shack  ♦  Bridge of Sacrifice  ♦  Caelem Ruins  ♦  Caelid  ♦  Caelid Catacombs  ♦  Caelid Colosseum  ♦  Caelid Waypoint Ruins  ♦  Callu Baptismal Church  ♦  Capital Outskirts  ♦  Caria Manor  ♦  Carian Study Hall  ♦  Carriage  ♦  Castle Morne  ♦  Castle Sol  ♦  Cathedral of Manus Celes  ♦  Cathedral of the Forsaken  ♦  Cave of the Forlorn  ♦  Chapel of Anticipation  ♦  Chelona's Rise  ♦  Church of Dragon Communion  ♦  Church of Elleh  ♦  Church of Inhibition  ♦  Church of Irith  ♦  Church of Pilgrimage  ♦  Church of Repose  ♦  Church of the Plague  ♦  Church of Vows  ♦  Cliffbottom Catacombs  ♦  Colosseums  ♦  Consecrated Snowfield Catacombs  ♦  Converted Fringe Tower  ♦  Converted Tower  ♦  Corpse-Stench Shack  ♦  Craftsman's Shack  ♦  Cuckoo's Evergaol  ♦  Deathtouched Catacombs  ♦  Deep Ainsel Well  ♦  Deeprooth Depths  ♦  Demi-Human Forest Ruins  ♦  Divine Tower of Caelid  ♦  Divine Tower of East Altus  ♦  Divine Tower of Limgrave  ♦  Divine Tower of Liurnia  ♦  Divine Tower of West Altus  ♦  Dragon-Burnt Ruins  ♦  Dragonbarrow  ♦  Dragonbarrow Cave  ♦  East Windmill Pasture  ♦  Effigies of the Martyr  ♦  Elden Throne  ♦  Eternal City  ♦  First Church of Marika  ♦  Flame Peak  ♦  Forbidden Lands  ♦  Forest Lookout Tower  ♦  Forge of the Giants  ♦  Forlorn Hound Evergaol  ♦  Forsaken Ruins  ♦  Fort Faroth  ♦  Fort Gael  ♦  Fort Haight  ♦  Fort Laiedd  ♦  Fourth Church of Marika  ♦  Frenzied Flame Proscription  ♦  Frenzied Flame Village  ♦  Frenzy-Flaming Tower  ♦  Fringefolk Hero's Grave  ♦  Gael Tunnel  ♦  Gaol Cave  ♦  Gatefront Ruins  ♦  Gelmir Hero's Grave  ♦  Giant-Conquering Hero's Grave  ♦  Golden Lineage Evergaol  ♦  Gowry's Shack  ♦  Grand Cloister  ♦  Grand Lift of Dectus  ♦  Grand Lift of Rold  ♦  Groveside Cave  ♦  Guardians' Garrison  ♦  Hallowhorn Grounds  ♦  Heretical Rise  ♦  Hermit's Shack  ♦  Hermit Merchant's Shack  ♦  Hermit Village  ♦  Hidden Path to the Haligtree  ♦  Highroad Cave  ♦  Highway Lookout Tower (Altus Plateau)  ♦  Highway Lookout Tower (Liurnia)  ♦  Impaler's Catacombs  ♦  Isolated Divine Tower  ♦  Isolated Merchant's Shack (Dragonbarrow)  ♦  Jarburg  ♦  Kingsrealm Ruins  ♦  Lake of Rot  ♦  Lakeside Crystal Cave  ♦  Laskyar Ruins  ♦  Lenne's Rise  ♦  Leyndell Catacombs  ♦  Leyndell Colosseum  ♦  Leyndell Royal Capital  ♦  Limgrave  ♦  Limgrave Colosseum  ♦  Limgrave Tunnels  ♦  Lord Contender's Evergaol  ♦  Lunar Estate Ruins  ♦  Lux Ruins  ♦  Malefactor's Evergaol  ♦  Minor Erdtree (Altus Plateau)  ♦  Minor Erdtree (Caelid)  ♦  Minor Erdtree (Consecrated Snowfield)  ♦  Minor Erdtree (Dragonbarrow)  ♦  Minor Erdtree (Liurnia Northeast)  ♦  Minor Erdtree (Liurnia Southwest)  ♦  Minor Erdtree (Mistwood)  ♦  Minor Erdtree (Mountaintops East)  ♦  Minor Erdtree (Mt. Gelmir)  ♦  Minor Erdtree (Weeping Peninsula)  ♦  Minor Erdtree Catacombs  ♦  Minor Erdtree Church  ♦  Mirage Rise  ♦  Mistwood  ♦  Mistwood Ruins  ♦  Mohgwyn Dynasty Mausoleum  ♦  Moonfolk Ruins  ♦  Moonlight Altar  ♦  Morne Tunnel  ♦  Mountaintops of the Giants  ♦  Mt Gelmir  ♦  Murkwater Catacombs  ♦  Murkwater Cave  ♦  Night's Sacred Ground  ♦  Nokron, Eternal City  ♦  Nokstella, Eternal City  ♦  Old Altus Tunnel  ♦  Oridys's Rise  ♦  Perfumer's Grotto  ♦  Perfumer's Ruins  ♦  Purified Ruins  ♦  Ranni's Rise  ♦  Raya Lucaria Crystal Tunnel  ♦  Redmane Castle  ♦  Renna's Rise  ♦  Revenger's Shack  ♦  Ringleader's Evergaol  ♦  Road's End Catacombs  ♦  Rose Church  ♦  Roundtable Hold  ♦  Royal Grave Evergaol  ♦  Ruin-Strewn Precipice  ♦  Sainted Hero's Grave  ♦  Sealed Tunnel  ♦  Second Church of Marika  ♦  Seethewater Cave  ♦  Sellia Crystal Tunnel  ♦  Sellia Evergaol  ♦  Sellia Gateway  ♦  Sellia Hideaway  ♦  Sellia, Town of Sorcery  ♦  Seluvis's Rise  ♦  Shack of the Lofty  ♦  Shack of the Rotting  ♦  Siofra Aqueduct  ♦  Siofra River  ♦  Siofra River Well  ♦  Slumbering Wolfs Shack  ♦  Smoldering Church  ♦  Spiritspring  ♦  Stillwater Cave  ♦  Stormcaller Church  ♦  Stormfoot Catacombs  ♦  Stormgate  ♦  Stormhill  ♦  Stormveil Castle  ♦  stranded graveyard  ♦  Street of Sages Ruins  ♦  Subterranean Shunning-Grounds  ♦  Summonwater Village  ♦  Swamp Lookout Tower  ♦  Swamp of Aeonia  ♦  Temple Quarter  ♦  Testu's Rise  ♦  The Four Belfries  ♦  The Shaded Castle  ♦  Third Church of Marika  ♦  Tombsward Catacombs  ♦  Tombsward Cave  ♦  Tombsward Ruins  ♦  Tower of Return  ♦  Uhl Palace Ruins  ♦  Unsightly Catacombs  ♦  Village of the Albinaurics  ♦  Village Windmill Pasture  ♦  Volcano Cave  ♦  Walking Mausoleum  ♦  Weeping Peninsula  ♦  West Windmill Pasture  ♦  Windmill Village  ♦  Witchbane Ruins  ♦  Woodfolk Ruins  ♦  Writheblood Ruins  ♦  Wyndham Catacombs  ♦  Wyndham Ruins  ♦  Yelough Anix Ruins  ♦  Zamor Ruins


Register to EDIT the Wiki!
    • If you're willing to face a Runebear, you can nab a Stonesword key, if you head south from the site of grace. The corpse you find it on is hanging over a cliff, and is down a little divot. It can be tricky to grab with the bear alone, but you have to maneuver close enough with the bear trying to give you an unpleasant hug. To top it off, this bear could be the scariest in the game. I can't get a good look, but the fur looks curlier and shaggier.

      • Anonymous

        I had the nearest site of grace already discovered ... not sure why the site of grace isnt mentioned here. It's called "Below the Well" and it's in the north-western part of siofra (not western part like where I was looking)

        • Anonymous

          It requires two keys to open, not one. This would have been good to know before rushing past all the archers with one key.

          • Anonymous

            After defeating the 3 red sign npc, the great jar will award you with Great-jar Arsenal. Talisman that increase equip load

            • Anonymous

              This location has 2 branching directions. One towards a bear, that leads back into the poison swamp aenia. The other that leads towards 2 giants with bows, and a giant pot that you can talk to if you're solo. The talk all it says is "..." Until you fight the red NPC invader that you have to summon in. Beyond that, well you'll see.

              • Anonymous

                A bit past the deep Sofia well, there's an NPC called "the Great Jar" who doesn't say anything and there's 3 npc red signs that you can summon to fight the 3 "knights of the great jar". I'm too weak to kill them but I assume you kill them to gain interaction with this "great jar"

              Load more
              ⇈ ⇈