Academy Crystal Cave |
|---|
 |
|
The depths of the Raya Lucaria Academy are rich in rose-tinted crystals, imbued with the natural magic of the area. |
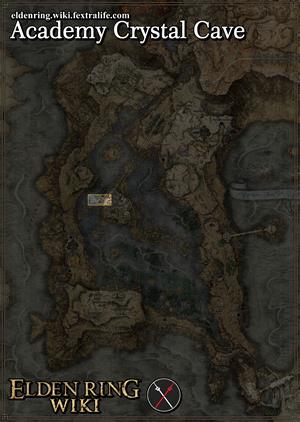
Academy Crystal Cave is a Location in Elden Ring. The Academy Crystal Cave is found in Liurnia of the Lakes. The entrance is found west of the Raya Lucaria Academy.
Academy Crystal Cave Map
Find the entrance to the Academy Crystal Cave on our Elden Ring Map Here.
All NPCs and Merchants in Academy Crystal Cave
- There are no NPCs or Merchants in Academy Crystal Cave.
All Items in Elden Ring's Academy Crystal Cave
Gather & Farm Items
Upgrade Materials
- There are no upgrade materials in this location
Elden Ring Academy Crystal Cave Creatures, Enemies, and Bosses
Academy Crystal Cave Walkthrough
The Academy Crystal Cave can be accessed by following the Liurnia shallows towards the west of the Raya Lucaria Academy. The entrance is found on the western cliff below the academy, barred by an Imp Statue. Look for the entrance on our Elden Ring Map Here. Two Stonesword Keys are required to dispel the fog barrier. These caves are very dark except for the flashes of glintstone spells cast by the sorcerers within. It is highly recommended to equip a Torch whilst traversing the caves.
Shortly after the entry, you will find the area's Site of Grace. Continue on into the cave and look to the left for a Crystal Cave Moss. This cave is rich in this item so be on the lookout for them if you require them for crafting. There is a Rat with its back turned which you can assassinate or skip if you wish. A couple more Rats lie in the path ahead. Following the linear path, you will arrive in a large foggy cave with many pillar-sized crystals.
There are several Twinsage Sorcerers in this cave, armed with powerful glintstone spells. Utilize the crystal pillars to block their line of sight, as well as their projectiles. At the start of the cave, look for the lone sorcerer facing a pillar and take this chance to ambush him with a critical attack. Beware of a second sorcerer just behind that pillar and the group of three sorcerers approaching from the back of the cave. Weave around the crystals and take them out one by one, mixing in any AoE attacks when you see an opportunity to hit multiple of them. There are two more sorcerers next to each other near the north section of this cave, and one more behind a pillar a few steps ahead.
After defeating all the sorcerers, look for an opening in the northwest for a small room with a cage. You can pick up a Stonesword Key from the corpse in the cage as well as some Budding Cave Moss along the walls. Go back to the large cave area and go east through a tunnel leading to a wooden doorway. Open the door and you will arrive in a storage area of sorts with a Battlemage guarding the doorway on the left. Battlemages are tanky and can take a lot more hits than the Twinsage Sorcerers. There is also a Glintstone Sorcerer patrolling the room. Go through the room the Battlemage was guarding to find another room where a Sorcerer is standing on a raised platform. Defeat the sorcerer and loot the chest in the room for a Rune Arc. To access the raised platform, attack an illusory walls close by (screenshot here) and loot another chest to collect the Crystal Staff.
Head back to the storage area and look to the east to find the fog gate leading to this dungeon's boss: The Crystalians. This boss encounter is against a pair of Crystalian opponents. One wields a spear, while the other wields a staff. Both are protected by a thick, crystal shield, significantly reducing the damage they take from your attacks. These shields will eventually break after each Crystalian's HP reaches a certain percentage. Cracks will be visible in their shields, signifying that you can now deal full damage to them. It is highly recommended that you use a tanky summon such as the Kaiden Sellsword Ashes to distract one of the Crystalians as you focus on the other. See the Crystalians page for further details on the fight.
Defeating this pair of bosses yields the Crystal Release Sorcery spell. Continue on to the door behind the bosses to reach an elevator that will take you to a tower within the academy. Climb the tower to find a chest containing the Terra Magica spell.
Elden Ring Academy Crystal Cave Gallery and Notes
[other images go here]
 Anonymous
What's the magic aura you see in the distance from on top of the tower?

 Anonymous
What's the magic aura you see in the distance from on top of the tower?

 Anonymous
Kaidan sellsword and page spirit ashes also present here. Two solid mid tier ashes. Page needs to be updated

 Anonymous
Battlemage gave me more trouble than the boss. Sometimes having enough room for maneuring matters more than the enemy.

 Anonymous
Oh Gee. Another slog though the entire cave before the boss again, slog through the entire cave before the boss again, slog through the entire cave before the boss again...
YAY FROM! GIT GUD!
 Anonymous
The battle mage enemy is an example of From being cheap as f**k, no way a mage should be able to take the punishment these enemies can without so much as flinching. First time I came across one of these was in the Atlus Plateau and he absolutely destroyed me three times in a row, to say I was surprised when I saw how little damage my 10+Lordsworn's Greatsword did from a critical hit back-stab the first time he battered me would be a massive understatement. Gave me more trouble than Trolls or Golems do and more than most of the dungeon bosses in Limgrave did as a low levelled character.

 Anonymous
Academy Crystal Cave is the absolute best place to find this, you can get 5-8 in a couple minutes per run.

 Anonymous
There is also a Battle Mage enemy inside not listed on this wiki page

 Anonymous
Once you're at the top of the tower after the bosses there doesn't seem to be a way out so you have to go via the dungeon anyway

 Anonymous
 Anonymous
 Anonymous
Night Maidens mist marginalizes these fights as it bypasses all damage reductions. Get a tanky Ash and throw NMM and watch them melt.

Can't find the other comment now, but somebody pointed out that Strike damage (hammers, whips, etc) ignores their crystal "armor". Even with a mere Stone Club +6 (and barely any STR), it made the fight trivial.

 Anonymous
I activated the summon statue by the entrance and from the entace to the boss fight I can't summon spirts. I keep reading saying that you're able to summon your ashes, is it a bug?

 Anonymous
It would be nice to know if the large club wielding sorcerer drops anything unique

 Anonymous
So let me get this straight... the above essay literally goes into detail about how pillars can be used to block line of sight with ranged enemies, but then says the hidden wall is "nearby"? Just who is this for?
It's to the left of the big mage with the club. Instead of going through his door you have to look in the wall to the left. There you go.
 Anonymous
I'm on 1.0.3 and the cave only required 1 stonesword key to get in and access the site of grace

 Anonymous
For anyone struggling: hammer / strike weapons completely bypass their armor by default. It took two jumping strong attacks each with my +9 Brick Hammer to end the fight almost instantly.

 Anonymous
Use the statues in the middle to break sight between the casting one and you while you work on the spear dude. Once he's down the rest of the fight should be trivial.

 Anonymous
For anyone struggling with this boss, the spell Finger Maidens Mist ignores their armor and eats their HP. It took me all of 2 minutes to kill them.

 Anonymous
There's a fog wall for me after defeating the boss. My only option is turn around or leave the cave. Again I have beaten the boss and the reward is locked behind a fog gate I can't interact with

 Anonymous
 Anonymous
This is one of the worst locations in the game. The road to boss is long, enemies are annoying and bosses duo itself takes 30 minutes to beat.

 Anonymous
 Anonymous
There is a hidden wall in this cave to the left of the big brute sorcerer.

 Anonymous
In the same area that the rune arc is found, just upstairs in a chest passing by the Sorcerer, you can get the crystal staff, scalings: d str / b int
minimun required for using it is 8 str / 48 int with a passive skill to increase the crystal sorcery spells, as im 4 points below i cant give the correct stats on sorcery buff
i forgot to say on the crystal staff description that it doesn't contain any skills, i will update soon if it can be upgraded

 Anonymous
Would love a grace name and direction to travel from to find this boss.
Please and ty


WE GONNA ROCK DOWN TO ELECTRIC AVENUE,
AND THEN WE'LL TAKE IT HIGHER
0
+10
-1