Cave of the Forlorn |
|---|
 |
|
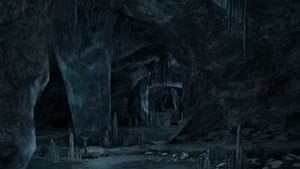
A cave system in the Consecrated Snowfield, serving as a sanctuary for Misbegotten. Their greatest warrior holds a legendary relic of the Golden Order |
Cave of the Forlorn is a Location in Elden Ring. It can be found in the ravine south of the Minor Erdtree in the Consecrated Snowfield. The entrance is guarded by a Giant Land Octopus. In order to enter the cave, players need to use two Stonesword Keys.
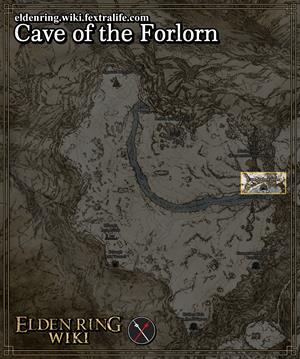
Cave of the Forlorn Map
The Cave of the Forlorn is found along the northern wall in the frozen ravine separating the north and south of the Consecrated Snowfield. The entrance to the cave is slightly southeast of the Minor Erdtree icon. [Elden Ring Map here]
All NPCs and Merchants in Cave of the Forlorn
- There are no NPCs or Merchants at this location
All Items in Elden Ring's Cave of the Forlorn
Gather & Farm Items
- x8 Crystal Dart
- x10 Freezing Grease
- x1 Golden Rune (7)
- x1 Hero's Rune (2)
- x7 Miquella's Lily
- Thawing Boluses
Upgrade Materials
- No Upgrade Materials at this location
Unique, Ashes and Keys
- No Uniques, Ashes or Keys at this location
Elden Ring Cave of the Forlorn Creatures, Enemies, and Bosses
Field Bosses and Bosses
Cave of the Forlorn Walkthrough
Enter the cave and you will find the Site of grace, near the entrance. Activate it. Head down to find a Golden Rune (7). continue long the way to find x4 Freezing Grease. Take the left path, roll to break the stalactites. You will find a few enemies there. There is another Freezing Grease to be found, on a body inside a small room.
Return to the entrance room and now take the right path, once there, you can take a small alley on the left, where there are a few misbegotten. Behind it you will find x1 Nascent Butterfly and on the other side of the room you can find x1 Golden Rune (10).
Head to the next room where you will find a Miquella's Lily on either side, as well as a few more scattered through the room, then use the snowy columns to reach the top and obtain x1 Hero's Rune (2). Head to the next room up the ramp to be greeted by another Misbegotten, head through the narrow path. You will find more Misbegottens here. You will find x10 Spiritflame Arrow and x1 Rune Arc on two bodies on a small room, again guarded by a Misbegotten.
Return to the previous room and by climbing again, you will reach a new area. Fall platform by platform, until you reach the lowest floor. Get ready to fight some Jellyfish.
Once you have cleared the room, enter through the hole on the ground. falling platform by platform again. You will obtain x6 Freezing Grease on one of the platforms. Once you are at the lowest level, you will be able to fight the boss, Misbegotten Crusader.
Defeat it to receive the Golden Order Greatsword.
Elden Ring Cave of the Forlorn Gallery and Notes
[other images go here]
 Anonymous
Super cool cave too bad there's literally nothing useful in it

 Anonymous
The whole time i expected to frozen floor to shatter when one of the axe wielding forlorn hit it - kinda disappointed it didn't. Missed an opportunity there imo.

 Anonymous
This cave, like most of consecrated snowfield and mountaintops, could've been so much more...It just feels empty

 Anonymous
The jellyfish chase you down into the pit FFS. On of the more tedious caves.

 Anonymous
Very unique and cool looking mini dungeon, wish there were more like this!

 Anonymous
 Anonymous
After you teleport out of the boss room, you'll be met face to face with a giant octopus camping at the cave entrance. Lovely.

 Anonymous
 Anonymous
i think the number of miquella's lilies here is wrong because i got 6. all of them were in the first floor.

 Anonymous
 Anonymous
Damn boss one shotted me like three times with the weapon art. I finally let my greatshield bois bully him while i attacked at range.

 Anonymous
These leonine misbegotten / misbegotten warriors get shut right down with repeated casts of 'stone of gurranq' it will jump about and avoid some but at close range it can't and that incantation hits like a truck in close quarters.

 Anonymous
 Anonymous
In the walk through it says stalactites instead of stalagmites

 Anonymous
Not sure why my coment was deleted but here i go again. Its missing gold rune 10 on the itens list

 Anonymous
 Anonymous
 Anonymous
 Anonymous
 Anonymous
I'm about done with this site. Very few ads but you need to be more thorough in your explanations

 Anonymous
 Anonymous
 Anonymous
Dark Souls 2 players: *screaming followed by foaming at the mouth from PTSD*

 Anonymous
 Anonymous
Didn't expect a unique layout on an optional dungeon after all the content recycling from Altus Plateau and Mountaintop.

 Anonymous
This cave was my favorite in the game, not only do you get a legendary weapon but the cave is also so beautiful it felt like an actual mountain.

 Anonymous
Anyone have issues with game crash approaching the bonfire or climbing over the dragon? I cannot enter this location without crash to desktop.

Why, oh why, is the Stake of Marika all the way behind like 10 pissed-off jellyfish and a death pit that requires you to drop down *from the other ****ing side??* Just lost 90k from this. Was it that hard to put it near the boss fog, y'know, where it was designed to be placed?

 Anonymous
Very little rewarded for such location. Visually Nice and different

 Anonymous
where is Dark Spirit Forlorn. this is flagrant false advertising

 Anonymous
The boss gets completely overwhelmed by the greatshield soldier ashes

 Anonymous
the land squid will jumpscare you if you use the teleport to entrance thing, be warned

 Anonymous
Walkthrough you had me at "Get ready to fight some Jellyfish." I'm always ready to fight some Jellyfish.
Anyone remember Legend of Zelda - Link to the Past on SNES where you'd hit the jellyfish and they'd turn red and go bezerk on you? You can tell Fromsoft drew inspiration from this.
 Anonymous
 Anonymous
This cave is worth a revisit once the ray traching patch is online.

 Anonymous
Coolest cave in the game, feels like playing Skyrim again. Wish they put more varieties in terms of environment theme in the side dungeons like this one

 Anonymous
Didn't see any info at all on this page so here's a short writeup. I started writing this after looting 1 or 2 items so there may be mistakes/omissions in the first paragraph:
There'll be 1 Misgotten sleeping on the right after you run past the frozen dragon corpse. You'll end up at point that diverges into two paths, going left towards a tunnel or forward through the icicles. If you go left, there'll be 2 Misgotten and 3 Giant Rats. There's a dead body in one of the nearby crevices with a Freezing Grease. If you go forward, run a little ways ahead and you'll find a Golden Rune [10] on the right and another 2 Misgotten sleeping on the left, next to a dead body with a Nascent Butterfly.
Keep moving forward and you'll end up at a medium-sized cavern with no enemies inside. If you look towards the right side, you'll find some rocks behind the pillar with the dead body that you can sprint-jump from to get on the rocks. Move and jump around the pillar in an anti-clockwise direction to reach the dead body and loot a Hero's Rune [2].
There are two other paths from this room:
If you go forward, you'll be travelling through yet another tunnel. There'll be yet another Misgotten sleeping on the right side midway through, before you emerge into yet another medium-sized cavern with 3 sleeping Misgottens. You can loot Rune Arc and Spiritflame Arrows x10 from the nearby crevice towards the right. This is a dead-end so travel back to the previous cavern.
If you look towards the left side, there'll again be a pillar with rocks that you can use to sprint-jump to the nearby ledges. This will lead you to an illuminated area with a series of ledges to drop down from. You'll encounter 5 aggressive Jellyfish once you drop down, with 3 of them hovering near 3 dead bodies. Loot them for Miquella's Lily x3, Crystal Darts x8 and Thawfrost Boluses x2. Keep going forward and you'll encounter another 3 Jellyfish around the corner, surrounding a dead body with Thawfrost Boluses x3.
There's a big hole in the ground right next to them. On the way down, there's another dead body with Freezing Grease x6. Once you're all the way at the bottom, the entrance to the boss arena will be nearby.
The boss of this cave is a Misgotten Crusader with around 10000 HP. He's a rather easy boss for this area. Defeating him nets you a Golden Order Greatsword and 93000 Runes.
Sidenote:
Interestingly, if you look down from the start of the cave you can actually look through the ice you're walking on and you'll see the aggressive red Jellyfish that you'll eventually run into.
- Fateburn


Good place to bow cheese Theodorix from.
0
+10
-1