

Walkthrough and 100% Guide for the Elden Ring Wiki covers a detailed step-by-step guide for the main story and locations of Elden Ring. The walkthrough will include vital information about items, gear, enemies, boss, NPCs that are encountered throughout the game. On the walkthrough page for Elden Ring, you can find important details and guides that will help you through your gameplay.
Elden Ring Legacy Dungeons Walkthrough
You can find a list of all the available Legacy Dungeons featured in Elden Ring, both Main and Minor Legacy Dungeons. Each page consists of a detailed walkthrough as well as various entries and a list of all the different items and equipment that you can find.
Elden Ring Main Legacy Dungeons:
- Stormveil Castle
- Raya Lucaria Academy
- Volcano Manor
- Leyndell, Royal Capital
- Crumbling Farum Azula
- Miquella's Haligtree + Elphael, Brace of the Haligtree
- Leyndell, Capital Ash
Elden Ring Minor Legacy Dungeons:
- Redmane Castle
- Leyndell, Capital of Ash
- Castle Morne
- Caria Manor
- Shaded Castle
- Castle Sol
- Ruin-Strewn Precipice
- Subterranean Shunning-Grounds
- Ainsel River
- Lake of Rot
And finally, there's a certain number of separate areas that are very much like Legacy Dungeons despite allowing you to ride Torrent within them:
Elden Ring Walkthrough Helpful Links
- Elden Ring Quests Guide: Find all NPC questlines.
- Game Progress Route: A streamlined to-do list by Location
- Interactive Map & Maps: You can check these pages for specific location details on all items.
- Recommended Level by Location: Make sure you're leveled for your area
- Endings: Learn about the game's Endings.
- New Game Plus: Learn about continued playthroughs.
- Secrets: Visit the Secrets page to find a list of all the secrets you can uncover in the game.
- Locations & Maps: You can find relevant information on existing creatures, drops, secrets, items, and more.
- Bosses & Enemies: You can also check our boss and enemy pages for strategies on how to handle these hostile characters.
- NPC Summons: You can check a list of characters that may join you for boss battles.
- Sites of Grace: Check out our various guides on how the Sites of Grace works, as well as information on where to find them.
- Level: An overall representation of your character's Stat growth, visit the page for Farming Tips.
- Recommended Level by Location: Visit the page for recommendations on level-based advancement.
- Dragonbarrow: can be done out of order but recommended level is 80+.
Elden Ring Game Progress Route Map

Elden Ring 100% Walkthrough Guide
Welcome to Elden Ring! - Elden Ring Tutorial
The Chapel of Anticipation
Welcome to our Walkthrough page for Elden Ring! Before you fully immerse yourself and start by exploring the Lands Between, your first step is to create your character. Keep in mind that your starting Class will have an impact on your overall gameplay through the early portions of the game, but as you progress you will be able to level up, tweak your character, and build it the way that fits your preferred playstyle. Apart from choosing your class, you will also be choosing one Keepsake item, a gift that is bestowed to you and that can be helpful to your adventure early in the game. (For tips on what to pick, see the Classes and Keepsakes pages.) Once you're done customizing your character, a cutscene will trigger.

You'll begin with your newly-customized character inside a chapel, the Chapel of Anticipation. Right off that bat, you will be rewarded with the "The Ring" Gesture. Gestures are a common feature in Souls games. They are emotes (physical actions) performed by your character to express different ideas or emotions. Gestures can be useful or fun if playing with other Elden Ring players online, and some gestures are used to accomplish different things in the game during solo play as well (see the Miscellaneous tab of the Secrets page for more info).
Look to your right and you will see a body that is glowing, loot it and you'll find x1 Tarnished's Wizened Finger. Head outside, go left, and cross the wooden bridge where you'll notice a large statue ahead. As you approach, the Grafted Scion will come in, leaping from the air to attack you. Just like any other Souls game, this boss is optional for you to defeat, but dying to the first boss or at some point shortly after usually happens and is required for you to progress beyond — if you do defeat the Grafted Scion, you'll be able to acquire some equipment that you can use later on once you have leveled up and reached the required stats. But if not, you will have the opportunity to travel back to this area when you are at a higher level later in the game (see The Four Belfries for more info).
Elden Ring Tutorial - Stranded Graveyard

Upon death, a short cutscene will trigger and you'll find yourself in the Stranded Graveyard. As you resume control of your character, you will automatically acquire x3 Flask of Crimson Tears and x1 Flask of Cerulean Tears, which are used to recover HP and FP, respectively. Ahead of you, you will see a ghost of a Commoner that is sitting in a chair, approach it and you'll find a message about the game's optional area for the tutorial which can be accessed by jumping down to the lower level of the cave.
We highly recommend you to go through the tutorial section to better understand some new basic mechanics of the game, regardless of whether you are a new or a veteran player of FromSoftware's games. If you want to skip the tutorial section, simply make your way up the stairs on the left, near the glowing golden sapling, and open the door at the top of the stairs. Through the door, you'll find an empty room and another set of stairs where you'll find a Site of Grace.
But if you choose to take the tutorial, jump down into the pit and you'll first encounter the Cave of Knowledge Site of Grace and will be prompted with a message tutorial on how it works. We suggest that you rest at the site of grace before pushing forward since there are undead and Noble soldier enemies. This way you can try out the different combat mechanics such as backstabbing an enemy, using your melee attacks, magical attacks, and such. The area here is pretty linear and you'll be given various tutorials on the basic combat mechanics of the game.

What lies ahead, past the section where you first find a Stake of Marika is a boss, the Soldier of Godrick. Pass through the gold fog to enter the boss arena. The Soldier of Godrick is very weak so a few hits from your attacks will do. If you have chosen a class that focuses on magical attacks, a few hits will take him out. But if you are focused on close-quarter combat, watch his attacks, block, guard, and dodge his attacks at the right time. Defeating the Soldier of Godrick yields 400 Runes.
From the boss arena, head straight and you'll find a corpse hanging by the ledge. You can loot the corpse to find the "Strength!" Gesture. Jump down, and you'll find yourself back at the starting point of this area where the ghost sitting in the chair is. Head up the stairs near the glowing golden sapling and open the door leading to the Site of Grace. By the archway, there is another body on the right that you can loot to find x1 Finger Severer and x2 Tarnished's Furled Finger.

IMP STATUE — Whether or not you explored the tutorial section and fought Godrick, when you enter the next area of the game you will see a double-headed imp statue on your right with white fog doors nearby that block you from entering a different area. This statue requires two Stonesword Keys to unlock the fog doors, though you will want to gain some more levels and gameplay experience before exploring this area, which can be challenging if you visit it right away. This is the Fringefolk Hero's Grave dungeon, which is populated with strong enemies, poison, and has a boss. We highly recommend that you return to this section later on when you are well-equipped and prepared. One tip is to mark sections that you would like to return to on your player map. If you do want to explore this section later, you can find some valuable items, as long as you are careful and aware of your surroundings.
There is a site of grace near where the Imp Statue is that you should activate. Then, to officially begin your journey through the Lands Between, head straight, ride the lift to the upper section, climb the stairs, and open the iron door to find Limgrave. (Click on the next tab labeled Limgrave at the top of this section to continue with the walkthrough.)
Elden Ring Walkthrough - Entering Limgrave
Elden Ring Main Quest Guide - Limgrave Points of Interest
- Visit the Merchant at the Church of Elleh.
- The Right Tools at Your Disposal.
- Get the Map Fragment for Limgrave.
- Where do I find Boc?
- Gather some Smithing Stones.
- Clear the Groveside Cave.
- Finding the Invisible Scarab.
- Exploring the Coastal Cave
- Defeat the Tree Sentinel!
- Discovering the Stormfoot Catacombs.
- If you're a Mage, SAVE SORCERESS SELLEN
- Complete Murkwater Catacombs and Murkwater Cave
Limgrave - Church of Elleh

Church of Elleh Elden Ring Map. Click on the image above to enlarge it.
Right off the bat, when you've arrived in the region of Limgrave, the first thing you should do after speaking to the White-Faced Varré near the First Step Site of Grace is to visit the Merchant Kalé who is at the Church of Elleh, the Church of Elleh can be located at the west. Just outside of the front entrance, to your right, you'll see a crucifix that looks like a Martyr's Effigy, check the base to acquire x1 Fringefolk's Rune. Now, be wary when you are traveling (on foot for now) to the church since there is an optional boss, the Tree Sentinel who is roaming around. The Tree Sentinel appears as a large knight on horseback, the boss wears shiny golden armor, both himself and the horse. If you want to challenge yourself early on, you could fight him to obtain a useful item.
If you do find yourself in a situation where you aggro the boss by accident, you could try to run away and keep your distance from it, however, running to the Church of Elleh will cause the boss to try and chase you and will attempt to reach you by destroying the structure of the location. You can click HERE for the map's coordinates. As you travel along the game, you will notice a prompt that says "Acquire Materials' when you are near items that you can pick up from the ground. In general, always pick up anything you come across, since you can carry a lot of items in this game and they will be useful for crafting things later on in the game. So pick up any Rowa Fruit you come across and kill some Sheep and other small animals for Thin Beast Bones. At the Church of Elleh, you'll find the Merchant Kale (make sure to talk to him and exhaust his lines), the Church of Elleh Site of Grace, and x1 Smithing Stone Shard (1) by examining the Smithing Table. You can buy the Crafting Kit from the merchant's inventory as well.
Meeting Melina and Renna
Next up follow the guiding grace north to Gatefront Ruins. Click HERE for the map's coordinates. On the way keep gathering ingredients in the woods, including Root Resin and Erdleaf Flower. Also kill some Deer andBoar for more crafting materials. There is a Site of Grace, nearby, the Gatefront site, so make sure to discover and use it first as a checkpoint (you can hug the cliff face going to the west as you move to avoid the enemies at the campsite). At this point, a cutscene will trigger upon resting at the site of grace and you'll meet Melina. Melina introduces herself when you've discovered three sites of grace within the overland. As you speak to her, you'll be able to unlock the feature of leveling up at Sites of Grace by using runes and you'll obtain the Spectral Steed Whistle that allows you to summon your mount, Torrent. Moving forward, you can now use the Spectral Steed Whistle to traverse the overland.

Before you move towards the Gatefront Ruins fast travel back to the Church of Elleh site at night and you'll notice Merchant Kale unconscious and a mysterious figure that is sitting on a collapsed section of the church's northern wall. This is Renna, speak to her and she will ask you about your identity, answer her by saying that you have been gifted with the ability to summon the Spectral Steed, she will then provide you with the Spirit Calling Bell, as well as the Lone Wolf Ashes. With this, you can now summon the spirits of fallen creatures and characters to help aid you in combat. Talk to her again and she will vanish.
The Gatefront Ruins

Gatefront Ruins Elden Ring Map. Click on the image above to enlarge it.
Travel back to the Gatefront site of Gatefront Ruins and you'll see a Hearse on the left, there is a chest on the right side of the Hearse where you'll see a Noble Stormveil Soldier guarding it. You can sneak behind the enemy and backstab it and follow up with an attack in case the backstab doesn't instantly kill the soldier. Open the chest to find x1 Lordsworn's Greatsword. There's another Hearse nearby that also has a chest containing x1 Flail. You can sneak into the camp, just as long as you are cautious of your surroundings, and grab the Map: Limgrave, West map fragment which can be looted by a pillar that's at the center of the campsite.
Now the area has a lot of Stormvel Soldiers here and Wolves, so the best way is to them out one by one while they are unaware of your presence. If you are spotted, one of the soldiers will sound the alarm, alerting all soldiers on the campsite to fight you. Take note as well of the elite soldier here, the Godrick Knight, you'll easily see this enemy patrolling the center area of the campsite, it holds a large shield, a spear, and a distinct helmet. Defeating it yields 260 Runes and drops x1 Partisan and x1 Godrick Knight Greaves.
You're not done here, also around the center part of this location, there is an underground chamber where you can find a chest that contains x1 Whetstone Knife and x1 Ash of War: Storm Stomp [Map Coordinates Here]. By using a Whetstone Knife, (although there may be some restrictions) you can use any Ashes of War to replace the Skill, as well as Scaling Affinities on your armaments. Return and take out the remaining enemies to farm Runes - you can also find the Agheel Lake North Site of Grace nearby [Map Coordinates Here] - with enough Runes, we suggest you fast travel back to Church of Elleh and buy the necessary items from Merchant Kale such as the Telescope, Cookbooks, a Torch, Cracked Pot, and information items that can provide you with more gameplay mechanics.
Where is Boc?

Boc Initial Location Elden Ring Map. Click on the image above to view the map coordinates.
Secrets are no surprise when it comes to a FromSoftware game, and in the Network Test in Elden Ring, you'll most likely miss this hidden NPC named Boc. Where do I find this hidden or secret NPC? Boc can be first be found in Limgrave transfigurated as a tree. Travel to the Agheel Lake North site of grace (east of Gatefront Ruins in Limgrave), and then south down the road to the big telescope. From there, approach the small grove of trees that has a lot of sheep nearby and a voice will call out. Hit the small yellow tree to dispel the illusion and spawn Boc. Speak to him twice to receive 10x Mushroom. Map Link for 1st location.
Smithing Stones for Everyone!

Limgrave Tunnels Elden Ring Map. Click on the image above to enlarge it.
Early in the game or later after you explore the map a bit, we highly recommend that you visit Limgrave Tunnels. This location can be found on the southeast side of the map from the Gatefront Ruins [Map Coordinates Here]. NOTE: Bring a Torch to light up some dark sections. Upon arriving at the Limgrave Tunnels, you'll see a lift that will take you down, step on the button platform and you'll find a Site of Grace there to rest or use as a checkpoint. Notice that when you ride the lift down from the entrance, you'll see that there are two pathways that you'll pass as you go down to the section with the site of grace.
At the moment, we've received comments from the community that this location is bugged (at least on PC, as of 3/3/2022), and entering cooperative play before exploring will cause the smithing stone drops throughout the mine to disappear permanently from the host's world. Please feel free to delete this paragraph if this bug has been fixed by deployed patch notes from the developer, FromSoftware, we will also keep an eye on this and update the Limgrave Tunnels page and this section once we have new updates - for now, we would suggest you enter Limgrave Tunnels on your own.
First, go back to the top, and on the left side of the lift, you'll see that you can jump down onto the pathway below from the ledge. This is a dead-end, instead, go down to the other pathway just below and you'll find a corpse at the end, you can pillage it to find x1 Golden Rune (4). Head to the lower section where the site is by dropping onto the platforms that are lit with candles.
Now, proceed north from the checkpoint and you'll encounter Miner enemies. These enemies with their stone skin are resistant to slashing and piercing damage, but weak to strike. Kill the first three on the wooden path then head down, turn right, and check the nearby corner. There is another Miner there and in front of it, you can pick up x1 Smithing Stone (1). Check the south section where you'll see another Miner and at the tunnel path, there are three Rats and another body that you can pillage to find x1 Smithing Stone (1) - go back to the opposite tunnel path near the wooden steps and ride the elevator down.
You'll notice as you move down that there is another pathway. Check this later, for now, investigate this section. Go straight when you reach the lower level where you'll see a small shack that is being guarded by a Zombie Dog inside, another one of that hound under the shack, as well as more Miners. Kill the enemies and loot the corpse inside the shack to find x5 Large Glintstone Scrap, also, make sure to check the spot where the Miner enemy was mining to find another Smithing Stone (1) that you can pick up. Also, if you check behind the shack, there's a tight path that you can pass through, at the end is another Smithing Stone (1). This area is now clear, go back to the lift, and make sure you are facing southeast as you go up - be ready to dodge roll or jump off the lift when you nearly pass the mid pathway of this elevator.
Move forward and you'll see more Miners here. There is one in front, another on the right, and three more at the path on the left side. Before going left, check the path on the right which is a dead-end, you'll find another body that can be pillaged to find x3 Glintstone Scrap. Next, go to the path on the left (make sure to check the sides of the wall to pick up Smithing Stones), and you'll find the third lift that goes down even further. The lower-most level contains a closed gate, and on the other side of it is the boss of this location.
As you were riding the third lift down, you should notice that there are some platforms here, one of them, having a corpse that holds an item, and another smithing stone that you can pick up. To easily reach these platforms, ride the elevator back to the top, then start to drop down to the platforms below from the left side of the lift. First, you'll find x1 Golden Rune (1) from the body and on the platform below the corpse, you can pick up x1 Somber Smithing Stone (1) - go all the way to the lower section where the gate is.
From the closed gate (leading to the boss arena), go right towards a dead-end to find x1 Smithing Stone (1). When you're ready to fight the boss, simply open the gate, and the battle against the Stonedigger Troll will begin.
Slashing weapons and presumably pierce damage work fine. You can check out the Stonedigger Troll page to find more guides and strategies on how to defeat this enemy - successfully defeating it rewards the player with x1 Roar Medallion and 1800 Runes - to leave the boss arena, walk up to the portal mist and use it to return to the entrance.
The Groveside Cave

Early in the game, you can find minor dungeons that you can complete early in the game, and by doing so, you can find various items and equipment that can help you through your journey. One of the locations we would recommend you to travel to is the Groveside Cave situated on the west side of the map, north of Church of Elleh and southwest of Gatefront Ruins [Map Coordinates Here]. This cave is small in terms of exploring it, as you move forward, you'll first encounter a pack of Wolves below, and some Cave Moss around. By the bonfire, there is a body that you can loot to find x1 Cracked Pot. Straight ahead is a dead end with two more wolves, there are two more bodies that you can pillage to find x3 Glowstone and x1 Golden Rune (1), as well as some Silver Firefly that's flying by the wall.

Next, head to the east side of the cave where you'll find a gold fog door, beyond it is a boss arena where the Beastman of Farum Azula is. You can visit the boss page for the Beastman of Farum Azula to find our guide on how to defeat it. This enemy rewards you with the Flamedrake Talisman and 1000 Runes. You've now cleared the area and you can interact with the portal mist to fast travel back to the entrance.
Finding the Invisible Scarab

From the Groveside Cave, travel west until you reach a beach. Look to the right and you'll see some rock formations, you'll notice that there is a trail of glowing lights that are circling the rocks. This is an invisible Scarab, all you have to do is stand directly in its path and strike at the moment it approaches you. Killing it rewards you with x1 Ash of War: Stamp (Sweep) [Map Coordinates Here]. From here, you can travel southwest to clear out the Coastal Cave.
Clear out the Coastal Cave
If you were following the walkthrough, you should have the Torch that you can buy from Merchant Kale. You will need the Torch here since this cave is dark inside. If you haven't purchased the item, fast travel back to the Church of Elleh site. Similar to the Groveside Cave, this is a small area to explore and also has an optional boss [Map Coordinates for Coastal Cave].

You'll find a few things here when you reach the bonfire past the cave's entrance. First, is the Coastal Cave Site of Grace, a Martyr's Effigy, and Boc ONLY IF YOU WERE ABLE TO FIND HIM AT HIS INITIAL LOCATION. You will find him writhing in pain on the ground right next to the Site of Grace, speak to him and he'll ask you to leave the place, but, this area serves as a side quest for Boc where you need to acquire an item and give it to him. Make sure to examine/rest at the site of grace before you continue forward.
As mentioned, the cave is dark, so you'll need the Torch as your main source of light. When you drop down into the pit, you'll encounter a couple of Demi-Human enemies. You are outnumbered here, so you can die if you are not careful. Kill all the Demi-Human enemies and loot their bodies to find items such as the Rickety Shield, Rainbow Stone, and x1 Land Octopus Ovary that is looted off a nearby body, next to the entrance of the boss lair. Now before going in, there is a Gold Summon Sign by the entrance that you can use to summon a companion NPC that can help you fight against the boss.
Upon entering, you'll be fighting against two Demi-Human Chief, along with its minions, the Demi-Humans. You can check our Demi-Human Chief page to find our guide on how to beat this enemy. Successfully defeating both Demi-Human Chief enemies rewards you with x1 Tailoring Tools, x1 Sewing Needle, and 900 Runes. Before leaving the lair, make sure to grab the Silver Fireflies, and near the portal mist, there's a path leading to another exit where you can loot x1 Smoldering Butterfly and x1 String from two corpses that are being guarded by two more Demi-Human enemies.

Continue out the exit from the boss lair and activate the Church of Dragon Communion Site of Grace so you can easily fast travel here later on. At the moment, you won't be able to commune via the altar since you will need an item to use it. However, you can find a Teardrop Scarab here. Walk to the cliffside on the south side of the island to find a scarab. Kill it to acquire x1 Somber Smithing Stone (1) [Map Coordinates Here]. Apart from that, you can find some Herba, Rowa Fruit, Mushroom here and there are Guillemot around that you can kill to acquire some materials such as a Flight Pinion or a Four-Toed Fowl Foot.

And lastly, if you go around the church, somewhere around the northwest, you'll encounter two Spirit Jellyfish enemies (They only appear at night). Kill it, and then use your mount to jump to the top of the ruined walls of the church. At the top, you'll find a corpse that you can loot to find x1 Exalted Flesh. Back on the ground, there's also another corpse by the bushes that you can loot to find x4 Great Dragonfly Head. You've now cleared the area. Go ahead and fast travel back to the Coastal Cave site and give Boc the Sewing Needle by speaking to him and waiting for his full response. You have now cleared Coastal Cave.

Exit the cave and go west where you'll find the Nomadic Merchant West Limgrave [Map Coordinates Here]. Next to the merchant, you can pick up x1 Smoldering Butterfly. Speak to the merchant to check his wares and if you have enough Runes, make sure to buy some of the useful items such as the Armorer's Cookbook [2] and notes.
Optional Field Boss: Tree Sentinel
At this point, you should be able to upgrade your main weapon to at least +1 and you should be comfortable in the combat mechanics of your character. You can return to either The First Step or Church of Elleh Sites of Grace and find the Tree Sentinel field enemy/boss. You can find this champion roaming around on his mount between the Church of Elleh and the First Step checkpoint. Since you also have your mount, you can use the Spectral Steed Whistle to summon torrent and fight while mounted. Successfully defeating this field enemy/boss rewards you with Runes and drops the Golden Halberd weapon.
Complete the Stormfoot Catacombs

The Stormfoot Catacombs is a dungeon crypt, it is inhabited by Fanged Imps. It is due West and north of Church of Elleh, [Map Coordinates Here]. Upon arriving, open the doors leading to the catacombs and you'll find the Site of Grace for this location below. As always, make sure to discover or rest here to make it your last checkpoint. At the bottom of the steps, you'll find a Commoner ghost sitting in a chair that you can talk to. At the first intersection, you'll see a dead-end ahead and a path that goes further in the crypt on the right. The path ahead is where 2 Fanged Imps will ambush you, one is hiding by the corner on the left, while the other is by the corpse behind the chair in the center. - kill the goblins and loot the corpse to find x2 Root Resin.

Head down the steps and you'll see another path on the left side, a door that is in the middle of two statues, x1 Grave Glovewort [1] next to a stone coffin, and on the left side of the statue is a summoning pool that you can activate. This door is locked at the moment and you will need to find the mechanism that will unlock this. Continue heading down the stairs at the north side of the crypt where you'll see more Fanged Imps that are above, you can kill them with magical ranged attacks from afar while they are unaware of your presence. In this room, you can find items such as x1 Grave Violet and another Grave Glovewort [1].

Continue forward through the narrow path, but as you reach the other end, walk carefully since you'll see a flamethrower mechanism ahead that will begin to project a jet of fire. The fire is coming from a stone pillar that can rise and fall. If you have a bow and arrow you can aim down the hallway to hit the pillar when the fire stops, making the pillar descend into the floor and the flames stop. These pillars will reappear in multiple catacombs in the game, so if you can hit them before passing through the fiery areas it will make your travels safer. You can also hit the pillars by activating Mohg's Shackle or Margit's Shackle, or if a pillar is already descended into the ground you can raise it up by standing next to it and jumping on top of it.
If you don't have an arrow, wait by the corner and as soon as it stops projecting the flames, quickly sprint straight and turn right before it projects the flames again. When it stops, go back and sprint forward towards the source of the flames. Behind the pillar, there is a corpse that you can pillage to find x1 Prattling Pate Hello. Before you go back to the next path that has another flamethrower, you can hit the back of the mechanism to deactivate it.
Now for the next set of flames, do the same thing, sprint forward, take cover by the corner on the right, and when it stops, sprint towards the source of the flames and hit the back of the mechanism to disable it. Behind the second flamethrower, the area is being guarded by a few Fanged Imps that are on the walls, and two by each corner. You do not have to kill these enemies, but if you do you get a couple items. Instead of running straight into the group, try to lure one imp out at a time by throwing projectiles or spells. Fighting one will be a lot easier than taking on the whole group. After you kill the enemies, loot the body to find x3 Smoldering Butterfly, and grab the Ghost Glovewort [1]. Next, go back to the corner where you took cover and climb the ladder.

At the top of the ladder, tread carefully since there is a Fanged Imp that is hiding by the corner on the left that while ambush you as you walk forward, while there is another you can see ahead of you. By the corner where the Fanged Imp was, there's another Grave Glovewort [1] that you can get. Continue forward towards another dead-end room that is being guarded by two Fanged Imps, one ahead, and the other, hiding by the corner on the right, ready to ambush you. Kill both enemies and loot the body resting against a stone coffin on the left to find x1 Wandering Noble Ashes, as well as picking up another Grave Glovewort [1] at the center of this room. Retrace your steps and jump down onto the platform you see below you (on the right side, looking down), where you'll find another Grave Glovewort [1] and the lever by the grim reaper statue at the center that will unlock the large locked door you saw earlier. From here, jump down and run back to the beginning of the catacombs. You may want to rest at the site of grace near the opening of the catacombs before passing through the gold mist door that leads to the boss of this location. That will refill your HP, FP, and flasks, but it will also regenerate the enemies in the catacombs, so be careful as you head to the boss door.

Beyond the mist lies the Erdtree Burial Watchdog enemy. You can visit our Erdtree Burial Watchdog page to find our guide on how to beat this enemy/boss. Successfully defeating it rewards the player with x1 Noble Sorcerer Ashes and 1300 Runes. You've completed this area, and you can use the portal mist by the roots to fast travel back to the crypt's entrance.
Sorceress Sellen - A Damsel in Distress

Waypoint Ruins Elden Ring Map. Click on the image above to enlarge it.
If you are playing as a class that specializes in using Sorceries, then it's a must that you find Sorceress Sellen and free her! Her initial location is at the Waypoint Ruins, found in the eastern part of West Limgrave. Elden Ring Map Coordinates Here. When you arrive, you will encounter some Poison Flowers around the ruins and a Giant Poison Flower that is guarding the entrance to the crypt.
It's not that difficult to kill the Giant Poison Flower if you want to get rid of it, you just have to watch out for the poison it releases as well as a projectile attack where it conjures energy rays from your position. It can easily be avoided when you see a light that shines above you, just move away from it to avoid getting hit. This attack will not track your movement. Before you head down the crypt, make sure to grab the materials around here or make further preparations before going through the mist.
Behind the mist, you will have to fight the Mad Pumpkin Head, a mini-boss that is guarding the room where Sorceress Sellen is. The room where you'll be fighting is quite small and only has minimal space for you to be dodging. If you explore this section a bit early in the game, we suggest that you at least acquire the Spirit Calling Bell, as well as the Lone Wolf Ashes that are given by Renna, or at least, have a good shield like the Brass Shield that can drop from Godrick Soldiers at the Gatefront Ruins (you'll have to repeatedly kill the soldiers though until it finally drops from them). By having the Brass Shield, you can block 100% of its attack.
The Mad Pumpkin Head moves quite slow when it attacks, so patience and carefully watching its attacks to time your dodges right is key to winning this encounter. If you do have the Spirit Calling Bell, summon the Lone Wolf Ashes and attack the guardian when it is distracted or when you have a window. After defeating it, open the steel door and you'll find Sorceress Sellen in her study room, speak to her and accept being her student and you can gain access to her shop - don't forget to use the site of grace as well so that you can fast travel here later on.
A Familiar Feeling

Murkwater Cave Elden Ring Map. Click on the image above to enlarge it.
Before you head over to Stormhill, you may want to complete Murkwater Cave and Murkwater Catacombs first. Murkwater Cave can be found up the ravine from Agheel Lake, while Murkwater Catacombs is at the end of the ravine (Elden Ring Map Coordinates for Murkwater Cave). Make sure you have a Torch before going into the cave, if you don't have one, buy it from Merchant Kale at Church of Elleh. There are some Skeleton enemies along the way, and as you reach the entrance of the cave, you'll get a notification and will be invaded by an NPC Invader, Bloody Finger Nerijuss. Some say he appears as you approach Murkwater Catacombs, but in some cases, the NPC Invader appears when you're about to enter Murkwater Cave, either way, just be prepared.
Hold your ground and wait for a few minutes, Bloody Finger Hunter Yura will be summoned to help you fight this NPC Invader. When he appears, you can just sit tight and let Yura handle it, or join the fight and help him. Successfully defeating Bloody Finger Nerijuss drops the Reduvia dagger weapon, some Runes, and a Furlcalling Finger Remedy, Yura on the other hand will leave, but you'll find him later on just ahead of the ravine before reaching Murkwater Catacombs.
Enter the cave, rest at the site of grace, continue further, and kill the Highwayman enemies. As you see the one that's running back and forth, make sure to look at the ground, there are some bells here, if you trip the chains, it will alert the rest of the Highwaymen, and there are about 5 of them ahead. Clear the cave and make sure to open the chest to find some Mushroom materials. Now, check the east side of the cave and you'll see a gold mist. Beyond the mist, you'll find a campsite, and there's no one as well.
Open the chest and someone will call you out as a thief, you'll find this voice to be Patches, a veteran From Softwater character, who makes his grandiose entrance. This "boss" fight is quite simple and easy to manage, when his health is at 50% he tells you that he surrenders. It's your choice to stop or continue attacking him. If you stop, the battle ends, and he'll act friendly towards you, speak to him and he'll mention to you about opening a shop of his own. But if you kill him, he drops his bell bearing, Patches Bell Bearing, which you can give to the Two Maiden Husks at the Roundtable Hold. If you do choose to spare him, make sure to talk to him and choose the option of forgiving him, return to the entrance and speak to him again at his camp in Murkwater Caves, you'll gain access to his shop if you want to buy some important items like the Stonesword Key - oh, and there's also a chest that you can open.
Go back outside and at this point, we recommend that you clear out Murkwater Catacombs which is inhabited by Imps, it's a small dungeon that hosts a mini-boss as well at the end, the Grave Warden Duelist. There are some upgrade materials that you can grab here such as the Grave Glovewort (1) and some materials, but most importantly, if you're looking for a hammer weapon, you can acquire the Battle Hammer and some Runes if you defeat the Grave Warden Duelist.
From here, it's entirely up to you if you want to explore or check some parts of the map or if you want to farm Runes, whatever you feel like doing. But if you're wondering what to do next, that would be to enter Stormhill which is beyond the Stormgate at " target="">Stormgate Ruins.
Elden Ring Walkthrough - Things you Should do in Stormhill
Elden Ring Main Quest Guide - Stormhill Points of Interest
- Speak to some early NPCs.
- Acquire some Important Items.
- Complete Castle Morne, as well as the Father-Daughter's questline.
- Fight Margit the Fell Omen and Receive an invitation to the Roundtable Hold.
The Woman in the Red Hood

Stormhill Shack Elden Ring Map. Click on the image above to enlarge it.
The first thing we would like to point out is when you are about to go through Stormgate. It is heavily guarded by Godrick Soldiers, Foot Soldiers, as well as Troll that will try to block your path as soon as you march in. There are two ways for you to tackle this, (1) simply pass through the enemies on Mount, at this point, you should have the Spectral Steed Whistle to summon Torrent, it will be a challenge for you if you try to go on foot, the Troll will eventually catch up to you and you'll be outnumbered by the soldiers, they will also shoot you with their crossbow, so, that's quite a lot to handle. (2) You can take them out one at a time, fight the Troll enemy first, then kill the Soldiers that you see, you'll at least be rewarded with Runes and you have the time to gather the materials and some loot here.
When you pass the fortified gate, you'll formally enter Stormhill. At the top, you'll immediately see an illusory tree. Make sure to check it to find a Golden Seed on the ground. The Golden Seed in Elden Ring is a very important upgrade item, it allows the user to upgrade the number of Crimson and Cerulean Flask Uses, but not the amount of Wondrous Physick flasks available. Continue following the path and a pack of wolves will appear, take them out, continue forward and you will find the Stormhill Shack. Make sure to discover the Site of Grace here.
Check the destroyed shack and you'll find a woman wearing a red hood, she won't introduce herself at first, but this NPC is Roderika, a vital character who is responsible for upgrading your Spirit Ashes if you complete her questline. Speak to her and exhaust her lines to (1) acquire the Spirit Jellyfish Ashes and (2) she will mention some clues about her questline, this simply requires you to find a key item, and you will need to give it to her - there's also a Stonesword Key that you can grab here.
Now, if you want to find another Spirit Ash item, from the shack, go southwest, you'll find a cemetery that is inhabited by multiple Spirit Jellyfish enemies, as well as some Skeletons that will come out from the ground. You can find the Godrick Soldier Ashes here. (Elden Ring Map Coordinates)
A Knight at Arms
If you are looking for extra Ashes of War, then you're lucky to find an NPC nearby who offers some Ashes of War. From the Stormhill Shack, open your map and mark the east side a bit (Elden Ring Map Coordinates) there is a link for the coordinates for this next location, follow it to find the Warmaster's Shack. There is a site of grace here as well, and inside the shack, you'll find the initial location for Knight Bernahl. Speak to him and choose the option saying that you are a Tarnished. After the conversation, you'll be able to check his inventory and you can buy available Ashes of War.
Now, remember this location since when it's night, a field boss will replace Knight Bernahl, this is the Bell Bearing Hunter. Specifically for this location, the Warmaster's Shack. The quickest way to spawn the boss is to rest at the Warmaster's Shack, advance time to nightfall, then rest again. You must enter the shack to make him spawn. He drops the Bone Peddler's Bell Bearing, as well as 2700 Runes. The bell bearing item is to be given to the Two Maiden Husks at the Roundtable Hold to gain access to some materials that you can buy (Thin Animal Bones and Hefty Beast Bone).
Potboy Needs Help!
Next, from the Warmaster's Shack, head northeast towards a cliff section. Along the way, you'll encounter some Land Octopus enemies and a Giant Land Octopus. It's a good practice to just kill these creatures to farm Runes. As you keep moving northeast, you will hear a voice asking for help, this is Alexander more famously known as "Potboy". Here are the coordinates listed on our Elden Ring Map. When you find him, you'll notice that he's stuck to the ground, talk to him first, choose to help, and then go behind him. Simply hit him with a few strikes using a heavy attack until he pops out from the ground.
Make sure to talk to him again to acquire a reward for helping. If you continue to talk to him, he will mention about a "festival of combat" is being held, this is referring to the Redmane Castle which you'll eventually explore later on. ( Note: Getting this dialogue will effetively 'break' the Ranni questling, at least until after the festval..) After talking to Alexander, work your way down to the stone bridge where you'll find the Saintsbridge site (Elden Ring Map Coordinates).
By the bridge, there is a lesser version of the Mad Pumpkin Head. Kill it and don't forget to loot the body to find a Smithing Stone (1). On the other side of the bridge, if you look to the right, move forward, and you should find the Nomadic Merchant of North Limgrave (Elden Ring Map Coordinates), it's a good practice to use the markers of the map to pinpoint the locations of the merchants whenever you look at the map in-game. Now, if you still weren't brought to the Roundtable Hold by Melina, if you follow the road ahead, you should find the initial location of D Hunter of the Dead. He can be found mourning a person dead at his feet. Here, he will warn you against going any further east towards Summonwater Village. Map Link.
Exploring East Limgrave

Third Church of Marika Elden Ring Map. Click on the image above to enlarge it.
As far as main objectives, there aren't that many, but instead, it's more of encountering a few more NPCs and finding some important items that can help you throughout your adventure. And if you can, avoid fighting the Giant Rune Bears here, unless you want to fight them. First, we suggest you try to find the Third Church of Marika, there aren't any enemies here and you'll find the Site of Grace for this location, as well as the Flask of Wondrous Physick and the Crimson Crystal Tear.
If you move south from the Third Church of Marika, you'll run into the Siofra River Well and more Rune Bears as well. Your goal is to reach the Minor Erdtree of Mistwood Ruins where you'll find the Map Fragment for East Limgrave, it's at the foot of a pillar with ancient writings on it. By the altar you will also find some items here such as the Greenspill Crystal Tear and Spiked Cracked Tear - there is also a nearby Teardrop Scarab that drops the Ash of War: Ground Slam upon killing it (make sure you kill it before it runs away and disappears).
The Howling Wolf - Mistwood Ruins

Mistwood Ruins Elden Ring Map. Click on the image above to enlarge it.
You can discover the path to Mistwood Ruins by interacting with an antique spectral tree located south of the Third Church of Marika, along the main road. Examine it, and a grace will manifest as a human spirit that will wander without a clear destination. The spirit often disappears, but its footsteps can be traced not to lose track of it. Finally, the grace manifestation will arrive at the hidden ruins and fade away.


Upon arriving, you'll hear a howling sound but tread carefully since there is a Lesser Runebear that is guarding this location near the stairs that lead down into the cellar. If you look up at the taller parts of the ruins, you may come across Blaidd. Listen to the howling sound and before you leave, you can grab some materials here and if you go down into the cellar, you'll find a chest containing the Axe Talisman. Regarding Blaidd, fast travel to the Church of Elleh and speak to Merchant Kale, you will acquire the Finger Snap Gesture from him. Return to the Mistwood Ruins stand below the spot where Blaidd is, and use the Finger Snap gesture. Blaidd will then jump down and you can speak to the character - Blaidd will tell the player he is searching for a man who goes by the name Darriwil.
When you're done, just go back northeast towards the Minor Erdtree and take the lift down to the Siofra River, activate the Site of Grace down there, and head back up - you will come here later as it's very above your current level.
Liberate Fort Haight
If you were traveling first to the Third Church of Marika, you might have encountered Kenneth Haight located at some broken structures along the northern cliff of the area. The area is inhabited by a group of demi-humans and you will need to get rid of them before talking to the NPC. If you agreed to help him, your task is to find Fort Haight and liberate it (Elden Ring Map Coordinates for Kenneth Haight). Fort Haight.

Fort Haight Elden Ring Map. Click on the image above to enlarge it.
Fort Haight can be found on the southeast side of the map from Mistwood Ruins, it's along the road (Elden Ring Map Coordinates Fort Haight). The outskirts of the fort, as expected, is guarded by enemies such as Godrick Soldiers, Demi-Humans, and a Lesser Mad Pumpkin Helm. By the stairs, you can find an illusory tree that has x1 Golden Seed, make sure to grab this for your Crimson and Cerulean Flasks. The way in is by going up the stairs and entering the main gate. Inside, there are more enemies here such as the Commoner, Rats, and a Godrick Knight. Make sure to clear the fort for items such as finding the Nomadic Warrior's Cookbook [6], Smithing Stone [1], the Dectus Medallion (Left), and the Ash of War: Bloody Slash that drops from the Godrick Knight upon defeating it.
Once the area is clear, make sure to activate the site of grace for Fort Haight, and return to Kenneth to acquire your reward, the Erdsteel Dagger. This NPC will then move to another location and can be found at the top section of Fort Haight.
Fight Against the First of Many Dragons

Dragon-Burnt Ruins Elden Ring Map. Click on the image above to enlarge it.
Now, if you want to gain access to some unique Incantation spells, then you may want to head over to the Dragon-Burnt Ruins to fight the Flying Dragon Agheel (Elden Ring Map Coordinates). You can check the page for Flying Dragon Agheel to find our written guide on how to defeat this boss, as well as a video guide. By killing this dragon, you'll be able to acquire the Dragon Heart which is used at the Cathedral of Dragon Communion. Below is a list of the available incantations you can exchange, including information on the number of hearts and conditions required to gain access to it.
Cathedral of Dragon Communion Incantations
| Incantation | Cost | Unlock Condition |
| Dragonfire | Dragon Heart x1 | None |
| Agheel's Flame | Dragon Heart x2 | Defeat Flying Dragon Agheel |
| Magma Breath | Dragon Heart x1 | Defeat Magma Wyrm (Mt. Gelmir) |
| Theodorix's Magma | Dragon Heart x2 | Defeat Great Wyrm Theodorix |
| Glintstone Breath | Dragon Heart x1 | None |
| Smarag's Glintstone Breath | Dragon Heart x2 | Defeat Glintstone Dragon Smarag |
| Rotten Breath | Dragon Heart x1 | None |
| Ekzykes's Decay | Dragon Heart x2 | Defeat Decaying Ekzykes |
| Dragonice | Dragon Heart x1 | None |
| Borealis's Mist | Dragon Heart x2 | Defeat Borealis the Freezing Fog |
| Dragonclaw | Dragon Heart x1 | None |
| Dragonmaw | Dragon Heart x1 | None |
| Greyoll's Roar | Dragon Heart x3 | Defeat Elder Dragon Greyoll |
Gain Access to New Sorceries
If you are playing as a Mage that focuses on Sorceries, then you might want to grab a scroll that you can give to Sorceress Sellen to gain access to more sorcery spells. Giving the Royal House Scroll unlocks the Glintblade Phalanx and Carian Slicer in her inventory. To find this scroll, head southeast from the Agheel Lake South Site of Grace, head to the top of a cliff and you'll see a statue of an object that looks like the half piece of a bowl or a circle. Face the other way, to see a Knight. Keep going to a structure to see a man standing watching over the big structure, alongside a dead body. In that body, you will find the Royal House Scroll - once you have it, fast travel to the Waypoint Ruins site and give the scroll to Sorceress Sellen.
Explore the Weeping Peninsula
Next, from the Agheel Lake South Site of Grace, if you head south, down the road, you'll find the Bridge of Sacrifice, and just past that, you will run into a woman named Irina who can be found sitting on a rock at the beginning of the main road in eastern Weeping Peninsula, upon speaking to her, you'll learn that she's from Castle Morne and that she will hand you a key item, Irina's Letter. She will ask you to deliver this letter to her father who is in Castle Morne, this formally starts the questline of Irina and her father, Edgar -your next side quest is to liberate Castle Morne and to deliver the letter to Edgar.
Castle Morne can be found at the end of the main road, situated on the southwest side of the map (). There are a couple of locations you may want to stop over since there are some helpful items that you can find there.
- Oridys's Rise (Elden Ring Map Link): You can find a Memory Stone here at the top of the tower. Useful when you need an extra slot to equip more Magic Spells.
- Impaler's Catacombs (Elden Ring Map Link): Located near Irina, if you want to farm for some Runes and acquire a new Spirit Ash, the Demi-Human Ashes, then clear out this mini-dungeon and beat the boss, the Erdtree Burial Watchdog.
- Demi-human Forest Ruins (Elden Ring Map Link): Inhabited by Demi-Humans and the Demi-Human queen, you can find items here such as the Shield of the Guilty, the Crystal Burst sorcery spell, and the Demi-Human Queen's Staff that drops from the Demi-Human Queen upon defeating it.
- Make sure you also check the north section of the Demi-human forest Ruins to find the Faith-Knot Crystal Tear (Elden Ring Map Link)
- Callu Baptismal Church (Elden Ring Map Link): You can loot the "The Flame of Frenzy" incantation off a corpse and you can also find x1 Sacred Tear in front of the altar.
- Morne Tunnel (Elden Ring Map Link): Heavily guarded by Misbegotten enemies and is the location of a mini-boss, the Scaly Misbegotten, clearing out this tunnel location is a must to find multiple Smithing Stones, some Golden Runes, and materials.
Liberate Castle Morne

Castle Morne Elden Ring Map. Click on the image above to enlarge it.
If you want to find a list of all the items you can find, as well as entries on NPC, Enemies, and Boss encounters, simply visit the Castle Morne page. This is an optional dungeon area that is not as large as the regular Legacy Dungeons. Players may find this castle by wandering the paths along Southern Limgrave and The Weeping Peninsula. Some NPCs encountered around Limgrave may speak about this castle, as well. If players come across the Bridge of Sacrifice, they may encounter Irina, an escapee of the castle south of the bridge, referring to Castle Morne. [Map Coordinates]
Upon riding the lift up to Castle Morne, you'll see the Misbegotten enemies all around the castle grounds. As you enter, make a hard left and go up the steps where you'll see a bonfire. There are two Zombie Dog enemies here, kill the hounds and loot the body to find x1 Smithing Stone (2). Go back down to the courtyard section where the Misbegotten enemies are and continue going straight. You can fight them if you want, but you'll easily be outnumbered. Or you can sneak around by moving to the left side where there are about three Zombie Dog enemies.
As you move forward, you'll notice a Lesser Pumpkin Head sitting on the ground. This enemy drops x1 Pumpkin Helm and x1 Sanctuary Stone. From where the Lesser Pumpkin Head was sitting, look to the left, behind the tree to find a corpse in a sitting position, pillage the body to find x3 Smithing Stone (1). On the right side, is a narrow path that is blocked by a single Misbegotten. You can sneak behind to backstab it - continue up the stairs and climb up the ladder at the end.
As you reach the top, a single Misbegotten enemy will rush in to attack you. Be ready to take it out. Head up the stairs where you'll see countless bodies of men hanged, and ahead of the path, is another Misbegotten on the left side of the runway, while two Winged Misbegotten are just a few steps ahead. You'll also notice on the right that there is a body that's hanging by the ledge of the wooden fence, you can loot the body to find x1 Golden Rune (2). Go straight towards another bonfire where you can pick up x1 Smoldering Butterfly.
Now, go back to the spot where the two Winged Misbegotten enemies were, check the left side to find a ladder that you can climb down. Move forward along the runway where you'll see a single Misbegotten at the end, near another corpse that can be pillaged. Don't run forward since there is another Misbegotten enemy hiding behind the barrels on the right. It will jump and attack you the moment you are close to it. Kill both enemies and loot the corpse to find x2 Smithing Stone (2). Retrace your steps, and climb the ladder back to the top - from where you got the Smoldering Butterfly material, look to your right and you'll see a part of the stone fence broken, you can jump down to find the Behind the Castle Site of Grace. [Map Coordinates]
After discovering the site and resting if needed, jump down to the lower section of the cliffs until you set foot on the platforms of the castle. Look to your left towards the broken stone fence and you'll see there's a wooden platform below with a corpse that can be looted. Jump down and pillage the body to find x1 Stonesword Key [Map Coordinates]. Jump down and you'll encounter more Misbegotten enemies ahead. On the right side, however, is an open gate that leads to a prison cell.
Inside that prison cell, there is a single Misbegotten enemy here that you can backstab. Kill it and then loot the body here to find x1 Pickled Turtle Neck. Move away as soon as you grab the item to avoid getting hit by the Skeletal Slime enemy that will drop from above. On the left side of the prison cell, you'll see a spirit NPC locked in a cage. Speak to it and it will plead for help. There isn't anything special here, so you can go back outside and take out the Misbegotten enemies one at a time as you move northwest.
Walk along the runway, kill the Misbegotten and Skeletal Slime enemies. On the other side, you'll see a bigger Misbegotten. Kill the enemy, and grab x2 Smoldering Butterfly near the bonfire. Climb the ladder to the top of the tower and circle around to find a treasure chest containing x1 Twinblade Talisman. Next, go back down, walk towards the runway (facing southeast), look to the right, and you'll see that you can jump down on the roof of what seems to be a castle gazebo. Jump on the roof and then to the ground to find two things, there is a special-looking Teardrop Scarab that you can kill which gives an additional usage for your Flask of Crimson Tears. You'll find it hiding by a bush, and you can identify it with its glow and ringing sound. Also, there's a tree nearby, check it to find a body next to it that can be pillaged to find x3 Tarnished Golden Sunflower.
Continue moving east until you've set foot on the east section of the castle. You'll notice that there is a square opening on the ground that you can enter. Below, there is a narrow beam, on that beam is a corpse with an item, x1 Smithing Stone (2). Drop down on the next beam but don't go all the way down since there is mischief (a group of Rats) and a single Misbegotten. We suggest you stay on the second beam and kill it one at a time while on high ground. If you accidentally fall, just sprint out of the prison cell, and fight them outside where there's more space for you to move around.
Inside that cell with the mischief, there's a body that you can loot to find x1 Whip. And outside, you can grab x1 Smoldering Butterfly near the bonfire, and if you go left, around the corner, you'll find the Beside the Rampart Gaol site of grace. Next, cross the narrow wooden bridge, as you approach the other end, move slowly since there are two Misbegotten enemies here, a winged one, and the other large variant that wields a large axe. In that spot where the two enemies were, there's another body next to the barrels and crates, loot it to find x8 Throwing Dagger.
Next, climb down the nearby ladder where you'll see multiple Spirit Jellyfish enemies. These aren't hostile and remain at rest unless you attack them. Move around to the left side of the ladder and you'll see an entrance that can only be entered by going through the gold mist. Beyond it is the boss for this location, Leonine Misbegotten - make sure you have made further preparations before fighting this boss, you can visit our Leonine Misbegotten page for guides on how to defeat this boss.
Defeating Leonine Misbegotten drops x1 Grafted Blade Greatsword and 2850 Runes. There still are some sections of the castle you'll need to explore here, so after the battle, first, make sure to examine the Morne Moangrave site of grace at the boss arena then fast travel back to the Castle Morne Lift site. Ride the elevator up and this time, you will need to explore the section on the right where there are multiple Misbegotten enemies standing on a pile of bones and corpses. You could try to sneak behind them.
If you're able to pass, there's a doorway that you can enter. Inside the armory, by the doorway, there's a chest on the left, open it to find x1 Claymore. Continue straight, down the stairs, and head outside where you'll see two Misbegotten enemies attacking a Godrick Soldier. Clear the path and climb up the nearby ladder. At the top, you'll see more Godrick Soldiers fight against the Misbegotten. You can simply watch them fight first, and whoever is left, you can finish them off.
Upon clearing the area, on the right side, there's another ladder that goes up, an execution podium at the center, and a path that you can explore on the left. Check the podium first and you can find x1 Furlcalling Finger Remedy looted off a corpse. While on the left side of the podium, there's also another body that's being guarded by two more Misbegotten enemies. Search the corpse to find x1 Steel-Wire Torch. Go back and climb up the other ladder on the right.
Return to the castle grounds, specifically where there are piles of bodies and Misbegotten enemies around a corpse that is tied to a wooden beam that is burning. Clear out the enemies and check the pile to find some corpses that can be looted such as x2 Fire Grease, Smoldering Butterfly that is flying around the flames.
Now, if you were able to speak to Irina (and exhaust her dialogue), she'll ask you to give a letter to her father, Edgar, a warden who's in Castle Morne. Irina can be found sitting on a rock just beyond the Bridge of Sacrifice, at the start of the main road in the eastern Weeping Peninsula [Interactive Map Location]. To deliver the letter, fast travel to the Castle Morne Lift site, go straight towards the Lesser Pumpkin Head, make a right, climb the ladder.
At the top of the ladder, go straight towards the runway with the hanging corpses, drop down from the wooden platform on the left side just a few steps after going up the short stairs, go straight until you reach the end, go up and around the wooden stairs where you'll find Edgar on one of the castle tower's rooftop. Give the letter and he'll give you x1 Sacrificial Twig. If you spoke to Edgar before clearing the castle, he will mention that he still must defend the castle and recover a sword before he can return to Irina. This means that you just need to clear out the castle by defeating Leonine Misbegotten and acquiring the Grafted Blade Greatsword, by doing so, return to Edgar and he'll mention that he is in your debt, that he is no longer bound by duty, and he can now return to Irina. This completes Castle Morne and as for the Father-Daughter questline, make sure you return to the spot where Irina was, near the Bridge of Sacrifice. You'll find Edgar discovering that Irina has been killed. [Map Coordinates for Edgar's position]
An Invitation to the Roundtable Hold
At this point in the game, Melina should have appeared to you when you rest at a site and she should have invited you to the Roundtable Hold. The Roundtable Hold serves as the central hub of Elden Ring, where fellow Tarnished and adventurers alike gather. You'll meet more NPCs here and you can request their services such as upgrading your armaments or purchasing items, spells, and more.
Now, if you're following the linear path of the game (in terms of story), by resting at the Site of Grace after defeating Margit the Fell Omen who is guarding the main gate of Stormveil Castle (Elden Ring Map Coordinates), will have Melina appear and bring you to the roundtable. On the other hand, if you have been exploring and wandering into further regions (at some point upon accidentally reaching the region of Caelid), Melina will appear and invite you over to visit the Roundtable Hold. Now, we are not entirely sure how far you need to explore in terms of you wandering around the map, but to set an example, this triggered Melina to invite us to the Roundtable Hold upon resting at a Site of Grace when we were somewhere in Caelid.
Either way, we highly suggest you make further preparations such as strengthening your Weapons by using the smithing table at Church of Elleh, and if you want to have an advantage during the battle against Margit the Fell Omen, purchase the Margit's Shackle item from Patches who's at Murkwater Cave. Margit's Shackle is a reusable consumable item that stuns/binds Margit for a few seconds. However, this can only be used twice per fight and only in the first phase. For future purposes, it can also be used against Morgott, the Omen King. If you're ready, proceed to Stormveil Castle and get ready to fight Margit the Fell Omen - you can find our strategy guide and video guide on how to beat this boss on our Margit the Fell Omen page.
Elden Ring Stormveil Castle Walkthrough
Elden Ring Main Quest Guide - Stormveil Castle Points of Interest
- Defeat Margit, the Fell Omen
- Speak to Gatekeeper Gostoc at the castle's gatehouse.
- Enter the castle using the secret, back entrance.
- Find Sorcerer Rogier at the castle's chapel.
- Meet Nepheli before reaching Godrick the Grafted.
- Defeat Godrick the Grafted and claim his Great Rune.
Stormveil Castle is a Legacy Dungeon in Elden Ring. A castle that lies on the cliffs of Stormhill, a stronghold of Godrick the Grafted. Be wary of this location since there are hordes of soldiers and hostile creatures that will stop anything and anyone who tries to infiltrate the area. Players entering Stormveil Castle should beware that it's a challenging dungeon with groups of numerous enemies with traps and ballistas as well as mini-bosses. This area does not allow riding.

Stormveil Castle Guide
- Previous: Stormhill
- Next: Raya Lucaria Academy
- Recommended Levels: 30-40
- Bosses: Grafted Scion, Lion Guardian, Godrick the Grafted
- Site of Grace:
Stormveil Cliffside [Map Link]
Stormveil Castle
Stormveil Main Gate [Map Link]
Rampart Tower [Map Link]
Liftside Chamber [Map Link]
Secluded Cell [Map Link]
Godrick the Grafted [Map Link]
Video walkthrough
Stormveil Castle Maps
Ground Level

1st Level

2nd Floor

3rd Floor

Rooftops

NPCs in Stormveil Castle
- Gatekeeper Gostoc
- Sorcerer Rogier
- Nepheli Loux
- Kenneth Haight (at the end of Nepheli's quest)
Stormveil Bosses
Stormveil All Items
Talismans
Consumables
- x10 Bolt
- x8 Kukri
- x10 Arrow
- x4 Golden Rune (1)
- x9 Golden Rune (2)
- x1 Golden Rune (4)
- x1 Golden Rune (5)
- x1 Fire Grease
- x1 Magic Grease
- x1 Stanching Boluses
- x1 Furlcalling Finger Remedy
- x1 Golden Seed
- x1 Gold-Pickled Fowl Foot
- x1 Silver-Pickled Fowl Foot
- x1 Grace Mimic
Weapons & Shields
- x1 Marred Leather Shield
- x1 Brick Hammer
- x1 Hookclaws
- x5 Throwing Dagger
- x10 St. Trina's Arrow
- x5 Ballista Bolt
- x1 Hawk Crest Wooden Shield
- x1 Misericorde
- x1 Highland Axe
- x1 Pike
- x1 Wooden Greatshield
- x1 Godslayer's Seal
- x1 Manor Towershield
- x1 Arbalest
Armor
Spells & Ashes
- x1 Rancorcall
- x1 Aspect of the Crucible: Horns
- x1 Ash of War: Stormcaller
- x1 Ash of War: Storm Assault
Upgrade Materials
- Poisonbloom
- x2 Herba
- x3 Mushroom
- x1 Trina's Lily
- x3 Arteria Leaf
- x1 Lump of Flesh
- x3 Ruin Fragment
- x1 Beast Blood
- x2 Old Fang
- x1 Pickled Turtle Neck
- x7 Smithing Stone (1)
- x5 Smithing Stone (2)
- x1 Smithing Stone (3)
- x8 Smoldering Butterfly
- x1 Somber Smithing Stone (1)
- x1 Somber Smithing Stone (2)
Enemy Drops
- Runes
- Banished Knight's Halberd
- Banished Knight's Greatsword
- Banished Knight Set
- Commoner's Shoes
- Commoner's Garb
- Commoner's Headband (Altered)
- Exile Armor
- Exile Greaves
- Flight Pinion
- Stormhawk Feather
- Crescent Moon Axe
- Warhawk's Talon
- Torchpole
- Omen Cleaver
Keys & Other
- x1 Rusty Key
- x1 Iron Whetblade
- x2 Stonesword Key
- x1 Chrysalids' Memento
- x1 Dozing Cross-Legged
- x1 Prophecy Painting
- x1 Mimic's Veil
- x1 Godrick's Great Rune
- x1 Remembrance of the Grafted
- x1 Shabriri Grape
- x1 Godskin Prayerbook
- x1 Festering Bloody Finger
- x1 Nomadic Warrior's Cookbook [10]
Enemies
Notes
Important Discoveries
- Speak to Gatekeeper Gostoc at the castle's gatehouse.
- Enter the castle using the secret, back entrance.
- Find Sorcerer Rogier at the castle's chapel.
- Meet Nepheli before reaching Godrick the Grafted.
- Defeat Godrick the Grafted and claim his Great Rune.
- Explore the Castle's Crypt.
Full Stormveil Castle Walkthrough
The Castle's Entrance

You've beaten Margit the Fell Omen and have arrived at the main gate of the Stormveil Castle, just by the gate's main gate, there is the Stormveil Main Gate Site of Grace that you can use. On the left side, you'll notice a room nearby, this is the castle's gatehouse, where you'll meet Gatekeeper Gostoc, an old tall fellow that may seem a bit suspicious. Speak to him and he will advise you to avoid entering the castle using the main gate because he says it's tightly guarded. But instead, he suggests you try the other way going through the opening, (on the left) claiming that guards don't know about that entrance. You will be given the choice to accept or reject his suggestion. If you reject it, he will be fine with that and respect your decision. He will even open the gate for you. But as soon as you enter a few steps, multiple arrows will strike you from far away. However, you can make it past them. For this walkthrough, we will go through the opening that Gostoc suggests.

Go out through the opening on the left and you'll see a summoning pool on the left corner which you can activate, and on the left side of the summoning pool is a body that you can pillage to find x1 Golden Rune (1). Turn around and hug the wall on the right, you'll see there's a concrete beam on the wall that you can jump on so that you can go through the opening. You'll then immediately see another body you can loot to find x3 Ruin Fragment. From there keep going straight and jump over the wall to find yourself in the west backside of the castle.

Before you jump down towards the castle grounds, look to your right and you'll notice that the destroyed wall is formed like steps that you can jump on to reach the high ground that's on the upper left. When you reach it, there's another body by a wall that you can loot to find x1 Smithing Stone (2). After grabbing the upgrade material, make your way to the bottom to continue towards the castle.

Just be careful since there is a Warhawk enemy here that will attack you once you are seen. Kill it and before continuing towards the overlooking area, you can roam around the cliffside (specifically on the left side) to find some materials such as x2 Herba, as well as an eyrie of Warhawk enemies. You'll notice that there are about 5 Warhawks here, so we suggest that you use a ranged magic attack such as the Glintstone Pebble to gain the advantage of attacking first while it is unaware.
Once you've cleared out the area, check the spot where the eyrie was to find a corpse that you can loot to find x1 Smithing Stone (3). From the same spot where you picked up the smithing stone, first, go left and work your way around the cliffside, at the end of it, is another body that you can loot to find x10 Bolt. Now, continue towards the overlooking area where you'll find the Stormveil Cliffside Site of Grace, use it to save it as your checkpoint and to rest if needed. There's also another summoning pool on the left side of it.

Head up the slope on the right and jump on the wooden path and steps that go to the top. Just before reaching the top of the platform, you'll find another corpse, midway through the steps, that you can pillage to find x1 Marred Leather Shield. Be cautious here and keep an eye out for three Exile Soldiers roaming outside since one of them can spot you as you try to grab the shield. You can try to backstab the first guard you see before it walks near the arch door so that you avoid catching the attention of the other guard that's inside.
Once you've defeated the first three guards, go inside and look to the left, there's another arch door where you'll see a body that's sitting by the edge of the platform, but before approaching it, look up, you'll see another Exile Soldier that is ready to shoot you as you approach the body. Take out the enemy first and then loot the corpse to find x1 Golden Rune (2) or you can just quickly grab the item and dodge to avoid getting hit. Now inside and head into the next room which is the castle's wine cellar where you'll encounter two commoner enemies resting by the barrels.
The Wine Cellar

Kill both enemies and then go left and straight under the stairs where you'll see some stacked boxes and barrels, break through it, but be careful since there is another Exile Soldier wielding an axe, roaming. You can hide first and wait as it makes another round, so you can backstab the enemy, instantly killing the guard. Check the left side corner at the end to find a body that can be looted, it has x1 Hookclaws. Now go back and tread carefully to the top of the stairs, as you head up, towards the first set of steps, you'll see more wooden barrels blocking the way, dodge through them, and be ready to sprint as soon as you recover from dodging since you'll encounter two more commoners ahead, one in front, and the other above one level that will throw bombs at you. Quickly kill the first commoner enemy, and then rush to the other that's at the top.

Once you've killed the two enemies, go straight, on the right side from the arch entrance with a locked door to find a body by the edge of the platform to find x5 Throwing Dagger. Go back and if you look to the right where the second commoner standing above on the wooden platform bridge was, there's a hole in the wall with roots, on the right side that you can jump on where you can find x5 Throwing Dagger. Go back and look to the right side, there's a hole in the wall that is covered in vines. Jump on it to find a body that you can loot to find x10 St. Trina's Arrow.
Go back down from the hole and continue forward towards the narrow path with the archway, be careful here, and be ready to dodge back since there is another Commoner enemy ahead that will throw a bomb at you, as soon as you try to pick up the item by the arch doorway. Sprint and dodge forward to close the gap and then kill the enemy, or you can use a ranged spell to kill it while it's unaware of your presence. You'll also find a body here to pillage to find x3 Smoldering Butterfly.

Turn to the left and break the boxes and barrels to see another set of small steps that goes up. Next to the second set of steps, you'll find another Commoner sitting, kill the enemy and then drop down below the platform from where the sitting Servant was, you'll find another body to loot that has x1 Golden Rune (2). If you want to challenge yourself, turn to the left, jump across the wooden platform and then go back up to the spot where the Commoner was sitting where you'll find a door to the right.
The Banished Knight

Before entering the room, be sure that you are prepared since the door will close behind you once you start to fight the Banished Knight inside the pitch-black room. Having a Torch will help you see here and will only be your source of light as you fight this enemy if you need to. The Banished Knight is a strong agile enemy that wields a sword and shield. If you can fight without a Torch, using a mix of melee and magical ranged attacks are best to use against the Banished Knight.
You may want to keep your distance as you fight the enemy since the knight's swings from the sword have long reach, and aggressively using the shield causes a swirl of wind. One tip is to use Glintblade Phalanx against it since the magical swords will automatically attack, causing the knight to flinch. Successfully defeating the Banished Knight yields 400 runes.

Make sure to loot its body to grab a cosmetic item, Banished Knight Armor (Altered), loot the corpse that's by a corner to find the Rusty Key. There is also a treasure chest here, just on the left side corner from where the corpse is, open the chest to find x1 Curved Sword Talisman. Since you're done here, go back down to the second level near the hole on the wall that has vines and use the key to unlock the door. Inside the room, there is a ladder that you can climb to reach the top level of the wine cellar.
Wine Cellar - Top Level

Through the arch door, look to your right first and you'll see a Commoner sitting on the floor with its back facing you. While it is unaware, you can use a ranged magic attack to kill it first, or jump to the platform to kill it. Walk up a bit and you'll notice another Commoner ahead, with the same tactic, kill it with a ranged magic attack. Go straight and slowly walk onto the wooden beam to reach the other side, at the end, there is a body that you can loot to find x1 Fire Grease.
Go back a bit and jump across to the platform on your left, go through the archway in the outer wall (you may have noticed some loot in the hole to the right of the archway; ignore it for now). Turn left. An Exile Soldier is on the ramparts, and another guard is down the stairs in the tower. There is a corpse on the ledge behind the second Guard that can be looted to find the Brick Hammer. You can jump down from here if you wish to return to the bottom of the ladder. Otherwise, retrace your steps back to where you came up the ladder. Be ready to sprint and dodge towards the set of stairs since there is a Commoner that is waiting to ambush you by the corner, on the left side.

Head up the stairs and on the upper platform where there are barrels, tools, and boxes, you'll see another Commoner sitting on the ground, kill it and check the corpse in front of it that's by a wall to find x1 Silver-Pickled Fowl Foot. Head outside and look to your left to find part of the castle's steps. But before going up, walk around the narrow path of the castle's structure until you reach a dead-end to find a body that you can pillage to find x3 Mushroom - from here go back and head up the steps.

At the top, you'll find a room on the right, take caution since another Banished Knight is wielding an axe that's roaming around. You can wait and sneak up behind the knight to perform a backstab and follow up with ranged attacks. You won't instantly kill the knight but instead, inflict a chunk of damage to its health. Alternatively, you can also use the elevator shaft in the middle as space to maintain distance, and you can use long-ranged attacks. Another way is if you try to sneak up behind the knight, with proper timing and positioning, backstabbing the knight at the right moment can cause the knight to fall off.
After defeating the knight, you can make a detour for an Arteria leaf, which you may have seen earlier in the hole in the wall, or continue and head to the second floor (and touch the site of grace first):
- Continue to site of grace: Go up the stairs to the second floor and you'll find a large room on the left that hosts the Rampart Tower Site of Grace - take this opportunity to rest and manage your equipment if needed.
- Arteria leaf: Go back outside where you fought the Banished Knight. Go the left side and jump down on the ledge below. Continue to the left along the edge until it ends. Jump down again on the wooden blanks to get the Arteria leaf. Go through the hole and make you way back up again.

You can also check the third floor where there is an Exile Soldier that's patrolling, while the other is on the other end of the platform that's holding a crossbow. Tread carefully while you are crouched so the one patrolling doesn't see you and slowly move back down to the second level as the guard goes down as well, when you have a clear shot, use a ranged magic attack to take it out. Go to the third level and take out the other guard with the crossbow next. This takes you to one of the castle's rooftops, go through the doorway with a large arch, and go around the path to find the entrance leading outside.

There is another Exile Soldier here resting by the pile of sacks on the left while another standing on a high platform. Kill it, and on the right side, just by the corner is another Exile Soldier with a crossbow. Once you've cleared the area, on the wooden platform where one of the Exile Soldiers was standing, there's a body that can be looted to find x1 Golden Rune (2). There are about three more Exile Soldiers as well on the other side, and you can find them looking tired and resting by the corners. You can take this advantage to collect Runes - you've cleared this area.
Castle Rooftops

While still on the rooftop, across from the entry area, if you look across, you'll notice that you can jump onto the balcony ledge and you can jump across. But tread carefully and wall-hug so that you don't fall! Jump up on the ledge and move along to the tower that's furthest to the right in the picture above. From there, move forward until you can safely jump across to the ledge of the destroyed tower. From there, go around to find an opening on the wall that you can go through. Jump down and you'll see a corpse that you can loot to find x1 Stonesword Key. You'll then notice that there is an exit to your left where you can jump down on a rooftop. Now prepare your weapon before jumping down since you will be ambushed by a Warhawk.

The Warhawk is quite agile and attacks in the air, so maintaining a safe distance while you attack it with ranged attacks, will surely do well against it. After killing it, you'll see another corpse sitting against a wall on the roof that you can pillage to find a gesture x1 Dozing Cross-Legged. Now walk to your left and look below where you'll notice a door that is blocked with white fog.

Before you try to jump down safely, you'll notice ahead of you that you can jump onto a narrow platform that's sticking around the wall. Move directly west along the railing, then carefully jump on the ledge. Hug the wall, go around three corners to reach a wooden plank that leads up on a bigger ledge. There, you'll find a corpse that you can pillage to find x2 Smithing Stone (2). Go back to the rooftops via the narrow ledge, and near the fallen pillar, you can use the narrow platforms sticking from the wall to jump down. Make sure you jump down carefully since there is another Banished Knight here.

As you jump down, turn around and go straight until you walk to a ledge. If you look down, you'll notice a statue and a corpse next to it that you can loot. You can jump down since your character can land safely from the height. Loot the body to find x1 Somber Smithing Stone (2). Now, if you look ahead, you'll see the door that is blocked with white fog, and next to it, is a glowing imp statue. There's also a doorway on the left side where you'll hear some loud crashing noises. If you examine the imp statue, you will be asked to use the Stonesword Key to permanently dispel the white fog, allowing you to pass through. Remember that using the said key will be consumed and removed from your inventory.

Go through the door to find the armory, but walk up a bit, and peak to the right side, you'll find x2 Exile Soldiers sitting. There's no point if you try to sneak in since the moment you step in, they will see you and attack you. You could bait the nearest one outside so you have better space to dodge and move around, kill both enemies and then check the room to find some loot there. There are three things that you can find here from the corpses. x1 Hawk Crest Wooden Shield, x1 Misericorde, and x1 Iron Whetblade. Now, there's is a door on the right side of the armory, don't go rushing through it, walk up slowly and you'll notice another Exile Soldier holding a torch on the left side. You can sneak behind the guard to backstab it or attack it a few times, causing the enemy to fall. You've cleared out the armory, next is to go into the room where you previously heard the banging noises.
The Grafted Scion

Before you enter, make sure you have made preparations just in case you fail in trying to sneak in or if you decide to just fight this mini-boss. This is the Grafted Scion, a boss you previously encountered in the Tutorial section of the game. Now, you'll notice that the guardian is walking back and forth. You can get to the room that's adjacent to it if you crouch and sneak in when he walks back. But in the other room ahead, you'll find a pile of dead bodies and x2 stray Rotten Strays eating the bodies. Kill the dogs and loot the wrapped bodies to find three things here: x1 Lump of Flesh, x1 Chrysalids' Memento on top of the pile of bodies, and x1 Golden Rune (1).
IMPORTANT NOTE: The Chrysalids' Memento can be given to Roderika to advance her quest. (However, before following these steps, it is advised that you first unlock the short-cut to the Rampart Tower site of grace. Move back into the room where the Grafted Scion was, and enter the doorway on the left (west) to reach an elevator that will bring you up to where it is located.) After unlocking said short-cut, you can now fast travel to the Stormhill Shack site of grace and give her the item, by doing so, make sure to speak to her and she'll mention that she will head to the Roundtable Hold where you can find her later on. If you return to the Hub, you can find her standing by the fireplace, if you speak to her, she will give you x1 Golden Seed as a reward. Once you have progressed her quest further (which can be easily done: at the Roundtable Hold, talk to Roderika and Hewg, always choose the dialogue options about either of them, and eventually, Hewg will agree to teaching Roderika about spirit tuning. You'll know you're done when Roderika is sitting across from Hewg). Once this is done and she has turned into a Spirit tuner, you can find a Crimson Hood where the Chrysalids' Memento was previously.

Now, you can sneak around the guardian if you observe and focus on when to sneak in. The guardian will not notice you if you crouch and start to move while it has its back facing you and if you remain moving at the sides if ever he turns to walk back. There are a few things you can grab here, x1 Stanching Boluses on the right and x1 Highland Axe that can be looted off a corpse that is sitting against a wall, under the large painting at the center of the room.
If you still want to avoid fighting the guardian at this point, you can continue to sneak through by going through the next room on the left from the corpse you've just looted. On the other hand, if you do decide to fight this guardian, you can bait it towards the arch doorway, either one since it won't be able to go through it. Defeating the guardian yields 1176 Runes.

Now, on the east side of the room, you'll see a set of stairs that goes up. An Exile Soldier is roaming the area, and in the first room that looks like an assembly room, there is a Banished Knight. There is also a door that is locked on the right side. You can sneak behind the knight to backstab it and then follow up with attacks - there's also a chance you can loot a Banished Knight's Halberd after killing the enemy.

Inside the same room, look to your right and head up the podium to find a chest. Inside it is a Mimic's Veil, a tool that allows you to use FP to mimic nearby objects. After grabbing the item, go through the arch doorway on the other end of the room straight into the adjacent arch doorway where another Exile Soldier is sitting against a wall. Head through the narrow hallway on the west where you'll find yourself inside a storeroom. Inside the storeroom, at the center, behind some crates, there is a Commoner corpse that you can loot to find x2 Golden Rune (2).

Head outside the next section where you'll see another Exile Soldier patrolling, alongside another Banished Knight wielding a sword and shield. After defeating the enemies, simply head straight and you'll find the entrance of a chapel. Approach the altar and you'll find the Sorcerer Rogier, make sure to speak to him and he'll mention that he's looking for something and questions why you are here, at the same time, he warns you about the dangers the castle holds. Tell him then that you're purpose is to defeat Godrick and he asks if you are after the Great Rune. After speaking to him, you will be able to purchase a few Ashes of War from the sorcerer such as the Ash of War: Glintstone Pebble, Ash of War: Carian Greatsword, and Ash of War: Spinning Weapon.

Return to the room with the Grafted Scion, and enter the northwest exit. You'll then reach a room that looks like a stable but has been used as another armory/stock room. Look to the top left, and you'll see a Commoner guarding. Move to the left and there is another door that leads to the upper area. Kill the enemy and go to the opposite end of the wooden platform to find a corpse that you can loot to find x10 Arrow - now if you go straight, you'll reach the castle's courtyard that is heavily guarded by Exile Soldiers. You won't be able to sneak around here since the moment you step out, there are three Exile Soldiers on the left who will start to shoot you with their ranged weapons. You could, however, bait the ones patrolling into the stable and lessen their numbers.
Courtyard Stock Room

From the arch doorway exiting to the courtyard, make a hard left and you'll see a set of stairs that goes underground. You'll find a room that is guarded by three Rats, and ahead, is a doorway that is blocked by a white fog. To dispel this, you will need to use a Stonesword Key on the Imp Statue. On the other side of the door is a stock room where you'll find two treasure chests, the one on the left contains the Godslayer's Seal, while the other has the Godskin Prayerbook. And if you go straight towards the doorway, there's a body that can be looted to find a Golden Rune (4).

From where the body is, turn right and you'll see a ladder around the corner. Climb the ladder, continue forward, along the path, there's another corpse that you can loot on the right side, behind a barrel, pillage the corpse to find some Arrows. Continue straight, turn left, straight again, and climb the second ladder where you'll encounter two Banished Knight enemies at the top. Just a few steps from the ladder is another corpse that can be looted to find x1 Festering Bloody Finger. Kill the knights and go east where you'll see a narrow bridge.

Upon crossing the bridge, there are two Exile Soldiers on the left. Clear the area and you'll find another ladder that you can climb. At the top, you'll see two more Exile Soldiers and a corpse that you can loot. The body is sitting by the edge of a podium. Looting it provides x1 Nomadic Warrior's Cookbook [10] - from here, you can circle back to the courtyard to continue your exploration or you can cross the other narrow bridge in front of the podium where you just looted the cookbook, this takes you back to the Grafted Scion's room and armory.
An Extra Stonesword Key

Before you head to the heavily guarded courtyard, we suggest you return to the large room where the Grafted Scion was. Head up the second floor, through the assembly room where the Banished Knight is roaming, and exit through the other doorway. Here, you'll notice that you can jump over a fence that has some pile of sacks. On the other side, one Exile Soldier patrolling, and on the right side, next to the crates and barrels, is a corpse that can be looted to find x1 Gold-Pickled Fowl Foot. Go to the left side, up the stairs, around the corner and you'll find a ladder that you can climb at the end.

At the top, go straight and you'll notice that there's a wooden platform below. Drop down and kill the Exile Soldier here. Follow the path and you'll find yourself at the upper east section of the room where the Grafted Scion was. This platform has a lootable corpse and a treasure chest that is being guarded by one more Exile Soldier, kill the guard and loot the body and chest to find x1 Stonesword Key and x1 Pickled Turtle Neck - from here, jump back down to the first floor, go west, and continue towards the courtyard.
Stormveil Castle - Courtyard

Killing them will have a chance to drop their equipment such as Exile Armor and Exile Greaves. Take out the ones wielding a crossbow with ranged attacks or you can rush in and melee attack them while they try to reload, and watch out for the one on the left who is operating a flamethrower. This area is swarming with Exile Soldiers so tread carefully. You can find various items here from the corpses that can be looted such as x1 Magic Grease, x1 Golden Rune (1), x2 Golden Rune (2), x1 Pike1, and x5 Smoldering Butterfly.

Make sure to kill all of the Exile Soldiers here since there is an ogre-looking enemy, the Omen, at the north side of the area. Check the guardhouse on the right as well and go up to find a body that can be looted to find x1 Wooden Greatshield. You can sneak past the large enemy by moving to the side on the right and then jump onto the steps. At the midsection of the steps is a Commoner's body that you can pillage to find x1 Furlcalling Finger Remedy.
At this point, you'll want to rest at a Site of Grace, luckily if you look to your left from the corpse you just looted, there is a room that holds one, on the right side, however, you'll see another Warhawk enemy. As you walk towards the room with the site of grace, look ahead and you'll see a corpse sitting by the ledge. You can loot its body to find x2 Smithing Stone (1) - grab the item and head inside another armory room with the Liftside Chamber site of grace - in this room, there is also a lever that you can activate to call down the lift, riding it will take you to the upper section of the castle.

If you ride the lift, follow the path to go outside and you'll notice an open area that has an opening on the ground. Make sure to crouch and quietly sneak in since there is a Teardrop Scarab below. Killing it will drop the Ash of War: Stormcaller. After killing the scarab, go back up and look to the left side, you'll see another corpse in a sitting position that you can loot to find x8 Kukri - jump down and head towards the path ahead you'll find the Secluded Cell Site of Grace inside a small armory adjacent to it - you've also found the entrance leading to the main boss of this dungeon, which is the door that is covered with a golden fog-aura.
Clearing the Castle

Now, there are still a few more things you need to discover here. Assuming you stopped to rest at the Secluded Cell site of grace, you'll notice the entrance leading to the main boss, this is your first main demigod encounter, and you're going to need some help from a certain NPC, as well as clearing the castle area first before facing Godrick the Grafted. You'll notice a Troll that's guarding the entrance, but since you went through the back, you have the advantage of attacking the enemy by surprise. You can just attack it and retreat since the Troll won't fit through the arch. But be careful since it will also shout at you, causing your character to get knocked back, and its attacks can still reach you if you're too close, kill the Troll and then another Exile Soldier, and continue outside where you'll find yourself at the main courtyard of the castle.

Just outside, down the steps, look to your left and you'll see a small glowing tree without its leaves, approach it and you'll find x1 Golden Seed that you can pick up. Tread carefully now since the area is again, heavily guarded and you'll encounter enemies such as the Warhawk. If you're looking at the eagle, check the left side and you'll find a small room.

Head inside and you'll find a fellow NPC warrior. Speak to her and she'll introduce herself as Nepheli Loux who is also a tarnished and a warrior, like you. You'll learn that you both have similar interests in taking out Godrick. Speak to her again and she will tell you that if you are to fight the grafted lord, to call upon her so that she may join and assist you in battle. After speaking to her a few times, check the corner of the room to find another corpse you can pillage to find x4 Smithing Stone (1) - go back outside to the courtyard as you maneuver your way through the barricades and enemies, you'll notice that you'll find yourself back at the courtyard that was heavily guarded.

At this point, you have already killed all of the Exile Soldiers, but there is still the ogre enemy known as the Omen along with the Rotten Stray enemy. You can use a site of grace nearby first before fighting the enemies so that you can use it as a checkpoint in case you die, just remember that the enemies will respawn upon resting. It's best to lure out the hound first, and then fight the ogre. The Omen wields a large cleaver, so again, maintaining a safe distance while you try to hit it with ranged magical or consumable attacks will work to your advantage. Defeating this ogre enemy yields 451 Runes and you can loot its body to acquire the Omen Cleaver.

After defeating the enemy, on the west side, you'll find a study room that has a painting surrounded by an aura in the middle. Examine it to acquire x1 Prophecy Painting, assuming you did rest at a site of grace, head back outside to the courtyard and defeat the Exile Soldier enemies again.
Head towards the southeast gate and make your way to the main grounds of the castle, which will lead you down near the entrance of the castle gate. Tread carefully as you make your way to the main grounds since there are Exile Soldiers stationed on the high ground who will shoot with a ballista - be ready to dash and dodge your way until you reach the main castle grounds. If you are intending to clear this area, it is recommended to start from the Castle Gate grace location and run in the front, which (if you zig and you zag) will get you a clear path right up to the ballista shooters, which will clear up the rest of the encounter. Make sure to get the guy up top with a projectile.
Mini-Boss: Lion Guardian

For some of you, this area is quite familiar, especially to those who were able to try the Network Test. This is where you'll encounter the Lion Guardian, a large, and fast beast that has a large blade attached to its paw. Do not engage the Lion initially, instead, run past, into the room with the kneeling knight statues, and beyond you will find a Site of Grace. This will allow you to engage the lion without having to fight or dash through hordes of enemies.
When you return to the courtyard, tread carefully, since the Lion Guardian will jump in and start to attack you. If you want to gain a bit of advantage to deal large damage before you even aggro the mini-boss, you can crouch and sneak around the runaway, move from the left side and go around to the right, you'll see the Lion Guardian just waiting and hiding on the right side of the runway.

Make sure that you are crouching and if you can sneak behind it, you can use a strong attack while it is unaware of your presence. If you retreat to the arch doorway with the room with armored statues, the beast won't be able to follow you inside, and you can exploit this tip by attacking it with long-ranged attacks. Defeating the guardian yields 1428 Runes, x1 Somber Smithing Stone (1), x1 Beast Blood, and x2 Old Fang.

In the middle, there is an arched doorway that you can enter where you'll see some armored statues. Across it, will lead you to another section of the castle where you can find the Limgrave Tower Bridge Site of Grace by the steps. If you go up the stairs, you'll notice a corpse at the top resting against a pillar on the left side. You can loot the corpse to find x1 Boltdrake Talisman. Now, go back to the castle grounds and clear out the remaining Exile Soldier enemies stationed near the castle's main gate. Tread carefully since there are guards who are operating a couple of ballistae, as well as the ones wielding a crossbow.

Near the main gate, you'll find another arch doorway that has a room with a site of grace. Head to that room and next to the site of grace, you'll see a corpse with half of its body hanging by the hole on the ground. Loot it to find x1 Golden Rune (5) then examine the site of grace to discover it. There's another arch doorway ahead, and on the other side, there is a balcony where you can find another corpse that you can pillage to find x1 Commoner's Simple Garb.
Go back inside the room and you'll notice a lever that you can interact with, have your character push it to open the castle's main gate. Head to the main gate and you'll see some corpses that you can loot to find the following items: x5 Ballista Bolt, x1 Golden Rune (2), and x1 Golden Rune (1). From here, you can now head back to the Secluded Cell Site of Grace and make further preparations before facing Godrick the Grafted.
Where to find the Claw Talisman

In case you miss this, there is a Talisman here that you may want to find. Fast travel to the Rampart Tower Site of Grace and make your way to the top-level towards the balcony section where there are multiple Exile Soldiers. At the balcony's entrance, on the left, you'll see one of the guards resting against a wall, near a stack of sandbags. Jump on it and walk carefully on the ledge, look to your left and jump down to the wooden platform. Jump down the other wooden platform below and as you hug the wall, you'll have to drop down onto the narrow ledge that's sticking out from the wall.

From there, drop down onto the rooftop where you'll see a destroyed pillar. Jump on it and get on top of the narrow platform of the wall on the right side and go around it as you hug the wall until you reach an open section that has a ladder leading to the top of what seems to be a watchtower. Be careful here since it is guarded by more Exile Soldiers. There's about one resting on the right side, while three more on the left, two holding a crossbow and normal bow, while the other with a sword and shield.

Take out the ones with the bow weapons first and then shift your attention towards the one with the shield. After killing the enemies, climb the ladder to find x1 Claw Talisman that can be looted off a corpse.
Facing Godrick the Grafted

Now, before going through the gold fog door, make sure to use the summon sign to summon Nepheli, provided that you've spoken to her earlier and exhausted her dialogues at her initial location. You'll need help from her since the battle is quite intense. Regardless of whether you are playing online or not, the summon sign will be available for you to use. Wait for her to be summoned and enter the boss arena.

In this arena, you'll find yourself in an open courtyard that has a high elevated platform on both ends of the arena. The area does have walls but some parts are open which can cause you to fall off and die if you aren't careful. The courtyard is covered with trees, pillars, and tombstones as well which can block your way, but these can be destroyed by Godrick's attacks. To your advantage, you can also use it as cover from his attacks. At the center, is a corpse of a dragon, which you can use to block his movements, not his attacks.

If you are utilizing spells or ranged attacks, summoning the wolves by using the Lone Wolf Ashes will help in depleting Godrick's health, as well as grabbing his attention. If you did summon Nepheli before stepping through the fog door, she can also help with small amounts of damage, but she's actually more effective by grabbing Godrick's attention as well, and surprisingly, she is a bit tanky, allowing her to at least survive until you reach the second phase of the battle. Utilize high ground and keep Godrick below you as you bombard him with magical ranged attacks. On the other hand, if you are using your melee weapons, make use of weapons that have a longer reach so you can land those attacks while maintaining a safe distance. Patience, timing, and playing defensively will work here since Godrick will be leaping into the air and executing tumbling attacks. During our playthrough, we were able to bring down his HP and enter the second phase just by bombarding him with magical attacks, of course, provided that we have our flasks upgraded and ready to use.

The second phase triggers when you've inflicted about 30-40% damage to his HP. A short cutscene will trigger where you'll see him cut off his arm, fusing it with the head of the dragon's corpse, reanimating it. During the second phase, Godrick gains additional attacks where he can now use his left dragon head arm as a flamethrower, as well as imbuing his attacks with flames. As soon as you continue the fight, move away from him or if you're positioned close to him, get behind him to avoid getting hit by the flames. If he starts to use one of his dragon breath attacks in a forward sweeping arc position, you must roll clockwise before the flames come into contact with you to avoid getting hit, since standing far away from his attacks may still reach you.

Luckily, you can still use the environment around you to use as cover for the flames such as the elevated platforms and ledges, especially when he shoots flames in the air. At this point, close-quarter combat won't work here, Nepheli will probably die, so again, you'll need to focus on his attacks, keep away from him, and rely on any ranged-based attacks. You can even throw daggers or darts at him since he is somehow vulnerable yet resistant to Bleed. Depending on the situation you are in, your best shot to defeat Godrick is to use magical ranged attacks. Successfully defeating Godrick the Grafted yields x1 Godrick's Great Rune and x1 Remembrance of the Grafted, as well as 15000 Runes.
By receiving a Great Rune, you can use it to restore the power at Divine Towers throughout the Lands Between. You will need to check the description of each Great Rune to discover which Divine Tower you should visit. At the center of the arena is a lost site of grace that you can examine and activate.
Godrick the Grafted's Throne Room

Straight ahead, is Godrick's throne room. At the center is a large seat and there are two rooms you can check on both east and west sides. The room on the east is empty, so check the west room where you'll see a set of steps going down to the basement section. Climb down the ladder that's on the left side and you'll immediately see a spirit NPC that looks like it's praying.

Approach it and you can find an item next to it, pick it up to obtain x1 Shabriri Grape. If you speak to the spirit, it will just ask where the maiden is and to take the grapes. If you turn back, you'll see a passage that goes outside, formally arriving at Liurnia of the Lakes. If you return to the Roundtable Hold, you'll find Nepheli Loux, the warrior who helped you in fighting Godrick, at the northeast side, by the library. Don't forget to speak to her so that she can give you x1 Arsenal Charm.
Using Godrick's Great Rune

Now, if you want to use Godrick's Great Rune, you will need to fast travel to the Limgrave Tower Bridge site at Stormveil Castle. The path ahead is guarded by reanimated Colossal Statues, you can choose to fight them one at a time or just make a run for it until you reach the end where you'll find a waygate. When you reach the other end, there are some Warhawk enemies here, as well as a flock of non-hostile Eagles. Keep going straight until you reach the large door of the tower, head inside, and step on the mechanism to activate the lift.

At the top, is another site of grace you can discover, the Divine Tower of Limgrave. Continue to the top until you reach the peak where you'll find a glowing sigil at the center. Approach and interact with it to restore the power of the great rune. Godrick's Great Rune blesses the player's character by raising all attributes.
Exploring the Castle's Underground Crypt

Now, you might have missed an area in Stormveil Castle, and that is an underground crypt. To find the entrance, first, fast travel to the Secluded Cell Site of Grace. Go straight through the tunnel, then turn around after walking up the sloped floor. From the wooden platform where the Kukri were, jump towards the northeast wall and land on the ledge there. Make your way to the right and jump once again to land on the windowsill.

Outside, you can find a Blade Talon Eagle and a sword-wielding Banished Knight, a Lump of Flesh is on a body to the right. Make your way back up and turn left, then after exiting the short corridor, you can jump up to find a Smithing Stone (2) to your right. Turn the other way to pick up another Smithing Stone (1) and a Golden Rune (2). In the next room, there are multiple Commoners and the Manor Towershield can be found next to the stairs. Head outside to find a Smithing Stone (3), then turn left and jump down multiple ledges. At the bottom, go around the tower to find a Golden Rune (5). You have to jump onto the ledge to pick it up, so jump while standing still and press forwards in mid-air in order to land on top of it. Go inside to find 5 Rainbow Stones, then turn left to open the shortcut to the Liftside Chamber site of grace. Turn around and jump across the tiled roofs on the opposite wall. There is an Arteria Leaf inside the tower, guarded by a Giant Bat. You can snipe two more hanging bats from here or simply go down the stairs and drop to the lower platform to take them out there. Walk across the broken beam and jump the gap to find a Smithing Stone (2). There is another way to get here, if you don't want to fight the bats, but take some fall damage instead: Start from the Liftside Chamber site of grace and exit through the doorway leading to the courtyard. Make a hard right from the door and approach the corpse sitting by the ledge. You should have enough health so that you can take the damage from dropping on the platform below. Next, walk up a bit to the ledge and drop onto the beam where you found the Smithing Stone (2).
To proceed, drop to the wooden platform on the right, and continue going down via the platforms on the right as well, til you're down on the ground.

Below, next to the wooden platform, there is another Commoner corpse that you can loot to find Golden Rune (2). Make sure to restore your HP or FP to be ready for the enemies ahead, a few Rats and one giant one. Kill the creatures and continue forward. Along the way, there is another corpse you can loot to find Poisonbloom. As you move to the right, you'll see a Teardrop Scarab, quickly kill it to acquire x1 Rancorcall.
The path from here is pretty linear and you'll find a pit that you'll need to drop down to, just make further preparations since a strong enemy will appear here. Also, if you notice there are multiple bodies in the pit that you can loot, there is a Stonesword Key among these. Take care of that later and fight the enemy first. As soon as you drop down, the creature will appear from the ground. The Ulcerated Tree Spirit is a towering, centipede-like creature that heavily features bodies composed of tree-like structures.

It is quick and very aggressive when it attacks and moves similar to a centipede. The Tree Spirit also features two large arms and it mainly uses it to swing around or to slam the ground. It can also use its tail to hit you. One of the best ways to defeat this elite enemy is to counterattack after it uses those heavy moves where it needs to recover. At some point, its HP is at 50-60%, it will start to glow and emit a blast. Be ready to move back to avoid getting hit by it. This also means all of its attacks will be imbued with the glowing power it's emitting, gaining more range and damage to your HP - take your time and be patient.

Once you've defeated this creature, you can loot the bodies and go forward where you'll see a giant face structured from roots. On the right side, there is a corpse that you can loot to find the Prince of Death's Pustule talisman. After grabbing the talisman, climb the ladder that's on the left. At the top, just drop down from the ledge and you'll find yourself back at the entrance of the Grafted Scion's room.
Where to find the Crucible Knight
Head out from the Rampart Tower Site of Grace to the Warhawks and lots of fire barrels, there is a small area on the left where the second eagle comes from, walk up here and jump on top of the outer wall and look down. There should be a ledge you can drop to, drop down and follow the ledge along to pick up a shield that does bleed damage and follow the route until you get to a ledge that is extremely high up, if the ledge does not break on its own, swing your weapon or roll and the ground should break and you will fall into a large bush below, there is a teardrop scarab here and a Crucible Knight will come to attack you, after killing him just run past him through a door and take a left back in to the castle to activate a lift shortcut that takes you back up to the Rampart Tower Site of Grace.
STORMVEIL CASTLE TRIVIA
The item descriptions for the Marred Wooden Shield and the Marred Leather Shield make note of the fact that they, along with the castle as a whole, are marred by thorns and mottling. The descriptions speculate as to the nature of this phenomenon, mentioning two possible theories: that it is the result of a curse brought about by Godrick's grafting, or that the source is more sinister and lies deep underneath the castle. When venturing into the underground passage near the Liftside Chamber Site of Grace, we find a mutated corpse implied to be that of a demigod (similar in appearance to Godwyn's body, found near the roots of the Erdtree. The Prince of Death's Pustule talisman's description and later interactions with Fia heavily suggest that it is in fact part of Godwyn's body, that spread under the land via the Erdtree roots). Rogier was injured after interacting with this corpse. Later, D, Hunter of the Dead, mentions how Rogier has been afflicted with thorns when discussing his current condition. This could mean that the thorns and mottling afflicting the castle do, indeed, come from the same demigod corpse.
Stormveil Castle Map


Miquella's Haligtree Videos
Speed Run Walkthrough
Entry to Cliffside
As soon as you reach the main gate, go in the room next to it and speak to Gatekeeper Gostoc, take the opening path on the left, and work your way through the cliffside. Go out through the opening on the left and you'll see a summoning pool on the left corner which you can activate, and on the left side of the summoning pool is a body that you can pillage to find x1 Golden Rune (1). Turn around and hug the wall on the right, you'll see there's a concrete beam on the wall that you can jump on so that you can go through the opening. You'll then immediately see another body you can loot to find x3 Ruin Fragment.
Before you jump down towards the castle grounds, look to your right and you'll notice that the destroyed wall is formed like steps that you can jump on to reach the high ground that's on the upper left. When you reach it, there's another body by a wall that you can loot to find x1 Smithing Stone (2). After grabbing the upgrade material, make your way to the bottom to continue towards the castle. And just before heading forward, you'll find some items to loot on the west side where there are multiple Warhawk enemies.
Cliffside to Rampart Tower
Activate the Stormveil Cliffside Site of Grace, and when you are about to head up towards the wine cellar, grab the Marred Leather Shield from the corpse on the narrow platform. Continue inside the wine cellar and grab the Hookclaws from a corpse on the first level of the wine cellar. Be careful of the Commoner and Exile Soldier enemies here. Next, on the second level, you will see a hole in the wall that is covered in vines, jump on it and you can find a body that you can loot to find x10 St. Trina's Arrow. Head to the third floor and enter the treasure room on the right where you'll fight the Banished Knight. Defeat the enemy, make sure to loot the body since it may drop its equipment. In the same room, make sure to loot the corpse on the right side to find the Rusty Key, and inside the chest on the left is a x1 Curved Sword Talisman.
Use the key to open the locked door on the second floor of the wine cellar and climb the ladder to reach the upper level. Make sure to check the east side to find a Fire Grease and then head towards the west side and loot a Silver-Pickled Fowl Foot from another corpse as well. Head outside and take the steps that will take you to the ground level of the Rampart Tower. In the Rampart Tower, there is another Banished Knight enemy, on the second floor you'll find a checkpoint, and on the third floor and rooftop are more Exile Soldiers. At the rooftop section, jump onto the ledge of the balcony and maneuver your way to the opposite ledge that's at the northeast. You'll eventually drop into a shaft where you'll find a Stonesword Key from a corpse.
Rampart Towers to Liftside Chamber
Jump onto the rooftops where you will fight a Warhawk, then loot the nearby corpse to find a gesture x1 Dozing Cross-Legged. From the rooftops, look down, and you'll notice that there is a door that is blocked by a white fog. Work your way to get to the bottom by using the narrow ledges and use the Stonesword Key on the imp statue to dispel the fog. Enter the armory and kill the enemies and then loot the bodies here to find x1 Hawk Crest Wooden Shield, x1 Misericorde, and x1 Iron Whetblade. In the next room is a fortress of the Grafted Scion mini-boss. Head to the room adjacent to it to find a pile of corpses and a Troll that has been cut in half, hanging. Kill the Rotten Strays and loot the wrapped bodies to find three things here: x1 Lump of Flesh, x1 Chrysalids' Memento on top of the pile of bodies, and x1 Golden Rune (1).
Since you have the memento, fast travel back to the Stormhill Shack site of grace and give her the item, by doing so, make sure to speak to her and she'll mention that she will head to the Roundtable Hold where you can find her later on. If you return to the Hub, you can find her standing by the fireplace, if you speak to her, she will give you x1 Golden Seed as a reward. Go back to the room where the key master is roaming and sneak behind it to grab the following items: x1 Stanching Boluses on the right and x1 Highland Axe that can be looted off a corpse that is sitting against a wall, under the large painting at the center of the room.
Defeat the Grafted Scion and go east to find a set of stairs that goes to the second floor. There are Commoner, Exile Soldier enemies here, and inside the assembly room is a Banished Knight. Inside that room, you'll find a chest on the podium containing x1 Mimic's Veil. Follow the path ahead which is somehow linear until you find yourself outside where you'll encounter another Banished Knight and an Exile Soldier patrolling. Defeat the enemies to push through and you'll find the castle's chapel where Sorcerer Rogier is. Make sure to speak to him and exhaust his dialogue. From there, go back to the room where you fought the Grafted Scion and go west heading towards the stable and the castle's heavily guarded courtyard.
At the courtyard, make sure to take out the Exile Soldiers here one at a time since there is a lot and most of them are using ranged weapons. In the courtyard, there are some corpses you can loot to find x1 Magic Grease, x1 Golden Rune (1), x2 Golden Rune (2), x1 Pike1, and x5 Smoldering Butterfly. At the northeast side, there is a guardhouse, go up and loot the body to find x1 Wooden Greatshield. Head back down and at the center of the courtyard, you'll notice that there is an ogre enemy known as The Omen. Killing it yields Runes and you can loot the Omen Cleaver weapon, in the position where the ogre was, look to your left and you will see a study room and a glowing painting in the middle. Examine the painting to acquire the Prophecy Painting.
Head up the steps, and at the midsection of the steps is a Commoner's body that you can pillage to find x1 Furlcalling Finger Remedy. There is a room at the west side that holds the Liftside Chamber site of grace.
Liftside Chamber to the Courtyard and Godrick
Call the elevator and ride it inside the same room where the site of grace is and follow the linear path. Make sure to crouch and quietly sneak in since there is a Teardrop Scarab below. Killing it will drop the Ash of War: Stormcaller. After killing the scarab, go back up and look to the left side, you'll see another corpse in a sitting position that you can loot to find x8 Kukri - jump down and head towards the path ahead you'll find the Secluded Cell Site of Grace inside a small armory adjacent to it - you've also found the entrance leading to the main boss of this dungeon, which is the door that is covered with a golden fog-aura.
From the Secluded Cell checkpoint, you'll need to work your way through the courtyard to reach the main castle grounds which are heavily guarded, since there are a few more things to discover. Where the Troll is guarding the area near the Secluded Cell checkpoint, you can find a glowing branch tree to find x1 Golden Seed. There is a room nearby as well where you can find Nepheli. Make sure to speak to her and exhaust her dialogue so she can mention to summon her for aid before fighting Godrick the Grafted. Continue making your way to the main castle grounds and defeat the Exile Soldiers, and the mini-boss, the Lion Guardian.
From where you fought the Lion Guardian, at the middle, there is an arched doorway that you can enter where you'll see some armored statues. Across it, will lead you to another section of the castle where you can find the Limgrave Tower Bridge Site of Grace by the steps. If you go up the stairs, you'll notice a corpse at the top resting against a pillar on the left side. You can loot the corpse to find x1 Boltdrake Talisman. Now, go back to the castle grounds and clear out the remaining Exile Soldiers stationed near the castle's main gate. Tread carefully since there are guards operating a couple of ballistae, as well as the ones wielding a crossbow.
Head to the guardhouse near the main gate, activate the site of grace inside it, loot the body to find x1 Golden Rune (5) then examine the site of grace to discover it. There's another arch doorway ahead, and on the other side, there is a balcony where you can find another corpse that you can pillage to find x1 Commoner's Simple Garb. Go back inside the room and you'll notice a lever that you can interact with, have your character push it to open the castle's main gate. Head to the main gate and you'll see some corpses that you can loot to find the following items: x5 Ballista Bolt, x1 Golden Rune (2), and x1 Golden Rune (1). From here, you can now head back to the Secluded Cell Site of Grace and make further preparations before facing Godrick the Grafted and make sure to use the summoning sign near the entrance of the boss arena to summon Nepheli.
After Godrick
Defeating Godrick yields x1 Godrick's Great Rune and x1 Remembrance of the Grafted, as well as 15000 Runes. After the battle, make sure to check the throne room ahead and go to the west side, head to the lower section and you'll immediately see a spirit NPC that looks like it's praying. Approach it and you can find an item next to it, pick it up to obtain x1 Shabriri Grape. If you turn back, you'll see a passage that goes outside, formally arriving at Liurnia of the Lakes. If you return to the Roundtable Hold, you'll find Nepheli Loux, the warrior who helped you in fighting Godrick, at the northeast side, by the library. Don't forget to speak to her so that she can give you x1 Arsenal Charm.
Now, if you want to use Godrick's Great Rune, you will need to fast travel to the Limgrave Tower Bridge site at Stormveil Castle. Work your way through the reanimated Colossal Statues, interact with the waygate portal and continue forward to reach the Divine Tower of Limgrave. Continue to the top until you reach the peak where you'll find a glowing sigil at the center. Approach and interact with it to restore the power of the great rune. Godrick's Great Rune blesses the player's character by raising all attributes.
Elden Ring Walkthrough - Liurnia of the Lakes: South
Elden Ring Main Quest Guide - Liurnia of the Lakes (South) Points of Interest
- Speak to some NPCs.
- Clear out Malefactor's Evergaol.
- Acquire some Important Items as you explore.
- Find Patches and collect upgrade items for your Flasks.
- Acquire the Academy Glintstone Key and explore Raya Lucaria Academy.
- Optional: Fight the dragon, Glintstone Dragon Smarag.
Speak to Boc the Seamster
Congratulations! You've completed the first of many Legacy Dungeons in Elden Ring, and you've beaten the first Demigod, Godrick the Grafted. If you were following our walkthrough for Stormveil Castle, you should formally arrive in Liurnia of the Lakes from the throne room of Godrick the Grafted. As soon as you enter the new region, you'll find the Lake-Facing Cliffs Site of Grace, examine it to discover the checkpoint, and if you were also following the walkthrough and have encountered Boc twice, you should find him here kneeling by the Lake-Facing Site of Grace, a cliff above to the entrance to Stillwater Cave. Make sure to talk to him and he'll offer to alter your armor. If he's not there when you first find the grace just rest.
The Wandering Maiden
You can also find Hyetta's initial location, found near the Lake-Facing Cliffs site of grace (Elden Ring Map Link). But for her to show up, you must complete Irina's questline in the Weeping Peninsula which is to deliver a letter to her father, Edgar who is at Castle Morne. Hyetta is initially found next to the Lake-Facing Cliffs site of grace. Hyetta says she roams The Lands Between in search of the distant light, drawn to her destiny by a guiding shine she feels in the back of her eyes when eating Shabriri Grapes. She will ask for one and if you choose to supply one to her, she will reward you with the As You Wish Gesture.
The Student of Raya Lucaria Academy
Next, if you move towards the southwest, you should find the Church of Irith (Elden Ring Map Coordinates), it's easy to find and you'll meet a new NPC here named Thops, he is a student at the Academy of Raya Lucaria. You can find him sitting on a bench inside the destroyed church. By the statue, don't forget to grab the Sacred Tear material for your flask. As for Thops, if you speak to him, you can learn some spells from him in exchange for Runes. First, you must donate 10 Runes, and then you can learn some Sorcery spells from him.

Church of Irith Elden Ring Map. Click on the image above to enlarge it.
These are just basic spells, but if you are not playing as an Astrologer and if you need to but the basic sorcery like Glintstone Pebble, then you can learn it from Thops for 1000 Runes. Eventually, if you speak to him again, he will share that he wishes to return to the academy, this means you will need to find a second Academy Glintstone Key for him later on which can be found in the academy. This church has a graveyard section, you may want to check it to find some Warming Stone, an Academy Scroll. just be cautious since there are Skeleton enemies there.
Malefactor's Evergaol
Near the Church of Irith and the Lake-Facing Cliffs site, you can go northwest from the map to find the Malefactor's Evergaol (Elden Ring Map Link). There is a mini-boss here, Adan, Thief of Fire who drops the Flame of the Fell God incantation spell and you can also find the Sacrificial Twig that can be found on a corpse on a stone platform jutting out of the cliff to the east. Accessible from above only, by heading east from Malefactor's Evergaol.

Malefactor's Evergaol Elden Ring Map. Click on the image above to enlarge it.
Unlike most evergaols, this one does not require a Stonesword Key to unlock. The transporter mechanism is active as soon as you reach the area. Enter the portal to challenge the boss imprisoned within Adan, Thief of Fire. Adan is a very straightforward fight. Despite his stout stature, he is quite agile and capable of quick dodge rolls. His main form of attack is his Flame of the Fell God spell, where he summons a large orb of fire that explodes after a short delay, dealing damage in a large radius and setting the area ablaze.
This attack is easy enough to avoid due to the clear telegraph and slow animation. He will also use a combo of multiple swings with his flail, ending in a spinning attack. This move has a long animation and can easily be exploited by ranged players.
Exploring the South Section
If you want to find a new set of Armor, you can find the Sage Set in the nearby cave of the Lake-Facing Cliffs site, Stillwater Cave. You can just run through and ignore the enemies if you can work your way around it. But if you are also aiming to clear out the cave, we recommend that you have a Torch to light up dark sections and to stock up with Neutralizing Boluses to alleviate the buildup and yo cure Poison. Stillwater Cave is inhabited by poison blooms and bats, and it is filled with poisonous miasma - it also has a mini-boss at the end, the Cleanrot Knight.
Stillwater Cave is a dark cave comprised of many pits where Poison Flowers and their giant counterparts bloom undisturbed. It is recommended to bring along a Torch and a handful of Neutralizing Boluses to counteract the poison build-up inflicted by its denizens. The Site of Grace is found shortly after entering the cave.

Stillwater Cave Elden Ring Map. Click on the image above to enlarge it.
The cave itself is rather small and there is a very straightforward path you can take to get to the boss: From the Site of Grace, hug the right wall and refrain from dropping down into the pits below as they are hotbeds for the Poison Flower enemies. There is a single Servant of Rot along the way. These are the mushroom-faced humanoids that cast poison bolts at targets from a distance. Take him out and jump the gap to reach the ledge ahead where two more servants await.
You can skip these if you are rushing to the boss. Hug the edge and head southeast until you see another servant around the bend. Jump down into the pit from here and run past all the Poison Flowers to find a tunnel in the southeast. This tunnel is filled with Servants of Rot but they are all in a rested state and will take a long time to get combat-ready, allowing you to simply weave around them to get to the mist gate at the end and challenge this dungeon's boss: The Cleanrot Knight.
The Cleanrot Knight is an imposing figure wielding a spear and a sword. After traversing through the mist gate, the boss will almost always run towards you and use his Impale attack. This is his most dangerous move and if the attack connects, he will raise you high in the air, deal tremendous amounts of damage and inflict the scarlet rot status on you. Dodge to the side when you see his spear glowing. Use your best spirit summons to distract him and take potshots at the knight from behind. Watch out for the water on the floor which will rapidly cause you to build up the poison stat. The Cleanrot Knight drops the Winged Sword Insignia upon defeat.
Stillwater Cave is a good source of Cave Moss should you require it for farming. Nearly every stretch of the cave has nodes of this material to collect from. Exploring the cave will also yield a good amount of Budding Cave Moss as well as Crystal Cave Moss crafting items. In general, the Giant Poison Flowers are not worth killing as they are highly resistant to magic and release a deadly poison at melee range. It's best to skip these while exploring the cave.
Finding Important Items in the Field
Once you're back to exploring the center section or south area of Liurnia, you'll want to grab a few items first and probably stop over some locations. We will be listing down the coordinates of the item and/or location marked on the Elden Ring Map so that you have a better picture of where the
- Academy Scroll (Elden Ring Map Link): It can be found just north of Church of Irith. It's by one of the big gravestones where the Skeleton Mages are rising. You can present this scroll to a sorcerer such as Sorceress Sellen so that you can gain access to additional Sorceries that you can learn. Sorceress Sellen is at Waypoint Ruins in Limgrave.
- Map (Liurnia East) [Elden Ring Map Link]: Found in the south of the swampy lake, in the middle by a monument with enlightened texts on it. A bit north from the Lake-Facing Cliffs site.
- Laskyar Ruins (Elden Ring Map Link): This ruins location can be found just a bit north of the monolith where you got the map fragment. You can find some useful items here such as a Ritual Pot, a Wraith Calling Bell, Smithing Stone [3], and the Glintstone Craftsman's Cookbook (2). Don't forget as well to discover the site of grace for the ruins. In the middle of the ruin is a waygate that will take you right in front of the South Raya Lucaria Gate grace site, take it and unlock this site because you'll need it later.
- Map (Liurnia North) [Elden Ring Map Link]: This map fragment can be found just a bit south near the Academy Gate Town Site.
- Golden Seed (Elden Ring Map Link): You can find one by an illusory sapling. It can be found near the Academy Gate Town Site and the Academy Gate Town.
Patches, a Crystal Tear, a Church, and More Items!
If you travel northwest, open the map, and place a beacon on the small isle near the telescope. You'll find the Scenic Isle Site here (Elden Ring Map Link). You will only find Patches here if you didn't kill him and decided to forgive him during your encounter with him at the Murkwater Cave in Limgrave. You can check his wares and purchase any items that you need. Continue moving northwest and you'll find another isle that has the Dexterity-Knot Crystal Tear (Elden Ring Map Link).
From the isle where you got the crystal tear, move west and you should find the Folly on the Lake Site. You can find it inside a gazebo, on the southwestern side of the lake (Elden Ring Map Link). Travel north from this site and you should find the Rose Church. White-Faced Varre can be found in this location and if you exhaust his dialogue, you can acquire the Festering Bloody Finger. There are also some items that you can find here such as the Nomadic Warrior's Cookbook [12] and the Bloodflame Blade incantation that drops from a Teardrop Scarab found along the marshes outside of the nearby island. Note that there is another scarab nearby that does not drop anything.
Also from the Folly on the Lake Site, if you travel to the east, you should find the Boilprawn Shack (Elden Ring Map Link). You can find the site for this location, as well as a new NPC, Blackguard Big Boggart. Make sure that you exhaust his lines and befriend him so he can be summoned later on for the Magma Wyrm Makar fight. Note, Blackguard Big Boggart will not speak with you beyond a line or two unless you speak with Rya first and she tells you about her stolen necklace. You first meet her at Liurnia of the Lakes under the pavilion next to the Birdseye Telescope north of Laskyar ruins. Exhausting her dialogue she will ask you to retrieve a necklace from someone who stole it.
You can visit Blackguard Big Boggart's page to learn more about his questline and to find a list of items that can be bought from him.
Now from the Rose Church, continue northwest and you should find the Temple Quarter (Elden Ring Map Link). For this location, you can grab some materials such as Bloodrose and kill the Albinauric and Glintstone Flower enemies to farm Runes. In one of the destroyed buildings, however, there is a treasure chest containing the Icerind Hatchet weapon.
Find the Academy Glintstone Key
Now, the next legacy dungeon you will need to explore is the Raya Lucaria Academy, mainly found at the center of Liurnia of the Lakes region. The only way in is by passing through the South Raya Lucaria Gate which is actually blocked by a barrier and can only be entered if the person is holding the Academy Glintstone Key. If you were exploring and stumbled upon the South Raya Lucaria Gate through the Academy Gate Town (Elden Ring Map Link) you should find a corpse of a Raya Lucaria Sorceror that's lying near the South Raya Lucaria Gate, if you loot the corpse, it holds the coordinates (Meeting Place Map - Elden Ring Map Link) for the Academy Glintstone Key.
The coordinates or location of the key will take you to a lake area that is guarded by the Glintstone Dragon Smarag. When you arrive, if you want to just grab the key, make sure you are riding your mount, and quickly run behind it. You'll see that it's guarding some corpses, the Raya Lucaria Sorcerer corpse holds the Academy Glintstone Key, while the other two holds a Dragonwound Grease and Kukri. The choice is yours if you want to fight this dragon or just avoid it - with the key, you can now enter Raya Lucaria Academy via the South Raya Lucaria Gate.
The Magical Dragon
Glintstone Dragon Smarag can be found due south of the Crystalline Woods site of grace, in central Liurnia of the Lakes. You will arrive at this location while exploring the lake area north of Temple District, he is usually asleep and guarding the Academy Glintstone Key, x6 Kukri, and a Dragonwound Grease (Elden Ring Map Link). Regardless of class focus, get into your most highly protective gear against magic, fire (unknown which his breath attacks inflict), and physical and aim to execute the majority of the fight from horseback, getting off your steed only to gain I-frames, especially during his dive attack, an easy to prepare for attack because of the long buildup animation.
As often as possible try to hit Smarag's head. With enough pressure, he will go to the ground and open himself to a critical strike. Poise damage is minimally inflicted against the legs, wings, and torso, though Banished Knight Oleg's additional pressure against Smarag's flanks is enough to push the meter to full, so don't dismiss those areas of attack altogether. The majority of damage you will be able to inflict will be against the flanks and wings because Smarag so often holds his head out of reach, even with a double jump.
Most of Smarag's attacks will deal significant damage, but a vitality stat of 20+ should be enough to survive a single hit from any of his attacks. instead of having that baseline health pool you can get good, anticipating his attacks and dodging. For a more detailed strategy and if you want to find our video guide on how to defeat this boss, check our Glintstone Dragon Smarag page - successfully defeating this dragon rewards you with 14,699 Runes and a Dragon Heart which you can use at the Church of Dragon Communion to learn unique Incantations - make further preparation after the battle as you make your way to Raya Lucaria Academy.
Elden Ring Walkthrough - Raya Lucaria Academy
Elden Ring Main Quest Guide - Raya Lucaria Academy Points of Interest
- Find the Academy Glintstone Key to pass through the gate's barrier.
- Investigate the two bridges leading to the academy's main gate.
- Explore the academy.
- Defeat the Monolith Guardian.
- Collect the Carian Knight Set.
- Fight the Red Wolf of Radagon.
- Keep an eye out for Crystallized Crabs.
- Explore the Rooftops of the academy.
- Obtain the Academy Glintstone Key.
- Find the Radagon Icon Talisman.
- Acquire the Azur's Glintstone Staff.
- Successfully pass through the Iron Ball trap.
- Fight the hostile NPC Knight.
- Face Rennala, Queen of the Full Moon.
- Give the Academy Glintstone Key to Thops.
The Academy of Raya Lucaria is a Legacy Dungeon in Elden Ring. Quite a different area as it has a variety of blue hues, compared to the green open spaces of Limgrave, covered in crystals not only in its environment but also the creatures that inhabit it. These range from snails to more vicious animals to the underwater crustaceans such as crabs and are heavily guarded by the academy's scholars.

Academy of Raya Lucaria Guide
- Previous: Stormveil Castle
- Next: Volcano Manor
- Recommended Levels: 50-60
- Bosses: Red Wolf of Radagon, Rennala, Queen of the Full Moon
- Site of Grace:
Academy Gate Town [Map Link]
South Raya Lucaria Gate [Map Link]
Church of the Cuckoo [Map Link]
Schoolhouse Classroom [Map Link]
Debate Parlor[Map Link]
Raya Lucaria Grand Library [Map Link]
Video Walkthrough
Academy of Raya Lucaria Map
Lower Floor

Ground Floor

1st Floor

2nd Floor

Church Balcony

3rd Floor

Rooftops

Grand Library

NPCs in Raya Lucaria
- Thops (Deceased)
- Bloody Finger Hunter Yura
- Sorceress Sellen
- Witch-Hunter Jerren
- Boc (if you gave him a Larval Tear)
- Rennala (after defeating her as a boss)
Raya Lucaria Academy Bosses
All Items in Raya Lucaria
Talismans
Consumables
- 5x Meteor Bolts
- 18x Crystal Dart
- 5x Magic Grease
- 5x Perfumer's Bolt
- 3x Golden Rune (2)
- 2x Golden Rune (3)
- 8x Golden Rune (4)
- 3x Grace Mimic
- 1x Spellproof Dried Liver
- 1x Rune Arc
Weapons & Shields
Armor
- Carian Knight Set
- Glintstone Scarab
- Karolos Glintstone Crown
- Olivinus Glintstone Crown
- Twinsage Glintstone Crown
- Lazuli Glintstone Crown
Spells
Crafting Materials
- Herba
- Crab Eggs
- Rowa Fruit
- Ruin Fragment
- Trina's Lily
- 5x Crystal Bud
- 2x Golden Seed
- 3x Living Jar Shard
- 4x Glintstone Firefly
Upgrade Materials
- 3x Smithing Stone (2)
- 3x Smithing Stone (3)
- 1x Smithing Stone (4)
- 2x Smithing Stone (5)
- 2x Somber Smithing Stone (3)
- 1x Somber Smithing Stone (4)
Ashes
- Marionette Soldier Ashes
- Avionette Soldier Ashes
- Ash of War: Charge Forth
- Ash of War: Spectral Lance
Keys & Other
- 1x Ritual Pot
- 1x Cracked Pot
- 3x Grace Mimic
- x1 Memory Stone
- x2 Stonesword Key
- x1 Conspectus Scroll
- x1 Imbued Sword Key
- x1 Thops's Bell Bearing
- x1 Glintstone Whetblade
- x1 Academy Glintstone Key
- x1 Silver-Pickled Fowl Foot
- x1 Great Rune of the Unborn
- x2 Furlcalling Finger Remedy
- Glintstone Craftsman's Cookbook [5]
- Remembrance of the Full Moon Queen
Creatures & Enemies
- Abductor Virgin
- Alabaster Lord
- Avionette Soldier
- Crab
- Flame Chariot
- Giant Crab
- Glintstone Sorcerer
- High Page
- Land Squirt
- Lazuli Sorcerer
- Lesser Mad Pumpkin Head
- Living Jar
- Magic Putrid Corpse
- Marionette Soldier
- Moongrum, Carian Knight
- Noble Sorcerer
- Raya Lucaria Foot Soldier
- Raya Lucaria Soldier
- Rotten Stray
- Teardrop Scarab
- Wandering Nobles
Notes
Important Discoveries
- Find the Academy Glintstone Key.
- Investigate the two bridges leading to the academy's main gate.
- Explore the academy.
- Defeat the Monolith Guardian.
- Collect the Carian Knight Set
- Fight the Red Wolf of Radagon.
- Keep an eye out for Crystallized Crabs.
- Explore the Rooftops of the academy.
- Obtain the Academy Glintstone Key.
- Find the Radagon Icon Talisman.
- Acquire the Azur's Glintstone Staff.
- Successfully pass through the Iron Ball trap.
- Fight the hostile NPC Knight.
- Face Rennala, Queen of the Full Moon.
- Give the Academy Glintstone Key to Thops
Full Academy of Raya Lucaria Walkthrough
How to Unlock the Academy of Raya Lucaria
First thing you will need to know is that there is no secret entrance to infiltrating Raya Lucaria Academy, the only way in is through the main gate that is currently sealed with a barrier. The only way in is by finding the Academy Glintstone Key and using it to pass through the barrier. To find it, grab the map that has the coordinates of the key which can be looted off a body that can be found near the main gate that is sealed with a barrier. This will lead you to an island that is situated on the west side from the academy.
On that island, you'll find that it is guarded by a field boss, the Glintstone Dragon Smarag. Fighting this dragon is optional since you can simply sneak behind it and loot the key from a Glintstone Sorcerer's corpse. Once you have it, return to the South Raya Lucaria Gate and you can pass through the barrier. The nearest site of grace is the Crystalline Woods site [Map Coordinates].
Academy Gate Town

Start by exploring the Academy Gate Town from its site of grace. Check the southwest section and you can find a glowing sapling where you can pick up a Golden Seed [Map Coordinates Here]. You'll want to clear out the outer area first before you head to the academy's gate. Go west and you'll see a Giant Crab that you can kill, this drops 1x Crab Eggs. At the same section where the Giant Crab was, you'll find a body that can be looted to find 3x Smithing Stone (2) [Map Coordinates Here].

In the same section, look behind and you'll see a couple of Land Squirts, and above it is a Teardrop Scarab hanging on the wall. Kill all the Land Squirts first and make sure you're using ranged attacks since attacking these things will release a poisonous mist. When that's done, you can hit shoot down the scarab and finish it off. This scarab drops the Ash of War: Charge Forth item. After grabbing the item you can now proceed to the heavily guarded front side of the gate which is at the west section of the Academy Gate Town.

We suggest you tread carefully since the path is blocked with barricades and is guarded by Raya Lucaria Soldiers and Foot Soldiers; apart from that you have to watch out for one of the Foot Soldiers that are operating a flamethrower which you can find at the top of each set of stairs. To your advantage, you can also bait the Soldiers to stand in front of the flamethrower so that they get hit. At the top, you'll reach the Soldier's stronghold where you'll also encounter the Flame Chariot.
As you take out the enemies in this section, don't forget to grab a Smithing Stone (3) that can be looted from the ground. Continue moving north through the enemies to reach the gate or you can go around it by moving east where you'll find a corpse that you can loot to find 4x Glintstone Fireflies - the end of this path is where you'll find the South Raya Lucaria Gate Site of Grace and the entrance to the academy, when you're ready, go through the sigil of the gate. Important: If you do not see the prompt to pass through the sigil, try standing under the sigil itself rather than against the physical gate.
Entering the Academy of Raya Lucaria

On the other side, you'll still be within Liurnia of the Lakes, however, you'll find the Main Academy Gate Site of Grace at the center and on the left is a lift that you can ride to formally arrive at Raya Lucaria Academy. Move through the runway and when you reach the other end that has a fountain, look to your left to find 1x Trina's Lily, while on the right, you'll find a corpse next to a tree that you can loot to find 1x Magic Grease.
Go back, and head up the stairs where you'll see two Glintstone Sorcerers at the top, be mindful when you are fighting these enemies since they can use sorcery and bombard you with glintstone sorcery from afar; use your shield, time your dodges right, or even close the gap and attack them with your melee weapon since they react slow towards close-quarter combat. Kill the two Glintstone Sorcerers and open the door to continue onto the next section, the Church of the Cuckoo.

In the next room, walk slowly and you'll see two Marionette Soldiers that will drop from above, you'll also see one Glintstone Sorcerer at the far end of the room by the altar. We recommend killing the sorcerer first since it will provide the Marionettes with covering fire. You can lure the two soldiers outside, deal with them first, and then take out the sorcerer, or, use the pillars in the room as cover from the sorcerer's attacks and fight the Marionettes simultaneously. There are also two more Marionettes that will drop from the ceiling if you walk on the left or right side of the room.
You can easily spot them if you look up and press the auto-lock button. Upon clearing the section, make sure to check behind the altar, there is a wall, and behind it is a corpse that you can loot to find a Somber Smithing Stone (3), while on the right side, resting against a wall, is another corpse that has a Golden Rune (2). Before Moving on there is also a hidden room on the right side as you enter. The first wall segment on the right side is an Illusory Wall. Break the illusion to reveal a small side area filled with stone coffins. On the other end of the area is a corpse with a Rune Arc. Now, there is another room that you can find on the left side that has the Church of the Cuckoo Site of Grace, just turn left as you pass through the arch doorway to find it - activate it and rest if needed.
Academy Graveyard

When you are ready, go down the corridor, opposite of the site of grace and turn left to find an exit that will lead you to a graveyard section. You will need to be cautious of your surroundings since the area is filled with Magic Putrid Corpses that wander, although they have high resistance to Magic Damage, they move slow and are not difficult to kill. Always check corners too since they can grab you, and if bitten, can fully drain your FP. If you get overwhelmed by their numbers, you can easily run past them or even try to dodge roll into them to knock them back, to create some space, and even interrupt their attacks. Alternatively, attacking them with your melee weapon will interrupt their moves.

From the door, you'll first see two of these Putrid Corpses ahead, you can take them out first, and when it's killed, go east from the door and go straight to find a corpse that you can loot. Just be careful since, by the corner of the path on the left, there is one Putrid Corpse hiding and waiting to ambush you. And just before you walk up to the corpse, there is one more, and two more that will burrow out from the ground. Once you've cleared the path, loot the corpse sitting by the ledge to find x3 Grace Mimic - retrace your steps and head down the slope.

As you're heading down the slope, look to your left and you'll see another corpse that you can loot by the tombstones. Walk carefully as you approach it and look to your right, there is a Putrid Corpse that is (again) waiting to ambush you, and more ahead as you get near the bootable corpse. Clear the path and loot the body to find x1 Spellproof Dried Liver. Next, look to your right and you'll see a wooden bridge, cross it, and be ready to clear the area since more Putrid Corpses will burrow out from the ground as you approach the other end of the bridge.

The other end of the bridge has multiple enemies such as the undead, a Rotten Stray, and two archer Marionette Soldier on high ground that are ready to shoot you if you come rushing in. Now, as you approach the other end of the bridge, turn left immediately and jump down from the ledge to find a path that curves to where the Marionette Soldiers are, kill the two soldiers and then loot the corpse that is hanging by the ledge to find x1 Marionette Soldier Ashes. By the large tree, if you're looking ahead, is the Rotten Stray that's eating the corpse that you can loot to find x1 Silver-Pickled Fowl Foot. As you continue forward there will be more Putrid Corpses and Rotten Strays around, so we would recommend you to move slowly and take out the enemies one at a time since you can easily die if you are outnumbered.

As you reach the arch doorway, you'll notice that there is another body that you can pillage to find x2 Magic Grease, it's on the right side near a lit torch and some tombstones. If you look down, you can find a platform that you can drop to. Kill the group of Putrid Corpses worshipping a statue and pick up the glowing item to receive the Carian Knight Set. Following the path, you can find a corpse that can be looted to find x1 Golden Rune (4). Go back and jumping down from the narrow path on your right side will lead you to the arch doorway again.
While on the left side of the arch doorway, you'll see a path that is lit with a torch, down the slope, you'll find a Teardrop Scarab, kill it to obtain x1 Ash of War: Spectral Lance. If you continue going down the slope, you'll see another corpse that you can loot that is being guarded by another Putrid Corpse. Kill the enemy and loot the corpse at the end of the slope to find x1 Golden Rune (4) - retrace your steps back to the arch doorway and pass through the hall.

As you exit the hall, you'll notice that there is a large rotating lift on the right, don't ride it first, but instead, go straight towards the section where you'll notice some maiden statues and a monolith at the center. On the right side of the monolith, you'll notice a small dark purple portal. As you get near it, an Alabaster Lord will appear from the portal and start to attack you; it will use a gravity type sorcery that pulls you in, as well as plunging its weapon into the ground to release a pulse of energy. Using sorcery such as the Glintblade Phalanx and Glintstone Pebble sorceries whilst maintaining distance is effective. If a player is pulled in, they should immediately dodge backwards to avoid its follow-up attack. Successfully defeating the Alabaster Lord rewards you with 3235 Runes and you can loot its corpse to find Gravity Well. Before leaving this section, make sure to jump on the monolith and pick up 2x Somber Smithing Stones (3).

Retrace your steps to the rotating lift, jump on the platform and ride it to the top. Jump onto the platform at the highest point and you'll see a Wandering Noble digging the ground; you can sneak behind to backstab it. Nearby, you'll see the arch doorway that leads indoors. Ignore that for now, and instead go right inside the small cave with crystals that is guarded with two more Wandering Nobles where you'll find 5x Crystal Darts on the ground, behind some grass and flowers.
By the arch doorway, look to your right and you'll see a slope that goes up, to a corner, there is another Wandering Nobles with a torch here, kill it and walk up a bit, on the right side, there's a body hanging by the ledge, loot it to find a Golden Rune (4) - after grabbing the Golden Rune, go back down and head through the arch doorway where you'll find the Schoolhouse Classroom Site of Grace.
Now go back where you left the rotating lift. Turn left and kill a Wandering Noble at the end to take the lift going down. Take off when you see the ground sticking out. Defeat the group containing 2 Avionette Soldiers and Wandering Nobles to get the Avionette Soldier Ashes.

If you ride the lift further to the bottom, you will encounter an Abductor Virgin, that is, the Iron Virgin, mentioned by Patches at the Scenic Isle. If you are eaten, then you will be trapped and teleported to the inquisition chambers of Volcano Manor, so you have to be careful if you don't want this to happen. One safe way to defeat the statue is going into the narrow path and trying a ranging battle. Defeat the enemy and loot the corpses here to find x1 Smithing Stone (5) and x1 Longtail Cat Talisman. There are also some Glintstone Firefly materials that you can loot here. If you look around, there is a small building that you can reach by jumping onto crystals. Grab the Lost Ashes of War in front of the building. Go back to the narrow path and ride the lift back to the top; on the way up, if you want, you can also grab x1 Trina's Lily on your left side with a well-timed running jump.
The Great Hall

Before you head to the great hall of the institute, make sure you've used the site of grace to rest, upgrade if needed, but most importantly, for it to be marked as your checkpoint. The area ahead is swarming with enemies such as Glintstone Sorcerers and Lazuli Sorcerers. The melee-focused Lazuli Sorcerers can be easily identified by their sword, shield, and light blue robe, but they will also use sorcery to aid themselves in combat. You can sneak behind and backstab it once it turns its back. From the doorway, go left and you'll find a room where you can loot x1 Conspectus Scroll, as well as a treasure chest containing x1 Glintstone Craftsman's Cookbook [5].

Before going out, there is an illusory wall in the same room. Where the corpse is, you'll see an empty bookshelf behind it. Hit it to reveal the secret passage. Go to the balcony and check the right side to find another corpse you can pillage to find x1 Smithing Stone [4], on the left side, you can jump down to the narrow path, walk to the end, around the corner, to find x2 Trina's Lily. From here, look northwest and climb up a few rocks to reach a ledge. At the end, you'll find x1 Olivinus Glintstone Crown that you can loot off a corpse. Grab the item and head back to the Schoolhouse Classroom site of grace.

As you return to the hallway, you'll see two Glintstone Sorcerers studying, one on the left, and one on the right. You can sneak behind them and pass through if you want to avoid fighting them, or sneak behind one and backstab it, then fight the other. Next, continue forward, up the steps, and you'll see four more Glintstone Sorcerers. If you peak at the corner on the left, you'll see a large Living Jar (similar to Alexander). The three Glintstone Sorcerers won't notice you since they all have their backs facing you. The Living Jar, however, will see you as soon as you walk forward.

You can bait it back down to the hallway or by the short stairs and fight it there so that you don't get outnumbered and you can focus on fighting the Living Jar. Defeating it yields 514 Runes and drops x1 Living Jar Shard and x1 Raw Meat Dumpling. Once you've defeated the Living Jar, take out the Glintstone Sorcerers and open the treasure chest to find x1 Ritual Pot before heading up the stairs on the right. Note: the sorcerer has a chance to drop x1 Academy Glintstone Staff that can be looted off its body.

You'll notice as well that there is a door opposite of the stairs - this is locked and can only be opened from the other side using an passage on the third floor via an illusory wall, so ignore this first and head up the stairs where you'll encounter another Lazuli Sorcerer standing in between two maiden statues. There is also another Glintstone Sorcerer on the left side, standing by the bookshelf, while two more patrolling by the other set of stairs, on the third floor. The one patrolling will notice you so bait the enemy to the lower floor and kill them, while the one standing by the bookshelf, you can sneak behind to backstab it.
We suggest that you kill both sorcerers first and then shift your attention towards the Lazuli Sorcerer. Upon defeating the enemies on the second floor, walk towards the balcony with large arc-looking statue, look to the left, and you'll see a corpse that's hanging by the balcony's fence, loot it to find x1 Furlcalling Finger Remedy - you've cleared the second floor.
Secret Wall: Upon reaching the top of the stairs (just before the boss room door), the first empty bookshelf on the left of the staircase is an illusionary wall. See picture below. This leads to a chest containing the spell Comet and a corpse behind the altar containing a Stonesword Key. Climb the ladder in this room and make your way to the terrace along the back wall. There is a hole that will drop you into another room containing the Graven-School Talisman. The pots will come alive once you approach the talisman.

If you're ready, you can find the gold mist door at the third floor that leads to the boss arena (Debate Parlor) of the Red Wolf of Radagon.
Greater Enemy: Red Wolf of Radagon

We suggest preparing before going through the mist to fight the Red Wolf of Radagon. The Red Wolf of Radagon Greater Enemy (Mini-Boss) is a big red wolf that uses its agility to leap around and to attack you. (1) This greater enemy can also use the Glintblade Phalanx spell. It can also manifest a large red glowing sword from its mouth and attack in a swinging motion on the ground or in the air.
During our encounter with this mini-boss, at the start of the battle, we used the Lone Wolf Ashes to summon three wolves to help in combat. They help in attacking the Red Wolf, and most importantly, they can catch its attention, allowing our character to attack it with ranged magical attacks while it is busy fighting the wolves. The wolf has low health and it is slightly weak against Slash Damage and/or Pierce Damage.

To determine when the Red Wolf uses sorcery, you'll see either one or more blue energy projectiles behind its trail. When this happens make sure you are far away and around a second or two, dodge or sprint sideways as it shoots at you. If you are in a position where you are near the Red Wolf, you'll have to try and dodge back after evading the projectiles since it will follow up with a few strikes. The best strategy is to wait patiently and look for that small window to counterattack it when it fully commits to a striking move.
This either happens when it uses a lunging bite attack, this move usually has a max of three hits, and after the third lunge, you can counterattack. Another will be after it leaps into the air and lands on the ground with the magical sword in its mouth, there is a chance for you to land one to two hits before it fully recovers. Just don't be greedy and remember to back away after landing your counters - as you defeat this greater enemy, it rewards you with 14000 Runes and x1 Memory Stone, you'll also find the Debate Parlor Site of Grace in this arena.

From the doorway leading to the courtyard, make a right, go around the corner and you'll see that there's a platform below. Jump over the fence, and climb the ladder. At the top, you'll see a window that is broken that you can go through. You'll find yourself on the upper level of the Debate Parlor.

Go to the left, and you'll find a body that you can pillage to find x5 Crystal Bud. Head to the opposite side on the right, and you'll find a treasure chest containing x1 Radagon Icon. Exit through the arch doorway near the chest, but be careful, there is a Lazuli Sorcerer hiding by the corner at the left side of the doorway and a Glintstone Sorcerer ahead. From where the sorcerer is standing, you'll find a corpse against a wall, next to a barrel. Loot it to find x1 Golden Rune (4) - jump back down to the Debate Parlor site of grace and continue towards the courtyard.
Academy of Raya Lucaria
Courtyard

From the Debate Parlor site of grace, exit through the doorway on the left to find the institute's courtyard. There are small Crabs here by the fountain and Wandering Nobles. From the doorway, turn left and head up the stairs to find a dead-end, along with five Living Jar enemies and one Glintstone Sorcerer. Kill the enemies and loot the corpse on the left for x3 Living Jar Shard, while on the right you can pick up x1 Cracked Pot. Go back down to the courtyard and jump on the large fountain at the center to find another body that can be pillaged for x1 Stonesword Key.

At the far north side of the courtyard, you'll find more Wandering Nobles, small Crabs, a Noble Sorcerer, and a moving Abductor Virgin. Be careful of this statue since it can extend its chain arms to reach out and attack you. If it gets close, the center part of its body will open, revealing some tentacle-like arms that will try to grab you. After you clear out the enemies within the courtyard, loot the body resting against some small cages on the northern side for x5 Glintstone Firefly.
If you check around as well, there are some materials that you can grab such as Rowa Fruit, Herba, and Trina's Lily. If you check the northwest section of the courtyard, you'll encounter a Giant Crab that will burrow out from the ground. Killing it yields Runes and drops x1 Crab Eggs. Head west of the courtyard and you'll see a glowing sapling that is guarded by three Wandering Nobles. Kill the enemies and check the glowing sapling to find x1 Golden Seed on the ground.

Also on the west, you'll notice a slope that goes down and around the corner of the building's walls. This leads to a dead-end where you'll notice another Wandering Noble sitting by the ledge on the right and hiding behind the grass bush by the corner on the left is a special-looking Crab that has crystals on its back. Upon death, this Crystallized Crab drops x1 Karolos Glintstone Crown.
Go back to where the glowing sapling is and check the right-side corner where you'll spot a corpse that you can loot. Tread carefully as you approach it since a Giant Crab will ambush you from the ground. Kill the enemy and loot to the body to find x1 Golden Rune (2). Also near this body, if you go check the ledge of the cliff on the left side of the body, there's another corpse that you can pillage to find x1 Golden Rune (4).
Academy Rooftops

After clearing the west side of the courtyard, return to the center area where the fountain is and you'll see a slope on the right (facing the doorway leading back to the Debate Parlor). At the top, there are multiple enemies here such as more Glintstone Sorcerers and Wandering Nobles. You'll see the Wandering Nobles kneeling, a Wandering Noble standing on the steps, two Glintstone Sorcerers standing by the balcony fence at the top of the steps, while another Glintstone Sorcerer is inside the room in front of the kneeling Wandering Nobles. Take caution since the moment you approach the group, the sorcerers will bombard you with magical attacks.
Sprint across the group of Wandering Nobles, up the stairs, and take out the two sorcerers first. Remember that they react slowly when you close the gap and fight them upfront. Next, kill the Wandering Noble, which has a chance to drop Aristocrat Coat, and kill the rest of the Wandering Nobles. Go back down and head up the steps opposite to it where you'll encounter more Wandering Nobles and another Glintstone Sorcerer. Clear this area and loot the nearby corpse to find x1 Golden Rune (2). Next, go back and head towards the arch doorway that was in front of the group of kneeling Wandering Nobles. You'll find an office where you can loot a body that is hanging on the fence of the window balcony - the body contains x1 Glintstone Whetblade.

Return to the upper balcony where you encountered the Wandering Noble and two sorcerers and jump over the fence on the left to reach the other side of a locked door. There is another Glintstone Sorcerer here as you jump down. Kill the enemy and open the nearby door to unlock a shortcut leading back to the central section of the courtyard. Next, continue going up the steps and you'll see another Glintstone Sorcerer roaming, wait for it to turn around, backstab it, then finish it off. Around the corner, you'll see another body hanging on the balcony's fence, pillaging the body to find x1 Golden Rune (3).

Now tread carefully since you will be traversing the rooftops of the academy, the slightest misstep could lead to death. You'll first encounter two Marionette Soldier enemies here. From where the Marionette Soldiers were standing, move to the right and jump onto the narrow platform that circulates the wall. You'll immediately notice the ladder here, go left to find a body sitting on the ledge and loot it to acquire x1 Golden Rune (4).

Go back to the ladder and climb to the top where you'll see a runway leading to a tower. As you walk towards the runway, look up and press the auto-lock button where you'll notice a new type of enemy. These are Avionette Soldier. They use their wings to fly through the air. Using long-range attacks such as sorcery will work well against these reanimated enemies. There is also one Glintstone Sorcerer that is patrolling the runway. Clear the path and along the runway, on the right, there is a corpse that you can pillage to find 5x Crystal Darts. Go towards the narrow platform circulating the tower's walls, turn left and you'll see another corpse that can be looted to find 5x Meteor Bolts. From where you looted the Meteor Bolts, walk to the ledge and jump down onto the rooftop.
Looking up, you will notice a corpse on the roof. To reach it, jump down once more and look to your left. There is another roof with a fair amount of gap but still reachable. Perform a careful running jump to step onto the roof and prepare for an immediate ambush a Avionette Soldier. Head left and follow the spiral path of rooftops, inhabited by several Marionette Soldiers. After a jump over a gap once again, you will see a ladder on your left. Just don't go into the ladder room naively since two Marionette Soldiers are each looking for an ambush from the left and right wall. The ladder leads to the top of a bell tower, in which you can obtain the Full Moon Crossbow. Now jump down to a rooftop, on the left of which you will see the forementioned corpse bearing a Smithing Stone (4).
Jump down from the corpse and you are back to where you were before. Do the hard jump again, but this time, go straight to perform another jump. Go to the tower that you see on your right; an Avionette Soldier will ambush in the middle. Go down through broken wooden floors until you see a Crystallized Crab, which can be looted for the Lazuli Glintstone Crown. Eventually, you will reach a small room with some crabs and a body holding a Somber Smithing Stone (4).

Leaving the room, go around to your left to climb the ladder. On your left, you will see a body that you can loot to find x1 Imbued Sword Key inside a tower. Looking across from the key, and you'll see a nearby narrow platform of another towering building. Jump across and go around the platform to find another body that's sitting by the edge, to pillage and acquire x2 Smithing Stone (3).
Retrace your steps back to the ladder to see two Marionette Soldier enemies roaming the rooftops north of you. Jump across the rooftop in front of the ladder. Move North, and then look to your right, there's a dead-end by the rooftop where you'll see a corpse that can be pillaged to acquire x2 Magic Grease. Just be careful since two Avionette Soldiers will ambush you.

Next, turn around and you'll see an arch window that you can pass through (this is the ceiling of the Church of the Cuckoo). Tread carefully as you will be walking on narrow beams of the church's ceiling. Look to the right and you'll see another body that can be looted to obtain x1 Golden Rune (3). Now from where the body is, if you look down, you'll see there's a glowing item on the chandelier. There's another vertical beam below that you can jump onto, and then jump to the top of the chandelier. Loot the body to find x1 Academy Glintstone Key.
Jump down onto the short bridge from the chandelier and tread carefully since the upper section of the church is guarded by Lazuli Sorcerers and Glintstone Sorcerers. Check the northwest side after killing the enemies to find a corpse that is sitting against a wall, you can pillage the body to find x1 Shattering Crystal. Make sure to kick the ladder down that's at the opposite side of the short bridge, this unlocks a shortcut leading back to the Church of the Cuckoo site of grace (take note that the enemies here respawn). Head east to see an arch doorway and a balcony, each at the end of a bridge.

Step into the corridor first and defeat the High Page guarding the entrance on the other side of the runway, but be ready to dodge since it will shoot you with a crossbow. Defeating the High Page drops 5x Perfumer's Bolt. Behind the High Page is a room covered with glintstone. You'll find the Azur's Glintstone Staff on the ground, next to the crystal formation with the dead School of Graven Mages at the center of the room.
Retrace back to go out to the balcony, and check the right side by the corner of the scaffolding to find another Crystallized Crab. This is similar to the one you first encountered at the west side of the academy's courtyard. If you want to save FP, you can strike it with your melee weapon and dodge it once it's close to you. It moves slow but it will use its pinchers to try and hit you once it's close enough. Killing it rewards you with the Twinsage Glintstone Crown. Finally, it's time to fast travel to the Debate Parlor site and head back to the courtyard.
You can go again to the rooftop area to get a missing item, Golden Rune (4), but probably you will just want to skip it. To reach it, go to the roof where you had to make a hard jump over the big gap. Go straight this time and at the very bottom, you'll encounter another Marionette Soldier on the right side. Kill it and continue west where you'll see another Marionette Soldier roaming the narrow rooftop. Jump across the next rooftop and you'll see another body here that you can loot to pick up x1 Golden Rune (4).
The Metal Ball Trap

At the courtyard, look east and you' 'll see a tall set of stairs. You'll notice (as shown in the image above) that there is a corpse that is hanging by the edge of a broken platform on the left. You need to cross the other side, towards the stairs, and then quickly jump onto the platform where the body is, loot it to find x8 Crystal Dart. The moment you step on the stairs, a large, smooth metal ball (not to be confused with Silver Spheres) continuously summoned by some out-of-sight Glintstone Sorcerers will roll down the stairs. This will not stop and it will keep spawning the large metal ball to stop you from reaching the top of the stairs.

At the bottom-most part of the stairs, by the edge, there is also another body here that you can pillage to find x1 Smithing Stone (5) - to avoid getting hit, stand by the side of the stairs and hug the fence. At the mid-section, there is another corpse that you can loot to find x1 Furlcalling Finger Remedy. Head to the top section and enter the room that has three door ways. The one on the right leads to a balcony with a sending gate. This sending gate takes you back to the Church of Vows. The one on the left is locked, while straight ahead, leads to a garden that is being protected by a hostile enemy NPC, Moongrum, Carian Knight.
Grand Library Outskirts

You'll want to fight this hostile NPC carefully since it has a few tricks up its sleeves. The Carian Knight, Moongrum can auto-parry your attacks if he is not doing any moves, and he will play defensively if you continuously use melee attacks, he can also block projectiles if he has his shield out, so watch out for that. Second, he can swap between his shield for a staff weapon, allowing him to conjure the Carian Greatsword sorcery. If he has swapped to the staff weapon, you'll want to back away from him to avoid getting hit by the sorcery attack, it has a long reach. Use your shield as well to at least lessen the damage if you don't have time to move away.
He can also use a flask to recover his health, and he can use a great amount of it. So apart from trying to be careful with fighting this knight, you will need to apply pressure by quickly attacking to stop him from healing. Now, we did discover one tactic that you can exploit. Bait and lead him towards the entrance of the doorway where the iron ball trap is. He will follow you, but not all the way. He will, however, keep walking side to side by the door and back inside, and he will wait for you to approach him. Remain at the sides of the stairs as you hug the fence to avoid getting hit by the iron ball and bombard him with ranged attacks when he's within your sight - successfully defeating this hostile NPC drops x1 Carian Knight's Shield.
From the garden where Moongrum was initially standing, straight ahead is a lift that you can ride to reach the upper level leading to the boss, while the left side of the courtyard goes down to a garden. This is guarded by a Glintstone Sorcerer and Wandering Noble. Go straight through the garden and unlock the door that serves as a shortcut back to the courtyard.

Now, you still need to clear this section and remember that the door opposite of the way portal is locked. Return to the garden and look behind the spot where the Glintstone Sorcerer once was. You'll find a corpse holding a Golden Rune (4), then look carefully past the edge to see a ledge you can jump onto, before crossing into the open window (pictured above). Enter the room, open the door, then climb up the nearby ladder.

At the top, you'll notice some enemies here, there are a couple of Glintstone Sorcerers (three to be exact) and a lesser Mad Pumpkin Head. Defeating the Mad Pumpkin Head drops a Sanctuary Stone. In this room, make sure to open the treasure chest to find x1 Glintstone Scarab. Killing the Glintstone Sorcerers in this room will also disable the metal ball trap to make for an easier runback to the boss room if you die (and to have an easier time collecting the loot on the ramp). Jump down from a balcony toward northeast direction to get Golden Rune (7) on the roof above the way portal.
Once you are ready, ride the lift to the top where you'll find doors leading to Rennala, Queen of the Full Moon.
Facing Rennala, Queen of the Full Moon

Beyond the doors is a grand library, the boss arena where you'll face Rennala, Queen of the Moon. For this boss battle, there are two phases. The first phase will take place in the library that is surrounded by stacks of books and bookshelves, while the second phase takes you to an interdimensional open area. Rennala is a boss that deals magical-elemental damage, summons spirits, and is also accompanied by her children who will also be attacking you. Rennala is immune to magic and resistant to other non-physical elemental attacks, but she is vulnerable to all physical attacks.

One of the most helpful tactics to use is to bring and use Lone Wolf Ashes to summon the three wolves that can help you in combat. The reason why you need this is to help lessen the number of her children and to easily track down the one who is sustaining the barrier that is protecting her. To identify which child is doing this, you'll see a gold aura emit around that particular child and you can also hear the child chanting a lullaby spell. Once you've found the source, you can strike the woman once and look for the next child who is sustaining the power of the barrier. Do this three times and Rennala's barrier will shatter, causing her to fall on the ground - this may look easy as you are reading this, but you will still need to watch out for the attacks coming from Rennala and her children. You'll usually see the children manipulate objects that are thrown at you, while Rennala uses magical attacks.

Once she falls to the ground, sprint towards her and attack with your melee weapon for a few strikes. Do not be greedy and be ready to back away since she will start to gather energy that explodes around her. You'll know when to move away once a gold aura starts to appear. Rinse and repeat until you reach phase 2. Take note that some of her children will be hiding in corners or behind bookshelves, so you'll need to check around the library.
This is why summoning the wolves is a good tactic since they'll just randomly run around attacking the children, and if you're lucky enough, if they spot one that is hiding, it can just attack it once, and you can find the next host. There is also one moment in combat that you will need to be aware of, when she speaks and says something about her children being born anew, get ready to get behind the bookshelves or stack of books since she will use them as projectiles to attack you.

The second phase happens once you've completely depleted her health in phase one. A cutscene will trigger and you'll be fighting her in an interdimensional plane, surfaced with bodies of water. As the battle begins, she will start by shooting an energy beam at you, be ready to dodge the moment it is projected. At this point, she will be more aggressive by casting more magic to attack you. If you're lucky enough and your spirit wolves are still alive, they will help in attacking and can even interrupt her attacks as she tries to channel them. Despite her using a variety of spells, they somehow project slow and are quite easy for you to track, allowing you to react at the right time to evade.

Once her health is about 70% gone, she will start to summon spirits. She will plunge her staff on the ground, emitting a blast that can damage and knock you down if you're near after she plunges her staff. Shortly after, a spirit of an enemy will appear depending on who she summons. Renalla can summon the spirit of a Troll, the Bloodhound Knight Darriwil, and a Dragon. Don't let any of those catch you off guard. They don't last until killed, but remain for a few attacks and leave the battlefield, so just focus on evading the spirit's attacks while simultaneously attacking Rennala.
Take note that every time she summons a spirit, white glyphs will appear on the ground that deals damage and can knock you down if you are caught or step on it. Defeating her yields 40000 Runes and rewards you with x1 Remembrance of the Full Moon Queen and x1 Great Rune of the Unborn.

You'll return to the library and see Rennala at the center. You can speak to her, and by doing so, choosing the Cosmetics option allows you to change the physical appearance of your character, while the Rebirth option requires you to provide a Larval Tear to use this feature. There is also a chest on the right side of Rennala, but it is currently locked - also, don't forget to examine the Raya Licaria Grand Library Site of Grace here.
Where to Use the Academy Glintstone Key

One of the items you've found in the academy is the Academy Glintstone Key. This is to be given to Thops who can be found at the Church of Irith. [Map Link]. Just make sure that you were able to buy everything that you need from him before or after giving him the key. Upon giving the key, if you travel to the Schoolhouse Classroom site of grace at the academy, you'll find him dead outside the room. Go outside and turn right. You'll find him sitting in a chair. You can loot his body to find x1 Thops's Bell Bearing, x1 Thops's Barrier, and x1 Academy Glintstone Staff.
Raya Lucaria Academy Map


Raya Lucaria Academy Videos
Speed Run Walkthrough
To enter Raya Lucaria Academy, you must have an Academy Glintstone Key to pass through the barrier. To find it, grab the map that has the coordinates of the key or travel to an island that is situated on the west side from the academy. On that island, you'll find that it is guarded by a field boss, the Glintstone Dragon Smarag. Fighting this dragon is optional since you can simply sneak behind it and loot the key from a lucarian sorcerer corpse. Once you have it, return to the South Raya Lucaria Gate and you can pass through the barrier. The nearest site of grace is the Crystalline Woods site [Map Coordinates].
At the Academy Gate Town Site of Grace, check the northeast section and you can find a glowing sapling where you can pick up x1 Golden Seed [Map Coordinates Here], next, go west and you'll see a Giant Crab that you can kill, this drops x1 Crab Eggs. At the same section where the Giant Crab was, you'll find a body that can be looted to find x3 Smithing Stone (2) [Map Coordinates Here]. In the same section, look behind and you'll see a couple of Land Squirts, and above it is a Teardrop Scarab hanging on the wall. Killing the Teardrop Scarab drops Ash of War: Charge Forth.
Upon entering the academy and finding the Church of the Cuckoo Site of Grace, you'll be exploring the graveyard section that's infested with Putrid Corpses. When you cross the wooden bridge, at the other end, make a hard left and drop down to the path below. Circle around where you'll encounter two Marionette Soldiers. In front of it is a body that you can loot to find Marionette Soldier Ashes. Continue through the graveyard, but as you reach the doorway that leads into the next section, go left and you'll find a path that is lit with a torch. You'll see another Teardrop Scarab there, kill it to acquire the Ash of War: Spectral Lance.
Head through the doorway to enter the next section where you'll find a large rotating lift. By the entrance, turn right, hug the wall, and drop down to the path below. Walk along the narrow path and you'll see another group of Putrid Corpses that are worshipping a large tombstone, kill the group and pick up the glowing item near the tombstone to find the Carian Knight Set. Go back to the section where the large rotating lift is, don't ride it yet, but instead go straight where you'll see some maiden statues and a monlith at the center. Defeat the Slender Wayfarer that is guarding the monolith to acquire the Gravity Well sorcery and pick up the smithing stone on the monolith.
Next, ride the lift and head to the lower-most section where you'll encounter a Pendulum Statue enemy. Defeat it and make sure to loot the corpse here to find the Longtail Cat Talisman. Ride the lift again and head to the top section, kill the enemies along the way and enter the next section where you can find the Schoolhouse Classroom site. From the site, enter the hallway and go to the room on the left. There's a corpse that you can loot to find the Conspectus Scroll and a treasure chest containing the Glintstone Craftsman's Cookbook [5].
Don't leave the room yet, in front of the body you just looted, make sure to hit the door in front of it to reveal the illusory wall. Pillage the body on the right of the balcony to find a Smithing Stones and then jump off the balcony from the left side. Grab the materials there and follow the narrow sideway, along the way, before jumping down and returning to the Schoolhouse Classroom site, there's a body that can be looted to find the Olivinus Glintstone Crown. Now continue exploring the hallway.
Take note that the Glintstone Sorcerer has a chance to drop the Academy Glintstone Staff. At the other end of the hallway where you encountered the giant Living Jar, you'll find a chest containing x1 Ritual Pot. On the second floor that is guarded by more Glintstone Sorcerers, make sure to check the balcony to find another corpse that can be pillaged to acquire Furlcalling Finger Remedy - head up the third floor, and if you are prepared, pass through the mist to fight Red Wolf of Radagon.
Defeating Red Wolf of Radagon rewards you with 14000 Runes and x1 Memory Stone, you'll also find the Debate Parlor Site of Grace in this arena. As you exit through the doorway, you'll enter the main courtyard of the institue. From the entrance, turn right and jump over the fence. Climb up the ladder and go through the broken glass window to reach the second floor of the Debate Parlor. Go to the left, and you'll find a body that you can pillage to find x5 Crystal Bud. Head to the opposite side on the right, and you'll find a treasure chest containing x1 Radagon Icon. Head back down and start exploring the courtyard section.
On the fountain, you can find x1 Stonesword Key. Make sure to go around the courtyard to find some materials. Head west of the courtyard and you'll see a glowing sapling that is guarded by three Wandering Nobles. Kill the enemies and check the glowing sapling to find x1 Golden Seed on the ground. Also on the west, there's a Cryallized Crab hiding around the corner, by the bush, kill it to acquire x1 Karolos Glintstone Crown.
After clearing the west side of the courtyard, return to the center area where the fountain is and you'll see a slope on the right (facing the doorway leading back to the Debate Parlor). At the top, there are multiple enemies here such as more Glintstone Sorcerers and Wandering Nobles. You'll see the Wandering Nobles kneeling, a Wandering Noble standing on the steps, two Glintstone Sorcerers standing by the balcony fence at the top of the steps, while another sorcerer inside the room in front of the kneeling Wandering Nobles. Kill all the enemies and go inside the small room to find a body that is hanging on the fence of the window balcony - the body contains x1 Glintstone Whetblade.
Now traverse the rooftops section of the academy. Make sure to check every corner and some platforms that you can jump on or can drop to find some materials. There's x1 Imbued Sword Key as well that can be looted off a body located on another towering building. Eventually, you'll end up finding a broken glass window that leads to the ceiling of the Church of the Cuckoo. Loot the body that's on the narrow beam and drop down until you land on the chandelier where you can take another Academy Glintstone Key from the corpse.
Jump down to the second floor and clear the area of Lazuli Sorcerers and Glintstone Sorcerers. Check the northwest side after killing the enemies to find a corpse that is sitting against a wall, you can pillage the body to find x1 Shattering Crystal. Head east, out the balcony, and check the right side by the corner of the scaffolding to find another Crystallized Crab, kill it to acquire the Twinsage Glintstone Crown. Also, there's another doorway here that is guarded by a single soldier. Inside the room that is being guarded, you'll find the Azur's Glintstone Staff on the ground - after clearing the second floor, make sure to kick the ladder to unlock a shortcut to the Church of the Cuckoo site.
Go back to the courtyard and go east where you'll encounter the large iron ball trap. Make sure to loot the bodies on the stairs and the broken beam to find items such as x8 Crystal Dart, x1 Smithing Stone (5) and x1 Furlcalling Finger Remedy. As you enter the next section, you'll encounter a hostile enemy NPC, Moongrum, Carian Knight that's guarding the lift leading to the main boss of this legacy dungeon. Defeating Moongrum drops the Carian Knight's Shield. Before riding the lift, check the west side, by the gate, turn left and jump over the fence as you walk on the narrow beam of the wall. Climb up the ladder, defeat the Lesser Pumpkin Head and Glintstone Sorcerers. There's a treasure chest that you can open to find x1 Glintstone Scarab - climb back down, open the closed door and ride the lift.
Beyond the large door is the Grand Library where you will fight Rennala, Queen of the Moon in two phases. Defeating her yields 40000 Runes and rewards you with x1 Remembrance of the Full Moon Queen and x1 Great Rune of the Unborn. Make sure to discover the site of grace here before leaving.
One of the items you've found in the academy is the Academy Glintstone Key. This is to be given to Thops who can be found at the Church of Irith. [Map Link]. Just make sure that you were able to buy everything that you need from him before or after giving him the key. Upon giving the key, if you travel to the Schoolhouse Classroom site of grace of the academy, you'll find him dead outside the room. Go outside and turn right, you'll find him, sitting in a chair. You can loot his body to find x1 Thops's Bell Bearing, x1 Thops's Barrier, and x1 Academy Glintstone Staff.
Elden Ring Walkthrough - Liurnia of the Lakes: East
Elden Ring Main Quest Guide - Liurnia of the Lakes (East) Points of Interest
- Clear out Cliffbottom Catacombs.
- Examine the Highway Lookout Tower.
- Travel to the Church of Vows.
- Visit the Minor Erdtree of Northeast Liurnia.
- Complete Raya Lucaria Crystal Tunnel.
- Investigate Ainsel River (Underground).
Cliffbottom Catacombs in Liurnia

Cliffbottom Catacombs Elden Ring Map. Click on the image above to enlarge it.
Once you've cleared Raya Lucaria Academy, it's time to explore the east side of the map for Liurnia of the Lakes, we recommend that you start from the Lake-Facing Cliffs Site and work your way up. The Cliffbottom Catacombs can be found a bit northeast of the mentioned site (Elden Ring Map Link). Cliffbottom Catacombs is a catacomb that is filled with imps and ogres, Walk carefully to not wake or alert the ogres or get jumped on by the imps. The catacombs also have multiple buttons on the floor that trigger traps that shoot projectiles at the player, use them to your advantage by triggering them to hit enemies. The imps in this dungeon will throw a blue pot explosion at players - this location is good to find upgrade materials such as Grave Glovewort [2] and Grave Glovewort [3] that are used to strengthen your Spirit Ashes with the help of Roderika.
Leaving the Site of Grace going down the stairs you will see the elevator room, step on the button to lower yourself down. A lever is present at the top and bottom of the shaft for you to call the elevator if it is not there. The first room after the elevator has 2 imps, one on the wall ahead and one standing on the right of the entrance. Past this room is the pair of locked doors flanked by 2 statues, the door will be unlocked by a lever found deep in the catacombs.
Stepping into the rest of the catacombs you will walk into a square room with a staircase, the stairs lead downwards going over a pit where an ogre can be seen sitting. Going forward into the next tunnel be careful of both the floor trap as well as the imp in the ceiling, there is another imp on the corner ahead that will jump you so be prepared for it.
Through this tunnel, you enter into a room with a high ceiling, and some stairs leading up on the left side, straight ahead there is a sleeping ogre between the pillars, kill it to get to the grave glovewort behind it. Up the stairs is a sealed door and an imp statue but also another ogre, this time awake and patrolling, above them are a pair of imps ready to throw grenades at you if you catch their attention. You could either rush the imps by going up the stairs and ignoring the ogre or kite the ogre down the stairs to separate the imps and the ogre to make for an easier fight.
The room sealed by the Imp statue will require a Stonesword Key to open, you will find 1 imp enemy and the Nox Mirrorhelm. Go up the stairs and carefully deal with the 2 imps in this room, a floor trap is placed right at the entrance to the room which can be used to shoot projectiles into one of the imps. Following the path out of this room, you will find yourself in the space above the initial set of stairs and entrance. There are multiple imps in this area and in the room on the left you can find 3 imps, the body there holds the scythe for you to loot.
To proceed to the lever you have to drop down into the room under the first set of stairs leading from the locked doors. This part of the catacombs has multiple ogres roaming the halls so tread carefully. Moving around the tunnels here you can find remains with loot on them, one of which is the Prattling Pate "Wonderful".
From the room you dropped down into go east to advance, there you will find a single ogre blocking the way forward, kill them to proceed. At the end of these tunnels is a ladder, climb it to find a room with a carpet and some bookshelves. On the left, you will find an ogre looking at a tomb in front of a stone statue, going right will lead you to the lever and the way back to the start. On the tomb is the Page Ashes.
BOSS BATTLE: ERDTREE BURIAL WATCHDOG
This fight is against a variant version of the Erdtree Burial Watchdog that uses a staff, spells, and has 3 heads that will do a 3 headed fire breathing attack. The fight is against just the boss without any additional enemies. The boss still uses the same movement pattern as the normal Erdtree Burial Watchdog, in their seated form floating up and towards the player before stomping down and walking towards the player to slam and slamming that down while in their standing form. While seated the Erdtree Burial Watchdog will also cast spells at players, breathing flames at them or casting seeking glintstone sorceries. Defeating this boss will reward you with Kaiden Sellsword Ashes and 3200 Runes.
The Wandering Maiden... Again.
After clearing the Cliffbottom Catacombs, from this location, head northwest and you should find the Purified Ruins. You can find items such as another Sabriri Grape, a Golden Rune [3], a Cuckoo Glinstone, and the Two Fingers Heirloom talisman. Since you have another Shabriri Grape, you'll find Hyetta on the western side of the Purified Ruins. She asks for another Shabriri Grape but does not give any reward this time. Continue going north and you'll encounter the Purified Ruins Waygate that teleports you to the entrance of Raya Lucaria Academy (Elden Ring Map Link) - next, make sure to discover the Liurnia Highway North Site, found on the side of the main road (Elden Ring Map Link)
Highway Lookout Tower
Just a bit northwest from the Liurnia Highway North Site, stopover the Highway Lookout Tower (Elden Ring Map Link) This tower is situated up a hill and is heavily guarded by specters of Noble Sorcerers and Noble Wanderers, as well as a Twinsage Sorcerer that can be found at the top floor of the tower. We recommend that you traverse the barricades while you are riding your mount since the specters will spawn as soon as you try to push through and the sorcerer at the top of the tower will start shooting sorcery projectiles at you. Climb up the ladder and loot the chest for a Glintstone Craftsman's Cookbook (3). Head up two more ladders, kill the sorcerer, and loot the corpse beside the enemy to find the Carian Glintblade Staff.
After clearing the location, climb back down and continue moving a bit northwest as you follow the road which takes you to the site of the Gate Town Bridge (Elden Ring Map Link). If you spoke to Hyetta earlier, you should find her here as well (Elden Ring Map Link Hyetta Third Location). Hyetta spawns near the site of grace. She will ask for another Shabriri Grape and will ask what the grapes are. Telling her will make her puke and then thank you for telling her. After sitting down at the grace nearby she will have more dialog. After once again sitting at the grace she will move to her next location.
Now, if you want to challenge yourself and if you want a new Ashes of War, then rest until nightfall by the site and you'll find the Night's Cavalry field boss here. This field boss can be found patrolling near the Gate Town Bridge, again, only appears at night, and it drops the Ash of War: Ice Spear if you defeat it. You can visit our Night's Cavalry page to find a written strategy, as well as a video guide on how to defeat this field boss.
Next, from the Gate Town Bridge site (Elden Ring Map Link), head east to beat the Tibia Mariner field boss. For (1) Mounted Combat, the strategy here is pretty straightforward. You ride up to the boss and hit him several times, then ride away before he hits you with his attacks. You can ignore his minions entirely as they tend to move slowly and don't hit that hard. It also makes it easy to get back to him when he vanishes and reappears. (2) Melee Combat, clear the minions first if you plan to play on foot so you don't get overwhelmed. Hit the boss a few times and then dodge to the side when he raises and splashes down. Keep repeating this, staying to his side or behind him if you can. If he disappears and reappears track him down and repeat. And (3) Magic and Ranged Users, much like melee, clear the minions first and then proceed to range the boss down with attacks. He moves slowly so you don't need to reposition very often.
Successfully defeating this boss drops a Deathroot and the Skeletal Bandit Ashes. Nearby, you'll notice a location, the Carian Study Hall, ignore that for now since it cannot yet be completed as you are missing a key item you will obtain later from this NPC.
Travel to the Church of Vows
The road north has two paths: One has a Golem that is guarding access to Ainsel River Well. Ignore this, for now, you'll check this later on. Take the other path up the slopes. The area to the left of the site of grace will have an Incantation (Flame, Cleanse Me!) and the Fire Monk Gauntlets. Stay the road and access the higher ground to arrive at the Church of Vows (Elden Ring Map Link and meet Miriel, Pastor of Vows who can teach you both Incantations and Sorceries, receive Scrolls and Prayerbooks, and give you Lore information.
This location is important because it allows you to cleanse your SIN (aggro'd NPCs) by using Celestial Dew and performing an "Absolution" at the altar. Make sure to discover and rest at the site of grace for the Church of Vows. And grab some items such as the Golden Tailoring Tools and the Gold Sewing Needle inside a chest. There is another field boss here that roams around the church at night, and this is the Bell Bearing Hunter. If you successfully defeat this boss, you'll be rewarded with the Meat Peddler's Bell Bearing.
Minor Erdtree Northeast Liurnia
Before you proceed to the next location, make sure to rest and prepare since you will encounter another boss at the next location. From the Church of Vows, travel northeast and you should find the Minor Erdtree of Liurnia Northeast, along the way is also the Ruined Labyrinth Site, don't forget to discover it. When you arrive, you'll encounter the Erdtree Avatar for this location. You'll want to defeat this field boss to acquire the following Flask Upgrades: the Lightning-Shrouding Cracked Tear, Magic-Shrouding Cracked Tear, and the Holy-Shrouding Cracked Tear.
Next, move southwest or go back to the Ruined Labyrinth Site, on the west side you should find a Walking Mausoleum (Elden Ring Map Link). To identify if you're near, players will hear mausoleums as they emit a distinctly loud bell sound as they walk about. They usually have a small roaming area, so they are easy to find. When you want to take on a walking mausoleum, you must attack its deposits until it comes down. This can take considerable time depending on the location.
Once the mausoleum is static, you can enter it at any time to perform a Remembrance Duplication: This is only available once per mausoleum, so pick wisely! Performing this rite will enable you to obtain the multiple Remembrance Weapons (Boss Weapons) and magic that they grant. Boss Armor is not gated behind their remembrances, but you must have defeated them to purchase from Enia at the Roundtable Hold.
More Smithing Stones For You!
At this point, you'll be needing more Smithing Stones to properly upgrade your armaments, lucky for you, there is a nearby cave here where you can gather the materials you need. From the Ruined Labyrinth Site, travel west and you should find the Raya Lucaria Crystal Tunnel. This area is similar to Limgrave Tunnels where you will need to explore the tunnel paths, gather the stones you need, fight the enemies and reach the boss at the end, the Crystalians.

Raya Lucaria Crystal Tunnel Elden Ring Map. Click on the image above to enlarge it.
When first entering the mine you'll find an elevator. Going down it will put you in front of the Site of Grace for this area. On the way down the elevator, you might notice two doorways on the left side of the wall. If you want to reach these, go back up the elevator and destroy the boxes on the left, right before you get on the elevator then jump down. Be careful because if you fall you will die. In the first doorway, you will find x1 Cracked Crystal. Following the ledge left drop-down and enter the next doorway. You'll get 3 Cracked Crystals. Continue following the ledges down. There are lamps to guide you. At the bottom of the elevator, before you head through the doorway, look behind you and grab the x2 Cracked Crystal that are in the corners.
Heading through the tunnel in front of the elevator will lead you to a fork in the path. Going right will bring you to a chest guarded by two Diggers. One of which will patrol the area. Inside the chest, you'll find Somber Smithing Stone (2) 1x. You can grab 4 Cracked Crystals from this room. Going to the right will lead you to an open area with one Digger on the left and three on the right. One of the Diggers on the right is patrolling the area while the other two are mining. You'll notice a support beam in the area. If you cross it you can jump on the wooden ledges that are jutting out. Near the top grab the Smithing Stone [3]. At the top, you'll find a corpse with one Somber Smithing Stone [3]. This room holds six Cracked Crystals.
In the next room, looking to the right you'll notice another Digger sitting down. Down the first set of stairs are two more Diggers who are also sitting down. They will attack you when you near them, just like the previous one who was sitting. After killing them look to your right. You should see a Digger and a path that leads to a small room. Be careful when attacking the Digger outside of it because one from beneath the stairs will attack you. The small room holds 2 Smithing Stone [3].
One on a wall to the left and one on a corpse to the right. Going behind the stairs you'll find a corpse with 1 Golden Rune [3]. This room contains a total of sixteen Cracked Crystals and one Smithing Stone [3] excluding the 2 Smithing Stones found earlier. Exiting this room leads you to an elevator with more ledges. Just like last time, stick to the left. You'll find a tunnel that leads to a ledge. On the right grab the Somber Smithing Stone [2] and the x2 Cracked Crystal. Go back to the elevator and stick to the left as you jump down.
Following the tunnel out connects you to a cavern with another support beam and another elevator. Before crossing the beam, kill the Digger on your left and grab the Smithing Stone [2]. After crossing the beam, kill the patrolling Digger but don't go up the stairs. Instead, go to the right of them and grab the Smithing Stone [3]. Go up the stairs and kill the other Digger that is patrolling, then take the elevator up so you have a shortcut if you die. This room holds eight Cracked Crystals, one Smithing Stone [3], and one Smithing Stone [2] minus what I already mentioned.
Be careful going through the tunnel leading out because a Marionette soldier will run out of the room to your right and attack you with four daggers. Kill him quickly if possible. Before going into the room they came out of, look at the other doorway and lookup. You'll notice two more Marionette soldiers hanging waiting to attack you. Getting close will make them fall. Both have two bows each and can be annoying if not dealt with quickly. The room the first Marionette soldier came out of holds one Smithing Stone [2].
Going through the other doorway where the two Marionette soldiers dropped down from leads you to another section with two doors. As soon as you pass the doorway on the right look up and you'll see another Marionette soldier wielding bows. They won't drop down until you attack them or the other two Marionette soldiers in the room. The two on the ground both wield daggers and are guarding a chest. Kill them then the archer if you haven't yet. The chest holds a Crystal Knife.
Go through the doorway that has a tunnel in view. The first level has no enemies on it. Go down the first set of stairs and kill the Digger. After you killed him look to the left. You should see three Diggers in a circle and two Crystal Sorcerers. Take out the sorcerers first. They have more health than the Diggers and the Diggers here won't attack you unless you attack them first. After dealing with the sorcerers, kill the three Diggers in a circle and collect the three Smithing Stone [3] and the Somber Smithing Stone [1]. There are two more Diggers in this area. After killing them all (if you want to) you can collect the eight Cracked Crystals, the Smithing Stone [2], and the Smithing Stone [3]. The last two smithing stones can be found in the collapsed tunnel in the back of the room. On your way out (looking left from the second platform leading down) there is a tunnel leading to a room with a corpse holding the Shatter Earth spell.
The tunnel in front of the stairs leads you to an elevator. To the left of it, after you break the items there, jumping down will lead you to a small tunnel with a Somber Smithing Stone [3]. Once at the bottom of the elevator you'll sell the golden boss fog. If you want to go back to the Site of Grace to rest and take the elevators you found along the way down.
Raya Lucaria Crystal Tunnel Boss Fight
This boss is the Crystalian. Its moves are easy to predict and you can summon spirits to help you. At the beginning of the fight, it's likely you won't be doing much damage. I was only doing 5-9 damage. Just keep dodging, blocking, and attacking the boss. Be sure to not get hit because it'll hurt. I didn't truly start damaging them till I staggered them then followed up with a critical blow. After that their health was around half. Getting hit with one of her throwing blades seemed to cause one resembling it to show around my wrist allowing me to do full damage (158-400). If you want to find more guides for this boss, visit our Crystalians page - defeating this boss drops 3000 Runes and the Smithing-Stone Miner's Bell Bearing (1) - turn this into the Twin Maiden Husks and you can now buy Smithing Stone [1] and Smithing Stone [2] with runes as long as you can afford them - now fast travel back to the Eastern Tableland Site and proceed to Ainsel River Well.
There are also some other locations you may want to visit in the east map for Liurnia.
Please note that if you've been following the walkthrough from the beginning, at this point there's not an easy way for you to reach the northern section of the area to access these locations, unless you want to do some fancy wall-climbing with Torrent and it is tedious and best left for later when you get easier access to these areas. But if want to attempt, following the steps below.
- Directly northeast of the Erdtree Avatar that you found earlier, there is a short stone spire next to the impassible wall. Your goal here is to use Torrent's double jump and to get to the top of that spire, then jump directly northeast to the small edges of the impassible rock wall and climb up to the northern section.
- It's recommended that you kill Erdtree Avatar before attempting this, because it will constantly grief you, making this next to impossible.
- After you reach the northern section, go north to reach the Frenzied Flame Village Outskirts site of grace to activate it, avoiding having to do the jump-climb again.
The northern parts of this area will now be accessible to explore the following:
- Converted Fringe Tower (Elden Ring Map Link): A tower that requires a puzzle to be solved in order to unlock it. The top of the tower is sealed by a puzzle. Read the message at the foot of the statue to find out what the puzzle is. To clear the puzzle, perform the Erudition gesture while wearing any Glintstone Crown in front of the door. The Hiama Glintstone Crown does not work for this.
- Church of Inhibition (Elden Ring Map Link): There is an NPC invader her, Festering Fingerprint Vyke. Defeat the hostile NPC to enter the church where you can find the Finger Maiden Set.
- Frenzied Flame Village (Elden Ring Map Link): Just a bit northwest from the Minor Erdtree. You can find items here such as Shabriri's Woe, looted off a body at the edge of the Frenzied Flame Village, and the Frenzied's Cookbook [1], looted off a corpse inside one of the houses in the village.
- Black Knife Catacombs (Elden Ring Map Link): This area is good to gather glovewort flowers used to upgrade your Spirit Ashes. And the boss here drops the Twinsage Sorcerer Ashes if you're looking for a spirit ash item that can use spells and attack long range.
Investigate Ainsel River (Underground)

Ainsel River Well Elden Ring Map. Click on the image above to enlarge it.
To reach the underground section, you'll need to ride the lift from the Ainsel River Well that will take you down. (Elden Ring Map Link). Beware tho that there is a single Golem enemy that is guarding this location. Once the Golem has been defeated simply walk through the entrance of the building to find a lever on the right wall and the elevator in the center of the building. Stepping on the button in the middle of the elevator will lower you down into the Ainsel River underground region.
From the Ainsel River Well Depths Site of Grace, you will see multiple Giant Ants clinging to the wall. Ignore them for a second and go right to pick up x3 Magic Grease. Now face the Ants. You can lure them down by approaching slowly, but you probably won't be able to fight them one by one. Try attacking them from range to achieve that. Go into the tunnel and pick up x8 Grace Mimic.
There is a single ant waiting to the right just past the item to ambush you. Head into the left corridor to find Smithing Stone (3). Along the way, more ants will be crawling out of the ground, or sneak up on you from behind. There is a total of at least 4 ants here, which can be fought individually. Head back to the main path, and this time, two Ants will drop down from above. There is an open cave ahead containing minor items and another Smithing Stone (3), guarded by an Ant in the far left corner.
Go right to find another room with Ghost Glovewort (1), x10 Shattershard Arrow (Fletched), and yet another Smithing Stone (3). Go up the stairs and cross the bridge to find the Ainsel River Sluice Gate Site of Grace. Go back and this time take the left path past the Smithing Stone, jumping up on the two stone ledges. You will enter a room with many ants on the ceiling and a bloated one in the center. It drops a Golden Rune (10) and a Rune Arc. Go straight ahead until you reach the Uhl Palace Ruins.
Elden Ring Walkthrough - Uhl Palace Ruins
To the right, you can see the elevator that is next to the previous site of grace. Walk across the stone arcs and loot a Smithing Stone (4), then jump down to the left for a Celestial Dew. Ideally, take out the Clayman from above, or try Guerilla tactics; they are fairly slow. Pick up some tier 1 upgrade materials on the ground, as well as small Golden Runes and Formic Rock. Go to the right past a statue and follow the river. you will see more ruins and more Clayman. Be careful and take cover since a Malformed Star will start shooting at you. Duck behind the various pillars, picking up a Ghost Glovewort (1) and Smithing Stone (1) x3 from a corpse on the ledge.
You can also leave these for now and come back after you have taken out the Malformed Star. Make your way across the pillars to the ruins on the left, then follow the path up to the Malformed Star. After defeating it, drop down to the left (facing the "tower"), the fall is lethal otherwise. Make your way inside the ruin to find the Nomadic Merchant (Elden Ring Map Link) who sells some cookbooks, Lost Ashes of War, and another Celestial Dew. Pick up the Map from a corpse on the right. Go back out and to the right to pick up x3 Smithing Stone (3) and drop down to find the Ainsel River Downstream Site of Grace.
Now clean up the loot in the area, there should be two Golden Rune (3) and Ghost Glovewort (1) and (2) on the far side and along the river, a Furlcalling Finger Remedy, Throwing Dart, Magic Grease x2, and another Golden Rune (3) on the central stairs. Up the stairs and to the right there is Shield Grease in a corner.
Head back to the site of grace and further downstream the river to find another room with multiple Ants. On the left, you can find the Immunizing Horn Charm (Elden Ring Map Link), x5 Crystal Dart, and x3 Smithing Stone (2). Continue this way and be ready for two Basilisks to the left, two more up ahead, and another one to the right further down the tunnel. The last one guards x4 Soap.
Go to the end for a nice view of the Lake of Rot. You can also pick up some Aeonian Butterflies and a Somber Smithing Stone (3) here. Head back into the Ant cave and pick up Ghost Glovewort (1) and Ghost Glovewort (2). If there are Ants remaining here, make your way past them, then head left to pick up Melted Mushroom x3. Turn the other way and pick up another Ghost Glovewort (2), then get ready to face the boss, Dragonkin Soldier of Nokstella, by entering the tunnel to the left. Defeating the boss rewards you with Frozen Lightning Spear and 12,000 Runes in hand - don't forget to check the chest inside a room underneath the massive skeleton and throne to find the Great Ghost Glovewort - for now, there's nothing else that can be done in this zone right now so we'll head back up to Liurnia of the Lakes and explore its western shores.
Elden Ring Walkthrough - Liurnia of the Lakes: West
Elden Ring Main Quest Guide - Liurnia of the Lakes (West) Points of Interest
- Clear out the Village of the Albinaurics
- Complete other Locations
- Visit The Four Belfries
- Meet Smithing Master Iji
- Complete Caria Manor
- Meet Renna and her Allies
- Complete Siofra River (Underground)
Folly on the Lake - Site of Grace
If you were following our walkthrough, you've just returned from the underground map and completed some parts of it within Ainsel River. For this section, we will guide you to exploring the west section of Liurnia of the Lakes before we proceed onto the next region which is Caelid. We suggest that you start at the Folly on the Lake Site of Grace and work your way from the bottom to the top (Elden Ring Map: Liurnia of the Lakes West Starting Point). Take note that it's entirely up to you on which location you want to complete first, you can always check the interactive Elden Ring Map to find what you need - now, your first stop, the Village of the Albinaurics.

Village of the Albinaurics Elden Ring Map. Click on the image above to enlarge it.
Along the way, you will pass by a swamp that is filled with poison, so we highly recommend that you travel to the village on mount. From the site, you can find the village on the southwest side of the map (Elden Ring Map Link). As you travel by mount, simply move northwest and run alongside the cliff. Remain on the left side, pass through a swamp section, and just ignore the enemies you run into until you reach the distressed village. You'll know when you're near once you reach the swamp section and upon going up to a rise of the land - the name of the location will appear upon formally arriving at the village.
As you enter, move towards the house, check behind it to find the Village of the Albinauirics Site. Map Link. Discover and rest here before you start to explore. Now, clear this section first around the house where you'll encounter Albinauric enemies. Make sure to also loot the body near a stone coffin to obtain x1 Larval Tear, and grab the materials around to find Mushroom and Rowa Fruit. Next, turn around and heap up the hill where you'll encounter a single Perfumer enemy, killing it may drop x5 Budding Cave Moss. If you walk forward, passing the two houses, on the right side, you'll see a disguised NPC. This turns out to be Albus, who will give you an important key item for your journey. Hit the pot to reveal himself.


Before exhausting his dialogue, he will give you a key item, the Haligtree Secret Medallion (Right). Speak to him again, exhaust his lines, and he will eventually die due to old age. Before you continue towards the boss, make sure to check behind the stone coffin next to Albus, there's another corpse that you can pillage to acquire an Ivory Sickle. If you don't need to rest at the site, you can proceed to the boss by crossing the stone bridge on this hill.
As you cross, you'll see a golden teardrop scarab. Make sure to kill it before it disappears. On the other side, you'll see a willow tree and a bonfire. The Omenkiller boss is there, as well as a few Rotten Stray. We suggest that you kill the hounds first so that you can fight the boss one on one. Instead of going down the slope, straight to the bonfire, jump down from the right side of the cliff and kill the Rotten Stray. Once the area is clear, then you can approach the bonfire and fight the Omenkiller.
You can visit the Omenkiller page to find more information about this boss, as well as guides and strategies on how to defeat this enemy. Successfully killing this boss yields 4900 Runes and drops the Crucible Knot Talisman. Make sure to also check the right side of this small arena and you will another body at the end of the path, pillage it to find x1 Rune Arc.
Before you leave this location, there is just one more section you need to clear. Return to the site of the village, next to the house near it, you'll find a wooden bridge. Cross the wooden bridge, kill the Albinauric enemies and make sure to loot the bodies here to find some items, as well as gathering some Erdleaf Flower. One can be found resting by the tree trunk, loot it to acquire x1 Albinauric Bloodclot, while the other is near a ledge, pillage that body to find a Crystal Sword. Also, if you check under the bridge leading from the swamp up to the village, you can find Nepheli Loux, she will return to the Roundtable Hold after you kill the Omenkiller - if you kill her, she will drop x2 of the Stormhawk Axe weapon.
There are some locations near the Village of the Albinaurics that you can also visit before you continue exploring the northwest side of the Liurnia Map, but some can only be accessed if you've made significant progress to Ranni's questline:
- Chelona's Rise (Elden Ring Map Link): A tower found in the very corner of the upper plateau in Liurnia's southwest. This tower is initially sealed, with an imp statue at the entrance holding a glowing book, instructing you to "seek three great wise beasts". See the tower's page for details. You can find the sorcery spell, Ranni's Dark Moon in a chest at the top of this tower. Nearby is the Altar South Site of Grace as well.
- Moonfolk Ruins (Elden Ring Map Link): A ruins section where you can gather some materials and find x1 Somber Smithing Stone [8].
- Lunar Estate Ruins (Elden Ring Map Link): The ruins of a large estate found in the southern plateau of Liurnia, accessible only after making significant progress in Ranni's questline. Once accessible, you can find a Golden Rune [8] in this ruins location.
- Cathedral of Manus Celes (Elden Ring Map Link): Located at South West Liurnia of The Lakes. Accessible only after making significant progress in Ranni's questline. You can find the Glintstone Dragon Adula roaming around only if you've dealt enough damage to it at its initial location in Three Sisters.
Seek the Converted Tower

Converted Tower Elden Ring Map. Click on the image above to enlarge it.
Return to the Folly on the Lake Site and this time, head west, before you reach the tower, you should find a Teardrop Scarab near the edge of the cliffs that drop a Somber Smithing Stone [2] (Elden Ring Map Link). You should find the entrance of the Converted Tower, use the Erudition Gesture in front of the statue for the ladder to appear. Climb to the top to find a Memory Stone. The Erudition Gesture is obtained by giving Thops the second Academy Glintstone Key at the Church of Irith. Alternatively, if you don't have the Erudition gesture unlocked yet and you're skilled enough on horseback, the puzzle can be skipped by using Torrent to climb the wall surrounding the tower. Then just jump up on the balcony in the back and jump off Torrent - also don't forget to discover the site of grace of this tower.
Minor Erdtree & Road's End Catacombs
Follow the road going north from the Converted Tower and you should find the Minor Erdtree for the southwest section of Liurnia (Elden Ring Map Link). This section is guarded by an Erdtree Avatar and if you defeat it, you'll be able to acquire the Cerulean Crystal Tear and the Ruptured Crystal Tear.
Also, situated in between the Minor Erdtree and the Converted Tower, on the west side of the map, the Road's End Catacombs location can be found (Elden Ring Map Link). Road's End Catacombs is a pretty straightforward dungeon, with just some slight changes to it. As you open the doors of the catacombs, head down the stairs and you will find the site of grace for the Road's End Catacombs. Make sure to discover it and rest if needed before exploring.

Road's End Catacombs Elden Ring Map. Click on the image above to enlarge it.
Just like the previous catacombs, this section is inhabited by Imps that love to hide around corners, on ceilings, walls, and are ready to ambush you. Head down the stairs and you will encounter the first Imp, grab x1 Grave Violet, and as you move towards the arched doorway, there is another Imp ready to ambush you on the right side corner. Get ready to dodge or put your shield up as soon as you approach the doorway. Before going down, make sure to pull the lever next to the reaper statue.
By the bush, you can gather some upgrade materials such as Grave Glovewort [2], continue going down, go straight, and you'll notice a dead end on the left. Look up, you'll find another Imp on the ceiling. Shoot it down, kill it and grab another Grave Glovewort [2] material. Be careful not to step on the pedestal that triggers arrows to shoot you. Grab the Grave Glovewort [2] on the right and another Grave Glovewort [3] ahead. Now you may think that there's nothing left to explore. But if you hit the wall of the dead-end where the Grave Glovewort [3] was, you'll reveal the illusory wall.
Beyond that path are more Imps inside a room that has an altar. Kill all the enemies and open the chest to find the Raya Lucaria Soldier Ashes. Now, go back to that spot where you grabbed a few glovewort materials by the bush, there is another illusory wall next to the stairs that go back up. Kill the imp and grab some items here such as another Ghost Glovewort [2] and a Rune Arc. The path ahead is dark so equip a Torch if you're having a hard time seeing. Past the body that you just looted, move forward a bit and turn left, enter the narrow path and you'll find another body at a dead-end. Loot it to find x3 Root Resin.
Now, hit the wall in front of the body you just looted to reveal yet another illusory wall. Go down, grab another Grave Glovewort [2], and hit the illusory wall ahead to reveal another section behind it. You'll find the path that leads to the mini-boss of this location, the Spirit-Caller Snail. You can visit our Spirit-Caller Snail to find guides on how to defeat this boss - successfully defeating it drops the Glintstone Sorcerer Ashes and 3000 Runes.
Revenger's Shack - Edgar, the Revenger

Revenger's Shack Elden Ring Map. Click on the image above to enlarge it.
Just north from the Minor Erdtree, you'll find the Revenger's Shack (Elden Ring Map Link), if you followed the father-daughter questline of Irina and Edgar, resting at the shack's site will trigger a hostile NPC invader to appear, and this is Edgar the Revenger. Killing him drops the following: 316 ![]() Runes, Furlcalling Finger Remedy, Shabriri Grape, Banished Knight's Halberd (+8), and x5 Raw Meat Dumpling.
Runes, Furlcalling Finger Remedy, Shabriri Grape, Banished Knight's Halberd (+8), and x5 Raw Meat Dumpling.
Cuckoo's Evergaol
Continue moving north from the shack and you will find the Cuckoo's Evergaol (Elden Ring Map Link). Cuckoo's Evergaol is located along Liurnia's western landmass, easily accessed on foot or horseback. This Evergaol does not require a Stonesword Key to unlock. The portal mechanism in the center is active as soon as you enter the area. Enter the portal to challenge the boss within, Bols, Carian Knight.

Cuckoo's Evergaol Elden Ring Map. Click on the image above to enlarge it.
Bols is a Troll Knight clad in Carian armor, wielding a massive greatsword. Due to his size, his movements are rather slow and his attacks have a hefty weight behind them. He compensates for this by frequently roaring, which not only increases his damage but releases a burst of pressure that staggers players. Be careful as he tends to combo into his attacks after a roar. Bols is tall enough that you can easily and safely dodge under his legs to avoid most of his attacks, but never take your eyes off him as he can quickly turn around for a devastating follow-up - successfully defeating this mini-boss drops the Greatblade Phalanx spell.
The Four Belfries

The Four Belfries Elden Ring Map. Click on the image above to enlarge it.
Continuing north from Cuckoo's Evergaol is The Four Belfries (Elden Ring Map Link) The Four Belfries is a hub for transporter waygates that lead to various locations. Each waygate requires an Imbued Sword Key to activate and is located at the foot of a belfry.
- The First Belfry: The first waygate is located closest to the foot of the hill. This transports you to a small sub-area of the Crumbling Farum Azula containing the Pearldrake Talisman. You cannot access the rest of the region from this sub-area. [Elden Ring Map Link]
- The Second Belfry: The second waygate is located further up the hill and to the east. This transports you to the Chapel of Anticipation, where you began the game. You can fight the first boss here which is the Grafted Scion. [Elden Ring Map Link]
- The Third Belfry: The third waygate is located to the west of the second one. This transports you to an otherwise inaccessible location in Nokron, Eternal City, housing the Mottled Necklace and a Lesser Crucible Knight. [Elden Ring Map Link]
- The Fourth Belfry: The final belfry is located at the peak of the hill. This belfry does not contain a waygate but instead houses a chest with an Imbued Sword Key in it. You can use this to open up any of the waygates of your choosing.
Other than that, make sure to activate the site of grace for this location. Once you're back or if you continue traveling, take the lower road north and loot the Hearse for the Carian Knight's Sword (Elden Ring Map Link). And further ahead of the Northern Liurnia Lake Shore Site, you can find the map fragment for Map (Liurnia, West) by the monolith (Elden Ring Map Link).
Kingsrealm Ruins

Kingsrealm Ruins Elden Ring Map. Click on the image above to enlarge it.
Just about northeast from where you got the map, you'll find the Kingsrealm Ruins (Elden Ring Map Link), this ruins location hosts a hidden, underground area where the optional boss Royal Revenant can be fought The stairs leading down into this area is covered by an illusory floor. You can find this in the northeast section of the ruins. The floor needs to be rolled on to dispel the illusion or hit with a melee weapon to be revealed. You can visit our Royal Revenant page to find our video guide, as well as a written strategy on how to defeat this mini-boss - successfully defeating the Royal Revenant rewards the player with ![]() 3,100 Runes, you'll also gain access to the room that holds a chest containing the Frozen Needle weapon.
3,100 Runes, you'll also gain access to the room that holds a chest containing the Frozen Needle weapon.
Meet Smithing Master Iji
From the Kingsrealm Ruins, continue moving north and you can find Smithing Master Iji (Elden Ring Map Link). This blacksmith sells Upgrade Materials such as Somber Smithing Stone [1] through [4]. This blacksmith is a gentle giant in charge of the smithing for the Carian royals, but will also provide his services to players. Make sure to talk to him when you see him. Your next step is to head to the Caria Manor, but we'll just note down some things for you:
- Acquire the Intelligence-Knot Crystal Tear (Elden Ring Map Link): From Road to the Manor Site of Grace, head southeast down the slope and turn back towards the north. Loot from a small, half-bowl structure guarded by a few Lesser Spider Hand and one Spider Hand enemies.
- Seluvis's Rise (Elden Ring Map Link): One of three towers found in the Three Sisters sub-region. Three Sisters is accessible after completing Caria Manor and defeating Royal Knight Loretta. So return here when you're done with Caria Manor.
Complete Caria Manor of Liurnia

Caria Manor Elden Ring Map. Click on the image above to enlarge it.
Caria Manor is a major dungeon comprised of a very large estate, overlooking the lakes from the north. Its eternal warden, Royal Knight Loretta fervently guards the manor. The large estate can be found in Liurnia of the Lakes, far to the north (Elden Ring Map Link). We will include a quick run-through of the paths to take to get to the boss of this location, as well as important landmarks. You can, however, visit the Caria Manor page for a more in-depth guide such as a list of items found in this location and more.
Caria Manor is accessed from its main gate in the south. Before the constant bombardment of glintstone arrows as you approach the gate. The estate's guardian is constantly bombarding the fields outside the manor to deter would-be trespassers. Once you reach the Site of Grace at the main gate, you are safe from these bombardments. When traversing the estate grounds, watch out for Glintstone traps. These are swords buried in the ground which spring a projectile trap that shoots a glintstone projectile upwards when walked on. These traps knock players away which is especially dangerous when on the higher levels of the estate.
Caria Manor - Gardens
The southernmost area of the estate is the Gardens. This is a very large courtyard infested with Spider Hands and their smaller counterparts. Be very careful when walking around the gardens as these Spider Hand enemies can cling to the walls of buildings, dropping down onto unsuspecting targets. They can also burrow into the ground and emerge only when prey is nearby.
Caria Manor - Chapel
The Chapel building is an important landmark found in the west of the Gardens. The upper level contains a Site of Grace and leads to the walkways in the gardens that will allow you to reach many different collectibles as well as progress to the manor's upper level. These walkways are guarded by Knight Spirits who appear as you move around the walkways. Be extra careful of glintstone traps up here as they can knock you back down to the gardens. Follow the walkways towards the east to reach a tower with a lift that will take you up to the Manor Upper Level.
Caria Manor - Upper Level
The Manor Upper Level comprises the northern half of the estate. This area is raised high above the gardens and is guarded by Direwolves and Wandering Noble zombies. Past the Direwolves, you will find a large stone archway to the east. Beyond this is a long staircase leading up to the final area and boss. However, it is heavily guarded by Raya Lucarian soldiers and a Troll Knight. If you look to the south, there is a platform with a ladder that you can climb up which will allow you to circumvent all the enemies at the large staircase as you will wind up behind the troll. Consider using this path if you are rushing through or don't want to face a large group of hostiles. Behind the troll are more staircases to the left and right, each with a Page enemy.
At the very top of the staircases, you can look to the south to find a hole in the wall. This leads to an area outside with wooden platforms along the walls which you can jump down from to reach the cliffside graveyards. There are some collectibles to be found along these cliffs and they are guarded by Living Jar enemies.
Back at the staircase, continue on through the stone archway to find a large circular arena-like area surrounded by chairs. Once you step into the center of this area, Royal Knight Loretta will appear before you. She is the guardian of this manor and also the one bombarding the fields outside with arrows. She uses a combination of glintstone sorcery spells and polearm attacks in combat. Defeating her awards the Loretta's Greatbow sorcery spell as well as the Ash of War: Loretta's Slash - defeating Loretta will spawn a Site of Grace in her arena and allow you access to the back of the manor.
Meeting Renna and her Allies

Ranni's Rise Elden Ring Map. Click on the image above to enlarge it.
Upon completing Caria Manor, your next destination will be Ranni's Rise (Elden Ring Map Link) but be wary since you may come across the Glintstone Dragon Adula, you don't have to fight this dragon, it's optional, and up to you. At Ranni's Rise, go all the way to the top and talk to Ranni the Witch to begin her questline: The Hidden Treasure of Nokron. Take her request and she will ask you to talk to three people who are in her service, these Are Seluvis, War Counselor Iji, and Blaidd who will appear in spectral form. These three will then appear in a spectral form on the first floor of her tower - talk to Ranni again after speaking to everyone to leave.
Now, moving forward, we will guide you to complete this quest. Blaidd will be waiting in the Siofra River area and will reveal that he suspects that Seluvis knows more than he lets on. Seluvis will inform you that Sorceress Sellen has some information, and provide you with Seluvis's Introduction. Sorceress Sellen then informs the player that Starscourge Radahn stopped the stars and that defeating him is the key to Nokron's secrets.
Therefore the first step is to visit Siofra and complete it. BE WARNED: if you follow Preceptor Seluvis's questline, you will betray Ranni and fail her quest. We will not do this on this walkthrough but you can read about it on his page: Preceptor Seluvis.
Explore Siofra River (Underground)

Siofra River Well Elden Ring Map. Click on the image above to enlarge it.
For this location, we highly recommend checking our interactive Elden Ring Map to check the items that can be found, as well as points of interest for the underground section. Elden Ring Map: Siofra River Starting Point. Head to Mistwood, go down Siofra River Well and make sure to discover the Site of Grace here if you haven't. The underground section is guarded by Ancestral Follower enemies and it is recommended that you take them out or try to take the advantage of dealing enough damage at a distance.
Some foraging for materials can be done here as well. One notable material you can acquire is a Golden Centipede which will be at the corner on some rubble when you approach the large statue. It is quite bright in color and hard to miss. Other materials can be forged around the grass and will have a glow for you to recognize them. Siofra River Well is also abundant in Dewkissed Herba.
On the upper levels, there will be a corpse draped over a wall gap. Loot it to gain Budding Horn x3. If you look at the stone wall of the ruins on the upper level, you'll notice they form stepping blocks that you can traverse the top of the walls. Carefully traverse the walls to get another Golden Centipede, and other items. You will also find two Ancestral Followers in front of a hole on the ground, after grabbing everything you can on the upper section, carefully drop into the hole to find a Teardrop Scarab that will drop the Oracle Bubbles, next to the scarab is a lootable corpse.
Continue onwards till you reach a large flight of stairs next to a waterfall. There will be another body draped over the handrail where you can obtain Golden Rune (4). Directly in the waterfall, you can also obtain Soap.
You can take the next lift to the next section, exit the lift at the top, turn north and run across the bridge walkway. Enter the structure, there will be a body containing Preserving Boluses. Under the bridge area, you can walk into the river, and on one of the bridge arches, you will find Beast Liver x3. Be careful progressing from here as you may encounter a Giant Crab, but nearby you should also be able to loot some Crab Eggs.
As you move forward you will run into an Obelisk where you can light the flame. If you head up on the rocks behind there will be an Ancestral Follower. Nearby, you can loot some remains to obtain Armorer's Cookbook (6) - the last large staircase lined with obelisks will lead to Hallowhorn Grounds.
Now, this area has a mechanic to summon a special boss: you must light altars scattered around the zone. There's a map of their location on the Siofra River page. You will find Blaidd standing near hallowhorn grounds, you can talk to him to advance his quest. You should then proceed to locate and activate the pillars in the area:
- First Pillar is by the site of grace Siofra River Bank. (Elden Ring Map Link)
- Second Pillar is in a corner west of the first pillar. (Elden Ring Map Link)
- Third Pillar is on a small island in a watery area with lightning whisps. (Elden Ring Map Link)
- Fourth Pillar is by a cliff on the eastern area of the map. (Elden Ring Map Link)
- Fifth Pillar is just south of Worshipper's Woods site of grace. (Elden Ring Map Link)
- Sixth Pillar is west of Worshipper's Woods site of grace. (Elden Ring Map Link)
- Seventh Pillar is to the right on the path toward "Below the Well" site of grace. (Elden Ring Map Link)
- Eight Pillar is on the left on the path toward "Below the Well" site of grace. (Elden Ring Map Link)
When all pillars are lit, you can now enter the arena of the Ancestor Spirit boss. The deer carcass at the back of the temple starts glowing and you can interact with it to teleport to the boss' area. You won't be thrown into battle as soon as you teleport, however, and will have to walk through a mist door to fight the boss. Make sure to visit our Ancestor Spirit page to find our different strategies and also a video guide on how to beat this boss - by defeating it, players are rewarded with 13000 ![]() Runes and the Ancestral Follower Ashes.
Runes and the Ancestral Follower Ashes.
You can exit the area by interacting with a white teleporter in the middle of the arena you fought the boss in. It might be hard to spot due to the size of the arena, but won't miss it if you start with your back to the boss door and proceed forward. As you explore, you can also take a gateway (see on map) to access the Dragonkin Soldier boss fight. This Great Enemy drops the Dragon Halberd, and players can loot the Marika's Scarseal talisman from nearby. Dropping down from here and going north will also bring you to a Golden Seed and the "Below the Well" site of grace.
Elden Ring Walkthrough - Caelid
Elden Ring Main Quest Guide - Caelid (South) Points of Interest
- Defeat the NPC Invader at Smoldering Church.
- Clear out Fort Gael.
- Complete Sellia Crystal Tunnels.
- Travel to Sellia, Town of Sorcery.
- Participate in the Festival at Redmane Castle.
The Smoldering Church

Smoldering Church Elden Ring Map. Click on the image above to enlarge it.
To begin the walkthrough for Caelid, let us start at the Smoldering Church, located northeast of Stormhill (Elden Ring Map Link). You'll notice that there are multiple bloodstains around the entrance of the church, this is because an NPC Invader, Anastasia, Tarnished-Eater, will appear here when you walk up to the entrance of the church. This NPC invader wields a curved greatsword and her moves can easily be read. Make sure to dodge when she does that leaping attack and you can follow up with your attacks before she recovers as soon as she hits the ground or if she uses an attack where she swings her weapon while she walks forward, use this opportunity to hit her with ranged-attacks. Defeating this NPC invader drops the Sacred Scorpion Charm and a Furlcalling Finger Remedy - make sure to check inside the church to find the site of grace and two bodies holding the Nomadic Warrior's Cookbook [14] and the Missionary's Cookbook [3].
Elden Ring Walkthrough - Gael Tunnel

Gael Tunnel Elden Ring Map. Click on the image above to enlarge it.
Now, if you want to gather some Smithing Stones and Somber Smithing Stones, you can check Gael Tunnel, southeast from the Smoldering Church (Elden Ring Map Link). You can also find Iron Fist Alexander inside the cave. The Site of Grace for this dungeon is found in a very deep pit ahead of the entrance past two Soldiers. There is no lift to take you down so you will need to do some platforming along the edges of the pit. There is a small room next to the second ledge you drop down to on the left. There is a corpse here with a Somber Smithing Stone (2). From the Site of Grace, head north through the tunnel archway to a large cavern with wooden walkways. Kill the Soldier on the right then head down the steps and clear the Miners and Soldiers on this floor. There is a corpse on the left with a Golden Rune (5).
Head down the steps for more Miners and Soldiers congregating by the fire and a few more under the walkway. There is a Gold-Pickled Fowl Foot behind some crates in the very back below the walkway. Look to the east for a tunnel leading to another cavern crawling with Land Octopi and a single Giant Land Octopus hanging from the ceiling in the back. There is a corpse below where the giant octopus was hanging from that contains a Cross-Naginata weapon.
Head back into the main cavern and go west to find a soldier kneeling by a ladder. Take him out and then descend the ladder to find another Soldier and a Miner. Loot the corpse in the center for 5x Large Glintstone Scrap and the other corpse nearby for a Grace Mimic. Continue along to the tunnel in the south to a room with a large wooden gate to the right which contains the boss arena, as well as a smaller wooden door straight ahead. Go through the small door first which leads to the rear entrance of the tunnel as well as the second Site of Grace which you should activate. Head back to the large gate to challenge the boss of this dungeon.
Boss: Magma Wyrm
This boss is highly susceptible to magic damage. Use sorcery spells that hit multiple times such as Glintblade Phalanx or Greatblade Phalanx to quickly break its poise and get a critical hit in. Sorcery mains can very easily lock this boss down. If you aren't sorcery focused, however, you will need to watch out for its mad dash attack where it spews lava from its mouth and then dashes around the room, leaving lava trails along the ground that persist for a few seconds. It is also equipped with a very large curved greatsword which it uses to slash in very wide arcs. However, its sword attacks are very slow with a very long wind-up. Take advantage of these animations and get hits in when you can - upon defeat, the Magma Wyrm drops a Dragon Heart, the Moonveil katana, as well as 7,500 Runes.
Minor Erdtree - Caelid
_map_elden_ring_wiki_guide_2560px.jpg?v=1646260699916 "minor_erdtree_(caelid)_map_elden_ring_wiki_guide_300px")
Minor Erdtree (Caelid) Elden Ring Map. Click on the image above to enlarge it.
Next, travel north from Gael Tunnel and you should find the Minor Erdtree of Caelid (Elden Ring Map Link). This area is protected by a field boss, the Erdtree Avatar, and defeating it drops the Greenburst Crystal Tear and the Flame-Shrouding Cracked Tear items for your flask. You can also find a Cracked Pot here, one can be found at the end of a tree branch extending from the northwest cliffs behind the tree.
Since you're already here, you might as well explore the Minor Erdtree Catacombs that are nearby, so that you can gather some upgrade materials for your Spirit Ashes and you can also acquire a new Spirit Ash. Imps make these catacombs their home, with many of them perched on the walls and the ceilings, awaiting passersby. Bring ranged attacks and spells or craft throwable Consumables to knock them off their perches and prevent unwanted surprises Press the target lock key frequently to easily find these mischievous creatures.
From the site of grace, head down the first corridor ahead and hit the Imp on the ceiling from afar. There is a lift leading down around the corner. From the lift, head down the western corridor and defeat the Imp in the corner. The room around the corner has a couple more Imps inside. There is a Grave Violet just before you enter the room and a Grave Glovewort (5) at the back of the room before the next room. In the next room, there is an imp hiding on the right side and one more clinging to the ceiling. After defeating them, pull the lever by the statue and then head back to the lift.
This time, head towards the east corridor and collect the Grave Glovewort (4) on the way. In the next room, hit one of the Imps in the upper level from the corridor and three Skeletal Slimes will drop in from the ceiling. There are several more slimes in the room behind the pillars and a couple more Imps in the upper level. Beware of the floor here which is oozing with water that inflicts rot. There is a Grave Glovewort (3) to the right by the entrance and an Aconian Butterfly on the corpse in the center. There is another Grave Violet and a Grave Glovewort (5) in the back half of the room.
Head back to the lift once more and step on the switch then get off before it rises. The rest of the dungeon is found in a passageway underneath the lift. Drop below and take out the Imp patrolling the area. The next room is filled with the same scarlet rot fluid and several slimes will drop down from the ceiling as you approach. You can take them out or just sprint past them. There is a narrow passage to the north with a set of stairs leading to a room with a bunch of crabs. Take them out and pick up the Grave Glovewort (4) and Golden Rune (4) by the wall at the end. On the east side of this room is a ladder leading up to a long hallway. Take the Imp out and pick up the Grave Glovewort (3) on the way.
There is another Imp on the ceiling halfway through the hallway and one more in the room at the very end. Pick up the Imp Head (Wolf) helm from the corpse bent over the sarcophagus and then turn right toward another room. This is the upper level of the first room with the scarlet rot fluid. Take the Imps out on the balcony if you haven't done so earlier. Check the corpse ahead for 2 x Sacramental Buds and head to the left for another Grave Glovewort (5). From here, you can head back to the second scarlet rot fluid-drenched room and continue to the western corridor and turn left to find the dungeon's boss door.
Mini-Boss: Erdtree Burial Watchdog (Scepter & Sword)
This boss fight is a Duo battle against two Erdtree Burial Watchdogs. One has a Sword, similar to the one encountered in Stormfoot Catacombs while the other has a Scepter. It is recommended you focus on the scepter one as it uses ranged magical projectiles. Consider summoning a spirit to distract one dog while you focus on the other. Aside from that, the strategies are largely the same as previous encounters. Always be on the move. If you are running, their aerial slam attacks should not hit you. Weave in 1 or 2 attacks max between slams and other weapon attacks. Watch out for when a Watchdog stands on its hind legs. It will slowly walk towards you and slam its weapon down very quickly. Be ready to dodge sideways - defeating the duo awards the Mad Pumpkin Head Ashes - now your next location is to clear Fort Gael but there are a few locations you may want to check out since you will encounter them anyway.
- Isolated Merchant's Shack (Elden Ring Map Link): Located East of the Minor Erdtree, there is a merchant here and a site of grace. Resting at nightfall and entering the shack triggers a mini field boss to appear, the Bell Bearing Hunter. Defeating it drops the Gravity Stone Peddler's Bell Bearing. Behind the shack is a Teardrop Scarab as well that drops the Ash of War: Sky Shot upon killing it.
- Shack of Rotting (Elden Ring Map Link): You can find a site of grace here to discover and activate. There are also some materials here and Preserving Boluses that you can loot.
- Forsaken Ruins (Elden Ring Map Link): The area is guarded by two Giant Crows. But you can gather some materials here such as Faded Erdleaf Flower, Trina's Lily, Golden Rune [5], and Smithing Stone [4]. Make sure to also have a Stonesword Key in your inventory so that you can dispel the fog leading to the cellar. The cellar has a chest containing the Sword of St. Trina.
- Caelem Ruins (Elden Ring Map Link): Ruins found on the western portion of Caelid, where the Caelid Highway cuts through. These ruins are filled with burning Putrid Corpses that shamble towards targets and explode kamikaze-style. There are also several Maneuverable Flamethrowers roaming the ruins. The cellar area is guarded by two Mad Pumpkin Head. Defeating these two awards 6,300 Runes and allows access to the treasure room at the back, where you can find a chest containing the Visage Shield.
- Abandoned Cave (Elden Ring Map Link): East of Smoldering Wall Grace on the eastern wall of the canyon, and slightly northwest of the Sellia Evergaol. The location is only reachable by approaching from the west and crossing the canyon using a tree. You can find items here such as the Serpent Bow. the Venomous Fang, and upon defeating the Cleanrot Knights, you can acquire the Golden Scarab talisman and 7000 Runes.
Clear out Fort Gael

Fort Gael Elden Ring Map. Click on the image above to enlarge it.
Follow the guide in the Fort Gael page for up-to-date info. At the end of Fort Gael, still take the waygate teleporter at the top of the watchtower, then head west across the bridge to activate the Impassable Greatbridge shrine, as this will prevent the need of traveling through Fort Gael again when ready to go to Redmane Castle.
Sellia Crystal Tunnel

Sellia Crystal Tunnel Elden Ring Map. Click on the image above to enlarge it.
There are a lot of items that you can find in the open world, so we highly suggest that you visit our Interactive Elden Ring Map to find the items that you want to find or at least discover the ones you've missed. The next location after Fort Gael will be Sellia Crystal Tunnel, northeast from the Abandoned Cave (Elden Ring Map Link). Just like any other tunnel location, this is a good area to gather Smithing Stones and Somber Smithing Stones. There is an alternate way as well to enter, you can reach this location (and by extension Caelid) early by opening the chest in Dragon-Burnt Ruins. It will envelop you in smoke and transport you to the mine but be warned, the enemies within may be too difficult for you at this time.
This section assumes you reached the dungeon naturally by exploring Caelid. From the Site of Grace, head north and up the ladder to reach a large cavern with many Digger enemies mining for crystals. These enemies are weak against magic and piercing attacks but resistant against other attack types. You can ascend by heading up the slope on the right but be careful of the Prawn Miners along the way. There is one standing atop the storage shed on the left. When you reach the top of the path, head for the end of the wooden walkway on the left and kill the prawn on the way. At the end of the walkway is a corpse with a Rune Arc. Opposite the walkway, you can find a Somber Smithing Stone (5) on the wall behind some creates. Head back to the storage shed with the Prawn that you passed on the way and jump up on its roof to reach the wooden platform in the east and drop down the edge of this platform to proceed.
In the tunnels ahead, beware of an ambush by a Digger and pick up the Smithing Stone (5) on the ground on the left. In the next section, climb up the ladder and go around the wooden walkway to find a corpse with a Somber Smithing Stone (4). Head north and take out the Prawn above the storage shed ahead. A Digger will also come out the side towards you. Check the shed for a chest containing the Rock Blaster spell. Go around the shed and take the ladder to the roof. There is a Golden Rune (4) on a corpse by the ladder. Kill the Diggers on the roof and head west to spot a tunnel. There is a Somber Smithing Stone (4) before the entrance to the right.
When you enter the next section, be careful of an ambush by a Prawn in the wooden structure to the left. There's a corpse with a Dragonwound Grease in front of the room and a Somber Smithing Stone (4) inside the room. There are two more Prawns on the elevated platform to the northeast. Take them out and collect the Faithful's Canvas Talisman on the corpse by the wall and the Smithing Stone (5) to the left. Head back down the raised platform and through the tunnel to the southwest and through the large wooden gate to engage this dungeon's boss.
Mini-Boss; Fallingstar Beast
The Fallingstar Beast is a massive quadruped made up of crystals or rock. It has a long spiky tail and a head reminiscent of a centipede's, with massive mandibles extending from its face. Because of the boss' size, you will have little room for maneuvering. The main attacks to watch out for are its head swipe combo, in which it bashes its head from side to side multiple times as well as its charge attack, in which it dashes towards you three times, quickly changing directions after each charge.
The beast can also cause the ground to erupt in a rockburst. This is telegraphed by lightning forming on its mandibles, as well as on the ground, indicating where the ground will burst. The key to defeating this boss is to constantly be on the move and attack during its long recovery animations. Defeating the Fallingstar Beast rewards you with the Somberstone Miner's Bell Bearing (1), x4 Gravity Stone Chunk, a Somber Smithing Stone (6) and x5 Smithing Stone (7), as well as 7,600 Runes - for more information of this boss, you can visit our Fallingstar Beast page.
Your next destination is Sellia, Town of Sorcery, but the following can be done/obtained on the way:
- Slightly southeast of the Astray from Caelid Highway North grace site, you will find the Aeonia Swamp Shore grace site. Then north of that you will find the Street of Sages Ruins, go there to find some items.
- Go south of the Astray from Caelid Highway North grace site, and you'll find the Caelid Highway South grace site, head east along the road and you'll find the Southern Aeonia Swamp Bank grace site.
- South of the Southern Aeonia Swamp Bank grace site, you can find a Windy Crystal Tear for your physick flask.
- Continuing south, you can find a Golden Seed.
- Following the road further south, then go west when the road splits, you can find a Teardrop Scarab that will drop a Somber Smithing Stone [3].
- Continue west from there and you will find the entrance to Caelid Catacombs.
Travel to Sellia, Town of Sorcery
To the east of the Swamp is Sellia, Town of Sorcery. This is an important location with many items to pick up. Notably, you will meet Gowry at his shack just north of Sellia Gateway, who will task you with defeating Commander O'Neil in the swamp to obtain the Unalloyed Gold Needle. Return it to him, and then head further northeast to the Church of the Plague to meet Millicent. Follow the steps outlined in her questline to obtain Prosthesis-Wearer Heirloom and then exhaust her dialogue to move her to Altus Plateau. Make sure to loot the Sacred Tear in the area, then head into Sellia proper.
Millicent's Questline (Caelid)
- From the Southern Aeonia Swamp Bank grace site, make your way north past Sellia Gateway. Note that along the way, there will be a troll atop a high cliff to the east that will throw projectiles at you, keep moving until you past the gate to avoid getting hit.
- Beyond the gate, you should see a shack on the east side of the road, but along the path to the shack, there's a docile Giant Dog sitting there watching the roads. Don't disturb it and go around it, unless you plan on killing it, because if you run towards the shack with it chasing you, there's a chance it may kill Gowry, a very important NPC in this questline.
- Speak with Gowry in his shack and he will ask for a favor. He wants help to heal a young girl, Millicent, found beyond Sellia, who has the Scarlot Rot. To do this he will ask you to seek an Unalloyed Gold Needle dropped by Commander O'Neil located in the deep scarlet Swamp of Aeonia, outside Sellia's bounds. In return, he will share the secrets of the town of Sellia.
- You will need to fetch the Unalloyed Gold Needle and return it to him. After returning to him, he'll tell you he'll need some time to repair the needle and will give you Sellia's Secret.
- Teleport to the Aeonia Swamp Shore grace site, and head northeast towards the brambles in the swamp.
- You may get invaded by Millicent along the way, so be careful and not fight her in the swamp, as you will be at a disadvantage due to the rot. Either find a safe ground and lure her in on safe grounds, or have some Preserving Boluses handy.
- Make your way northeast to the Inner Aeonia grace site and discover it. From there, head south into the brambles and you'll find Commander O'Neil.
- Be aware that there's a Cleanrot Knight that patrols the area and may attack you.
- You can summon your Spirit Ash here as the fight is not instanced.
- The ground around the boss can cause rot buildup, so be vigilant.
- After beating the commander, make sure to discover the Heart of Aeonia grace site before continuing. Return to Gowry and give him the Unalloyed Gold Needle.
- Warp to a nearby point or quit the game then reload and return and he'll give you the repaired needle.
- Bring the needle to Millicent at the Church of the Plague.
- Light the beacons in Sellia, according to the secret Gowry gave you, to open the way to the church. Three need to be lit and this will also unlock treasure chests behind each barrier with the final barrier allowing access to a double boss fight.
- Follow the Sellia, Town of Sorcery walkthrough. After that, discover the Chair-Crypt of Sellia site of grace, then warp back to the Sellia Under-Stair grace site, run up the staircases, then head northeast, up the giant staircases where you got the Golden Seed, and go through the gate and discover the Sellia Backstreets grace site. From here, follow the road east then south to the Church of the Plague.
- After Millicent uses the needle, rest at the nearby site of grace, then exhaust her dialog. She will gift you the Prosthesis-Wearer Heirloom. Rest again/ quit and reload at the site of grace to move her to Gowry's shack.
- Return to Gowry's shack to find him gone, but Millicent is there. Exhaust her dialog. Quit/ reload at the shack, this will move Millicent and have Gowry return. You can now purchase spells from him.
- Millicent now will be located just north of the Erdtree-Gazing Hill Grace in Altus Plateau [Map Link]. The player can give her the Valkyrie's Prosthesis item to advance her questline after exhausting her dialogue.
- The rest of the questline for Millicent is located in another region. To continue reading about Millicent's questline, please check or Millicent page.
The Radahn Festival in Redmane Castle

Redmane Castle Elden Ring Map. Click on the image above to enlarge it.
Redmane Castle is a small castle that is heavily guarded at the castle's outskirts by Radahn Knights and Soldiers. The Redmane Castle serves as the gathering point for warriors alike who are wanting to participate in the Radahn Festival. (Elden Ring Map Link)
**NOTE: (App ver. 1.02.3) Either collecting both Dectus Medallion halves and taking the Grand Lift of Dectus OR reaching far enough in Ranni's questline, Blaidd will siege the castle and kill almost every enemy and the duo boss. This will make going through the castle easier but doors will be locked leaving you temporarily out of some loot. After defeating Radahn, speak to Blaidd on the battlefield. Then fast travel to the Chamber Outside The Plaza Grace, speak to the Castellan at the chapel, and rest at the Grace several times. This repopulates the castle and unlocks the doors allowing access to previously unavailable loot including the Red-Hot Whetblade.**
Before you go forward make sure you to read up on Ranni the Witch's questline, and complete it up at least up to the point where you received an introduction from Preceptor Seluvis to Sorceress Sellen, take the introduction to the sorceress (at this point she should be at the Waypoint Ruins) and show it to her before continuing with the following below.
The fastest way to reach Redmane Castle is by using the waygate teleporter found on the watchtower of Fort Gael [Map Coordinates]. When you arrive, you'll find yourself outside the fortified outskirts of the castle. If you haven't already, be sure to first head west across the bridge to activate the Impassable Greatbridge shrine. Next to the shrine, there is a watchtower you could climb to gain loot from. Be careful though as at the top of the first ladders, there are 2x Radahn Soldiers wielding spears and a Radahn Knight also wielding a spear at the top of the second ladder. Work your way back east across the bridge, and around the base of watchtower encountered here to find x1 Smithing Stone [3] on a corpse. Continue up the pathway until you encounter the main gate, which is currently closed. Follow around castle to the southwest until you see the same tower we previously went around to loot a smithing stone. Jumping the gap to its roof, you can then climb down two ladders in order to find a corpse that can then be pillaged to acquire x1 Smithing Stone [6]. Climb back up both ladders and jump off the tower towards the cliffs on the southeast to continue (you might want to summon Torrent to make this jump easier).
Along the path of the cliffs, you'll encounter Giant Bat enemies. Keep moving southeast as you reach the top and around the castle where you'll come across a field full of tombstones and a large tree without its leaves. You'll encounter a few enemies here such as more Giant Bats and a Poisonous Bat by the tree, but more importantly, a Teardrop Scarab, hiding between some tombstones on the left. Make sure to quickly kill the Teardrop Scarab to obtain x1 Ash of War: Flaming Strike - make sure to check behind the tree to find x1 Miquella's Lily and x8 Smoldering Butterfly that is looted off a corpse that is sitting against a tombstone.
From here, use the ladder to climb to the top, you don't need to take the stairs since the door at the top is locked and can only be opened from the other side. At the top of the ladder, make a left and simply follow the path of the rooftop section until you reach another ladder on the west that you'll need to climb down. At the bottom, you'll first encounter a Zombie Dog roaming. Kill it and enter the stable-like room on the left where you'll see multiple Commoner enemies resting (most of them will not attack you unless you do). Inside that room, you can loot two corpses to find Armorer's Cookbook [5] and x1 Smithing Stone [5]. Don't forget to unlock the door here to open the shortcut leading back to the open field with tombstones.
Go back outside, turn left and you'll see another arch doorway. Inside that room, there is a single Executioner-looking enemy that wields a crossbow. You can kill it to acquire some Runes but there isn't anything inside and the door here is locked. Use the bricks and rubble to jump over a low part of the wall and down into the clearing below.
Upon landing, look to your left to find a guardhouse. Go up the stairs and check behind the wooden crates to find x1 Golden Rune [6] that is looted off a corpse. Go back down and head east first towards the entrance of the plaza, there are two Lion Guardian enemies at the north section leading to the main gate that we can ignore for now. Midway up the steps, you'll see a waygate teleporter. Walk past it, continue through the courtyard past the wooden stakes and go inside the room on the right to find the Chamber Outside the Plaza Site of Grace. After discovering the site, go back outside and check the west section. Go up the stairs to another rooftop where you can find a corpse sitting against some wooden crates. Loot it to find x1 Smithing Stone [4].
Go back down towards the west part of the castle where you'll see a hangman's gallows. You'll notice that you are on high ground and you can attack the two Lion Guardian enemies below that are roaming around the castle's main gate. Killing both of the enemies rewards you with Runes along with x2 Somber Smithing Stone [4], x2 Beast Blood, x4 Old Fang. Jump down once the area is clear and loot a corpse that's on a pile of dead bodies and skeletons to find x1 Smithing Stone [4].
Check the tree near the gate to find x1 Arteria Leaf and one Skeletal Slime enemy. Most of the buildings here with the doors are locked, so check the area near the south corner to find a glowing Teardrop Scarab, which will refill your flask if needed. If you haven't discovered the Imapssable Greatbridge site, head back to the waygate teleporter that you passed before, and use it to transport yourself past the heavily-guarded great bridge, near the Impassable Greatbridge site [Map Coordinates] - after touching the grace, use the waygate to transport back to the castle's plaza.
From the waygate, head north through the doorway, past the site of grace, and enter the plaza where you'll encounter a few NPCs gathered for the Radahn Festival. You can find NPCs such as Blaidd, Alexander, and a maiden who gives you the Polite Bow Gesture if you talk to her. Now, go north, up the stairs, then towards the right where you'll see a large sculpture of a chalice. There's a body on the left side of it - loot it to find x1 Somber Smithing Stone [5]. When you are ready to start the festival, turn back in the direction you just came from and speak to the crier on the right side of the stairs. A cutscene will trigger.
After the cutscene, run up the stairs opposite the crier and enter the chapel where you can loot a body for x1 Smithing Stone [6]. Leave the chapel via the eastern door, and you'll see a lift. Ride it down and at the bottom, you'll find a waygate teleporter and a Stake of Marika next to it. The waygate teleporter will transport you to the boss arena at Wailing Dunes, where you will fight Starscourge Radahn - we highly suggest checking our Starscourge Radahn page to find more guides and strategies on how to defeat this boss.
After defeating Radahn, you will receive Radahn's Great Rune, visit the Divine Tower of Caelid to restore it.
Nokron, Eternal City and Ranni's Quest
After defeating Rahdahn, you will now have access to Nokron, Eternal City. Follow the walkthrough on that page to procure the Fingerslayer Blade along the way. After finishing with Nokron, give Ranni the Fingerslayer Blade to continue with her quest, refer to Ranni the Witch page for more info. After giving her the blade, Renna's Rise will be opened and you can proceed to the next part of this walkthrough.
Elden Ring Walkthrough - Nosktella, Eternal City & Lake of Rot
Elden Ring Main Quest Guide - Nokstella, Eternal City & Lake of Rot Points of Interest
- Explore Ainsel River Main
- Acquire Miniature Ranni
- Explore Nokstella, Eternal City
- Speak to Miniature Ranni
- Travel to the Lake of Rot
- Defeat Astel, Naturalborn of the Void
- Ringleader's Evergaol
Ainsel River Main
Elden Ring Map: Nokstella Eternal City Starting Point. Begin from North-West Liurnia of the Lakes. Take the stairs to the very top of Renna's Rise and take the waygate there. It will teleport you to Ainsel River Main, that northern part of Ainsel River that was inaccessible last time you were there. Upon entering through the Waygate, pick up the Miniature Ranni from a coffin, then proceed to the Site of Grace.
Go ahead and hide behind the partial walls to approach the Malformed Star. Take it out for a Somber Smithing Stone (7), then turn around and loot two Glove Gravewort (6), two Ghost Glovewort (6) and one (7), two Golden Rune (7), Human Bone Shard x3, and a Smithing Stone (4). Beware of the Clayman. Behind the Giant Poison Flower (which emits clouds inflicting Madness) near the waterfall are the Clayman Ashes and a Stonesword Key. Make your way back to where the Malformed Star was to pick up another Ghost Glovewort (7).
Head down the tunnel where some Giant Ants are waiting for you, as well as Stimulating Boluses. There are two Ants with wings ahead, as well as an Ant with a reinforced head, reducing the damage you deal with it significantly. Pick up Shield Grease x2 and Golden Rune (10) x8, then head to the left. Go ahead to fight some Scythe-wielding gravity mages, then turn right until see a corpse above you. Drop down and climb onto the ruins to loot the Wing of Astel from a chest. Then go back to get a Somber Smithing Stone (6) from the aforementioned corpse. Go back to where the ants were and take the other way, pick up another Ghost Glovewort (6) in front of the wall, then go up to enter Nokstella, Eternal City.
Nokstella, Eternal City
Continue west and keep following the path up, making sure not to fall back down into the lower floors of Ainsel River, and eventually, you'll reach Nokstella, Eternal City (Elden Ring Map Link). From the Site of Grace, there is Magic Grease x3 in the ruins directly to the left. On the right, you will find a Swordstress riding a Giant Ant, and Ghost Glovewort (7). In the ruin ahead there are two Nox Monks, a Smithing Stone (6), and Drawstring Holy Grease x2. You can go to the right around the larger building ahead to pick up Silver Tear Husk x3. Going straight ahead, there are 3 Poison Snails guarding a Celestial Dew in an alcove to the right. Further down the path, more Snails await you, four of them drop down onto you when you loot the Smithing Stone (6). To your left are many Silver Tears, some of them will explode into lightning upon death, along with another Ant-riding Swordstress.
There are also some tears up on a ledge to the right which will shoot at you. Try taking one of the tears out from range to trigger a chain reaction. There is a Golden Rune (10) on the right side of the river, a Ghost Glovewort (8) on either side. Consider fighting the remaining tears before picking these up, however. Some of them have shields. Continuing on the right you will find 3 Giant Ants and a Stonesword Key. Take out the remaining Swordstress riders and tears, then pick up another Ghost Glovewort (8). In the far right corner, there are two plated ants that you can simply ignore. The ruin on the left contains a Celestial Dew. Quickly go down the elevator to activate the Nokstella Waterfall Basin Site of Grace, then go back up.
The remainder of this walkthrough is dedicated to picking up items, including a Golden Seed at the end. To start, go to a ruin on the left side earlier which contains a Somber Smithing Stone (7) and many tears. There is a single Golden Centipede in another room. Go further back and up the stairs to fight a Swordstress guarding a chest with Ghost Glovewort (9). At this point, you can go back to the first site of grace, or spend some of the upgrade materials.
Next, head up the main stairs where another Swordstress awaits you, along with Fan Daggers on a corpse. Turn left to fight yet another Swordstress who guards a chest containing the Ant's Skull Plate. Note that the chest is not in the center but off to the right. After fighting the tears further up the stairs, head around the building on the left to find the Archer Ashes. Inside the building, more tears await you, a chest containing the Ghost-Glovewort Picker's Bell Bearing (2). Now heading right, pick up two Golden Rune (10). Go around the building on the left again and use a Stonesword Key to find two Nox Monks and a chest with the Nightmaiden & Swordstress Puppets Ashes inside.
Now, upon crossing the bridge, a giant iron ball will roll at you. Try sprinting to the right next to the building ahead, the ball will get stuck. You will see particle effects once it attacks, then you have a short window to attack for yourself. In the building, there is another ball on the ceiling, so try to take it out with ranged attacks from outside. Each ball drops a Larval Tear, the chest inside contains a Great Ghost Glovewort. There is a Golden Rune (10) on the bridge and another one on the stairs. Turn right past the stairs and pick up a Smithing Stone (6).
The building on the left contains another ball along with many tears and a chest with a Somber Smithing Stone (7). On the stairs to the left from here is a Teardrop Scarab carrying a Somber Smithing Stone (6). The building is occupied by two silver tears that transform into humans, and a Swordstress. It also contains a chest with the Moon of Nokstella. Exit to the left, drop down some ledges, and take the elevator down to pick up a Golden Seed. You are done now and can warp to the Nokstella Waterfall Basin Site of Grace. Select the option "Talk to Ranni" until you exhaust the dialogue while resting there, if you want to follow her questline.
There is a Ghost Glovewort (9) to the left of the elevator you came down with, then go through the tunnel. There are three Basilisks here, as well as a Smithing Stone (4) and (5). Fighting the Baleful Shadow here grants you the Discarded Palace Key to be used in the Raya Lucaria Grand Library. Go inside, take the elevator down and touch the Lake of Rot Shoreside Site of Grace, run to the water's edge and find a corpse with the map fragment for the area.
Now that you've got the map and a Site of Grace to teleport to, we're taking a quick detour for Ranni's quest. Feel free to skip this part if you've chosen not to provide your services to her. Teleport back to the Raya Lucaria Grand Library. There is a small chest next to a bookshelf northwest of where Rennala is sitting that can be unlocked with the Discarded Palace Key that Miniature Ranni handed over to you. Inside you'll find Ranni's ring, the Dark Moon Ring. And with that out of the way, you can teleport back to the Lake of Rot.
Lake of Rot and the Grand Cloister
Just a reminder that the waters of Lake of Rot are treacherous and can quickly apply Scarlet Rot each second that you stand in the water. It is recommended to have many Preserving Boluses on hand to remove the status effect immediately and even equip Talismans and Armor that can help alleviate its build-up.
If you look out into the lake, you may be able to see four pillars standing on their own small island in the distance. These small islands have buttons on them that raise landmasses in the lake, giving you safe platforms to stand on while navigating through the Lake of Rot. The nearest pillar to you right now at the starting island should be to your southwest, and after that, the next one should be south of the first pillar. You may notice a familiar-looking boss in the middle of the lake.
Ignore him for now and find the next two pillars to raise all four landmasses in the lake and make item collection and boss fighting easier and much safer. One of the landmasses lifts the button, with you on it, to a raised level. While you're here, you may as well defeat the Alabaster Lord to receive his sword, the Alabaster Lord's Sword, and loot the Somber Smithing Stone (9). There is a slope that leads to a ladder on the east side of the pillar to help you to get down or go back up.
With all the landmasses raised, we can go deal with the boss. In the middle of the lake, next to three raised islands, sits the Dragonkin Soldier once again. Defeat him, being careful not to get knocked down in the water. From here you can choose to loot bodies scattered all around Lake Rot to obtain items, many of which are Somber Smithing Stone (7) & Somber Smithing Stone (8). Several items of note are the Nomadic Warrior's Cookbook (22) obtained from a lone chest in a large ruin in the southwestern section of the map, and the Mushroom Crown on a corpse hanging off a pillar in the ruins in the southeast corner.
The Grand Cloister
After you're done with this area, head over to the southern section, where you'll find a waterfall. Climb down the stairs next to it to reach the Grand Cloister and grab the Grand Cloister Site of Grace. The area here is infested with Lesser Kindreds of Rot and there are a few corpses with Golden Runes. If you head north, you'll come across a waterfall with two corpses under it, one with a Smithing Stone (6) and another with a Smithing Stone (7). Be prepared as you approach this waterfall, however, as an Ulcerated Tree Spirit ambushes you from the water. Once you manage to defeat it, you'll be rewarded with a Golden Seed.
Next, head west, where you'll see a bunch of rot prawns dancing in front of a temple. You can kill them one by one since they don't seem to take notice of their surroundings much. When they're all gone, head inside the temple to grab the Scorpion's Stinger. Head back out of the temple and head south, where you'll find an open coffin at the tip of the waterfall. Interact with the coffin to rest in it and a cutscene will play.
If you open your map now, you will find yourself in an isolated area south of the Lake of Rot. Through the mist door, you'll fight Astel, Naturalborn of the Void, defeating this boss, you'll gain the Remembrance of the Naturalborn. You can check our Astel, Naturalborn of the Void page to find various strategies on how to defeat this boss - with all of the underground areas fully explored, head north past his boss room to find a lift that takes you back to the surface at Deep Ainsel Well. Head northeast and you'll come to the Moonlight Altar grace site, located in Western Liurnia, which if you've been following the walkthrough, were inacessable until now. Here are the few things we can explore here:
- Chelona's Rise (Elden Ring Map Link): A tower found in the very corner of the upper plateau in Liurnia's southwest. This tower is initially sealed, with an imp statue at the entrance holding a glowing book, instructing you to "seek three great wise beasts". See the tower's page for details. You can find the sorcery spell, Ranni's Dark Moon in a chest at the top of this tower. Nearby is the Altar South Site of Grace as well.
- Moonfolk Ruins (Elden Ring Map Link): A ruins section where you can gather some materials and find x1 Somber Smithing Stone [8].
- Lunar Estate Ruins (Elden Ring Map Link): The ruins of a large estate found in the southern plateau of Liurnia, accessible only after making significant progress in Ranni's questline. Once accessible, you can find a Golden Rune [8] in this ruins location.
- Cathedral of Manus Celes (Elden Ring Map Link) Located at South West Liurnia of The Lakes. Accessible only after making significant progress in Ranni's questline. However, you can find the Glintstone Dragon Adula roaming around only if you've dealt enough damage to it at its initial location.
- Ringleader's Evergaol (Elden Ring Map Link). Located North West from Moonlight Altar site of Grace. This Evergaol does not require a Stonesword Key to unlock as the portal mechanism in the center is active as soon as you enter the area. Within, you can challenge Alecto, Black Knife Ringleader, a remarkably agile and aggressive assassin. Upon defeat, Alecto drops the Black Knife Tiche spirit ashes as well as 80,000 runes.
Elden Ring Walkthrough - Altus Plateau
Elden Ring Main Quest Guide - Altus Plateau Points of Interest
- Travel to Altus Plateau
- Speak to Millicent
- Complete Old Altus Tunnel
- Complete The Shaded Castle
- Travel to the Golden Lineage Evergaol
- Complete the Second Church of Marika and Minor Erdtree
- Explore the Eastern Altus Heights
- Unlock Mt Gelmir's site of grace
Exploring Altus Plateau
Elden Ring Map: Altus Plateau Starting Point. The Altus Plateau, northeast of Liurnia, is your next destination. There are two ways to access it: fight your way up through the cliffside dungeon at Ruin-Strewn Precipice (the red-outlined hole on the map, accessed from the northern canyon of Liurnia of the Lakes), or use the left and right halves of the Dectus Medallion at the Grand Lift of Dectus.
Entering from Ruin-Strewn Precipice is better as you can obtain several crafting materials, including a Dragon Heart and Golden Seed within it. You will head up to the plateau from Magma Wyrm Site of grace and can pick up the Ruler's Set shortly after.
You are now at the Abandoned Coffin site of grace (see it on the map here). Head West from this site of grace and defeat a Teardrop Scarab to loot Ash of War: Sacred Order. Further east, Perfumer's Ruins has the Omenkiller Set, Perfumer's Cookbook (1), and Perfumer's Talisman. Nearby, Unsightly Catacombs has valuable Ghost Glovewort (5) and Grave Glovewort (4) to loot, as well as the Perfumer Tricia spirit ash from the dual boss of the dungeon.
Return to Abandoned Coffin and follow the road north toward Lux Ruins, Ancient Dragon Lansseax will standinn your way but it's an optional fight as you can just run by if you prefer, heading to meet Millicent and collect a Golden Seed before veering slightly south to Erdtree-Gazing Hill and Lux Ruins. Ash of War: Shield Crash can be looted from a teardrop scarab here, and the Greatshield Talisman from a chest further east.
Elden Ring Walkthrough - The Old Altus Tunnel
These tunnels are located southwest of the Bridge of Iniquity in Altus Plateau (Elden Ring Map Link). The location may be difficult to find due to the large amounts of similarly jagged, rocky hills in the area. The entrance is barred by an Imp Statue which requires 2 Stonesword Key to dispel the fog. The Old Altus Tunnels are a rich source of Cracked Crystals. There are countless amounts of these items found all over the walls and they respawn whenever you rest at a Site of Grace. Be sure to be on the lookout for these if you need them for crafting. Inside, you will predominantly encounter Miners and Zombie Dogs. There are also a couple of Nobles guarding the workers.
From the entrance, check behind the wall on the right for a corpse with 3 Explosive Stone Clumps. Descend the lift to find the Site of Grace. Note that this is the only Site of Grace within these tunnels, but the dungeon isn't particularly long either. When ready, head down the first corridor to find a few barrels and a storage shed on the left. Beware the red barrels marked with a white stripe. These are explosive barrels and can be set off with fire damage. However, you can also use these to your advantage if you have any fire spells. Inside the shed are a Miner and Zombie Dog waiting behind the barrels. Look outside the shed and to the right for a Smithing Stone [5].
Next, you will arrive in a large cave with lots of wooden walkways. Follow the closest one to the right and head up the ladder. This leads to a room with second storage shed on the right and 2 miners chipping away at the crystals while a Noble guards them. Take out the Noble first and two dogs should come rushing out of the shed. After defeating them, check the shed for a Boltdrake Talisman +1, which is an upgrade to the original talisman. Check around the left side of the shed to obtain Somber Smithing Stone [6]. Outside the shed and to its right, you can find Stanching Boluses amongst the crates. In the small alcove right of where the miners were, there is another Smithing Stone [5] behind the barrels. Head back out to where you climbed the ladder and this time, drop down onto the storage shed below to get to the lower level.
Before jumping down, consider taking the enemies below out with ranged attacks from the roof of the storage shed you jumped on. There is a Noble and two here who are quite powerful and tanky but should be rendered helpless with a ranged onslaught from your unreachable location. When you finally drop below, check the shed you were on top of for a Smithing Stone [4]. There is another Smithing Stone [5] in the small space between the shed and the east wall. The shed on the opposite side has a Troll Hammer but watch out for the dogs inside. Check the alcove east of the sheds for yet another Smithing Stone [5]. You can climb up the long ladder here to get to a wooden walkway with two Miners. You will find another Smithing Stone [5] by the walls and a Golden Rune [6] on a corpse in this area. Get back down to the lower level and look for a tunnel on the west side which leads to a small room with a dog and a miner. Defeat them and check the crystals in the room for a Smithing Stone [5] and a Somber Smithing Stone [5].
Finally, go back to the long ladder and head through the tunnel behind it to reach a fog gate that leads to the dungeon's boss: The Stonedigger Troll. This boss is quite simple and is easy to punish at range if you use your Spirit Summons to distract it. Watch out for its roar which can knock you down, allowing the troll to follow up with a devastating smash with its club. Upon defeat, the boss drops the Great Club hammer weapon and 9,600 Runes - exit and continue following the canyon north until you come to a poisonous area, this is the Shaded Castle (Elden Ring Map Link).
Elden Ring Walkthrough - The Shaded Castle
The Shaded Castle can be found in the North part of the Altus Plateau between the Mt. Gelmir and the Altus Plateau regions and can be seen while crossing the rope bridge between them near the Bridge of Iniquity Site of Grace. The castle is half-sunken into a poisonous bog with the air tinged yellow by the fumes. The castle can be reached by heading north in between the cliffs between the regions, heading east and north from the Altus Tunnel Site of Grace is a good way to get there. The Second Church of Marika is close to this area through a safe way down to the valley from there may be difficult to find and navigate.
To enter the Castle players can use their steed to jump over low parts of the wall to get on top. One way in can be found is by following the wall to the northwest and climbing the rocks into the wall. Another way in can be found on the northeast side, keep close to the wall when the ground raises to find a low wall that can be jumped into. The northeast entrance is recommended as this entrance is close to the Shaded Castle Ramparts Sites of Grace, follow the wall southwards to find this Site of Grace. Another Site of Grace in this location is the Squire's Residence [Elden Ring Map Link]
Along the top and within the castle walls players will find Poison Skeletons as well as some humanoid enemies wearing cloaks and a dagger. A variation of the cloaked enemy using a shield and throwing fire can also be found on the walls. Many poison slugs can be found on the ground but also latched on the walls of the castle. 2 Boss enemies from other areas appear in The Shaded Castle as regular enemies, Royal Revenants show up in 2 different places on the castle grounds while Cleanrot Knights can be found in a few different areas atop the walls and within the castle.
From the Shaded Castle Ramparts Site of Grace, there is a ladder that leads into the castle area. A large amount of the castle grounds are covered in poison, walk carefully between safe or raised areas to not accumulate poison status while exploring or fighting in this area of The Shaded Castle. Using ranged attacks and abilities can be very effective in this part of the castle as you stand in safe places or use the height and range advantage of being on the walls to easily deal with the enemies. Within the walls of the castle, there are a few large dead trees that can be seen from far away, powerful enemies can be found under them but also many bodies with treasures found on them. A Royal Revenant can be found under the black tree in the northwest around bodies that hold a Ghost Glovewort (4) and a Somber Smithing Stone (5). You can find a Smithing Stone (5) and Drawstring Fire Grease under the tree in the south of the castle.
There are also rocks that cut out from the ground creating small pockets within the castle grounds where enemies and treasure lie. Within the east side of the outer wall, north from the Shaded Castle Ramparts site of grace, is a small area with the south side walled by rocks. Walking down the stone pillar into the area players will be able to see the "Champion's Song" Painting on the right within a wooden structure, to get to the painting there are a set of stairs at the bottom that players can walk up. Following the outers walls of the castle in the northwest area, there is an area where one can find a large Poisonflower along with many poison skeletons, a Smithing Stone (5) can be found in the corner behind it.
To get further into the castle, there is a ladder leading up to the inner west wall, going over this wall will bring you into the next area of the castle and give you access to the next Site of Grace as well as the ladders up to the main castle areas. Going along the top of this wall, heading to the west, you will find a Cleanrot Knight at the end defending the entrance to a small room there. Defeat them to get to the chest that has the Valkyrie's Prosthesis within, you will need this to advance Millicent's quest. Going east along the wall you will find some poison skeletons and one particularly large one on the wooden bridge.
From the inner west wall, you can climb over the roofs of the broken buildings to get across the gap and reach the Shaded Castle Inner Gate Site of Grace. Alternatively, you can go up the stairs in the middle of this courtyard area then head left to the Site of grace all the same. The inner east wall can be reached by a ladder that leads up from the inner part of the wall on the east side of the courtyard. At the top of this wall are some enemies but also the Perfume Bottle and a Smithing Stone (5) for players to loot. In the middle part of the courtyard up the stairs is a small garden area where a Royal Revenant will spawn and attack the player, also in this garden is a Rot Grease on a body.
The Shaded Castle Inner Gate is the last Site of Grace between the player and the boss, there will be 1 ladder that the player can kick down later to give themselves a shortcut back up. Going further inside the gate, past the many statues, there will be a ladder on the left leading up to the rest of the castle, a spirit NPC can be seen on the right with some clues on what had taken place in this castle.
Heading up into the castle you will start seeing Zombie Dogs and other humanoid enemies within the buildings. Be careful of the small spaces in the buildings and walkways and of being swarmed by multiple enemies. The rooms here have many statues and bookshelves, with enemies hiding behind some of them, the rooms do not have great lighting so a torch is a good idea. Within the first room after going up the ladder there is an undead soldier wielding a sword waiting on the side of the entrance ready to jump you. Inside this first room, you'll find a ladder with a ranged enemy next to it and a Page hiding behind the statues. Taking the ladder up will bring you to an open area with no enemies, the Perfumer's Cookbook (2) can be found here on the body sitting on the chair.
Leaving the room leads to an open walkway with a bridge that reaches the other side and the next tower up. On the right is a zombie dog chewing on a body, pillage the body for a Hefty Beast Bone. A Cleanrot Knight can be found on the bridge blocking the way, once across the bridge the next room has many statues but also 2 Page enemies, one behind the statues and one, up the stairs. 2 Gold Fireflies can be found on a body at the back of the room.
Going up the stairs leads to the upper courtyard area of the castle, this is the last area with enemies before the boss and also where a ladder can be found that when kicked down will help create a shortcut from the Inner Gate Sites of Grace. Another Cleanrot Knight can be found defending the central tower, there are also many zombie dogs in this area, be careful with being surrounded by them. Once this area is clear head to the opposite side of the courtyard from the entrance to find a lit brazier near the edge with a ladder to kick down. The central tower holds an elevator for players to go up, across the bridge at the top is the boss fight for this area.
Mini-Boss: Elemer of the Briar
Elemer of the Briar is a humanoid boss that primarily uses one large sword to fight the player that deals a large amount of damage with their attacks. The large greatsword they use and the shield on their back are both dropped when the boss is defeated. While this boss is a melee fighter, the sword that the boss uses can be thrown and used at a range, the boss can even continue attacking at range before retrieving their sword. Watch out for when their arm or weapon glows red to dodge out of the way of their attacks. After beating the boss, in the hall where they are defeated the Castellan's Hall Site of Grace appears and becomes available to use and he drops the Marais Executioner's Sword along with the Briar Greatshield, you can visit our Elemer of the Briar page to find more guides and strategies on how to defeat this boss.
Other Points of Interest in Altus Plateau
Once you've completed this location, there are a few things you may want to check before proceeding to the next area:
- Maleigh Marais, Shaded Castle Castellan (Elden Ring Map Link): Located on the west side, outside of The Shaded Castle, is a hostile NPC who will chase and attack you when you are seen. Defeating this hostile NPC will drop the House Marais Set and Antspur Rapier.
- Golden Lineage Evergaol (Elden Ring Map Link): Evergaol is located in the south-western Altus Plateau. Godefroy the Grafted is imprisoned within. Defeating the boss drops the Godfrey Icon talisman.
- You can follow now follow the main road north and activate the Altus Highway Junction site of grace, nearby you can meet Boc the Seamster and advance his quest. North from here, the road takes you to a Golden Seed and Map (Altus Plateau) to reveal the region.
- Slightly north, talk to Brother Corhyn who is looking for the Goldmask. Directly east from the Altus Highway Junction Site of Grace, follow the road until it breaks off north into an open cave, in the cave the Amber Starlight will be sitting below a statue surrounded by octopus ball creatures. Map Link - you need this item for Seluvis's quest if you are doing it, but in this playthrough, we have already bypassed his side-quest.
- Keep following the road north then go West to visit the Second Church of Marika and loot the Crystal Tear there. Bloody Finger Hunter Yura will be here, and if you talk to him you will trigger an invasion from Eleonora, Violet Bloody Finger, who allows for the acquisition of Purifying Crystal Tear alongside Eleonora's Poleblade. This is a VERY useful item for an upcoming Boss fight, and doing Yura's quest is not necessarily required for her to spawn, but the triggers are unclear at this time.
- Return to the road and follow it to the valley with the Minor Erdtree. The tree is protected by Wormface, a boss that drops Speckled Hardtear and Crimsonspill Crystal Tear. There's also a Golden Seed slightly north and west of the tree. Within this valley, you will find Mirage Rise to the west, which asks that you find symbols in the valley to unlock the tower and gain the Unseen Form and Unseen Blade spells. To the East, Altus Tunnel has Smithing Stone (5) upgrades and the Somberstone Miner's Bell Bearing (2). Woodfolk Ruins has an underground cellar with Wrath of Gold in a chest, another one with Nomadic Warrior's Cookbook (19), and a teardrop scarab with Ash of War: Golden Slam in the northern area of the ruins.
- Go north of the minor erdtree through a small village area. Take a right on the cobblestone path at the intersection. Continue through the small wooded area, be careful of a ballista/catapult that will be shooting at you. On your left there is a lookout tower. Near it you can find a Golden Seed. From this point East, enemies will shoot at you with deadly ballistae and catapults. Instead of going East toward the capital, go north into Dominula, Windmill Village. Here you can defeat the Godskin Apostle boss that drops the Scouring Black Flame incantation, after which you can talk to Millicent again. The area also has the Goskin Peeler twinblade and Celebrant's Skull warhammer.
- If you return to the road, there's the option to head East into Lyndell, Capital City outskirts. We will leave this for later and instead take the lower road southeast. This will bring you to an unnamed ruins where a noble will transform into a Lion Guardian. Defeat it to get a Larval Tear, then continue following the road until you come to an elevation with lightning and Ancient Dragon Lansseax. This is an optional fight, and west from here there's another boss encounter with a Black Knife Assassin just outside the Sainted Hero's Grave. The grave has the Crimson Seed Talisman and Dragoncrest Shield Talisman +1. South from here, Stormcaller Church has a Crystal Tear to loot, as well as the Dragonbolt Blessing incantation.
- You have now successfully looted the eastern part of Altus Plains, so backtrack to Dominula, Windmill Village, and head west instead. Following the main road without going up you will arrive to meet Goldmask near the collapsed bridge. The lower area has Radiant Gold Mask helm. After interacting with Goldmask, go back to Brother Corhyn near the Altus Highway Junction site of grace and tell him of your finding. He will move to Goldmask's location.
- Travel back to Goldmask and Corhyn will have more incantations to sell, and dialogue that you should exhaust to progress his quest. To the north from here, in the higher areas, the Windmill Pastures (East and West) hold the Noble's Set, Battlemage Set, and Giant Rat Ashes. You can do a quick sweep of this before dropping back to the road and taking the Great Stars Warhammer from the enemy Hearse traveling here. Following this road West leads you directly to Mt. Gelmir, but it's a good idea to follow it until the Bridge of Iniquity site of grace to activate it for teleporting. The road ahead from here is a dead end with difficult enemies leading to an invasion by Anastacia, Tarnished-Eater, and the Golden Vow (Spell).
Elden Ring Walkthrough - Mt. Gelmir
Elden Ring Main Quest Guide - Mt. Gelmir Points of Interest
- Complete Wyndham Ruins
- Complete Wyndham Catacombs
- Travel to Fort Laeidd
- Defeat the Magma Wyrm
- Explore Gelmir Hero's Grave
- Travel to the Volcano Manor
The Wyndham Ruins & Catacombs
Elden Ring Map: Mt. Gelmir Starting Point. We'll complete a couple of locations that are technically Altus Plains to make it easier to understand progress. From the Erdtree-Gazing Hill site of grace, go straight north and up to arrive at Wyndham Ruins and Wyndham Catacombs. There's a Tibia Mariner at the Wyndham Ruins to defeat and earn a Deathroot as well as Tibia's Summons spell.
Wyndham Catacombs is just near the ruins on the northwest side of the map from the ruins. Leaving the Wyndham Catacombs Site of Grace the only room at the top of the catacombs is the locked door with the 2 statues, locked by some contraption. Moving past this door is a room with an elevator, beware of the trap button between the rooms as this will fire a row of 3 lightning shots 3 times. The elevator is a simple platform with a button that players can step on to get the elevator to move. At the top and bottom of the elevator shaft are levers that will call the elevator to the player when needed.
Once at the bottom of the elevator shaft hit the button once more to have it rise then roll off onto the ledge above to collect the Grave Glovewort on the ledge above. The first room outside the elevator shaft has 2 imps throwing lightning bombs as well as a large guillotine trap cutting the room in half that raises and drops repeatedly. Past this room around the corner is a room with 2 imps, one on the far wall from where you enter as well as one directly on the right of the entrance.
Following the path down the narrow stairs brings you into the large underground sewer area with watery ground and many slimes and skeletons. There is a lightning trap hidden in the water in the middle of the room, stepping on the trap will cause lightning to strike down around the trap, enemies do not trigger the trap but the trap rearms quickly so watch out and avoid the damage. Moving forward and around the bend, players will find a Leyndell Knight defending the way forward.
At the top of the ladder watch out for the trap on the ground close to the ladder that will fire lightning bolts from behind. There is an imp statue sealing the room ahead and a path leading left, on the crossroad an Imp will attack you so be ready. The sealed room requires a Stonesword Key to open and holds the Lightning Scorpion Charm but otherwise has no enemies or other loot.
The next room in the Catacombs is the room with the spike ceiling and a raising floor platform. If the player is standing on the platform when it is raised to the top, the floor will rise rapidly to stab the player into the ceiling repeating until they are off the platform or dead. This room has 2 imps that throw lightning bombs, one ahead of where the player can see is the way forward and one above the entrance. To get across without taking damage from the spikes, step on the platform to make it rise then run across when as it resets, this gives the player more time to move across the room while the mechanism resets and raises again. In this final room is an imp directly on the right of the entrance holding a large sword, as well as another Leyndell Knight. The lever to open the locked doors is found here. Similar to getting across the first time, to get out, step on the platform to have it raise then run across while it resets to get above the entrance, then simply wait for the platform to lower and jump down with it to get back to the entrance.
While in the sewer area players can see an area locked behind a rusted gate. To reach this area players have to get underneath the platform in the spike ceiling room. Get the platform to rise at the entrance then walk off and jump down underneath while the platform is moving. From this area, a tunnel will lead you to the locked sewer area where multiple skeletons are seen. When you walk to the end of the room where the 2 bodies to loot are, 2 Giant Crabs will rise from below. The tunnel you enter from is too small for them to fit so kiting them there can help make for an easier fight. Once the Giant Crabs are dead you can loot the Ancient Dragon Apostle's Cookbook (1) from one of the bodies. The rusted gate can be opened by a lever on the right.
Mini-Boss: Erdtree Burial Watchdog
The boss for these catacombs can be found past the originally locked doors. This is a variant Erdtree Burial Watchdog that has a lightning tail with additional moves and can shoot lightning at the player. The Boss will charge lightning very visibly then fire it at the player giving the player time to move behind a pillar or prepare to time a dodge or block. While in their seated form the Watchdog will float up and towards the player before slamming their sword down, they will also now spin with their sword when close to the player to do damage. Using Spirit Ashes to help with the fight can be very helpful to direct the attention away from you so you can deal damage freely or find extra time to heal if necessary - defeating this mini-boss drops Glovewort Picker's Bell Bearing (1), along with 12000 ![]() Runes.
Runes.
Seethwater Cave
Once you are done with exploring those, go west and down to the canyon floor, to find Seethewater River site of grace. Begin your ride northward, a teardrop scarab nearby drops Ash of War: Barrage (Elden Ring Map Link). Continue your way north avoiding the waves of heat until you come to a Golden Seed (Elden Ring Map Link). Further ahead, you can loot 1x Smithing Stone (5) before arriving to an Imp Gate defended by Basilisks that needs a Stonesword Key - this is Seethewater Cave.
From the Site of Grace, drop down a small ledge to find 2 Leyndell knights, one patrolling and one sitting in a room to the right. Continue onwards and drop down a hole to reach the main area of the cave with a poisonous floor and many Servants of Rot. From the drop down, there is some loot to the right, then turn left. Ahead, there is another side path to the left which contains some Rats and a Giant Rat as well as some Cave Moss. Go back to the main corridor and proceed to find multiple Servants of Rot walking around a tree.
Try to lure them out one by one or sneak/sprint past them and drop down. To the left is the way back up, along with more rats and servants. You can find the Mushroom Set in a room off this path containing a Giant Poison Flower. Head back down and to the right, then drop down to reach the last tunnel before the boss. Head upwards to find a rat guarding a Golden Rune, then go the other way to find the boss: Two Kindred of Rot which drop the Kindred of Rot's Exultation talisman. Beware that their projectiles apply poison even if you block.
Fort Laiedd
Follow the road north until a fort comes into view, this is Fort Laiedd, and it's UNDER the area with the map fragment so don't fret that you aren't up there yet!. Activate the Seethewater Terminus site of grace and head inside the fort (Elden Ring Map Link). The Fort is surrounded by Fire Monks and Maneuverable Flamethrowers. You can avoid most of the enemies outside the fort around the wooden barricades by quickly riding towards the fort's entrance but there is a single Fire Monk near the steps that you should take out, lest it follow you inside.
Inside the fort's walls is a Prelate enemy that can drop the Prelate's Inferno Crozier warhammer (whether or not this is a guaranteed drop needs to be confirmed). After defeating him, head for the door in the south. Inside, you can loot the Armorer's Cookbook (7) off a corpse amongst the crates and barrels. Head up the steps to reach the roof where you can loot 3x Slumbering Egg and a Golden Rune (8) from the corpses strewn about. You will also see some dialogue pop up.
The source is a ghost that can be found on a wooden platform outside the northwestern walls, you can jump over the walls and onto the platform. Once you reach the ghost, you can loot the Fire Scorpion Charm talisman next to him. Speak to him once and he will stop talking.
- Once you're done, leave the fort and proceed south where you'll encounter the Magma Wyrm field boss. Defeat it to earn a Dragon Heart and unlock the Magma Breath spell at the Cathedral of Dragon Communion. You can also find Iron Fist Alexander for the fifth location of his questline. Beware that you will lose health while talking to him if you are in the wrong spot, so keep in mind Alexander can be spoken to from the safety of the rock in the lava lake.
- Follow the road south past some enemies and a graveyard that can be looted for runes, until you come to the Hermit's Shack. Defeat the demi-humans here to loot Roiling Magma. You can also use the giant Rune Bear to destroy the statue and get some more smithing stones.
- Continue following this road to arrive at Craftman's Shack. You can obtain the Pulley Crossbow as a treasure here as well as activate a convenient site of grace. Up ahead is Hermit Village, which is barricaded and has several enemies for you to deal with. Loot the Hierodas Glinstone Crown from a corpse in the southern area of the village, and the Prattling Pate "You're Beautiful" from a door nearby. The north of the village has the miniboss Demi-Human Queen Maggie, who will drop a Memory Stone upon defeat. Slightly north around the corner, you can get Comet Azur from Primeval Sorcerer Azur and activate the site of grace.
- Traverse the beam by the sorcerer to cross the canyon and drop down. You can activate the lift to Gelmir Hero's Grave. This location has a Deathroot, as well as the Bloodhound Knight Set, Gelmir Knight Set, Bloodhound Knight Floh spirit ashes, and the Mantis Blade curved sword. Once you complete the location, return to the entrance and explore south to continue.
- You will be ambushed by a pack of wolves and then arrive at a fortification defended by a Mad Pumpkin Head and some soldiers. The Pulley Bow can be looted here, and you can opt to follow the Rainbow Stones glowing on the ground and if you dismount and get close to the edge, Patches will knock you to the ground level near the entrance to Seethewater Cave, to prevent you accessing the Volcano Manor. The road south from the patches encounter takes you to the First Mt. Gelmir Campsite site of grace, that has a staircase leading you down to the dead-end road toward Corpse-Stench Shack.
- You should instead cross the beam leading to the other side of the canyon and begin making your way up the ladder behind a Grafted Scion mini-encounter. This next section is a continuation of ladders and optional drops to loot. One of the rests has a Nomadic Merchant, before leading you to an encounter with the Full-Grown Fallingstar Beast that drops Fallingstar Beast Jaw.
- From the crater of this boss encounter, you have to take some broken pillars to the west and jump across to the other side to land successfully near the Road of Iniquity site of grace. You will be attacked by Marionette Soldiers to be careful. You can loot a Golden Seed and kill an invisible Teardrop Scarab to obtain Ash of War: Through and Through (Elden Ring Map Link).
- You are now at the right level to obtain the map shard, but be careful as you approach the pillar as there are deadly Spider Hand enemies ready to ambush you. Activate the site of grace first! Go down the road toward the pillar and run past all the hands and map to rest at Road of Iniquity, then loot Map (Mt. Gelmir). You now have revealed the zone and are ready to head into Volcano Manor, which is just above.
Elden Ring Walkthrough - The Volcano Manor
Volcano Manor is a Legacy Dungeon in Elden Ring. Volcano Manor is unique in that much of its progression, if you so choose, can be done outside of the manor itself. You will be tasked with assassinating Tarnished from other worlds, rebelling against the Fingers and the Erdtree itself. There is another way to beat the dungeon, however, if this band of dissenters and their tasks do not appeal to you. You'll find guides for both the assassination questline and the dungeon area here for a complete run of this Legacy Dungeon.

Volcano Manor Guide
- Previous: Raya Lucaria Academy
- Next: Leyndell, Royal Capital
- Recommended Levels: 80+
- Bosses: Abductor Virgins, Godskin Noble, God-Devouring Serpent, Rykard, Lord of Blasphemy
- Site of Grace:
Abductor Virgin Map Link
Audience Pathway Map Link
Guest Hall Map Link
Prison Town Church Map Link
Rykard, Lord of Blasphemy Map Link
Subterranean Inquisition Chamber Map Link
Temple of Eiglay Map Link
Volcano Manor Map Link
Video Walkthrough
Volcano Manor Map

Lower Lava Level

Upper Lava Level

Ground Floor

1st Floor

2nd Floor

3rd Floor

NPCs in Volcano Manor
- Patches - Merchant if forgiven at Bossfight.
- Knight Bernahl - Ash of War merchant wares available if completing assassination quests for the Volcano Manor
- Rya
- Tanith
- Diallos - After being talked to in north Liurnia of the Lakes [Map Link]
Volcano Manor Bosses
All Items in Volcano Manor
Talismans
Consumables
Weapons & Shields
Armor
Spells
Upgrade Materials
- 1x Perfume Bottle
- 1x Smithing Stone [4]
- 3x Smithing Stone [6]
- 1x Smithing Stone [7]
- 2x Somber Smithing Stone [5]
- 1x Somber Smithing Stone [6]
- 1x Somber Smithing Stone [7]
Enemy Drops
- Inquisitor's Girandole (Abductor Virgins)
- Ghiza's Wheel (Inquisitor Ghiza)
- Furlcalling Finger Remedy (all assassination targets)
- Rune Arc (all assassination targets)
- Scaled Set (Old Knight Istvan)
- Crepus's Vial (Rileigh the Idle)
- Hoslow's Petal Whip (Juno Hoslow, Knight of Blood)
- Hoslow's Set (Juno Hoslow, Knight of Blood)
- Bloodhound Claws (Bloodhound Knight)
- Great Omenkiller Cleaver (Omenkiller)
- Dragon Heart (Magma Wyrm)
- Godskin Stitcher (Godskin Noble)
- Noble Presence (Godskin Noble)
- Remembrance of the Blasphemous (Rykard, Lord of Blasphemy)
- Rykard's Great Rune (Rykard, Lord of Blasphemy)
- Aspects of the Crucible: Breath (Tanith's Knight)
- Consort's Set (Tanith's Knight)
- Albinauric Bloodclot (Albinauric)
- Man-Serpent's Shield (Man-Serpent)
- 5x Serpent Arrow (Serpent Snail)
Keys & Other
- Ash of War: Royal Knight's Resolve
- Depraved Perfumer Carmaan Ashes
- Drawing-Room Key
- Hoslow's Vow Gesture
- Letter from Volcano Manor
- Man-Serpent Ashes
- Missionary's Cookbook (6)
- Nomadic Warrior's Cookbook (21)
- Recusant Finger
- Red Letter
- Seedbed Curse
- Serpent's Amnion
- 2x Stonesword Key
Enemies
- Abductor Virgin
- Albinauric
- Bloodhound Knight
- Burning Slug
- Inquisitor Ghiza
- Mage-Serpent
- Man-Serpent
- Omenkiller
- Serpent Snail
- Teardrop Scarab
- Wandering Nobles
Notes
- There are three ways to reach the Volcano Manor
- One way through Rya's questline
- Another through the Abductor Virgin at Raya Lucaria Academy
- Finally, by just walking there from the Grand Lift of Dectus or Ruin-Strewn Precipice
- There are also two ways to reach the Volcano Manor's final boss
- One by completing assassination quests
- Another through completing the dungeon area
Dungeon Important Discoveries
- Explore the ruined town
- Lower the shortcut bridge
- Defeat the Magma Wyrm
- Defeat the Godskin Noble
- Pick up Rya's Quest Item
- Explore the temple areas
- Face the God-Devouring Serpent / Rykard, Lord of Blasphemy
- Collect the Serpent-Hunter
- Confront Tanith
Full Volcano Manor Walkthrough
How to get to Volcano Manor
Rya's Questline
Volcano Manor can be reached in three different ways. One way to reach this location is by completing the first part of Rya's questline. You'll find her at Liurnia of the Lakes, east of the Scenic Isle Site of Grace [Map Link] where she'll ask you to retrieve a precious necklace. Complete her request and she'll give you a Volcano Manor Invitation, and clue you in on where to find her next. She'll next be found at the top of the Grand Lift of Dectus (if you've found both halves of the Dectus Medallion) or at Lux Ruins (if you've not completed the medallion). If you speak to her, she'll teleport you right into the lobby next to Tanith.

Abductor Virgin
Another way to reach this area is by getting teleported by an enemy. Do note that if you decide to take this route, you will have to fight a difficult boss, the Abductor Virgins, to move forward. If you spare Patches and talk to him at the Scenic Isle, he may mention an Abductor Virgin at Raya Lucaria Academy with teleporting abilities. Make your way over there and find the water wheel elevator, just west of the Schoolhouse Classroom site of grace. Take it to the bottom and get killed by the Abductor Virgin in this area. You must be killed by a specific attack where it traps you in its iron maiden-like body. Using a Sacrificial Twig or Twiggy Cracked Tear effect will prevent you from losing runes while still teleporting you. Doing this successfully takes you to a unique area within the Volcano Manor area. Hop across the lava flows and travel southeast, dropping down a few ledges along a lava waterfall until you reach a stonework structure. Go up the stairs to reach the Subterranean Inquisition Chamber Site of Grace [Map Link]. Be sure to activate this site prior to jumping off as there is no getting back up once you drop down to the fallen pillars in the lava.

Loot the bodies in this area for Smithing Stones [4] & [6] and jump from pillar to pillar until you reach a small cave in the south. It may look like a dead-end, but walk near the back of the cave where there's a crumbling section of ground and you'll fall through the floor into another cavern. The path here is quite linear. You'll want to head south from here, where you'll soon reach a fog door. Through this door are the Abductor Virgins, who drop the Inquisitor's Girandole upon defeat. Their defeat also makes the Abductor Virgin Site of Grace [Map Link] available and allows you to exit the cavern to emerge into Mt. Gelmir. From here, you can drop down to the Seethewater River Site of Grace, from which you can start exploring the rest of Altus Plateau.

To head to Volcano Manor, travel north from the Seethewater River Site of Grace, hitting the Seethewater Terminus Grace. Travel through the Fire Monk camp and around the pool of lava (ignoring the Magma Wyrm nearby), and then follow the path that circumvents clockwise around the mountain, taking you past the Hermit's Shack and to the Craftsman's Shack Site of Grace. Continue northeast through the Hermit Village, ignoring Demi-Human Queen Maggie and reaching the Primeval Sorcerer Azur Grace. Look northeast and walk over the narrow ledge, then drop down onto the plateau below. The door near you leads to the Gelmir Hero's Grave if you need a quick checkpoint. Then, head north until you see a Mad Pumpkin Head, go northeast across the narrow ledge behind it, fight past a Grafted Scion, and ascend the ladder up the mountainside. Take the next ladder you see on your left, fight through a camp of frenzied Soldiers (and Knight), descend north down a ramp, look west, and then cross the bridge to the Ninth Mt. Gelmir Campsite Site of Grace. Jump up the Spiritspring or climb the ladder, ignore the Full-Grown Fallingstar Beast at the top and leap off the narrow ledge extending from the western side of the arena. Continue descending down the ramp past the Marionette Soldiers, making a U-turn and dashing past the Troll guard to enter Volcano Manor.
Alternate route directly into Volcano Manor Hall: Right after you are captured by the Abductor Virgin, look to your right over the waterfall. The drop is non-lethal; it will take about half your health (ignoring lava damage) instead. Go as far southeast along the cliff edge before jumping down into the lava below, then wade southeast down the lava (healing off any damage) until you reach a wooden platform with a cage lift. Ride this lift up, then look to your right to take a second lift up. Travel up the stairs, past the Blackflame Monk, but before you enter the church ahead (contains a boss fight with the Godskin Noble), look to your left for another flight of stairs going down. Descend it, push the lever to raise a metal bridge, then cross it to reach the Prison Town Church Site of Grace to enable fast travel out of this area. You can travel up the hidden back passage from behind the altar and hit an illusory wall at the end of a dead end which leads into a room in the Volcano Manor, but you'll be behind a locked door that can only be opened with the Drawing-Room Key, received on the other side.
Go back onto the bridge, then carefully hop onto one of the studs on the left side. From that, hop onto the wheel that hoisted up the bridge, and finally make a running (but difficult) jump onto the opposite balcony. You'll pick up a Somber Smithing Stone (7) from the corpse. Run for the door you see, past the Iron Virgin, and from indoors, head down the stairs to a room with a corpse holding a Seedbed Curse. Cross the long large room to pick up an Ash of War: Royal Knight's Resolve, then head up the stairs to open a door that leads into the Volcano Manor main hall.
From Altus Plateau
Starting from the Altus Plateau Site of Grace, travel south to the main road and follow it, taking the northeast branch from the junction. You'll reach the Forest-Spanning Greatbridge Site of Grace with a merchant and Finger Reader Crone. Nearby is a sending gate that sends you to the opposite side of the valley. Follow the main road north and then eastward, ignoring the windmills you see as you go downhill and under the broken great bridge. You should reach the Road of Iniquity Side Path Site of Grace and pass by a Caravan and the Writheblood Ruins. Cross a wooden bridge and hit up the Bridge of Iniquity Site of Grace, then go northeast into an are patrolled by Iron Virgins. The Corpse-Stench Shack at the end has an invasion from Anastasia, Tarnished-Eater that drops the Butchering Knife, and the shack itself holds the Golden Vow incantation.
Near the Corpse-Stench Shack, rather southeast of it, is a ladder which leads up the mountain. Ascend it and turn left to get to the First Mt. Gelmir Campsite Site of Grace. Dash through the camp full of frenzied soldiers, go past the Mad Pumpkin Head and go northwest along the narrow path. (This is where your route will merge with the other route highlighted in green in the diagram further above.)
Jump down to a ruined campsite, fight off a Grafted Scion and ascend the next ladder you see. Take the next ladder on your left which leads you to another merchant, then keep going up the mountain from his location. You'll reach a plateau with several frenzied Soldiers and a Knight. After you fight them off, look for a ramp that lets you descend to the plateau below. Look west for a bridge that leads you to the Ninth Mt. Gelmir Campsite Site of Grace. Take either the ladder or Spiritspring Jump to the Full-Grown Fallingstar Beast, go northwest and jump the gap going downhill, then keep descending downhill, making a U-turn and rushing past the Marionettes and Troll guard to reach Volcano Manor.
Volcano Manor Assassination Quests

There are also two ways to reach to the final boss of this dungeon. One way is to complete various assassination quests for the Volcano Manor. Do note that this requires you to have access to Mountaintop of the Giants. Speak with Tanith, the lady sitting in a chair in the manor's lobby, and pledge your services to the Volcano Manor. She will give you the Drawing-Room Key which allows you to unlock several doors in the manor.
Before following her instructions and heading to the drawing-room, turn left and head up the stairs, where you'll find yourself in a grand dining hall. On your way to the far end of the hall, you'll get invaded by Inquisitor Ghiza. Defeat him for his weapon, Ghiza's Wheel, and collect the Smithing Stone [6] on the corpse where he spawned.

Back downstairs, you'll see a hallway in the western section with a bunch of locked doors, many of which can be unlocked using the Drawing-Room Key. The first door to your right has a corpse with a Perfume Bottle on it and the left is inaccessible for now. Further through the hallway, the next set of doors to your left open up to the drawing-room. You may recognize some familiar faces here as Rya and Knight Bernahl can be found in this room (though Bernahl doesn't open his shop until you've completed the first Volcano Manor assignment). If you've progressed through his quest enough, Diallos will also be found here. Interact with the item on the table to collect a Recusant Finger and the Letter from Volcano Manor.

This first letter instructs you to find and invade Old Knight Istvan at Limgrave and sets a red marker on your map to find the summon sign quickly. You can reach his summon sign by heading north from the Warmaster's Shack [Map Link]. Defeat him to collect several items including his armor set, the Scaled Set, and report back to Tanith to receive the Magma Shot Sorcery spell as a reward. You unlock the NPC quest for Patches, who can be found sitting by the wall at the Volcano Manor's entrance. He asks you to invade Great Horned Tragoth. Keep in mind that this NPC can be summoned to assist with several boss fights unless you assassinate him during Patches' quest. From here, head back to the drawing-room to pick up some interesting dialogue from Rya and speak to Bernahl to gain access to his store. The next Letter from Volcano Manor awaits you at the table as before.

This second letter instructs you to find and invade Rileigh the Idle at Altus Plateau and, like before, sets a red marker on your map. You can reach his summon sign by going up the elevator next to the Old Altus Tunnel Site of Grace [Map Link], then heading northeast. Defeat them to collect several items including a Talisman, Crepus's Vial, and report back to Tanith to receive the Serpentbone Blade as a reward. After this, you unlock NPC quests for Rya and Bernahl.

Go back to the drawing-room to pick up the Red Letter. This final letter instructs you to find and invade Juno Hoslow, Knight of Blood at the Mountaintops of the Giants, and sets a red marker on your map. His summon sign can be found east of the Shack of the Lofty. Upon meeting him for the first time, you will get the "Hoslow's Oath" Gesture, and defeating him gives you access to several items including his weapon, Hoslow's Petal Whip, and his armor set, Hoslow's Set.
- If you do not have access to Mountaintops of the Giants yet, keep reading to use the manor's illusory wall to proceed.

Report back to Tanith and she'll reward you with the Talisman Taker's Cameo and ask if you would see her Lord. Accepting her offer teleports you to a Site of Grace right outside the fog door to the God-Devouring Serpent/Rykard, Lord of Blasphemy boss fight. Exhausting Diallos' dialogue multiple times between doing each Volcano Manor quest makes him leave the manor and move to his next location. Make sure you accept and complete any Volcano Manor NPC quests still unattended to before defeating Rykard as they may disappear from the manor after you beat the boss (Rya may wait for you to complete her quest even after defeating the boss, however, this is uncertain).
From here, you can continue reading on to navigate your way through the Volcano Manor's actual dungeon area, but if you'd rather take up Tanith's offer to skip ahead to the boss click here.
Going through Volcano Manor's Illusory Wall
There's another way to get to the final boss without having to kill your fellow Tarnished. It should be noted that defeating the boss this way, before completing the letter requests, locks you out of the Volcano Manor assassination quests, as well as parts of Rya, Bernahl, and Patches' quests. This method starts the same way as above; talk to Tanith and pledge your services to the Volcano Manor to get the Drawing-Room Key. Feel free to explore the manor the same way as above, going upstairs to defeat Inquisitor Ghiza, looting the corpses, and speaking to the NPCs, however, don't leave the manor just yet. When you enter the hallway from the lobby, enter the first door to the right, the same one with the corpse with a Perfume Bottle on it as mentioned above. If you attack/jump/walk/roll into the wall just behind that corpse, you'll reveal a secret passageway.

Follow the path through a room full of Serpent Snails and you'll end up with a room with two ways forward - one down a flight of steps, another through an open doorway to your left. Head left first, being wary of Serpent Snails that may ambush you and continue until you reach a dead end. The corpse at the end of this passageway has the Nomadic Warrior's Cookbook (21) on it, and to the left of it, reveal another hidden door that opens up into a room with the Depraved Perfumer Carmaan Ashes.
Go back to the room where you saw that flight of stairs and descend them to fight a Lesser Bloodhound Knight that drops the Bloodhound Claws. Make sure you pick up the Fireproof Dried Liver here too, it may come in handy. Continue moving forward to get to a church with the Prison Town Church Site of Grace. Exit the church and you'll emerge to see a village submerged in lava. To your left will be an incomplete bridge that you can't cross just yet, so instead turn right and scale the rooftops, following the enemies, until you can safely jump down to the west, onto the stone walkways of the village. Head up the stairs and you'll get to a fog door locked behind an imp statue. Use a Stonesword Key and fight your way up to collect the Crimson Amber Medallion (+1).
Head back out of the building and turn right to cross the bridge where there's a Man-Serpent at the end. The building behind it is inaccessible from the front door, but circle around the left side of the building and do some jumping to find remains with Albinauric Bloodcot x1 an then an open door to the right, allowing you to unlock the front door of this building from inside. Watch for guys up in the ceiling. Inside the rooms are a remains with a Beast Blood and a remains with Golden Rune [9]. Make your way down to the cellar of the building and at the bottom of the stairs go through the doorway to your left. When this opens into a room, make a right and then another right to get to the Guest Hall Site of Grace.
After interacting with the Site of Grace, head back to the previous room and out the closed-door - it should open up to the sight of buildings almost fully engulfed by the lava. Turn right to find a ladder and descend onto the lowest level and closer to the lava. Head south and circle round to the corner of the building where you'll find a corpse with two Fireproof Dried Liver on it. Continue navigating the cooled lava east, picking up the Golden Rune (9) on the corpse laying on the well to your left. Directly across from the well is a slope behind the building that leads to a corpse on the roof containing Smithing Stone (6). Return to the ground moving east past the well, and head up the stairs to reach an area with a Man-Serpent wielding a whip guarding two cage lifts -- see pictures below.

Defeat it and take the lift directly to the north up. Turn right to pick up a Somber Smithing Stone [5] from a corpse then turn back around to ascend the flight of stairs. Don't enter the temple just yet! Right before you do, turn left to find the incomplete bridge you saw across the way earlier. On this side, there's a lever you can turn to lift the bridge piece from out of the lava, making a shortcut to this area from the Prison Town Church.
Taking a Detour for Items
Now that you've got this shortcut, you can start exploring for some more collectibles. Make your way back to the Prison Town Church. Scale up the roofs again to the right and instead of turning westward to drop down to where the imp statue is, turn eastward where you'll find a short wooden bridge. Continue following the enemies and the path down to the lower section of the town, collecting valuables such as Golden Runes on the way, and you'll eventually get to the Omenkiller. Defeat him to get his weapon, the Great Omenkiller Cleaver, and head to the building in the northeast to collect the Erdtree Seal.
Scale up the roofs again to drop onto a wooden platform on which a Facing back toward the gate, there is a small courtyard to the left guarded by two dogs that leads to a broken staircase along the outer wall. Get a running start & jump across the broken segment to reach a corpse with a Stonesword Key (trying to drop down from the roof above the item is a fatal fall). After collecting the key, drop down & follow the path around the wall until you get to the place where a bunch of gravestones sit in cooled lava and loot the corpses in this area to collect items such as a Golden Rune [9], Smithing Stone [6] and the Smoldering Shield. Be careful of the living jars as several of the small jars will explode upon death causing heavy damage.
Teleport back to the Prison Town Church Site of Grace and cross the shortcut bridge. Head back down the stairs and the cage lift you took previously. Turn left and into the other cage lift in the area. This one takes you back down to lava-level and if you walk forward, a Magma Wyrm will pop out of the lava, which when defeated, will drop a Dragon Heart. In the far end of the cave, you'll be able to spot a corpse with a Smithing Stone [7] on it.
Head back off that small island, and enter the small opening in the wall to the west. Continue forward towards the building ruins, following the Burning Slugs along the way, and you'll find yourself back at the stairs that take you to the cage lifts. Take the northern cage lift back up to the temple and now we can head in.
Miniboss: Godskin Noble
When you get about halfway through the temple, the Godskin Noble spawns. Ranged and magic users will find simply keeping your distance and hitting him from afar to be effective for the first half of the fight, even more so with Spirit Ashes to be able to tank for you. Many of his attacks during this phase, including a backhand slap and rapier attacks, are melee-ranged. He has an attack where he spawns black fire in a circle around him - melee users should dodge away and wait for him to leave the circle of fire before engaging him again.
After reaching about 50% health, the Godskin Noble rises and explodes in a small area around him. He now has attacks that have wide AoEs and an unpredictable roll attack. His skills are still widely telegraphed, so time your dodges well. Defeat him and you'll be rewarded with his weapon, the Godskin Stitcher, and the Noble Presence Incantation.
Completing the rest of the Dungeon
The Godskin Noble's defeat opens up the Temple of Eiglay Site of Grace. On the altar where he spawned, you can pick up the Serpent's Amnion. This is Rya's quest item so you can head back to her now and teleport back here whenever you're ready. South of the Site of Grace, is a lift which you should take. Before heading out to the balcony, you can head right and follow the path to grab a Golden Rune [9] from a corpse.
Head back and go to the balcony. If you look down, you'll be able to see a mountain ledge you can safely jump down to. Follow the Burning Slugs northeast until you get to a corpse sitting on the mountain's edge that has a Furlcalling Finger Remedy. Turn left and you'll see another ledge you can safely jump down to. Follow the path until you see a Abductor Virgin in front of a building with an open window. Fight it or run through the window. At the southern side of the room, you'll find a ladder you can descend. There will be a Drawstring Fire Grease on the corpse here. Follow the stairs down and you'll find the Missionary's Cookbook (6). Backtrack back up the stairs and the ladder. There's a door on the west side of this room that opens up to a bridge.
Jump into the left side to get Crimson Tear Scarab. Jump once more and move counter-clockwise to come back where you were before. Go back to the bridge and head up the stairs but before going into the building, turn right and jump off the stairs, where you'll find a Teardrop Scarab that drops a Somber Smithing Stone [5]. If you have been doing doing Rya's quest, look west and you can find a room where she can be found, you can make your decision on whether or not to kill or spare her here, visit her page to read up on her quest line. Back out of the room, hug the wall and follow the cooled lava further to the north (be careful of enemies along the way), you will then encounter a room rife with Basilisks, five to be exact, kill them quickly, and do not stay in one spot as you can be caught in their breaths and be turned to stone. If needed, kill one or two, run out of the room and back south, wait until your petrification buildup goes away, then return and repeat the process until they're all gone. Grab a Somber Smithing Stone [6] and head back south to the entrance to the room where you found Rya. In front of Rya's room, look southeast and you will find an open window next to the lava waterfall, go through it and grab a Stonesword Key. Head through Rya's room to find a ladder that takes you back up to where you're supposed to go. Head right first to activate the elevator to make a shortcut to Temple of Eiglay site of grace.
You'll come across a Man-Serpent with a fiery whip. Before fighting it, don't forget to get a Commoner's Headband lying on one of protruding stones on your right. Head through the door behind him and then through another set of closed doors on your right. On the altar protected by some enemies is the Man-Serpent Ashes. Head up the first set of stairs and before going up the second set, turn around to go up the flight of stairs behind you.
Through the doorway found on this floor is an imp statue that has to be unlocked with two Stonesword Keys. You'll find cages here you can jump down to, but before doing that, turn right and drop down to the platform below. Follow the path, head up the stairs, and in the next room, you'll find the Dagger Talisman. You will see some cages which you can jump atop, do so and drop further down onto the wooden platform, kill the enemy here, and look down to the northeast to find more cages to drop onto. After dropping down a few cages, you'll be on stable grounds again, look southwest for a room full weak enemies and a Seedbed Curse on a corpse, be careful as they can overwhelm you. After grabbing the item, turn left to ascend a flight of stairs and after defeating the Abductor Virgin here, you can collect a Somber Smithing Stone [7] off of a corpse draped over the broken part of the banister. Head back into the building and continue north-east where you'll a corpse with the Ash of War: Royal Knight's Resolve.
If you continue on this path, you'll eventually make it back to the entrance of the Volcano Manor, unlocking the door in front of Patches. Teleport back to the Temple of Eiglay Site of Grace and retrace your steps back to the room with the Man-Serpent Ashes. Climb up both flights of stairs and you'll find a waygate. This takes you to the Site of Grace right outside the fog door to the God-Devouring Serpent/Rykard, Lord of Blasphemy boss fight, the same place Tanith teleports you to if you complete all three assassination requests. Rest at the Site of Grace and when you're ready, head through the fog door.
- If you've been following the walkthrough, and for completion, it's recommended you finish the Royal Capital to get access to the Mountaintops of the Giants to get to the final assassination, the Red Letter, before facing Rykard. The NPCs of Volcano Manor will be forever changed after killing the following boss, so be sure to check their quest lines before doing so.
Facing Rykard, Lord of Blasphemy

Immediately when you enter the boss arena, pick up and equip the Serpent-Hunter on your left. If you read it's description, it says that it reveals its true power when used against giant serpents. Well, what do you know, Rykard's boss fight starts with the God-Devouring Serpent. When using the spear against the boss, the weapon shoots out powerful gusts of wind that increase its range massively. That being said, the weapon doesn't completely trivialize this first phase. The God-Devouring Serpent has many quick attacks with long-range, but its most dangerous ones are heavily telegraphed, so keep an eye out for them and time your dodges well. Don't get greedy and start spamming attacks with the Serpent-Hunter, you may get animation locked. Instead time your attacks between his, and eventually you'll stagger him and be able to get some free hits in.

After the God-Devouring Serpent's health reaches 0, a cutscene plays and Rykard, Lord of Blasphemy reveals himself to the player. Do note that you will have to repeat the fight with the God-Devouring Serpent if you die at any point during this second phase. The Serpent-Hunter retains its special abilities during this second phase, so keep it equipped. Rykard, Lord of Blasphemy loses the quick attacks of his first phase but instead has access to deadly moves that have massive areas of effect. The same strategy applies here, time your attacks in between his (should be easier here as he has slower attacks) and wail on him whenever he gets staggered. At 50% health, the fight gets a bit more hectic as he spawns homing skulls to attack you. It may take a couple of tries before you get dodge timing right, but as soon as you get the hang of his attacks (and maybe with a bit of help from some Mimic Tear cheese and upgrading the Serpent-Hunter), the fight becomes easier.
Upon Rykard's defeat, you will receive the Remembrance of the Blasphemous and Rykard's Great Rune. The Eye Surcoat can also be picked up from the right side of the arena and the Rykard, Lord of Blasphemy Site of Grace will be accessible.
Returning to the Inhabitants of the Volcano Manor
After defeating Rykard, Lord of Blasphemy, you can return to the main chambers of Volcano Manor and speak to the NPCs. They harbor no ill-will against you but will talk about the dissolution of the Volcano Manor. After a time-skip or reloading the area, the NPCs will leave the area, with Bernahl leaving a sword at his seat that you can continue buying his wares off of.
At this point, if you teleport back to Rykard's boss arena, you'll find Tanith feasting upon his remains. You can choose to attack her, and if you do so her knight, Tanith's Knight, will invade you. Upon his defeat, he will drop the Aspect of the Crucible: Breath Incantation, and Tanith's clothing set consisting of the Consort's Mask, Consort's Robe, and Consort's Trousers. Doing this too early prevents you from completing Patches' quest however. With this, the Volcano Manor Legacy Dungeon is complete.
Volcano Manor Map


Volcano Manor Videos
Speed Run Walkthrough
The fastest way to reach Volcano Manor is by either doing Rya's questline or following Patches instructions and getting kidnaped by Abductor Virgin underneath Raya Lucaria Academy water wheel lift, beating the Abductor Virgins boss and heading north through a narrow opening at the Seethewater River site of grace.
This speed run walkthrough will assume you're systematically completing the areas in The Lands Between and that at this point you don't have access to the Mountaintop of the Giants yet. With this assumption, we will be skipping the Volcano Manor assassination quests and heading straight for Rykard through the secret passageway. Keep in mind that defeating Rykard locks you out of these quests, as well as the NPC quests of the Volcano Manor inhabitants.
Speak to Tanith and join the Volcano Manor for her to give you the Drawing-Room Key. With the key in hand, head through the hallway in the west, and open the first door to your right. Attack the wall behind the corpse to reveal a secret passageway and head through it until you reach a room with two ways forward. If you fancy yourself the Nomadic Warrior's Cookbook (21) and the Depraved Perfumer Carmaan Ashes, head through the doorway on the left and make sure to reveal the hidden doorway left of the corpse at the dead end. Otherwise, head down the flight of stairs and past the Bloodhound Knight to get to the Prison Town Church Site of Grace.
Upon leaving the church, turn right and scale the rooftops, following the enemies until you can safely drop down to a flight of stone stairs facing west. At the imp statue, turn left and when you get to the Man-Serpent guarding the door, circle round the left of the building to get inside. Head downstairs, where you'll find the Guest Hall Site of Grace in one of the rooms.
From this room go back, to one room and head out through the closed door. To your right is a ladder going down, after which you should head east to ascend a flight of stairs. Ignore the Man-Serpent and get straight into the cage lift immediately in front of you to take you up to the next floor. Continue forward ascending another flight of steps and before you enter the temple, turn around to your left to make a shortcut back here.
Enter the temple to fight the Godskin Noble and acquire the Godskin Stitcher and Noble Presence incantation. After interacting with the Site of Grace, turn right and take the elevator up. Right ahead is a balcony. Jump over the banister down to the cliffs and follow the Burning Slug path. When you get to a corpse sitting by the cliff's edge, turn left and jump to the ledge below, once again following the path until you find a building with an open window.
In this room, there is a ladder you can go down to reach the Missionary's Cookbook (6) in a jail cell. When you've got that, return up the ladder. Head through the door to the west, cross the bridge, go up the stairs and when you're in the building, turn right, going forward until you get to a Man-Serpent with a fiery whip. Head through the door behind him then take the next door to your right. On the altar is the Man-Serpent Ashes. Run past the enemies, heading up both flights of stairs, and you'll find a waygate on a balcony.
Take the waygate and you'll be teleported to the Site of Grace right outside the fog door to the God-Devouring Serpent/Rykard, Lord of Blasphemy boss fight. When you enter the fog door, immediately take and equip the Serpent-Hunter to your left. This spear has special properties during this boss fight that makes its range longer. After the first phase, the God-Devouring Serpent is defeated, you'll fight Rykard, Lord of Blasphemy straight after. Defeat the boss and you'll be rewarded with the Remembrance of the Blasphemous, Rykard's Great Rune, and the Eye Surcoat. Grab the Site of Grace that spawns here too
If you'd like extra quick loot, you can head back to the NPCs and speak to them. They'll disappear from the location after reloading the area. Head upstairs to fight Inquisitor Ghiza and acquire Ghiza's Wheel, as well as a Smithing Stone [6] on a corpse nearby. Teleport back to the Rykard, Lord of Blasphemy Site of Grace. Attack Tanith here and fight her knight to earn her clothing set, Consort's Set, and the Aspect of the Crucible: Breath incantation
Volcano Manor Trivia
- A couple of illusory doors have been discovered in Volcano Manor that require multiple (roughly 50) hits to open. It is assumed that these are the result of developer oversight, as they have 9999 health (this is the same for all illusory doors; they are usually killed by the game once interacted with) and do not play any of the audio/visual cues. These doors additionally all lead to previously accessible areas. These have been patched out as of v1.04.
Elden Ring Walkthrough - Leyndell, Royal Capital
Elden Ring Main Quest Guide - Leyndell, Royal Capital Points of Interest
- Defeat Tree Sentinel duo
- Collect Map & Golden Seed
- Complete Sealed Tunnel
- Collect Golden Seeds & Fight Margit
- Complete events in Hermit Merchant's Shack
- Loot Flask Upgrades
- Visit Blackguard Big Boggart
- Complete Auriza Hero's Grave & Auriza Side Tomb
- Defeat Draconic Tree Sentinel
- Compete Leyndell, Royal Capital
Elden Ring Map: Leyndel Royal Capital Starting Point. There are two ways to access Leyndell, Royal Capital, but we will approach it from South to North to procure the map fragment as soon as possible. You will thus begin from the Altus Highway Junction site of grace, and take the large bridge up to the gates. Here you will have a duo of Tree Sentinel bosses that drop the Erdtree Greatshield. They are optional, so you can run by and get to the Outer Wall Phantom Tree site of grace instead. Here you can collect 2x Golden Seed and Map (Leyndell, Royal Capital). (Elden Ring Map Link)
From this site of grace, if you go south, you will come to the Minor Ertree Church (Elden Ring Map Link) and can loot Missionary's Cookbook [4] as well as the Golden Order Seal. From here, we will travel north and slightly east and down into the watery area. On the southern point of it, there's the "Sealed Tunnel", which requires you to hit an illusory wall to enter. (Elden Ring Map Link)
Sealed Tunnel

Sealed Tunnel Elden Ring Map. Click on the image above to enlarge it.
Even though it looks like a "Sealed" Tunnel as its name says, there's a cavity that will open a secret path if you attack it. There are many Miners that can be easily surprised as they are working. The mine keeps hiding paths, the second one is behind the chest that contains Smithing-Stone Miner's Bell Bearing (2). You will find an elevator right after that and you will notice when you go down, that there are some areas to discover the middle way down. It's very safe to jump in those areas, as you can jump your way down whenever you need to return to the main way, as there are some platforms and wooden structures that will ease the fall.
Once down, at the end of the path, there's another illusory wall, followed by another one with a Golden Rune (5) in front of it. This next area is much bigger. Try to stay up on the wooden platforms and take out the enemies there, in the pit below there is an Abductor Virgin waiting. There is a path to the right containing a Stonesword Key. On the roots going across there is a Gold-Pickled Fowl Foot. In the pit below, try to lure out the abductor virgin to break the statue which contains three Smithing Stones (6). There is also a Rune Arc, Golden Run (1), three Furlcalling Finger Remedy, and a Somber Smithing Stone (5) on the wall.
At the very end of the path, there's an Abnormal Stone Cluster ready to explode behind some debris, in a very dark cavity. Behind it, there's another illusory wall. Follow through and climb over the roots to reach another area to dropdown. Be careful and keep easing your fall by falling short distances. Once you have reached the bottom, you will see an arena that contains the boss fight against Onyx Lord who drops the Onyx Lord's Greatsword.
Divine Tower of West Altus

Divine Tower of West Altus Elden Ring Map. Click on the image above to enlarge it.
The point of this tunnel (besides the loot) is that it acts as a passageway to the Divine Tower of West Altus, where you can activate Rykard's Rune (Elden Ring Map Link). If you don't have it yet you will have to come back later. Reach this tower after defeating Rykard, Lord of Blasphemy at the Volcano Manor and obtaining Rykard's Great Rune [Elden Ring Map Link] to restore its power. Choose to reach this location before this event and you will instead be greeted with its tightly blocked shut doors.
The entrance to the Divine Tower is hidden and can only be found by going through a series of illusory walls and to defeat Onyx Lord in the Sealed Tunnel. (Follow the Sealed Tunnel Guide to reach this area.) Once you reach the tower, step to the center of the tower platform to ascend. Take the stairs up wrapping around the exterior of the tower to eventually reach. Here, you can restore the power of the Great Rune.
Exploring the Capital
Return to the Outer Wall Phantom Tree site of grace and take the road North. You can opt to fight a Gargoyle or press forward until you see another Golden Seed and the Palm Reader of this area (Elden Ring Map Link. A teardrop scarab nearby will drop you Ash of War: Golden Parry. Take the road northwest from this point and listen for a familiar voice saying "I see you, tarnished". This is Margit, who will drop the Viridian Amber Medallion +1 if defeated. Press on along the road and activate the Outer Wall Battleground site of grace.
You will now want to turn eastward until you find a road heading further east. If you take a small detour north on this road, you can follow it on a u-turn to arrive at the Hermit Merchant's Shack (Elden Ring Map Link). There's a merchant here as well as two nighttime invasions: Bell Bearing Hunter (drops Medicine Peddler's Bell Bearing) and Deathbird (drops Twinbird Kite Shield). From here, we'll take the road east and north. Don't go to the Minor Ertree yet, as an altar at the top of the road has the Winged Crystal Tear. After collecting, visit the Minor Erdtree and loot Twiggy Cracked Tear and Crimson Crystal Tear.
- Travel directly south until you see a moat at the base of the wall. If you followed the instructions in Liurnia and talked to this merchant, you will now meet Blackguard Big Boggart. You can purchase Boiled Crab from him. This moat will also have an invasion from Dung Eater if you have advanced the Roundtable Hold quest with him.
- Follow the path east from here and the road will diverge north and south. To the South, you can take on Auriza Hero's Grave and loot several heavy armor and weapons. To the north, Auriza Side Tomb has the Soldjars of Fortune Ashes that summons "potboys" to fight alongside you as well as Grave Glovewort (5), (6) and Ghost Glovewort (6) and the Perfumer's Cookbook (3).
- Turn back toward the Minor Erdtree and return to the main higher road. This time follow the higher path east until it turns into an open-field boss fight with the Draconic Tree Sentinel. Defeating this boss will reward you with Dragon Greatclaw, Dragonclaw Shield, and access to the Legacy Dungeon of this area: Leyndell, Capital City. The path within the legacy dungeon is challenging so you should upgrade everything that you can and optimize your setup before heading in.
Auriza Hero's Grave Walkthrough

Auriza Heros' Grave Elden Ring Map. Click on the image above to enlarge it.
Before heading here, make sure you have one Stonesword Key ready to use on an Imp Statue (Elden Ring Map Link). Upon arriving, you'll find the Site of Grace for this location. On the left side of an altar, you'll see an arch doorway that is blocked by a white fog. Use the Stonesword Key on the Imp Statue and inside that room, you'll encounter two Basilisk enemies. There's a corpse here that you can loot to find the Golden Epitaph weapon.
Now head west where you'll need to traverse some slopes that head down to the lower section of this location. As you move towards the slope, a large environmental hazard, a chariot will appear. This isn't the only chariot that will appear, but there will be multiple ones as you progress. If you need to move fast, try wearing light armor or equipping them first until you reach the end of this section. On this first slope sprint down and about halfway, move to the corner on the left or right to take cover. There will be two Skeleton enemies that will reanimate when you come around the corner depending on the section you dive into. Wait for the chariot to move past you and run down till you reach the first set of pillars and arches. Stand directly under this arch for now.
Next, you'll have to go up a second slope. The two chariots won't hit you if you're standing in between the pillars. Wait for the second chariot to go up, move up along with it, and roll or move towards the corner on the left. When it moves down, quickly duck into a safe spot as it approaches. Keep right. For the third slope, you'll notice that this slope is wide compared to the first two. There are two chariots on the third slope that simultaneously moves up and down. Examine how both chariots move so that you know which way to move.
As you go down the third slope, you'll notice that there is a gap that you can drop to. If you keep right, you can drop down to a safe spot. Use this to take cover. You'll find a body here that can be looted to find x1 Stonesword Key and x1 Ghost Glovewort [6] that is guarded by a single Skeleton enemy. As you continue heading down, if you need to take cover, just near the end of the slope, there's another corner on the left side that you can use to take cover, but there's another Skeleton enemy here that will ambush you.
Make your way to the next row of pillars. As for the next slope that also goes down, keep an eye again for the other two chariots, sprint in a zig-zag direction, and stand in between the pillars (you won't get hit here). Notice as well that there is a body hanging by the edge of the slope on the left, loot it to find x1 Golden Rune [7]. You should still be near the row of pillars.
Vulgar Militia Ashes
Use the body as an indication of where to drop below. Before jumping, you'll notice the thin wooden plank structures over the large drop. This is where you'll be dropping. Drop down the first short plank then onto the lower longer one directly underneath. Then you'll want to drop to the perpendicular plank and walk along it. You'll find the ashes here and another lower plank at the end perpendicular to the one you're on. Drop down one last time and make your way into the next area that it leads to. You should see a statue. Clear the toads in the area and you'll come across a corpse where you can loot Vulgar Militia Ashes. This area will also be filled with Basilisk Creatures.
Return to the wooden beams over the large drop. You should be able to drop down one more level onto the narrow stone arches. Follow the narrow route to the end. This area will have one large archway and a ladder. Ascend the ladder and you'll find yourself with another chariot at the end of the tunnel. There's only one short slope left that goes up. You need to take cover by using the corner on the right side and then sprint towards the door.
Dungeon Mini-Boss
Beyond the door, simply head down the steps. This section is guarded by a few Skeleton enemies, it should be easy for you to fight and pass through them. At the bottom section is a large archway that is covered with a gold mist. Beyond it serves as the arena for the bosses of this location, the Crucible Knight and Crucible Knight Ordovis. We suggest that when you are fighting them, take out the Crucible Knight first and use any of your upgraded or strong Spirit Ashes. This way, you won't have to fight the bosses on your own.
Successfully defeating them both yields 28000 Runes and rewards the Ordovis's Greatsword, as well as the Armor pieces for the Crucible Axe Set. There are some Root Resin materials that you can get in this boss arena - simply use the portal here to return to the entrance.
Clearing the Chariots
Just before the door leading towards the boss, there is a pit with some wooden planks, you can jump on them and a body hanging on the ledge tells you where to drop. After reaching the planks, go down them until you get to the stone pillars and move to the ladders. As you advance through the hallway, a chariot will spawn on the outside, as it goes down, rapidly head up the ramp and to the right to find a pillar. Hitting it will raise it to the main hallways. When you make your way back you may notice a new chariot summoning circle. This will lead the chariots to crash into each other, breaking and leaving you with a new Ash of War and the Tree Sentinel Set:
- Ash of War: Holy Ground
- Tree Sentinel Helm
- Tree Sentinel Armor
- Tree Sentinel Gauntlets
- Tree Sentinel Greaves
Once the chariots are dead, go down the same path you took until the hall where you hit the pillar. The path downwards will be clear leading to an elevator where you can find a Ghost Glovewort [6] and towards a little room with an enemy protecting the Crucible Feather Talisman. The pillars can be moved with arrows from a distance if you prefer a safer approach to them.
Elden Ring Walkthrough - Auriza Side Tomb

Auriza Side Tomb Elden Ring Map. Click on the image above to enlarge it.
Azuria Side Tomb's gimmick is its Teleporter chests porting you between inaccessible areas (Elden Ring Map Link). Furthermore, these catacombs contain two copies of the same set of rooms which will be called areas A and B. To start, make your way through the first room and take the teleporter trap. You will end up in the "starting room" of area A. You also get here if you jump out of the window in the previous room with the living jars. Go through the area, checking below the stairs for glovewort.
In the final room, there is an illusory wall on the left side. There are two teleporter traps here that will take you to area B. The chest in the final room (chest 1) always goes to the room behind the bars, the one in the secret room (chest 2) goes to the "upper ledge". This holds for area B as well, so chest 1A takes you to the room behind bars in area B (containing two Giant Living Jars), 2A takes you to the upper ledge in area B, 1B takes you to the room behind bars where there is a ladder to the lever for the door, and 2B takes you to the upper ledge in area A.
In short, take the chest in the secret room in area A, then make your way to the final room in area B and take the chest there, go up the ladder and use the lever. If you want to be a completionist, there is another giant living jar (and 2 smaller ones) in the "starting room" of area B. The boss of this Dungeon, Grave Warden Duelist, also has a few living jars in his arena that will attack you. Kill him to acquire the Soldjars of Fortune ashes.
Elden Ring Walkthrough - Completing Leyndell, Royal Capital
Elden Ring Main Quest Guide - Leyndell, Royal Capital Points of Interest
- Enter Leyndell, Roytal Capital.
- Go to the Erdtree Sanctuary.
- Defeat Godfrey, First Elden Lord (Golden Shade).
- Proceed to the Queen's Bedchamber.
- Defeat Morgott the Omen King.
- Barrier in the Capital Outskirts is no longer.
- Proceed to the Forbidden Lands.
Leyndell, Royal Capital is a Legacy Dungeon in Elden Ring. A sprawling capital city that houses various strong enemies, as well as champions that were previously encountered. The Royal Capital of Leyndell functions as the seat of government and administrative center of Altus Plateau. For an overview of this location outside of the "dungeon", visit our location page for Leyndell, Royal Capital.

General Information
- Previous: Volcano Manor
- Next: Crumbling Farum Azula
- Recommended Levels: 90+
- Bosses: Morgott the Omen King, Godfrey, First Elden Lord
- Site of Grace:
Avenue Balcony [Map Link]
Capital Rampart [Map Link]
East Capital Rampart [Map Link]
Queen's Bedchamber [Map Link]
Elden Throne [Map Link]
Lower Capital Church [Map Link]
West Capital Rampart [Map Link]
Fortified Manor First Floor [Map Link]
Video Walkthrough
Leyndell, Royal Capital Maps


NPCs in the area
Bosses
Items
Talismans
Consumables
- x1 Lord's Rune
- x9 Holy Grease
- x5 Fan Daggers
- x1 Exalted Flesh
- x1 Hero's Rune [1]
- x1 Hero's Rune [5]
- x2 Soporific Grease
- x20 Black-Key Bolt
- x8 Poisonbone Dart
- x1 Golden Rune [1]
- x4 Golden Rune [8]
- x7 Golden Rune [9]
- x2 Golden Rune [11]
- x1 Golden Rune [12]
- x1 Clarifying Boluses
- x1 Dragonwound Grease
- x1 Holyproof Dried Liver
- x3 Lightningproof Dried Liver
- x1 Invigorating White Cured Meat
Weapons & Shields
- x1 Black Bow
- x1 Bolt of Gransax
- x1 Cane Sword
- x1 Coded Sword
- x1 Envoy's Long Horn
- x1 Erdsteel Dagger
- x1 Gravel Stone Seal
- x1 Gargoyle's Halberd
- x1 Golden Greatshield
- x1 Hammer
Armor
- Lionel's Set
- Alberich's Set
- x1 Guilty Hood
- Raging Wolf Set
- x1 Erdtree Surcoat
- x1 Deathbed Dress
- x1 Imp Head (Corpse)
Spells
Upgrade Materials
- x1 Golden Seed
- x2 Smithing Stone [4]
- x2 Smithing Stone [5]
- x7 Smithing Stone [6]
- x4 Somber Smithing Stone [5]
Enemy Drops
- Page Hood
- Page Garb
- Iron Cleaver
- Golden Seed
- Fulgurbloom
- Miquella's Lily
- Perfumer Hood
- Miranda Powder
- Perfumer Gloves
- Hefty Beast Bone
- Omensmirk Mask
- Strip of White Flesh
- Knight's Greatsword
- Budding Cave Moss
- Leyndell Knight Helm
- Leather-Draped Tabard
- Leyndell Knight Gauntlets
- Somber Smithing Stone [4]
- Lordsworn's Straight Sword
Keys & Other
- x4 String
- x2 Rune Arc
- x8 Old Fang
- Gravel Stone
- Miquella's Lily
- x1 Cracked Pot
- x3 Gold Firefly
- x3 Beast Blood
- x1 Seedbed Curse
- x2 Perfume Bottle
- x1 Talisman Pouch
- x1 Rold Medallion
- x3 Stonesword Key
- x3 Nascent Butterfly
- x1 Lost Ashes of War
- "By My Sword" Gesture
- x1 Morgott's Great Rune
- x1 Sanctified Whetblade
- x1 Flightless Bird Painting
- x1 Two Fingers' Prayerbook
- x1 Furlcalling Finger Remedy
- x1 Remembrance of the Omen King
Enemies
- Giant Rat
- First-Generation Albinauric
- Putrid Corpse
- Perfumer
- Commoner
- Omenkiller
- Rotten Stray
- Misbegotten
- Fingercreeper
- Oracle Envoy
- Large Oracle Envoy
- Broken Statue
- Miranda Sprout
- Page
- High Page
- Leyndell Knight
- Leyndell Soldier
- Leyndell Foot Soldier
- Valiant Gargoyle
- Errant Sorcerer Wilhelm
- Vargram the Raging Wolf
- Guardian
- Lesser Ulcerated Tree Spirit
- Crucible Knight Ordovis (Lesser Variant)
Notes
Important Discoveries
- Explore the Capital.
- Clear out the sewage section.
- Defeat the Lesser Ulcerated Tree Spirit to obtain a Gold Seed.
- Investigate the former Roundtable Hold.
- Invade and defeat the Errant Sorcerer and Vangram.
- Defeat the Specter of Godfrey.
- Defeat Morgott the Omen King.
- Examine the Erdtree.
- Acquire the Rold Medallion from Melina.
- Explore the Mountaintop of the Giants.
Full Leyndell, Royal Capital Walkthrough
East Capital Rampart Site
For this walkthrough, we will be providing you a guide on various sections the area, as well as indicating important loot, enemies, any NPCs, and related bosses. The Leyndell, Royal Capital region is only accessible to players who have gathered two Great Runes and has content for highly leveled gameplay. If you want to check a summary of the various entries found within Leyndell, Royal Capital, please visit our location page for Leyndell, Royal Capital. We will begin the walkthrough by starting your exploration at the East Capital Rampart Site of Grace [Map Coordinates Here].

Exit the door through the west exit and head southeast where you'll encounter several Oracle Envoys, and one Large Oracle Envoy, which are white-colored enemies holding instruments. Eventually, before reaching the end, you'll notice a Broken Statue guarding a doorway behind it. Make sure to fight this enemy from long range since it will conjure pillars of flames that will track you. After defeating it, go through the arch doorway it was guarding to enter a study room. Inside, you'll encounter a Perfumer. Go down to the first floor and exit the door on the right where you'll encounter three more Oracle Envoys.
Go straight and pass through the narrow runway where you'll see another Oracle Envoy at the end. Enter the door on the right side and quickly dodge or prepare to hold your shield to block the attack from the Leyndell Foot Soldier that is ready to ambush you. Exit the opposite door and head up the stairs. You'll find yourself back at the section where you encountered the Broken Statue - go back to the first floor of the study room (where you initially encountered the Perfumer) and exit towards the other door that's facing west.

By the doorway, there's a lever on the left, pull it to call the lift and ride the elevator down if it's not already present. At the bottom, you'll encounter two Commoner enemies resting by the door. Jump over the balcony to the left and onto the roof of a short building. Look down, you'll see a Leyndell Knight, take this opportunity to kill it while you are on high ground. Jump down and kill the Leyndell Foot Soldier that's resting here as well. Go north and then make a left. Next to the bodies of the Commoners, there's another doorway on the left, be cautious since another Leyndell Knight is patrolling and will eventually walk through that doorway. After killing the knight, go towards the doorway and enter a stock room filled with crates and barrels - you can break through and exit the doorway facing west.

Behind those crates and boxes blocking the doorway, there are a few more Commoners sitting by the hall, as well as more around this section. Go up the stairs, exit to the balcony, and enter the doorway on the right side of the balcony. In that room, you'll notice another Perfumer sitting at the center, next to some Commoners. You can sneak behind to backstab it. You'll notice that if you exit the doorway ahead, you'll find yourself back at the starting point from the lift you rode earlier. Within this octagon shaped room is a ladder, climb it. At the top you can claim a Perfume Bottle in a chest. Kill the Commoners that are outside the balcony if you want.

Go back inside the room where you killed the Perfumer, exit the balcony, go back down the hallway with the resting Commoners, and exit the doorway facing west where you'll enter a small garden that is guarded by a single Leyndell Foot Soldier. Walk towards the left side corner of the fence and you'll see that you can jump over it to go down. As you walk around the corner, you'll encounter two Rotten Strays on the right, eating a corpse that's holding an item, and another hiding by the corner on the left. Kill the Rotten Strays and loot the body to find 3x Old Fangs.
Royal Capital Grounds

Next, head northwest towards the capital's main grounds where you'll see an Erdtree Avatar that will appear. You can hide behind cover and wait for it to walk past you so you can sneak in, just keep an eye out because it will walk back. There are a couple of things you can grab here, there's a body lying on a short set of stairs that can be looted to find 3x Gold Firefly. By the steps, you'll see another corpse that's hanging on a large Carriage that's been tilted (defeating the Erdtree Avatar yields 10062 Runes and rewards you with a Lord's Rune). By the large Carriage that's on right, you'll find another corpse by the Carriage's wheels, loot it to find a Golden Rune [9]. (You can go to the golden entrance with 2 flags and 2 firestands - near the tilted Carriage - to activate the Grace Avenue Balcony.)
There's a set of stairs next to it if you check around the side of the Carriage. Go up the first set of stairs, make a hard left and you'll see two Leyndell Foot Soldiers, another Perfumer next to a gazebo, and a Leyndell Soldier on the right side. Kill the enemies, check behind the chalice statue to find a Smithing Stone [4] that is looted off a corpse. (from the gazebo, you can jump over the fence to land on the Carriage that's been knocked over, loot the body here to find one Holy Grease)
Go up the next set of stairs, kill the two Leyndell Soldiers that are chit-chatting, and check the alleyway first, ahead of the two soldiers. By the dead-end, there's another corpse you can pillage to find a Golden Rune [8]. Go back, check the east side where you'll bump into two more Leyndell Foot Soldiers guarding by the short steps, along with another Leyndell Soldier.

As you head down, you'll notice another Broken Statue enemy ahead. Kill it and loot the bodies that are around to find the following items, one Golden Rune [11], one Golden Rune [8], and one Somber Smithing Stone [5].
Royal Capital Grounds - Northeast

Now explore the northeast section, go back to the section where you encountered the Erdtree Avatar. Proceed northeast, from the Carriage, if you haven't yet, pick up a Golden Rune [9] from the body that's beside the Carriage's wheels. Turn left from the large Carriage, and head down a short set of stairs to the area with a fountain. enter the doorway that's on the left side; in that room is another lift that will take you down if you ride it. From the bottom of the elevator ride, exit the doorway and go down the stairs where you'll encounter some zombie enemies. Use caution, you'll be blindsided by a bloodthirsty zombie that comes from your right. Clear the area, loot the nearby corpse to find a Golden Rune [9] - also make sure to jump on the roof of the small buildings to find a corpse that's holding the Black Bow.
From the stairs, check the left side first and you should see another corpse that is sitting against the wall. You can pillage the body to acquire a Gravel Stone. If you continue exploring the south section, you'll find another body that you can loot to find a Smithing Stone [4]. A Skeleton will jump down from the tree once you loot the body. From where you looted the body, look to your right and you should see another corpse next to a tombstone, loot it to find a Stonesword Key.

After clearing and looting the graveyard go back to the Stairs. Now continue moving southwest (stay on the right side until you reach another stairs), then look to your right, you'll see a zombie that's on its knees. Backstab it and jump down to the sewage at the side first, don't move forward towards the destroyed building since a Lesser Ulcerated Tree Spirit will appear from the ground as you approach it. Look to the right side of the sewage and you'll see another body at the end, loot it to find a Guilty Hood. Turn around and walk towards the opposite side of the sewage where you'll enter the sewage tunnel. You'll encounter some Rats and some bodies that you can pillage to find a Golden Rune [1] and a Golden Rune [8]. Move forward and look above, you'll see a Fingercreeper on the wall. Shoot it down and kill it. Go up the stairs on the left and head inside a storage room that is guarded by a Leyndell Knight. In this room, you'll see another corpse sitting against a metal door.

Loot it to find a Cracked Pot, if you go out the doorway on the left, you'll enter the area where the Lesser Ulcerated Tree Spirit will appear. If you have a mage build or are capable of attacking with long-ranged attacks you can bait it by the doorway and attack inside the storage room. Killing the tree spirit rewards you with a Golden Seed. If you did beat this enemy, go outside the open area and loot the body to find a Smithing Stone [6].

Go back to the graveyard and continue exploring the southwest section where you'll enter a wine cellar that is heavily guarded by Leyndell Foot Soldiers. Kill them and go up the stairs of the wine cellar to acquire 1x Clarifying Boluses from a corpse. Next, before climbing up the ladder, make sure to also open the treasure chest behind a gate that you can open. Inside that chest contains a Stonesword Key. Now climb the ladder and open the door to unlock a shortcut leading to the Avenue Balcony Site of Grace. Make sure to check around the site to find x1 Smithing Stone [6].
Now, go back down first to the lift (at the graveyard entrance) and ride it back up. Exit the doorway and investigate the opposite doorway where you'll encounter a lesser variant of Crucible Knight Ordovis that's standing next to an altar inside a room. Kill it and you'll see near the altar, another corpse you can loot to obtain a Hero's Rune [5]. In the same room, check the statue beside the doorway on the left to find another corpse holding a Golden Rune [9]. Pass through the short hallway, make a right and ride the elevator up - open the door and you'll unlock a shortcut leading back to the East Capital Rampart site.

From the East Capital Rampart site, go back to the long road with the carriages where the Erdtree Avatar spawned at the northeast section of the capital grounds, and open the large doors at the Easternmost end. Beyond the doors is a section of the capital that is flooded with sand and gravel. This part of the capital grounds is guarded by Misbegotten, and some Rotten Strays.
Upon entering, you may want to check this area first (specifically the southeast section), before you head up the stairs. You'll encounter Misbegotten and Rotten Stray enemies here and find some corpses along the way that you can loot to find items such as 3x Beast Blood, a Golden Rune [9], and a Lightningproof Dried Liver. At the end of the path, you'll encounter a larger Misbegotten and another Rotten Stray. There is another body from where the enemies are standing, loot it to find a Perfume Bottle - upon clearing this section, go back and head up the stairs.

As you head up the stairs, you'll encounter a group of Misbegotten, two Perfumers, and a larger Misbegotten. Kill all the hostile characters and don't forget to flood the corpses by the stairs and the tombstones to find items such as 3x Nascent Butterfly and 1x Exalted Flesh. You'll notice that at the top of the stairs, it's a small graveyard section where you'll encounter more Misbegotten. Check the northwest side, go to the end, and you'll find another corpse you can pillage to obtain 2x Soporific Grease, be cautious when you loot the body since a large Misbegotten next to it will attack you. To the northeast is a lower section with a Misbegotten praying to a statue. Behind the statue is a Somber Smithing Stone (6).

Upon clearing the north portion, check the south side and you'll find an entrance that leads to a small debate room. Pull the lever that's on the podium and this will take you to the upper section of the capital. Go up the stairs, kill the Leyndell Foot Soldiers and Leyndell Soldiers, and by the arch doorway, on the left, loot the body to find a +1 variant of the Flamedrake Talisman. At this point, the path ahead is blocked by a seal that is placed by Morgott, so you'll have to go back first.
Avenue Balcony Site - Lower Capital

From the Avenue Balcony site, go up the stairs, turn right from the doorway and proceed southwest. You should see two Leyndell Soldiers by the steps and a Leyndell Knight that is guarding a door. Kill the enemies and make sure to loot the corpses on the stairs to find items such as a Golden Rune [8], a Golden Rune [12], and 2x Lightningproof Dried Liver. The door cannot be interacted with so go back down, turn right, and move towards the section ahead where you'll spot another Leyndell Soldier and a Leyndell Knight that's sitting under a tree and bonfire. Careful with this knight since it is wielding a large bow. Check the gazebo on the right side that is being guarded by a Perfumer, you'll see a ladder that goes down to the sewers.

Pass through the sewers and you'll find another ladder at the end. Kick it down and jump down to the roof of a small building from the left side. Below you, you should see a strong-looking enemy, a Lesser Omenkiller. Killing this enemy has a chance to drop the Omensmirk Mask. Jump down, grab the item if it drops from the enemy, and loot the nearby corpse to find a Smithing Stone [6]. Next, go inside the small church and you'll find the Lower Capital Church Site of Grace. On the bed inside this room, you'll find two things, Lionel's Set and the Deathbed Dress - from the church, if you go straight, you'll see a short ladder that you can climb down, this takes you back to the sewage where you encountered that Fingercreeper and Rats.

Retrace your steps to the sewers section by climbing back up the tall ladder. If you look below, you'll see a Fingercreeper. You can kill this creature just by using long-ranged attacks while you're on high ground. Once it is dead, (with enough health, at this point you should have enough HP) jump down and loot the body to find 1x Lost Ashes of War. The Fingercreeper may also drop a Somber Smithing Stone [4] upon killing it. To leave the sewers, go northwest, follow the path as you kill more Lesser Fingercreepers. There are also a few bodies in the sewers that you can loot, these corpses hold items such as 8x Poisonbone Dar, 4x String. The area here is a bit linear, where eventually, you'll encounter a Broken Statue blocking the path.

In front of the Broken Statue, you'll find a pit, jump down and loot the bodies to find items such as a Holyproof Dried Liver, an Erdsteel Dagger, and 5x Fan Daggers. Once you've grabbed all the items, climb up the tall ladder to find yourself back on the capital's grounds. At the top of the ladder, check the stairs on the left, you'll find another corpse that you can pillage to acquire 1x Dragonwound Grease. Turn around and you'll see three Leyndell Knights, one with a large bow and the other two wielding a sword and large shield. Take caution and take them out one at a time, there's also a body that you can loot here, it's hanging on the balcony fence, it holds a Golden Rune [9] - if you need to rest at a site, you can go straight and this will lead you back to the Avenue Balcony Site.

After clearing the avenue balcony section, you'll notice that you're right by the wing of the giant ancient dragon corpse. You can actually jump on and climb it. As you climb to the top, you'll find some materials here such as some Gravel Stone. Hike to the top and then jump towards the destroyed wall of a building on the left. You should see another corpse that you can pillage to acquire a Rune Arc. Climb up the ladder that's in front and go up the stairs. At the top is another Leyndell Knight. Kill it and loot the corpse that's near the spot where the knight was standing to find 5x Gravel Stone.
As you enter the arch doorway, prepare to dodge or ready your shield to avoid getting hit by the Leyndell Foot Soldier that will ambush you. Kill the enemy, loot another corpse here to find a Golden Rune [11], continue forward and you'll find the West Capital Rampart Site of Grace.
Royal Capital Grounds - Southeast
Starting from Avenue Balcony site of grace, go to the main avenue (where the Carriage is) If you want, you can search this area thoroughly until you see a Lion Guardian and a broken bridge towards the west side. You can get quite a lot of runes, various materials, and some notable loots e.g., an Imp Head (Corpse), a Stonesword Key, and some Arteria Leaves if you explore the various side streets and shadowy nooks along the southeast side (towards upright carriage crashed into a building)
Note that some of the area is only accessible via rooftops. Indeed, there are some loots available on the rooftops as well. To collect them, go to East Capital Rampart site of grace. Stick to the the right side and jump over the wall when you see a Broken Statue. You can see a roof onto which you can jump on your right side. There will be imps on the rooftops here and there and you will frequently need to make careful running jumps over the gaps between roofs. The loots are mostly runes but there is a Stonesword Key among them. If you look around while you are moving on roofs, there will be an unreachable corpse from this set of roofs. The loot is a Smithing Stone (5), accessible from the roof on the right side of an outside corridor that you cross after taking a short elevator while you were making a way from East Capital Rampart site of grace to Avenue Balcony site of grace.
West Capital Rampart

Continue south from the West Capital Rampart Site of Grace, follow the inlaid stairs downward and check the right side, there's a body here that you can loot to find the Cane Sword. Turn around and exit the arch doorway facing north, on the other side, you should find some Oracle Envoy by the balcony on the right, and one on the left. There's another corpse by the balcony that you can loot to find a Golden Rune [9] and a lever - pull it and go back up to the starting point of the West Capital Rampart site.

From afar, you'll notice a statuesque enemy, called a Valiant Gargoyle. You can use long-ranged attacks against it if you can but just watch out when it releases a roar, the waves move fast that damages and can knock you back if hit. Defeating this enemy drops the Gargoyle's Halberd. On the same spot where the Gargoyle enemy was, look to your left and you'll see two Oracle Envoys standing between a glowing sapling. Kill the enemies and pick up a Golden Seed.
Go towards the southwest and take the stairs. Continue uphill until you reach a large building. You can obtain Star Fist and Ritual Shield Talisman here by taking the path to the left alongside the building wall. You will also meet Goldmask and Corhyn here if you are following their quest.
Head back down the hill to where the little golden tree was (the one with the seed) and look north this time. You'll see a set of stairs that goes down. As you go down, prepare to take out the Page enemy that's hiding by the corner of the stairs. Exit the room on the left and you'll see another body that's hanging on a ledge, loot it to find a Smithing Stone [6]. Jump down to the roof of a stable and investigate the south side first where you'll encounter a few Rotten Strays. In this section, you'll notice a large root that is protruding from the ground and is wrapped around a large building ahead. If you look to the right, on the roof of a stable, there's another body that you can pillage to find a Golden Rune [9].

On this roof, look to your left, and you'll see an arched doorway leading to an armory. Go inside, enter the next room that is connected to the armory and you'll find some items that you can grab. You can pick up the Sanctified Whetblade and the Hammer on the floor. Exit the doorway on the left side to enter a bedroom where you can find more items such as a Hero's Rune [1] on the bed, and the "By My Sword" Gesture that is looted off a burnt corpse.
Exit the bedroom and follow the path on the left. You'll somehow realize that you are inside the old location (or the original) of the Roundtable Hold. Jump on the round table and pick up the item to acquire a Rune Arc. Go east, check the balcony and you'll see a corpse hanging on the balcony fence, loot it to find a Smithing Stone [5]. Go back and investigate the north section and enter the office that's on the left. It's a room similar to where Gideon Ofnir is usually found. By the fireplace, there's another body sitting in front of it. Loot it to find a Furlcalling Finger Remedy.

Go back outside and proceed to the library, you'll see a corpse that is tied to a chair. Loot the body to obtain a Seedbed Curse. Next, open the closed door in southwest direction to loot Coded Sword. Finally, return to the southeast section, this is the same looking section where you usually see Smithing Master Hewg and Roderika. Go down to the first floor, but walk carefully so that you can loot the body that's hanging on the broken stairs, pillage it to acquire a Smithing Stone [6]. Jump down, make a hard left, and go straight to enter the dining room. By the bonfire of the dining room, you'll find 20x Black-Key Bolts on the ground and the Two Fingers' Prayerbook that can be looted off the corpse - enter the kitchen, kill the three Commoners.

Now retrace your steps and enter the main hall. A few things you'll notice here, there's a red summoning sign on the ground, and in between the two maiden statues at the center of the main hall, there is another corpse in a sitting position. Pillage this body to acquire all of the Armor pieces for the Alberich's Set. Next, check the commoner's quarters which are on the right side of the main hall. In the armory, check behind the weapons to find a corpse holding a Smithing Stone [5]. Proceed further where you'll find the Fortified Manor, First Floor Site of Grace, and the Flightless Bird Painting in the bedroom. The red summon sign is only available, if the player has visited Volcano Manor.

VOLCANO MANOR QUEST: Return to the main hall and if you examine the red summon sign on the floor, you'll be asked if you want to invade the world of Vargram the Raging Wolf and Errant Sorcerer Wilhelm. By doing so, you'll be transported to their world as an invader where you'll need to defeat the two hostile NPCs. Upon successfully vanquishing both NPCs, you'll return to your world and acquire the Raging Wolf Set - before exiting the main hall, rest at the site if needed.
Before leaving the main hall, on the left side is a door which can be opened. There are 2 Iron Maidens, both can be killed without melee since they can't get through the door. In the yard a Stormhawk Axe can be looted and 3x Nascent Butterfly. On the other side of the hallway a Somber Smithing Stone [6] can be found on a corpse. At the opposite end of the yard is a lift, which leads to the Divine Bridge Site of Grace - the same place that you get teleported to from the Tower of Return. If you haven't already looted it, the Blessed Dew Talisman can be found from a chest in here, and on the opposite end is a sending gate that leads to the Isolated Divine Tower, but we won't be going there now.
As you go back out the entrance of the main hall to the city street, turn left and you'll see pair of Leyndell Knights ahead - one on the ground and another on an elevated platform with a Greatbow. Kill the bottom Leyndell Knight and it should drop the Gravel Stone Seal. After dispatching these enemies, check the stable on the right to find another corpse you can loot, the body has 5x Old Fangs.

Look to the left, jump on the dragon's claw, and use it to jump onto the roof of the nearby stable. From there, sprint to jump so that you can reach the small guardhouse. Inside, there are two bodies that you can pillage to find a Smithing Stone [6] and a Stonesword Key. Also, don't forget to check behind the stone structure, you'll find another corpse by the rubble, loot it to find 3x Gravel Stones. At this point, you'll want to return to the opposite side of this section where the large root of a tree is protruding from the ground and start hiking until you reach the top.

As you work your way up, you will encounter multiple Guardians. You'll normally find them sitting and they appear to have roots and branches growing from their bodies. Although the path here is quite linear, make sure to check the west side of this large tree, you'll find a path that you can quickly check where you'll encounter some Miranda Sprouts, and as you reach the dead-end, there's a body that you can pillage to find a Smithing Stone [6]. Also, as you're about to reach the top, walk on one of the large branches that's connecting to a narrow roof, also on the left side, there's another body on the roof that you can pillage to acquire 3x Holy Grease - upon reaching the top, enter the room of the cathedral and you'll trigger a boss battle against a specter of Godfrey, First Elden Lord.
Boss Battle: Specter of Godfrey

For this battle against the specter of Godfrey, we suggest you summon any of the strong Spirit Ashes that can help you in fighting this mini-boss. Although appearing as a specter, it's still agile and attacks aggressively. As soon as the battle starts, summon your spirit ash, and be ready to dodge his attack where he leaps in the air and throws his axe. If you did dodge this attack, dodge the second time or ready your shield up to avoid his follow-up attack where he picks up the weapon and swings it.
During our battle against the specter of Godfrey, we were mainly using long-range magic attacks. With the help of your summoned spirit, it can catch Godfrey's attention for a while, making it possible to bombard him with magic. Keep your distance and always be ready to block or dodge if he so happens to switch his attention to you and attacks. If you are fighting up-close, it's more of waiting for that window of opportunity to strike back after his combo attacks.

He will usually swing his battleaxe three times and end up with a headbutt, making it possible for you to counterattack after dodging or blocking the fourth attack. He can also dash and then stomp the ground to release a shockwave, if you see him dash to the sides or when he lifts his foot, be ready to dodge back or ready your shield to avoid getting hit. Some of Godfrey's attacks can be read easily since he telegraphs this moves slowly, just like when he lifts the battleaxe and swings it forward, you'll have enough time to react if you pay close attention to his movements.
Godfrey can also be stunned if you land a critical hit, if this happens, the specter of Godfrey will kneel to the ground, quickly rush in, and execute a finishing blow that applies a medium amount of damage to its health. Be patient and assess the situation depending on his movements so you can react properly. By defeating this mini-boss, you'll acquire a Talisman Pouch and 80000 Runes - make sure to examine the lost grace in this arena to discover the Erdtree Sanctuary site. After the battle, make sure to check the left side corner from the entrance to find a body that you can loot, pillage it to obtain 3x Somber Smithing Stone [5]. Go back outside and you'll see a small building that has a lift, ride it to reach the lower section of the capital.
Exploring the Capital

Go down the stairs, into a building where you will find an elevator. Go down that, down more stairs and past a message on the floor and one more set of stairs and you'll encounter two Perfumer enemies, on the right side, there's another corpse you can pillage to find 5x Holy Grease. As you move towards the northeast, walk up to the first statue on the left of the runway. Ready a spell such as the Glintblade Phalanx or be ready to attack it with a melee weapon since an invisible Teardrop Scarab will run away, you'll notice the golden tracks it leaves behind once it moves. Using the Glintblade Phalanx against it is a good move since the swords will automatically pierce through it, revealing it, and eventually, killing it. This golden teardrop scarab will drop the Barrier of Gold incantation. Continue northeast towards the stairs, but be ready to fight the lesser Crucible Knight Ordovis that's patrolling. On the way back, look to your right(northwest direction) to notice an item on a golden giant-spear-shaped structure. You can jump safely onto the balcony below you, which lets you get onto the spear. Carefully jump up the spear's contours and you'll eventually acquire the Bolt of Gransax. You can then drop onto the roof of the gazebo below you for another Stonesword Key.

Teleport back to the Erdtree Sanctuary site and continue your exploration of the capital. From the site, head outside the balcony, and proceed northeast. As you walk along the runway, turn right and you'll see another branch of the tree, connecting to the second floor of the sanctuary. As you reach the second floor, keep going straight towards a building where you'll see multiple corpses of the elderly Finger Reader Crones.
At the top of the stairs, there is a Black Knife Assassin, sitting by the doorway. Be ready to fight it the moment you approach. This enemy is very agile, wields a Blade of Death, and can conjure projectiles at you that reduce your max health and inflict damage over time. After defeating the assassin, enter the chamber and you'll find the Queen's Chamber site, as well as another Incantation spell, the Blessing of the Erdtree. Make sure to rest and make further preparations before you fight the next boss, Morgott, the Omen King.
Before fighting Morgott, go back to the Bridge where the Black Knife Assassin was. Go back to the Beginning of the Bridge and jump down to the west. Go through the window and loot the Erdtree Bow in the Chest and the Celestial Dew, don't forget to kick down the ladder at the end. Jump up on the Tree Branch and loot the Golden Order Principia.
Boss Battle: Morgott, the Omen King

NOTE: If you want to summon dung eater for this fight you need to go to Subterranean Shunning-Grounds and unlock dung eaters cell DO NOT do the invasion at the moat! If you do his summon sign will not appear in front of the gate. If you are ready, follow the path up the stairs and pass through the mist, a cutscene will first trigger before the battle starts. During our encounter with Morgott the Omen King, we fought him by using ranged magical attacks and by summoning our strongest Spirit Ash, specifically the Kaiden Sellsword Ashes. Using a spirit ash will always be helpful since you have an additional character that can help in fighting, and most importantly, it kind of taunts the boss and catches their attention, making it possible to bombard them with magic.

As the battle starts, quickly summon your equipped spirit and prepare to block or dodge his first move. Morgott wields a katana-like weapon and he'll dash to the sides quickly and follow up with a slashing move. If you were able to summon your spirit as soon as the battle starts, Morgott will immediately shift his attention towards that spirit and start attacking it. Apart from him holding a weapon, just like Margit, he can manifest a random secondary weapon such as a sword, a hammer, a spear, or a dagger. Morgott can be stunned as well if you land critical hits, and he gets stunned, make sure to execute that strong executing attack to take out a chunk of its health.

At some point, you will want to watch out for one of his attacks where he summons a myriad of swords that will rain from above. It will appear on random spots of the arena and will continue to shoot out those myriads of swords for a couple of seconds. Ready your shield if you need to block or move away from those spots until the swords disappear. Once his health is at 50%, Morgott starts to gather energy and releases it, when he starts to glow, make sure you are away from him. With perfect timing, patience, and carefully analyzing his moves, you'll be able to defeat this boss. Successfully defeating Morgott the Omen King rewards you with Morgott's Great Rune, the Remembrance of the Omen King, and 120000 Runes (90000 if Melina was summoned for the fight).
Beyond the Barrier
After defeating Morgott, you have no choice but to advance into the Erdtree, and notice that its impenetrable thorns are denying you entry. Turn back and rest at the Site of Grace in the boss arena that's just appeared. Melina will appear and she will hand you the Rold Medallion, and you'll get a red marker that shows you the way forward. With Morgott defeated, the seal that was blocking the path that you previously encountered where the section is guarded by Misbegotten can now be explored.
To quickly get there, fast travel to the Avenue Balcony Site of Grace, head out onto the main street where you previously fought the Erdtree Avatar, then turn left and follow it to the large double doors. Exit through them and take the uphill path on your left, and you'll reach an elevator that was previously inaccessible. Ride it to the top, fight off a few soldiers along the way, and be wary of the two Leyndell Knights up ahead. Defeat both, and nearby is a corpse that you can loot to find an Invigorating White Cured Meat. By the broken statue, you'll also find a Teardrop Scarab, killing it will cause it to grow in size and regaining its HP. Make sure to quickly kill it and get a Somber Smithing Stone (6).
Continue along the path and enter the tower on the other side. You then have two possible exits. Through the southern door of this tower, you will go on a bridge that leads to the Divine Tower of East Altus - however, be aware that the Fell Twins will ambush you on the way. Take this route to unlock the power of Morgott's Great Rune. If you ride the lift down, you'll formally arrive at the Forbidden Lands and the next Site of Grace.
Before you continue, ride the lift back up again, face southwest, and keep an eye out for a passageway in the elevator shaft. You can jump into that passageway mid-ride, and find the Official's Attire on a body in a chair right before a door where you will find the Blade of Calling in the room at the end.
Leyndell, Royal Capital Map

Dungeon Maps: Exploration starts from the northeast Site of Grace called Capital Rampart at the 1st Upper Floor.
Underground
2nd Lower Floor

1st Lower Floor
Ground Floor
1st Upper Floor
2nd Upper Floor
3rd Upper Floor
Elden Throne
Leyndell, Royal Capital Videos
Speed Run Walkthrough
East Capital Rampart to Avenue Balcony
Leave the East Capital Rampart room and turn left. After taking out the Large Oracle Envoy, you can either proceed forward and fight through the Broken Statue, or turn left to a doorway that leads under the pedestal. Either way, the way forward is a lift that takes you to a multi-story tower at the south.
Enter the tower and climb to the second floor for a Perfume Bottle. Climb to the top and find a Seedbed Curse. Return to the second floor, clear out the enemies, then look northeast. You should be able to jump across the rooftops to get onto the main street. Descend to the main street, then travel northeast to an area with a fountain. Enter the doorway on your right, then fight off or sneak past the Crucible Knight on the far side of this room. Ride up the elevator at the end of this corridor and open a locked door that serves as a shortcut that links the East Capital Rampart Grace to the main street.
(Alternate route: Turn right from leaving the East Capital Rampart room. Look down from the locked door, and you can find a small ledge on the pillar that you can jump onto. You don't have a lot of footing so try to hug the wall it extends from. You'll take nonlethal fall damage from this jump, then you can descend onto the roof of the great circular building below. This gets you down onto the main street without needing to fight through as many enemies, but skips the rest of the loot.)
Go back to the main street and follow it southwest. You'll eventually fight an Erdtree Avatar; defeating it gives you a Lord's Rune. Proceed forward and look to your right for an open gate with a staircase going down. This is the Avenue Balcony Site of Grace.
Avenue Balcony to West Capital Rampart
Return to the main street and follow it to a giant locked gate. Rather than approach the gate, look left, pick off a Soldier, and fight past a Leyndell Knight with a greatbow. Hop into the gazebo (mind the Perfumer nearby), look northwest and descend the ladder into a small sewer. Cross it, kick down the ladder, and then fight off an Omenkiller for the Omensmirk Mask. Enter the nearby building to find the Lower Capital Church Site of Grace, and pick up Lionel's Set and the Deathbed Dress from the bed.
Exit the church, descend the short ladder, then instead of going down the stairs, head across into the small building. There is a Leyndell Knight that's guarding a corpse holding a Cracked Pot. Head out the other door to an open area, where you can fight off a Lesser Ulcerated Tree Spirit for a Golden Seed. Looking back at the doorway from where you came, there is a bridge to your left. Cross it, then fight your way uphill through the graveyard, picking up a Stonesword Key along the way. You'll eventually go up a short flight of stairs that leads you to a fountain. Instead of going to that fountain, jump on the roofs of the sunken buildings from the stairway, and you can eventually find the Black Bow from a corpse on a roof. Travel southwest to the end of this graveyard and you will end up in a wine cellar filled with Leyndell Soldiers lobbing lightning pots at you. Behind a grate is a chest with another Stonesword Key. Climb up the ladder to unlock a door that leads back to the Avenue Balcony Site of Grace.
From the Lower Capital Church Site of Grace, now exit the building, descend the ladder, and also descend the staircase and traverse the canals. One of the dead ends has a corpse with a Lost Ashes of War guarded by a Giant Hand Spider. Your ultimate destination should lead you behind a Broken Statue which you can dispatch without it ever harming you. Drop onto the open area, collecting a Holyproof Dried Liver, another Erdsteel Dagger, and 5 Fan Daggers. Ascend the ladder to find yourself behind a Leyndell Knight with a greatbow.
(Alternate route: From the Avenue Balcony Site of Grace, go down the stairs into an open area where you'll immediately be fired upon by that greatbow Leyndell Knight. Fight your way through them - there's a total of three Leyndell Knights and some Commoners to dispatch. Walk to where the greatbow knight was standing and proceed with the next step of this walkthrough. This route is the shortest but very combat-heavy, and skips the loot you can find above.)
You'll find yourself at the base of the petrified dragon corpse. Jump onto its wing and climb it. You'll eventually see a broken part of the capital walls that you can jump into, marked by a corpse holding a Rune Arc. Follow the path upward, and take out a Leyndell Knight on the way up. You'll eventually reach the West Capital Rampart Site of Grace.
West Capital Rampart to Spectral Godfrey
Travel south, and fight the Valiant Gargoyle for the Gargoyle's Halberd. It won't respawn on defeat. You can also find a Golden Seed at the Erdtree sapling. Travel forward, passing under the tree branch, and then ascend uphill until you reach a coliseum. Collect the Ritual Shield Talisman and Star Fist. This is also where you can find Brother Corhyn and Goldmask for the next step of their questline.
Return to the West Capital Rampart Grace, travel south again and hop down the first set of stairs you see for a Cane Sword. Follow the corridor without ascending back up the stairs, pick off a few Oracle Envoys, and pull the lever that will open the great locked gate. From here you can look westward, jump down, and go through the doors into the Fortified Manor. Here, you can assist Recusant Bernahl in a 2-on-2 invasion with his summon sign, pick up Alberich's Set, and activate the Fortified Manor Site of Grace in one of the side rooms. The first door on your right from the main entrance leads to a corridor going to a courtyard that has the Stormhawk Axe and a lift going up to the Divine Bridge Site of Grace.
Exit the main entrance of the manor and turn left to fight two Leyndell Knights for a Gravel Stone Seal. Hop onto the stables to find another Stonesword Key. Turn back and head to the opposite side of the main entrance. Fight off the dogs and jump onto the stables. This will lead to a balcony that gets you to the Manor's upper floor. Enter it for a familiar sight. Great loot to be found includes the Sanctified Whetblade, Two Fingers' Prayerbook, a Rune Arc, the Coded Sword, another Seedbed Curse, and 20 Black-Key Bolts.
Leave the area and return to where you fought off the dogs. There is a large tree branch going into the ground. Jump on it and follow it upwards, fighting off Erdtree Guardians on the way. You'll eventually end up at a balcony with a Stake of Marika, and this is where you fight a golden specter of Godfrey, First Elden Lord for the third Talisman Pouch. Hit up the Erdtree Sanctuary Site of Grace in the middle of this boss arena after finishing the fight.
(Alternate route: From where you fought the Valiant Gargoyle, you can hop onto the tree branch. This merges with the main branch that leads up to the Godfrey fight.)
Erdtree Sanctuary to Morgott
From the Site of Grace, take the eastern exit. Climb up the branch and circle into the upper level of this building. Head north out the building, then look left and jump onto the roof and follow it into an open window. Pick up the Erdtree Bow in the chest here, kick down a shortcut ladder in a side room containing a Celestial Dew, then climb on the branch to reach the corpse holding the Golden Order Principia book.
Go back to the Grace on the lower floor, then take the west door out. Descend down the stairs and go down the lift. You'll find a statue of Radagon with a game-generated message in front of it. Use Law of Regression (can be learned from the Golden Order Principia) to trigger a transformation and advance Goldmask's questline. Head down the next flight of stairs, fight past the Perfumers, and then defeat the patrolling Crucible Knight. Kill the invisible golden Teardrop Scarab for the Barrier of Gold incantation. Look over the balcony, align yourself with the golden dragon's spear, then drop down onto a ledge and climb up this spear to obtain the Bolt of Gransax. You can also drop back down to the roof of the gazebo below you for a Stonesword Key.
Return to the Erdtree Sanctuary Grace, climb back to the upper level, then return to the northern exit. Travel down this path, fight off a Black Knife Assassin, then enter the Queen's Bedchambers for a Site of Grace and the Blessing of the Erdtree incantation. Go southeast up the stairs to the boss fight with Morgott, the Omen King. You can summon Melina to assist with this fight.
After Morgott's Fight
After completing the fight, travel into the Erdtree to find that you cannot advance. Return back, and rest at the Site of Grace. Melina will provide a way to deal with the Erdtree's thorns and give you the Rold Medallion.
Return to the Avenue Balcony Grace, exit to the main street and turn left. Follow the street northeast and out a large gate to an area populated by Misbegotten. The path divides into two here - the lower path leads to a Perfume Bottle guarded by a Leonine Misbegotten, while the uphill path is populated by a large group of Misbegotten and leads to a lift that goes east out of the capital.
Follow the path all the way east. You can go southwest to an ambush from the Fell Twins before reaching the Divine Tower of East Altus to activate Morgott's Great Rune. Otherwise, ride the elevator down, checking the southwest corner of the elevator shaft for a room holding the Blade of Calling. Head out the building at the bottom of the elevator ride and you'll reach the Forbidden Lands and the next Site of Grace.
Elden Ring Walkthrough - Mountaintops of the Giants
Elden Ring Main Quest Guide - Mountaintops of the Giants Points of Interest
- Explore the Forbidden Lands
- Explore the Mountaintop of Giants
- Obtain Area Map
- Explore Zamor Ruins
- Access Ancient Snowvalley
- Complete Shack of the Lofty
- Complete Minor Erdtree
- Unlock Heretical Rise
- Complete Frozen Lake Objectives
- Complete Guardian's Garrison
- Obtain second Map Fragment
- Unlock Foot of the Forge
- Complete Castle Sol
- Explore the Consecrated Snowfield
- Complete Miquella's Haligtree
- Defeat the Fire Giant
Explore the Forbidden Lands
You've now finished Leyndell, Royal Capital and your initial thought would be to explore the " target="">Mountaintop of Giants region. Before doing so, we recommend exploring the Forbidden Lands. Elden Ring Map: Forbidden Lands starting point. The Forbidden Lands is a small stretch that connects Leyndell Royal Capital with Mountaintops of the Giants. There isn't much to do in this area, but there are two boss encounters to take on.
The first one happens only at night, you can encounter a Night's Cavalry that drops Ash of War: Phantom Slash. Further north, there's a Golden Seed to be looted (Elden Ring Map Link). Before you gain access to the lift, you will face Black Blade Kindred which drops Gargoyle's Black Axe and Gargoyle's Black Blades. Talk to the Palm Reader near the lift from some lore, and then ride it to reach the Mountaintops of the Giants.
The Mountaintop of Giants
Elden Ring Map: Mountaintops of the Giants Starting Point. Unlike other areas, you begin this zone with an easy one-way forward that leads you straight to the first map fragment Map Mountaintops of the Giants, West (Elden Ring Map Link). Activate the site of grace and talk to Shabriri for some quick information. You should now explore Zamor Ruins and find the stairs leading down to a chest to get Smithing-Stone Miner's Bell Bearing [3] as it will allow you to buy Smithing Stone (5) and (6) from the Roundtable hold. there's also Zamor Ice Storm (Spell) that can be looted here.

Shack of the Lofty Elden Ring Map. Click on the image above to enlarge it.
Follow the road east and north through a narrow passage that brings you about to a small landing with Fire Monk enemies. You can loot Briars of Punishment before braving the narrow road north past an Archer Golem. Keep moving and make good use of double-jump! You will arrive at Ancient Snow Valley Ruins, and notice there is plenty to explore at a higher level than you are. Travel the canyon floor north until you reach a frozen river with Guardian Golems, then head EAST and take your first right to loot a Golden Seed. Backtrack to the spot you first reached the river and now instead travel West past demi-humans and bats until you discover Shack of the Lofty. Here you can loot Traveling Maiden Set, and fight Juno Hoslow if you're doing the Volcano Manor quests.

Stargazer's Ruin Elden Ring Map. Click on the image above to enlarge it.
To the south of the shack, take the spirit spring to the higher ground and complete Stargazer's Ruins by summoning the Jelly Fish Spirit Ashes. You'll be rewarded with Primal Glintstone Blade. You should now also talk to Brother Corhyn before crossing the narrow bridge southeast, looting a Somber Smithing Stone (9), and arriving at the region's Minor Erdtree. Defeat the Erdtree Avatar and loot Crimson Bubbletear and Cerulean Crystal Tear before taking the northern bridge to cross over to the Snow Valley Ruins Overlook site of grace.
Heretical Rise

Heretical Rise Elden Ring Map. Click on the image above to enlarge it.
From here we will travel East until we reach the Freezing Lake site of grace. Now open your map and take a careful look and you will notice a broken bridge with some archers. Behind them, there's an invisible path leading up to Heretical Rise. Use your torch or online bloodstains / messages to chart your way through the invisible bridge and you can obtain Founding Rain of Stars from within the tower.
Heretical Rise Puzzle solution:
You must head over to the other side of the ravine in the north and find the invisible bridge that takes you across. See this for the bridge start location. From here make your way across the ravine and as you reach the tower look to your left. You should see a very faint mist that guides you on a winding path up to enter the tower from a balcony above. Tip: You can use Rainbow Stones or shoot arrows with a bow to mark safe spots to walk on - once inside, defeat the Avionette Soldiers and take the lift up, then the stairs past a Marionette Soldier to reach a chest with your reward: Founding Rain of Stars.


Continuing through the Mountaintop of Giants
You will now travel south and down the eastern slopes to the Frozen lake, which is engulfed in a snowstorm and will remain that way until you defeat Borealis the Freezing Fog. The very southeast of the lake has a site of grace and the First Church of Marika, so it's advisable to visit there first to get a Sacred Tear and Somberstone Miner's Bell Bearing (3). You can take on the dragon or not, and if you explore the mid-west section of the lake you can enter Spiritcaller's Cave for a rather annoying Boss Fight with Godskin Apostle & Godskin Noble that yields the Black Flame Ritual incantation. The cave also has the White Reed Set and Godskin Swaddling Cloth.
Once you are done with the lake, head south on the upper portions to unlock the Whiteridge Road site of grace. You can opt to do the Lord Contender's Evergaol nearby, or press on to complete Guardian's Garrison to loot the Giant's Prayerbook. From this point, you will cross a frozen chain to the south-eastern area of the region, by Giant's Gravepoint and loot Map (Mountaintops of The Giants, East). The area that follows has some challenging enemies with high reach, so feel free to ride by to expedite your progress.
Your first step will be to follow the cliff edge and go west until you spot an opportunity for a narrow jump across a gap that lands you above the starting point of Zamor Ruins. Here you can complete Giants' Mountaintop Catacombs (get Glovewort Picker's Bell Bearing [2] from the boss as well as the Fire Monk Ashes). Nearby, Giant-Conquering Hero's Grave has a true wealth of high-level ash materials (Grave Glovewort 7, 8, and 9!), as well as Giant's Seal and Flame, Protect Me. Come with 2 Stone Sword Key to unlock everything. The boss is the Ancient Hero of Zamor and will drop the Zamor Set and Zamor Curved Sword.
Giants' Mountaintop Catacombs

Giants' Mountaintop Catacombs Elden Ring Map. Click on the image above to enlarge it.
From the Site of Grace go down two flights of stairs, an Imp will be hanging off the far wall to jump onto you. The room straight ahead will have another imp on the wall, a second one will ambush you from the right once you enter. Pick up the Grave Glovewort (7), then turn around and to the left. After fighting past two more imps, you will reach an elevator which you should ride to the lower level.
Optional: Send it back up but stay on the lower level. The elevator has another platform that will be accessible to you now. Take it down to reach the lowest level of the catacombs. There is an imp here and a Lesser Burial Watchdog, the magical variant. You can cheese it slightly using the stairs. Pick up the Grave Glovewort (8) below the stairs, then proceed, but be careful since a statue will spit frostbite-inflicting dust at you. Duck into the corridor on the left, but avoid stepping on the pressure plate there.
Take the statue out by hitting it, then go back to the corridor on the left to pick up Grave Glovewort (8) while being ambushed by two imps. Ahead, there is another statue, this time you have to turn right to avoid it. However, the corridor is behind an illusory wall (identifiable by being "flat" without the usual rims) and an imp hides inside. In the room with the second statue is another Lesser Burial Watchdog (physical variant). Consider using the statue by luring the watchdog into the corridor to take it out. Afterward, pick up the Fire Monk Ashes from a chest behind the statue.
After making your way back up one floor, fight past some imps until you reach another elevator. You will then encounter a Giant Living Jar, be careful with the pressure plated dart trap in the following tunnel. The next room contains multiple guillotines and exploding living jars. Make your way through, as well as the following corridor (containing some Land Squirt), avoid the pressure plate in the penultimate room, then fight another giant living jar in the last and pick up a Grave Glovewort (7). You can also use the dart trap that is activated by the pressure plate to take out the living jar. In the room with the pressure plate look for an alcove on the side and drop down there, you should immediately see a corpse holding a Nascent Butterfly. Below you is a statue that will serve as a point of orientation.
Optional: This room should look familiar, take the path to the right when facing the statue, then pass the guillotines to find another giant living jar, guarding a Grave Glovewort (8). Make your way up again past the land squirts, then use the pressure plate to take out another living jar and pick up Grave Glovewort (7). Jump down the alcove again, this time dropping down multiple ledges. You are now back where this paragraph started. In the room with the statue, take the path which the statue is facing.
Optional: Go up the elevator. Take out the three imps in the following room before engaging the upcoming burial watchdog (frostbite variant). Pick up Root Resin x5 and Grave Glovewort (9), then make your way back to the elevator and take it down.
Send the elevator up and drop down below it. There is another Giant Living Jar here, but you can turn around and run for the lever which is on the opposite side of the room next to a corpse holding Golden Rune (10). Now drop down, take the path the statue is facing, and after a short elevator ride up you should be ready to fight the boss, the Ulcerated Tree Spirit. He drops a Golden Seed and Glovewort Picker's Bell Bearing (2). A chest in the boss room contains a Deathroot.
Teleport back to Giant's Gravepost and this time take the south road toward Church of Repose. You will be invaded by Okina before arriving, so be ready with some hemorrhage resistance and get the Okina Mask and the Rivers of Blood katana after defeating him. The church has a Sacred Tear to loot, and you should explore the southeast cliffs from the church to loot an Ancient Dragon Smithing Stone, the Ash of War: Troll's Roar.
From the church, follow the eastern cliffs and go north, unlocking the Foot of the Forge site of grace. Across the chain is the Fire Giant boss fight, but before you engage you should travel north to loot a Golden Seed, and follow the edge of the cliff circling the whole area until you see Crimsonwhorl Bubbletear that converts damage received into HP.
We will now take a detour to complete Castle Sol, which we left unattended as the boss battle can be rather challenging, and this loop allowed you to loot upgrade materials and level up. Return to the Snow Valley Ruins Overlook and wait until nightfall. Far to the west from this point, at night, a Death Rite Bird invasion will trigger here, and this field boss drops the Death Ritual Spear. From here, travel north and east toward the Walking Mausoleum of the area. Unlock the site of grace, then explore to defeat a Tibia Mariner before entering the Castle.
Elden Ring Walkthrough - Castle Sol

Castle Sol Elden Ring Map. Click on the image above to enlarge it.
From the main entrance, you can find a Lion Guardian elite roaming the main courtyard. You can attempt to defeat it to permanently get rid of it (Lion Guardians do not respawn) or sneak by while its back is turned. Make your way through the wooden barricades in the northwest and follow the path along the walls. Look for a room with several Skeletal Slimes in it. Get rid of the slimes and then pick up the Nascent Butterfly on the corpse by the ladder. Ascend the ladder and look towards the eastern edge of the roof for a corpse with 5x Fan Daggers. Carefully traverse the top of the castle walls in the northeast and pick up the Golden Rune (10) on the corpse in the corner. There are Castle Guards on the walls as well as on the roofs of the buildings across from the walls that will fire explosive projectiles at you. You can try to pick them off with ranged weapons or magic if you have spells with good range. Be especially aware of the ballista operator further down the walls. It can one-shot players even at high levels. Dash towards and behind him and take him out quickly as there is another ballista operator atop the central building of the courtyard. Get up to this building by using the walkways, take out the ballista and then check the corpse in the back for a Smithing Stone (6). Drop down the ladder here to get inside the building and pick up the Sorcerer Painting sitting inside. Unlock the door and then teleport back to the main entrance.
Back at the entrance, enter the courtyard and sneak towards the gravestones in the south for another Golden Rune (10), but beware of the sleeping Lion Guardian. Now make your way to the wooden walkway directly east of the main gate and check under it for a Smithing Stone (5). Head up the walkway and check the left side for a corpse hanging over the edge. You can loot a Freezing Grease off of it. Back in the center path, check the corpse on the right for 3x Thawfrost Boluses. Continue along to the building in the north which connects to a walkway in the east. Beware the spectral melee Castle Guards here that teleport in and out of range, as well as the guard with a crossbow in the distance. Head up the wooden stairs on the left and defeat the guards that teleport in here. Check the corner for a corpse with another Golden Rune (10). From here, head on south to reach the Church of the Eclipse, an important landmark with a Site of Grace inside. On the way, you can kill the crossbow guard and loot the corpse hanging on the low wall for another Thawfrost Boluses. Activate the Site of Grace and then head back outside and look to the east for a ladder leading to the middle level of the eastern castle section. Head south from here and pick up the Golden Rune (9) off of the corpse on the right.
Back inside the church, check the altar for an Eclipse Shotel curved sword. Head out of the church using the eastern exit and check behind the church for a ladder leading up to the outer walls. Beware the crossbowman in the distance and the guard atop the ladder. Follow the walls towards the south and when you see a short set of steps to the right, you can jump to the building with an opening on the roof. This leads into a room full of Rats where you can pick up 3x Smithing Stone (7) from the corpse in the corner.
Exit the room and turn the corner on the right to find a corpse with a Rune Arc by the campfire. Teleport back to the Church and head up the ladder once more. This time, follow the walls to the southern side where you will find a ladder leading to a lower section of the wall. There is a Spectral Banished Knight here equipped with dual swords. He is very aggressive and will often teleport behind you. Your objective here is the corpse hanging off a wooden ledge in front of him. You can loot the Cerulean Amber Medallion +1 from the corpse. You can try to beeline for the corpse, ignoring the knight and then heading back up the ladder and rushing back to the church but be careful as he can chase you for quite a while.
Back at the Church, take the eastern exit once more and continue to the building ahead. Head up the stairs and check the corpse by the edge for a Smithing Stone (6). Continue along with another set of stairs and exit the building to arrive at the upper level of the castle's eastern section. The boss door can be found here but before entering, pull the lever on the left to activate the elevator for a shortcut.
Mini-Boss Commander Niall
Commander Niall is a tall and built knight with a peg leg, clad in heavy armor, wielding a halberd that doubles as a battle standard. He is accompanied by two Spectral Banished Knights, one equipped with dual swords and the other equipped with a sword and shield. Success in this battle hinges on your ability to manage the two very dangerous knights. Niall himself doesn't get too dangerous until the knights are defeated. He will lumber around the arena, making no real effort to close the distance, so focus on the knights at the beginning. Of the two, the dual sword knight is the most aggressive and dangerous. It is highly recommended that you summon a tanky spirit to more easily manage both knights at once. They are also susceptible to Magic Damage so Sorcery mains should have a slight advantage damage-wise.
Once the knights are killed, Niall begins actively pursuing you and using his more dangerous moves. Niall commands the powers of Ice via a whirlwind he summons around him, as well as Lightning via infusions on his artificial leg. Niall's most dangerous moves always involve him summoning whirlwinds of frost around him. He can then follow up with a stomp of his peg leg, infusing it with lightning, and then leaping towards you to perform a powerful leg smash that creates a lightning shockwave on impact. He can also follow up with two versions of a dash attack. The first is a single whirl of his halberd followed by a quick dash into an uppercut with his halberd. The second version sees Niall charging up for a few seconds as he sucks in frosty winds towards him, he then whirls his halberd several times, creating an expanding whirlwind of frost.
Finally, he dashes to the side and then runs toward you, culminating in an uppercut with his halberd. This move tires Niall out and he will be kneeling and vulnerable for several seconds. This is the biggest damage window throughout his fight so be sure to dodge the uppercut and get as many hits in as possible as he recovers. Defeating Niall awards 90,000 Runes and the Veteran's Prosthesis fist weapon. You can also now access the Site of Grace in his arena and proceed to the northeast tower where you can find the Haligtree Secret Medallion (Left), one of two halves of an artifact required to operate the Grand Lift of Rold.
Upon completing Castle Sol, you now have three choices:
- Return to Foot of the Forge and Defeat Fire Giant, then backtrack to Consecrated Snowfield's secret location
- Ignore Foot of the Forge and Fire Giant, backtrack to Consecrated Swowfield's secret location
- Return to Foot of the Forge and Defeat Fire Giant, proceed to Fire Forge, and be automatically teleported to Crumbling Farum Azula
For this walkthrough, we suggest you complete the Consecrated Snowfield first before you fight the Fire Giant and proceed to the next series of events that will bring you to the Crumbling Farum Azula. The Consecrated Snowfield region is a secret area on the lower plains of the Mountaintops of the Giants, that can only be accessed by those that collect both parts of the Haligtree Secret Medallion. Haligtree Secret Medallion (Right) is found in Liurnia of the Lakes. Haligtree Secret Medallion (Left) is found in Mountaintops of the Giants.
Once you have both pieces of the medallion, go to the Grand Lift of Rold and select "Hoist secret Medallion" (make sure your action is "Hoist Secret Medallion" and not "Hoist Medallion") to brandish your secret one. For the walkthrough page, we will mainly provide you with a guide for Miquella's Haligtree, but we still recommend you to explore the region and also check our Interactive Elden Ring Map.
Elden Ring Walkthrough - Consecrated Snowfield
Elden Ring Main Quest Guide - Consecrated Snowfield Points of Interest
- Unlock Secret Path at Grand Lift of Rold
- Complete Hidden Path to the Haligtree
- Loot Golden Seed & Cookbook
- Complete Consecrated Snowfield Catacombs
- Complete Enemy Caravan Events
- Complete Yelough Anix Tunnel and Ruins
- Frozen Waterfall Exploration
- Gather Map Fragment
- Minor Erdtree Event
- Golden Seed & Apostate Derelict Exploration
- Unlock and Complete Mohgwyn Palace
- Complete Ordina Liturgical Town
- Unlock Miquella's Haligtree
Exploring the Consecrated Snowfield

Consecrated Snowfield Elden Ring Map. Click on the image above to enlarge it.
The Consecrated Snowfield region is a secret area on the lower plains of the Mountaintops of the Giants, that can only be accessed by those that collect both parts of the Haligtree Secret Medallion. Haligtree Secret Medallion (Right) is found in Liurnia of the Lakes. Haligtree Secret Medallion (Left) is found in Mountaintops of the Giants. Once you have both pieces of the medallion, go to the Grand Lift of Rold and select "Hoist secret Medallion" (make sure your action is "Hoist Secret Medallion" and not "Hoist Medallion") to brandish your secret one (Elden Ring Map: Consecrated Snowfield starting point).
This area is optional and it is up to you if you want to continue the main route which is Crumbling Farum Azula, but we do recommend that you explore this section and complete some of the Legacy Dungeons located in this section. You can also find items such as Grave Glovewort (9) in the area as well as the Deathroot, Blackflame Monk Ashes and Silver Scarab, and Spelldrake Talisman +2 loot before moving on. Upon arriving, you will be in an area overcome by a snowstorm and with very poor visibility. You should head due north to unlock the first site of grace of the area (Consecrated Snowfield Site) and continue on that same path along the barely visible road to collect the Nomadic Warrior's Cookbook (23) and a Golden Seed.
If you opt to stick to your right (east) and go north as you come out of the hidden path catacombs, you will find a teardrop scarab that drops Somber Smithing Stone (8) somewhere near the cookbook location. Continue hugging this cliff and proceed further into the storm until you arrive at the Consecrated Snowfield Catacombs.
Elden Ring Walkthrough - Consecrated Snowfield Catacombs

Consecrated Snowfield Catacombs Elden Ring Map. Click on the image above to enlarge it.
The Consecrated Snowfield Catacombs are swarmed with Imps and patrolled by Cleanrot Knights ready to stop enemies from venturing within their halls. Beware of the Erdtree Burial Watchdogs ready and watching for trespassers to jump on. Players should also walk carefully when moving up stairways so as not to stumble into a face full of icy breath being shot down the corridors by the frost traps. To access the boss room of this area you must hit the lever found far inside the catacombs. Gain access to the second floor near the tall frost trap and hit it so it goes down, then get on top and hit it again to rise up to the third floor and activate the lever.
Heading up the stairs from the Site of Grace the first room is more stairs, with a 90-degree turn and a large pit on the side, players will die if they fall into the pit. There is 1 imp at the turn of the stairs that can be a surprise, make sure not to fall off during this fight.
The corridor at the top of the stairs has a frost trap at the end of it breathing icy breath that will do damage and apply Frostbite if it connects. Time your step and move between the safe pockets on the sides of the corridor. Once at the frost trap hit it once to have it lower into the ground and stop firing the breath. On the way down the corridor, there is one safe pocket on the right side and then another one further on to the left side. Around the corner on the left is an imp waiting to jump and attack the player, get behind the imp to stay away from the icy breath while fighting. Going down this left path will lead to the locked doors of the catacombs and further into the catacombs.
The room with this first frost trap is a dead-end room, jump onto the frost trap to be raised up to the ledge above where an imp is waiting to attack. A corpse sitting in front of the tomb at the top holds a Rejuvenating Boluses.
Leaving the doors is a set of stairs up, walk carefully when going up these stairs as there will be another frost trap breathing down the doorway at the top. This room is a large hall with a tall ceiling and a tall frost trap. 3 floors can be seen in this room with the lever for the locked door found on the third floor. On the right close to the entrance is an imp, as well as an Erdtree Burial Watchdog with a staff on the 2nd floor that will jump down to attack you. A body with 4 Root Resin can also be found in this room.
Hitting the frost trap will lower it but instead of turning off the breath, the now lowered statue will breathe the icy breath in the other directions, down the tunnels leading out of the room. The icy breath can be used to help deal with the Watchdogs as you can make them follow you into the tunnels then use a ranged attack to lower the frost trap, round the corner to have the watchdog stop chasing, and keep taking damage from the frost trap - the room on the left leads to a dead-end room with 4 imps in it with a Grave Glovewort (9) inside, a Grave Glovewort (8) is found in the tunnel between.
The room on the right has 2 imps in it, one found close on the right of the entrance and one, up the stairs. Going up the stairs will bring you to a dead-end room with an Erdtree Burial Watchdog with a sword sitting over a body that has the Imp Head (Elder) as well as a Grave Glovewort (9) and a Grave Violet. Instead of going up the stairs, there is a pathway under the stairs leading to the next room of the catacombs. A Cleanrot Knight is found inside, patrolling the room, as well as a Grave Glovewort (8).
Go slowly up the next set of stairs, if the tall frost trap is raised up it will wait for the player to peek out before spraying the ice breath, right at the top of the stairs is an imp that is waiting to attack. The stairs lead to the second floor in the large hall, on the left side is a Grave Glovewort (9) as well as a room with 2 Cleanrot Knights within and the Ghost Glovewort (9).
Hit the frost trap to lower it if it isn't already lowered then jump on top and hit the frost trap to raise up to the third floor of the room to find the lever. a Grave Glovewort (9) and a Golden Rune (12) can be found here on this third floor on either side of the lever.
Mini-Boss: Putrid Grave Warden Duelist
The mini-boss for this location is the Putrid Grave Warden Duelist, the fight with this boss is without any additional enemies. This boss wields a large axe with two hands, running at their target and spinning their axe, and many of its attacks consist of slow spinning moves that players can dodge roll to easily get out of range if needed. Apart from that, this boss will also, occasionally, throw its axe at you - successfully defeating the Putrid Grave Warden Duelist rewards the player with x2 Great Grave Glovewort and the Rotten Gravekeeper Cloak.
Other Points of Interest
- Exit the catacombs and go west into the storm. You will find a traveling caravan of enemies following a Hearse with St Trina's Torch inside its chest (Elden Ring Map Link).
- Continue west from here, slightly south-west from the Inner Consecrated Snowfield site of grace and there will be another Hearse this time with the Flowing Curved Sword in its chest (Elden Ring Map Link).
- Where you got the Flowing Curved Sword, if you visit the area at night, you will encounter a field boss, two of the Night's Cavalry that drop the Night's Cavalry Set, and an Ancient Dragon Smithing Stone (Elden Ring Map Link).
- Just about east of Yelough Anix Ruins, or the southwestern area of Consecrated Snowfield on the map, you can find the Stalwart Horn Charm +1 talisman. You won't miss it since it is on the way to Yelough Anix Tunnel entrance between the two large "trees". It is located on a corpse slumped over a log and is guarded by two Ancestral Followers (Elden Ring Map Link).
- You should now explore and complete Yelough Anix Tunnel.
Elden Ring Walkthrough - Yelough Anix Tunnel

Yeloguh Anix Tunnel Elden Ring Map. Click on the image above to enlarge it.
Yelough Anix Tunnel is found in the western area of Consecrated Snowfield, just south of Yelough Anix Ruins. Upon entering the dungeon and descending the lift, activate the Site of Grace and then head down the tunnel ahead. You will see several dead Miners along the way. When you reach the cavern at the end, look to the left for a hole. The door in the north does not open from this side so drop down into the hole. Defeat the two Miners in the room and pick up the 3x Freezing Grease on the corpse in the middle of the frozen lift.
Follow the path east to reach a cavern with wooden walkways. Defeat the Miners on this floor and check the corpse on the ice platform in the middle for a Golden Rune (10). Drop below into the gap in the center or use the ladder on the side. Look for a small opening on the right with two Miners and a corpse with a Rune Arc. Head to the other path where there is a gravity portal. A non-boss Alabaster Lord will emerge from it as you approach. After defeating him, check the cavity in the wall on the left for 2x Smithing Stone (8). Finally, check the back of the room for a corpse next to wooden planks on the wall for an Ancient Dragon Smithing Stone.
Head back up the ladder and using the ice platform in the center, jump the gap onto the opposite side and head through the opening in the wall. Kill the Miner sitting by the campfire and collect 6x Explosive Stone Clump from the corpse nearby as well as a Somber Smithing Stone (8) on the left side. Climb up the ladder and defeat the two Miners in the middle platform, then collect the Somber Smithing Stone (8) to the right of the ladder. Head up the second ladder and through the tunnel above.
In the next room is a gravity portal in the north. Before approaching it, check the cavity in the wall on the right for a Somber Smithing Stone (9). The corpse in the center of the room also has a Hero's Rune (5). Upon approaching the portal, a non-boss Onyx Lord will emerge and begin attacking. Be careful of his meteorite spell as the room has very little space for you to maneuver in. Once he's defeated, continue along to the west and find the small door on the left of the next room. This is the locked door from the beginning of the dungeon and serves as a shortcut for the boss ahead. Head through the large wooden gate to engage the dungeon's boss.
Mini-Boss: Astel, Stars of Darkness
Astel, Stars of Darkness is the mini-boss for this location. This boss has an extremely powerful Heavy Tail Whip that can one-shot even high-level players. It has a distinct animation from his standard tail whip where he swings his tail from side to side before striking. It is important to time a dodge perfectly against this move even if you are very far away. The boss also has a railgun-like beam move that hits over a very long range but has a narrow hitbox.
Periodically, he will teleport into a different location in the cavern but it's easy to tell where he is going to appear. Another dangerous move in his arsenal is his meteor swarm, which calls plenty of meteorites to rain destruction in the arena. You can run towards and under the boss to avoid getting hit by these. Despite its powerful set of moves, its poise can be easily broken, especially if you land multi-hit magic spells and skills. When it is knocked down, get to his head for a critical hit on its forehead - upon defeat, Astel will drop the Meteorite of Astel spell.
Other Points of Interest
- Yelough Anix Ruins (Elden Ring Map Link): A set of ruins found west of the Consecrated Snowfield map, and north of Yelough Anix Tunnel. In these ruins is the Unendurable Frenzy spell found in a chest in the underground treasure room. The entrance to the room is found west of the central section of the ruins, surrounded by walls from all sides. The maddened Giants can destroy the walls using Unendurable Frenzy (the cascading orange lights that emerge from their eyes), allowing you to jump the wall using Torrent. There is also a Stonesword Key far in the north inside a small open structure.
- Just about the north of the location of the ruins, you will come to an area with Rune Bears and an invasion by Sanguine Noble that drops the Sanguine Set (Elden Ring Map Link).
- Past this invasion and northeast, a special gateway with some blood is the teleporter point to the underground Mohgwyn Palace. Make a note of the location as you will come back here later.

Albinauric Rise Elden Ring Map. Click on the image above to enlarge it.
Return to the Inner Consecrated Snowfield site of grace (here). To the east, on the cliffs overlooking the frozen river, you can find Glintstone Craftsman's Cookbook (8) and the Albinauric Rise tower. The entrance to Albinauric Rise is initially sealed upon your first visit. There is a statue of two Imps fighting each other right outside the tower. This is a clue as to how to unlock the seal. There are two ways you can go about solving this puzzle. Choose the one which is more convenient for you:
- Puzzle Solution #1 - Requires killing an imp while you have the Fanged Imp Ashes summon out. This can be purchased from the Isolated Merchant found at the Raya Lucaria Academy for 2,000
 Runes.
 - Puzzle Solution #2 - Requires using a Bewitching Branch on one of the two imps patrolling the tower to make them kill each other.
Upon solving the puzzle, you are notified of the seal being broken. Head into the tower and get to the top floor to find the Graven-Mass Talisman sitting on a bed of crystal. Further east from here, you will be attacked by a pack of wolves and have the option to take a gateway to access the Minor Ertree (Elden Ring Map Link). Defeat the Putrid Avatar guarding it to loot Ruptured Crystal Tear, then follow the road sloping down and west.
Ordina, Liturgical Town comes into view, and you can get close and activate the site of grace if you want. We won't do the town yet, so head slightly south and collect the Golden Seed of the area, before riding to the frozen lake to find Map (Consecrated Snowfield). If you follow the frozen river all the way east to the waterfall, you will be able to loot Ancient Dragon Smithing Stone and explore the Cave of the Forlorn.
Cave of the Forlorn

Cave of the Forlorn Elden Ring Map. Click on the image above to enlarge it.
The Cave of the Forlorn is found along the northern wall in the frozen ravine separating the north and south of the Consecrated Snowfield. The entrance to the cave is slightly southeast of the Minor Erdtree icon. The entrance is guarded by a Giant Land Octopus. To enter the cave, players need to use two Stonesword Keys.
Enter the cave and you will find the Site of grace, near the entrance. Activate it. Head down to find a Golden Rune (7). continue along the way to find x4 Freezing Grease. Take the left path, roll to break the stalactites. You will find a few enemies there. There is another Freezing Grease to be found, on a body inside a small room. Return to the entrance room and now take the right path, once there, you can take a small alley on the left, where there are a few misbegotten. Behind it, you will find x1 Nascent Butterfly and on the other side of the room, you can find x1 Golden Rune (10).
Head to the next room, use the snowy columns to reach the top, and obtain x1 Hero's Rune (2). Head to the next room to be greeted by another Misbegotten, head through the narrow path. You will encounter more Misbegotten enemies here. You will find x10 Spiritflame Arrow and x1 Rune Arc on two bodies in a small room, again guarded by a Misbegotten. Return to the previous room and by climbing again, you will reach a new area. Fall platform by platform, until you reach the lowest floor. Get ready to fight some Jellyfish.
Once you have cleared the room, enter through the hole on the ground. falling platform by platform again. You will obtain x6 Freezing Grease on one of the platforms. Once you are at the lowest level, you will be able to fight the boss, Misbegotten Crusader - defeating it rewards you with the Golden Order Greatsword.
Other Points of Interest
- Optional Field Boss: At nightfall, you can find the Great Wyrm Theodorix field boss, just outside the cave. You can acquire a Dragon Heart if you successfully defeat it.
- Return to the Ordina site of grace (Elden Ring Map Link) but don't go into the town yet. Instead, do a loop around it so you can loot the Black Knife Set from under an archway on the northern outskirts of the town.
- West from here, you can challenge a duelist to obtain Rotten Greataxe and Rotten Duelist Greaves if you were hoping to complete that set (Elden Ring Map Link).
- Your objective now is to get to the base of the river and follow it north, as this will allow you to bypass the attacks of the Walking Mausoleum. At the very end of the river, a Death Rite Bird spawns at night that will drop you Explosive Ghostflame.
- From that dead-end, find a narrow path along the cliffs heading north and west, and follow them upward using the cliff as a guard for the mausoleum attacks. Ride into Apostate Derelict and loot the Silver Mirrorshield within, then deal with the mausoleum outside. Don't forget to activate the Apostate Derelict Site as well (Elden Ring Map Link).
- Return to the Waygate that teleports you to the underground area beneath Caelid to find Mohgwyn Palace (Elden Ring Map Link). You can visit our Mohgwyn Palace page to find entries on the different items that can be found in the location, as well as a walkthrough.
Exploring Ordina Liturgical Town

Ordina Liturgical Town Elden Ring Map. Click on the image above to enlarge it.
If you prefer, head into Ordina, Liturgical town, and activate the evergaol system there to enter an instanced event. It's a ghost city located in the north of the Consecrated Snowfield and can easily be accessed by riding north past the frozen ravine. You can find more details such as a walkthrough and a list of items found in the location by visiting the Ordina Liturgical Town page. Your objective is to light 4 candles:
- Candle #1 is in the central square - beware though that you will most certainly be attacked by a shadow assassin. All other candles can be reached without the shadow assassin attacking you.
- Candle #2 is at the far west edge of the town, and there's a ladder up to it blending in with the stones. From the starting point turn right and jump over the balcony, turn left and go around the town until you reach the ladder.
- Candle #3 From the starting point, jump over the balcony to the south. Continue south and at the stairs, jump on the upper railing and onto the balcony on the left side of the stairs. There is a ladder to your direct left, next to a door. Climb the next ladder right in front of you and you will reach candle 3.
- Candle #4 This is probably the hardest Candle due to the archers. If you have Loretta's Greatbow or any other bow, first climb the stairs leading to the seal you try to open. From there you can get a shot of the archer on the right. If you're lucky you can finish him off right there or he'll jump to the other side of the roof. Now climb the same ladder you used to get to #3 and if the archer's still alive, finish him off from that corner. Now it's simple, follow the rooftops to where that archer was, climb the tower and light the final candle.
Once you have activated all the candles, you will leave the instance and the northern wall magic block at the top of the northern staircase will be gone. You can use that gateway to access Miquella's Haligtree.
Elden Ring Walkthrough - Miquella's Haligtree
Elden Ring Main Quest Guide - Miquella's Haligtree Points of Interest
- Explore Miquella's Haligtree
- Defeat Loretta, Knight of the Haligtree
- Enter Elphael, Brace of the Haligtree
- Defeat Malenia, Blade of Miquella
Elden Ring Map: Miquella's Haligtree Starting Point. Miquella's Haligtree is split into two main parts, the tree canopy area and the walled structure within the Haligtree, Elphael, Brace of the Haligtree. You can find details on each of these sections on their respective pages. But we will also be indicating it here on the walkthrough page.
Explore Miquella's Haligtree
Miquella's Haligtree is a Legacy Dungeon in Elden Ring. Miquella's Haligtree is found far to the north of the Consecrated Snowfield and the entire Lands Between. You'll find yourself on the canopy of a great branching tree, fighting against deadly foes. If you're looking for the castle area situated within Miquella's Haligtree, visit Elphael, Brace of the Haligtree. [Elden Ring Map here]

General Information
- Previous: Crumbling Farum Azula
- Next: Elphael, Brace of the Haligtree
- Recommended Levels: 110+
- Bosses: Loretta, Knight of the Haligtree
- Site of Grace:
Haligtree Canopy [Elden Ring Map Link]
Haligtree Promenade [Elden Ring Map Link]
Haligtree Town [Elden Ring Map Link]
Haligtree Town Plaza [Elden Ring Map Link]
Video Walkthrough
Miquella's Haligtree Map


NPCs in the area
- No NPCs in the area
Bosses
Items
Talismans
Consumables
- 1x Dappled Cured Meat
- 8x Fire Grease
- 10x Flaming Bolt
- 3x Golden Rune (10)
- 1x Golden Rune (12)
- 1x Golden Rune (13)
- 1x Hero's Rune (4)
- 1x Numen's Rune
- 1x Preserving Boluses
- 2x Rot Grease
- 4x Warming Stones
Weapons & Shields
Armor
Spells
Upgrade Materials
- 6x Aeonian Butterfly
- 2x Ancient Dragon Smithing Stone
- 1x Lost Ashes of War
- 4x Sacramental Bud
- 2x Smithing Stone (6)
- 1x Smithing Stone (7)
- 2x Smithing Stone (8)
- 1x Somber Smithing Stone (8)
- 1x Somber Smithing Stone (9)
Enemy Drops
- Iron Cleaver (Misbegotten)
- Iron Greatsword (Leonine Misbegotten)
- Grave Glovewort (1) (Lesser Spirit-Calling Snail)
- Somber Smithing Stone (7) (Battlemage)
- Loretta's Mastery (Loretta, Knight of the Haligtree)
- Loretta's War Sickle (Loretta, Knight of the Haligtree)
- Envoy's Greathorn (Giant Oracle Envoy)
Keys & Other
Enemies
- Battlemage
- Giant Ant
- Giant Miranda Sprout
- Lesser Spirit-Caller Snail
- Misbegotten
- Oracle Envoy
- Large Oracle Envoy
- Giant Oracle Envoy
- Miranda Sprout
- Putrid Corpse
- Teardrop Scarab
Notes
Important Discoveries
- Do the puzzle at Ordina, Liturgical Town to reach the Haligtree
- Be careful of the Oracle Envoys up in the canopy
- There are two Stonesword Keys here to collect if you fancy
- Defeat the Giant Oracle Envoy
- Grab the Lost Ashes of War and the Oracle Envoy Ashes
- Reach Miquella's Haligtree Town
- Collect the Pearldrake Talisman +2 and Viridian Amber Medallion +2
- Grab the Ancient Dragon Smithing Stone from under a large Misbegotten
- Defeat Loretta, Knight of the Haligtree
Full Miquella's Haligtree Walkthrough
How to get to Miquella's Haligtree
Miquella's Haligtree is accessed by completing the evergaol candle puzzle located at the Ordina Liturgical Town to be able to go through the Waygate that leads to the Haligtree. Map Link. You can find the solution to the puzzle on the town's page.
Miquella's Haligtree Canopy

You have to be incredibly careful when traversing Miquella’s Haligtree. The enemies here have good range and any misstep, poor jump, or even a simple knockback from an enemy can send you falling off the tree and to your doom. Having ranged attacks and skills helps immensely for this area, and holy damage negation is great for weathering the projectiles. After arriving at Miquella’s Haligtree, immediately turn around. You’ll find a corpse sitting at the branch’s tip that has a Stonesword Key on them. Turn back around and move forward to get to a Site of Grace.
Starting at the site of grace, face North. On the right, you'll see a ladder with a enclosed gazebo on the left of it. The next site of grace is in that gazebo, so your goal is to proceed through the treetops until you reach the ladder and climb down. (See first image below)


Look east and you'll find three Oracle Envoys at different levels of the branch's edge that you can sneak up to and knock off the tree. At the first Oracle Envoy, you can turn right and follow the branch to get to a corpse that has three Sacramental Buds. After knocking off the third Oracle Envoy, look eastward and jump down to the branch close to you. Ahead, is a Large Oracle Envoy. He will knock you off, so quickly close the distance and prevent him from attacking by staggering him out of his attacks. You'll find a corpse with a Golden Rune (10) right where he was standing.

Turn left and follow the branch northeast. You'll see three Oracle Envoys on the branch above and one patrolling the one you are currently on. If you can snipe them from far away, for example with Loretta's Greatbow, it will help you navigate this area. Otherwise, sneak forward and jump down to the wide tree branch to your southeast that's patrolled by Giant Ants. If you get spotted at this point, the Oracle Envoys will spit bubbles that can 2-hit you. Facing south, looking towards where this wide branch splits, head up the left side to get out of their range. There's a Large Oracle Envoy here that, as long as you don't attack, will not notice you. You can safely deal with any Giant Ants you've alerted here and pick up a Golden Rune (10) on a corpse. You'll be able to spot an item in the east, but we'll grab that when it's safer.

Once that's all dealt with, you can go back to where this branch splits and instead go up the right side where you'll find a corpse with a Dappled Cured Meat. Head back down the branch facing north, and take the first right. This branch leads up to where those three Oracle Envoys were sniping you from. You can now close the gap and defeat these enemies, making navigating this part of the haligtree safer.

Backtrack to the left split of the branch where you found the Golden Rune (10) and when facing south, take the left detour branch towards where the item we saw earlier is. If you have any ranged attacks, it's worth taking care of the Oracle Envoy and the Giant Poison Flower here as their attacks can knock you off of this thin branch. Follow this branch and when you get to the end, turn north-east and jump down to the closest branch. Follow this branch around and you'll reach that corpse you saw at the tip of the branch containing a Stonesword Key. Other items you can find on your way include two Aeonian Butterflies, a Preserving Boluses, and three Fire Grease.

Navigate your way back to the thick branch where the Giant Ants were found. Facing north, continue making your way down the branch finding four Warming Stones on a corpse lying on some mushrooms. If you turn around and go up the thinner branch to the right, you'll find the Prattling Pate "My Beloved". From the corpse with the Warming Stones, you should be able to see a Giant Oracle Envoy in the far distance. Get ready to make a break for him because he will spot you from a mile away, and he will shoot 5 homing bubbles at a time to destroy you. From the corpse, you can sneak towards the first set of large pink mushrooms you see on your right. If you look down you'll be able to see a thin branch you can jump down to.
After jumping down, sneaking will no longer help you as the Oracle Envoy should have spotted you. Turn left at the juncture and follow the path of the branch, rolling past the Poison Flowers and dodging the incoming bubbles, until you get to the Oracle Envoy. Because of how the branches are formed and sloped, you can angle yourself to where he shoots his bubbles at the floor and attack him during his downtime. If you're walking up at him to deal melee attacks, be particularly careful of when he jumps up and slams the ground as this move can potentially knock you off of the tree.

After you've defeated him, turn around and look for a branch going upwards. You'll see two Oracle Envoys, a Large Envoy, and a Giant one all with their backs turned. Carefully pick them off, then at the top of this branch, you can collect the Oracle Envoy Ashes. Turn back, follow the branch southwest where you'll find a corpse on the platform that has a Lost Ashes of War. You can now backtrack to the thick branch where there are two corpses with items under the branch he was standing on, one of which contains ten Flaming Bolts and another with a Numen's Rune. Continue facing north and making your way down the branch and you'll get to a platform with a ladder going down. After heading down the ladder, you'll find a non-functioning lever to the right. This will be used for a shortcut that links to the end of this area. Continue forward and you'll find the Haligtree Town Site of Grace.
Miquella's Haligtree Town

From this point on, navigating the tree is less dangerous, but do note that falling off the platforms and buildings into the void is still fatal. As you make your way down the steps ahead, a Misbegotten will come rushing at you. Another two can be found distracted on the next platform. Note that failing to backstab the closest distracted Misbegotten will attract the attention of a more powerful one on the platform above you, and they will jump down and attack. From here there are two ways forward - up the ladder or further down the steps.
Note that from the ladder, if you look off to the West, you can see the next site of grace.

Head up the ladder first, where you'll find a Misbegotten ravaging a corpse. To the right, you'll see three scarlet rot zombies peering over the edge. It doesn't seem that any of these enemies will notice you until you attack them, so dispose of them however you please. The body here has two Rot Grease on it and if you turn to face where the zombies were facing earlier, you'll see another platform with an item guarded by a Leonine Misbegotten (provided you didn't aggro it from below). The item here is a Pearldrake Talisman (+2) and once you've grabbed it, head back down the ladder.

Continue down the stairs where you'll see some Misbegotten seemingly praying to the skies. Beware of the zombie ambush when you reach the base of the stairs though. Head through the building to the right, again being careful of a zombie ambush as you approach the building, and you'll see an item on a corpse right ahead. Before picking it up, take care of the axe-wielding Misbegotten around the corner, or it'll charge you while you're trying to loot. Once you've looted the corpse for a Smithing Stone [8], continue heading down the steps where you'll find another two Misbegotten and a corpse with six Hefty Beast Bones on it. You can also choose to jump down from where the zombie waiting to ambush you were to the lower floor of the building, skipping the zombie group and the axe-wielding Misbegotten on the top floor. Before you leave through the gaping hole in the building, head out the southern door, where you'll get to a ledge with a Golden Rune [13] on a corpse.

Back through the destroyed wall, there's a ladder going down. If you have any ranged attacks, you might want to get rid of the Giant Poison Flower you can see from the top of the ladder because once you descend it, you'll find that there are two Giant Poison Flowers here sitting next to each other. Alternatively, you can jump across to the platform with a ladder going up to the right and a wooden bridge to the left. If you decided to go down and kill the flowers, head up the ladder that used to be behind the rightmost flower, and head in the building to your left through the open window. If you turn to face the southeast, you'll see the aforementioned bridge, with a corpse holding five Fire Grease, connecting this building to a platform with the ladder going up. There isn't much at the top besides a hoard of zombies that you can farm, so once you've taken the item off of the corpse, turn around and head back to where you came from.

After emerging from the building, you'll see a large Misbegotten standing guard in front of a statue. Be careful as you exit the building, because two other misbegottens will ambush you, alerting the large enemy. You can back up in the building to manage the fight better. Defeat the group of enemies and grab the Ancient Dragon Smithing Stone in front of the statue.
- If you're finding this to be difficult and far away from a site of grace; while dodging enemies, you can run out the building, into the next building to the west/southwest, run straight out of this building, turn south to find a wooden bridge, run across the bridge to the Haligtree Town Plaza Site site of grace. Backtrack to gather the following items.
Enter the doorway into the building in the west/southwest. In this building, you can go either straight ahead or to the left. To the left, you'll find a corpse (guarded by enemies) hanging off the ledge with a Somber Smithing Stone [8] on it, be mindful of the ambushing zombies and a misbegotten enemy. Straight ahead, you'll cross a bridge that takes you to the Haligtree Town Plaza Site of Grace and a Golden Rune [12].

Facing south, jump down to the roof of the building and collect the Smithing Stone [6] from the corpse, then turn around to go to the branch with the Giant Ants protecting a corpse with four Aeonian Butterflies on it. Turn back toward the building on the roof you jumped off, and head inside. There'll be three scarlet rot zombies and a corpse holding a Somber Smithing Stone [9].

When you emerge from the building, turn hard right and defeat the Lesser Spirit-Caller Snail here. There's another snail straight ahead from the building and another to the right of that snail, hiding in the corner of the roof. You'll want to have them defeated before doing this next part. After looting the Golden Rune [10] off of the corpse here, face southeast and head to the tip of the roof. The jump onto the other roof is difficult but manageable. If you, however, can't make the jump, you will still survive by simply landing on the platform the building is standing on.

If you jumped onto the platform, head up the ladder, be careful of the zombie that may ambush you as you approach it, and take the zombies up here out to grab the Smithing Stone [6]. Taking a ladder behind (north), you will reach a roof you intended to jump onto. Now jump to the roof to southwest direction. Facing north, you will see a room slightly below the roof you are standing. This will net you Viridian Amber Medallion+2, found in a chest.

Jump back to the platform and this time head down the ladder to the east, where you'll find you can continue east, or go west. Through the western doorway is a corpse with a Sacramental Bud and a Crimson Teardrop Scarab each guarded by a large Misbegotten in their little rooms. The way forward is to the east, into the little walkway.

After defeating the two Misbegotten here, you'll find a doorway leading back outside to your left. There'll be a Battlemage just across the way inside the gazebo, and one patrolling the bridge on the right. Take these two mages out to safely cross the bridges. In front of the gazebo, you can loot a Smithing Stone [7] from the corpse, and inside you'll find a Smithing Stone [8]. If you turn around to face the bridge you just came from, you'll see two other bridges on either side. Up the leftmost bridge is a gazebo with a Hero's Rune [4] on a corpse. When you've grabbed that, cross the rightmost bridge and take the lift up. This takes you back to the Haligtree Town Site of Grace and activates the shortcut here.
After activating that, and resting at the Site of Grace if needed, head back to the gazebo through the shortcut and you'll be able to sneak past the Battlemages this time if they're back. Cross the northeastern bridge to get to a large, open courtyard.
Miniboss: Loretta, Knight of the Haligtree

When you walk into the courtyard, Loretta, Knight of the Haligtree spawns at the far end. This fight is relatively straightforward, with easy-to-read, telegraphed movements and attacks. Her biggest strength is her mobility on her horse, allowing her to close the distance between her and ranged or magic users. This boss fight is made even easier when fighting with any Spirit Ash to distract her from you. The biggest skill to look out for is Loretta's Greatbow, where she channels a large magic greatbow to shoot a powerful homing shot at you. This skill gets upgraded to Loretta's Mastery when she's under 50% health, where instead of one magic bolt, she fires four. This skill has a relatively long charging time, and you'll be able to tell when she's about to cast it when she draws her halberd like a bow. When you see this happen, create distance between you and the boss, and if dodging to the side isn't working for you, try dodging into it. Other than that, dodge her attacks and hit her in between, and you'll occasionally be able to stagger her for extra hits.
Loretta's defeat nets you 200,000 Runes, Loretta's Mastery, and her weapon, Loretta's War Sickle. The Haligtree Promenade Site of Grace is also now available where she spawned.
Getting to Elphael, Brace of the Haligtree
Defeating Loretta opens up the fog door to the north. Simply follow the path down the stairs, then down the ladder. Before going into the room to the right, head up the stairs next to it, where at the top you'll find a chest with an Ancient Dragon Smithing Stone. Head back down and take the lift in the room you passed by to emerge into Elphael, Brace of the Haligtree.
Miquella's Haligtree Map

Top Level
Middle Level
1st Lower Level
2nd Lower Level
Miquella's Haligtree Videos
Speed Run Walkthrough
After reaching Miquella's Haligtree from Ordina, Liturgical Town, immediately turn around and grab the Stonesword Key off of the corpse. Turn back around and head forward to interact with a Site of Grace. Continue forward, sneaking past the three Oracle Envoys on the left. At the third Oracle Envoy, look east and jump down onto the branch. Defeat the tall Oracle Envoy here to keep him from knocking you off and collect the Golden Rune (10) from where he was standing.
Turn left and jump down to the thick branch with Giant Ants on it. Facing south, head up the left side of the thick branch to get out of the attack range of some Oracle Envoys that may be attacking you and to deal with any Giant Ants you've alerted. If you're feeling adventurous, you can run up the thin branch to the right when facing north and follow the branch left, circling until you get the Stonesword Key off of a corpse hanging off the tip of a branch.
Facing north, head down the thick branch until you get to a corpse with 4 Warming Stones lying on some large pink mushrooms. A bit forward and to the right, you'll be able to jump down to a thin branch. Follow the branch left and you'll get to a large Oracle Envoy. Defeat him and you'll be able to access a corpse slouching under a nearby statue that has a Lost Ashes of War on it.
Head back to the wide tree branch and head down it until you find a ladder. Take the ladder down and continue forward, where you'll find another Site of Grace. Continue forward and head down the stairs. Turn right to enter a building and loot the Smithing Stone (8) off of the corpse here. Continue down the stairs and head down the ladder here. Defeat the two Giant Poison Flowers here and head up the next ladder.
At the top of the ladder, steal the Ancient Dragon Smithing Stone from under the large Misbegotten and run through the doorway in the west. In the left room, you'll find a Somber Smithing Stone (8) and right ahead, you'll find the Haligtree Town Plaza Site of Grace.
From this Site of Grace, jump down to the roof in the south and collect the Smithing Stone (6). If you jump down and into the building, you'll find a Somber Smithing Stone (9). In the area ahead, you'll find three Lesser Spirit-Caller Snails that you should defeat. After defeating them, face southeast and head to the roof's tip, then jump down to the platform in front.
Head up the ladder here and grab the Smithing Stone (6) from the corpse. Climb down the ladder to the east then continue heading eastward. Through the building, there'll be a door to the left that opens to a bridge leading to a gazebo. Run past the Battlemages here and collect the Smithing Stones (7) & (8) on the corpses by the gazebo. Facing the bridge you just took, go up the bridge to its right and head up the lift to activate the shortcut.
Head back down the lift, then cross the northeastern bridge to get to a large open courtyard. Loretta, Knight of the Haligtree spawns here and upon defeat, drops Loretta's Mastery and Loretta's War Sickle. Interact with the Site of Grace that spawns after her defeat, and head through the doorway behind it. Follow the path and before heading down the lift, climb the stairs next to its room to grab an Ancient Dragon Smithing Stone on the roof of the building. Going down the lift takes you to Elphael, Brace of the Haligtree.
Gallery

Complete Elphael, Brace of the Haligtree
Elphael, Brace of the Haligtree is a Legacy Dungeon in Elden Ring. Elphael, Brace of the Haligtree is a big castle that constitutes the second part of Miquella's Haligtree dungeon. It can be accessed after beating Loretta, Knight of the Haligtree by going down the elevator found shortly after.

General Information
- Previous: Miquella's Haligtree
- Next: none
- Recommended Levels: 110+
- Bosses: Malenia, Blade of Miquella
- Site of Grace:
Prayer Room [Map Link]
Drainage Channel [Map Link]
Elphael Inner Wall [Map Link]
Haligtree Roots [Map Link]
Malenia, Goddess of Rot [Map Link]
Video walkthrough
Elphael, Brace of the Haligtree Map

2nd Upper Level

1st Upper Level

Middle Level

1st Lower Level

Drainage Channel

2nd Lower Level

Haligtree Roots

NPCs in the area
- Millicent (moves here for the final part of her questline)
Bosses
Items
Talismans
Consumables
- Golden Rune (10) x 2
- Golden Rune (12) x 1
- Golden Rune (13) x 1
- Hero's Rune (5) x 2
- Holy Grease x 3
- Immunizing White Cured Meat
- Lightning Greatbolt x 7
- Lord's Rune x 2
- Numen's Rune x 2
- Pickled Turtle Neck x 1
- Rot Grease x 1
- Spiritflame Arrow x 15
- Warming Stone x 2
Weapons & Shields
Armor
Spells
Upgrade Materials
- Ghost Glovewort (7) x 2
- Ghost Glovewort (8) x 1
- Ghost Glovewort (9) x 1
- Golden Seed x 1
- Great Grave Glovewort x 1
- Smithing Stone (6) x 1
- Smithing Stone (7) x 2
- Smithing Stone (8) x 3
- Somber Ancient Dragon Smithing Stone x 2
- Somber Smithing Stone (9) x 2
Enemy Drops
Lesser Cleanrot Knight:
Lesser Crystalian:
Haligtree Soldier:
- Brass Shield
- Haligtree Crest Surcoat
- Haligtree Gauntlets
- Haligtree Greaves
- Haligtree Helm
- Lordsworn's Bolt
Revenant:
Keys & Other
- Aeonian Butterfly
- Arteria Leaf
- Cleanrot Knight Finlay Ashes
- Ghost-Glovewort Picker's Bell Bearing (3)
- Haligtree Soldier Ashes
- Miquella's Lily
- Nascent Butterfly
- Seedbed Curse
Enemies
- Haligtree Knight
- Haligtree Soldier
- Lesser Cleanrot Knight
- Lesser Crystalian
- Lesser Kindred of Rot
- Putrid Avatar
- Revenant
- Ulcerated Tree Spirit
Notes
Important Discoveries
- Reach Elphael by beating Loretta in Miquella's Haligtree
- Two imp statues can be opened with a Stonesword Key
- One has the Triple Rings of Light incantation
- Another has Marika's Soreseal
- Grab the Somber Ancient Dragon Smithing Stone from behind a Putrid Avatar
- Reach Elphael's Inner Wall
- Reach Elphael's Drainage Channel
- Complete Millicent's questline
- Grab the Dragoncrest Greatshield Talisman
- Reach and defeat Malenia, Blade of Miquella
Full Elphael, Brace of the Haligtree Walkthrough
How to get to Elphael, Brace of the Haligtree
After defeating Loretta, Knight of the Haligtree in Miquella's Haligtree, continue heading north past the Haligtree Promenade Site of Grace to reach a tower with a lift that will take you down to the bridge leading to the base of Elphael.
Navigating Elphael's Outer Wall

After you leave the building, head towards the bridge in front of you. There will be a corpse with three Holy Grease on it and guarding the building up ahead will be a Lesser Cleanrot Knight. Defeat him to access the Site of Grace further in. You'll find Millicent here if you're close to the end of her questline. Continuing forward, you can simply run past these enemies but to comfortably and safely loot items, it’d be a better idea to take them out. After you head down the stairs, take the first door to your left to find two Haligtree Soldiers and a corpse with a Golden Rune (12) on it. Exit the room and continue moving forward.

Ignore the next room to the left, we'll be visiting here a little later. If you take a peek in though, you'll see a stairway with a Haligtree Soldier at the top and its base. Continue walking on the outer wall and head down the stairs a level. You'll find two Haligtree Soldiers and a corpse dangling over the broken banister with five Lightning Greatbolts on it. If you jump down to the support beam from this broken banister, you can jump down to the platform with the gazebo. Turn left into the room, fight past a Lesser Cleanrot Knight, and you'll find the Cleanrot Knight Finlay Ashes in a chest. Head back out the room and jump onto the next support beam in the north. Inside the small room is a chest with a Somber Ancient Dragon Smithing Stone. If you continue north past this room, you'll also find a Seedbed Curse. Backtrack to the broken banister. Head down the next set of stairs and facing south, continue forward through a narrow passageway guarded by a Haligtree Soldier with a greatshield and spear. In the first small room to your right, you'll find a Smithing Stone (7), and if you continue walking down the path, you'll eventually reach an imp statue (requiring a stonesword key) with the Triple Rings of Light Incantations locked within.

Turn around, facing north, and then look to your right where there will be a Putrid Avatar standing on the walkway below. If you're nervous you can fight it from range (though note it can attack you back from the distance), but you'll be able to fight it later up close.
![]()
Keep walking forward down the last flight of stairs towards a room with two Lesser Cleanrot Knights. Right before you get to the room, if you jump over the banister down to the lower platform, you'll find another Seedbed Curse by following the path. Head back to the room with the Lesser Cleanrot Knights. Running past these enemies is not recommended as they have quick movement and powerful attacks. In the vicinity, you'll find an Immunizing White Cured Meat and a Smithing Stone (7). Head out the northeastern door to find a Golden Rune (10) on the balcony, then head back and exit through the northwestern doorway.

Through the first doorway on your left, you'll find another large twisting branch. Hop on to it and it'll give you access to an upper ledge with five Old Fangs. Head back down the outer walkway, just outside the room you fought the two Lesser Cleanrot Knights, and head northwest down the stairs. You'll get to a platform with three Haligtree Soldiers. Don't head down the stairs to the bridge, for now, we're just here to take a look at our surroundings. Up ahead on the other side of the bridge, you'll be able to spot two ballistae staring right down the bridge. While it is possible to dodge these two ballistae and cross the bridge, when you get to the other side, there is an Erdtree Avatar and another two ballistae on a higher level that you won't be able to reach from down here.

Instead, turn back around and go up the stairs. Enter the room with the branch again, hop on to it and climb up until you reach the upper ledge where the Old Fangs were. Walk down the structure and hop onto the top of the building. Kill the Teardrop Scarab and, optionally, the large flower and hop down the stairs to the West. Continue up the stairs and kill the soldiers and ballistae. Go back down the stairs and you'll end up in a room with another two Lesser Cleanrot Knights, two Warming Stones, and 15 Spiritflame Arrows. After dealing with that, head up the stairs to the west and you'll be able to take out the two ballistae up on this higher ledge that we mentioned earlier. On a corpse between them is a Smithing Stone (8), and in front of the large goblet behind them is a corpse with the Haligtree Soldier Ashes.

Instead of jumping down to the lower platform, scale up the support beam to the right of the two ballistae and above the Erdtree Avatar, and facing west, jump into the room on the upper floor. The corpse here has a Haligtree Knight Helm. If you continue west and jump down, you'll find yourself behind the Erdtree Avatar and can interact with the Elphael Inner Wall Site of Grace, as well as pick up a Smithing Stone (6) from a corpse slumped by the wall.
From here, you can safely pick off the Erdtree Avatar for 27090 Runes and a Lord's Rune, and clear out the courtyard. With all the ballistae down, you can safely loot the corpses on the bridge for a Golden Rune (11) and an Arteria Leaf.
Taking a detour for more loot

Backtrack back to the room we ignored earlier - the one with the stairway and a Haligtree Soldier at either end. It's not recommended to teleport back to the Prayer Room Site of Grace as the enemies will respawn, making looting more tedious. Up the stairs, take a right and jump onto the large branch you see right in front of you. Following this tree branch up and across takes you to a bell tower where you'll find the Miquellan Knight's Sword. If you head down the ladder, you'll find a lever that doesn't seem to work. You'll be able to activate a shortcut here later on.

From this bell tower, you can jump down to the walkway in the east patrolled by a Putrid Avatar. If you're having a difficult time defeating this enemy, you can instead snipe it from the balcony where you previously found the Triple Rings of Light. Regardless of how you beat it, it'll drop 27090 Runes and the Rotten Staff and not respawn. In the room up the stairs to the north (where you may or may not have chosen to cheese the Erdtree Avatar) is a Putrid Lesser Crystalian guarding a Somber Smithing Stone (9). With the Erdtree Avatar's defeat, you are now free to collect the Numen's Rune and Somber Ancient Dragon Smithing Stone from the corpses on the walkway.

At the end of the walkway, from the corpse with the Smithing Stone, you'll be able to hop down safely to the lowest level of the castle. Be extra vigilant down here as multiple Revenants will pop out of the ground while you traverse the area. Though risky, it is possible to sneak by the Revenants. Spirit Ashes can be summoned here, however, if you wish to comfortably get rid of these threats. Immediately to your south, is a room locked behind an imp statue. Inside, you'll find Marika's Soreseal. Follow the path north and on your way you can loot four Aeonian Butterflies and a Golden Rune (12). Through the next doorway to your left, you'll find three Beast Blood on a corpse guarded by a Revenant ambush.

Continue following the path north. Once you reach a wider area with a patrolling Revenant, look out for a door behind and to the left of you. This room houses three Lesser Crystalians (two ringblades and one spear), one of which is hidden behind the pillar right next to the entryway, and some loot including a Somber Smithing Stone (9) and 3x Pickled Turtle Neck. Exit again through the doorway and to your right, in a little alcove in the wall is a corpse with a Lord's Rune.

Continue your journey north. The ladder on your right leads to the room with the Lesser Cleanrot Knights that provides the alternate path behind the ballistae. The opening to the left is a clearing where a final Revenant will spawn. Loot the Smithing Stone (8) here and head up the ladder, where it will take you back to the courtyard you fought the Erdtree Avatar in. Head back to the Elphael Inner Wall Site of Grace and we can continue progressing the dungeon from here.
Elphael Inner Wall

As you head through the doorway down the stairs, you'll notice a giant tree root to your left. Climb it and fight the three Lesser Crystalians to loot the Rotten Crystal Sword from the chest they were guarding. Head back and continue following the path southwest. Before climbing up the tree root on your left, continue down the path and you'll find a Hero's Rune (5) at the end of it.

Taking the tree root up leads you through a hole in the wall and down onto a cliffside. Here you'll find a bunch of flowers submerged in water that works the same as the waters of Lake of Rot - quickly building up Scarlet Rot each second you stand in them. Preserving Boluses will help you immensely in combating this section of Elphael. On top of this, be careful of any enemies lurking in the water. While there are no Basilisks in this area, Lesser Kindreds of Rot will still seek to ambush you while wading in these infested waters.

Turn hard left when you reach the water to find a Lesser Kindred of Rot guarding a corpse with a Rot Grease on it. From here, the path forward is rather linear. Make your way to the central island, then to the submerged pillar on the left if you want to collect some Aeonian Butterflies. After which, you should make your way to the fallen pillar found to the right of the cliff up ahead and follow the tree roots to get back up on land.

Before heading up the hill, go through the doorway to your right to find a Golden Rune (10) and head down the ladder. You'll emerge in a small room with the Drainage Channel Site of Grace. With this Site of Grace accessible, you can now go back and head up the hill in the scarlet rot area. At the top will be a Lesser Kindred of Rot, and by following the branches southwest, you will end up at a large lake.

Get ready to fight because as soon as you approach the Great Grave Glovewort in the middle, a Lesser Ulcerated Tree Spirit will pop out from under you. Defeating it nets you 26460 Runes and a Golden Seed. The end of Millicent's questline happens here as well. You'll have a choice between assisting her or betraying her depending on the summon sign you choose. After you're done with that, make your way back to the Drainage Channel Site of Grace.

Taking the door to the east will bring you back outside. On your left is a thick tree root you can climb. From here, you'll want to jump down to the next support beam you see on your right. Descend down the beam to the next tree root you can access, then go up the next support beam and root that will lead you onto the roof of a building. There are two holes in this roof; the hole you want to go down is one that overlooks wooden support beams instead of leading straight to the lower floor of the church. On your left is a balcony with the Dragoncrest Greatshield Talisman in a chest guarded by Lesser Kindreds of Rot.

Head down to the lowest floor of this building. Out the northern balcony, there's a corpse with an Aeonian Butterfly hanging off the banister. Out the eastern door, you'll emerge into a large courtyard. Turn left and you'll find a graveyard infested with Lesser Kindreds of Rot. Explore the area to loot two Ghost Glovewort (7), a Ghost Glovewort (8), a Ghost Glovewort (9), a Numen's Rune, and the Ghost-Glovewort Picker's Bell Bearing (3). Turning right from the eastern door takes you instead to a graveyard filled with Haligtree Soldiers and Haligtree Knights. This area houses a lot of Miquella's Lilies and corpses with three Arteria Leaves and a Hero's Rune (5).

After you're done exploring the courtyard, head back inside the building and through the southwestern doorway is a lift going down. This lift will take you down to the Haligtree Roots Site of Grace. Before going through that fog door right ahead, the doorway to the southeast opens up to a room with a large scarlet flower. Under it is Traveler's Set and heading up the stairs takes you to a lift going up, making the shortcut at the bell tower earlier accessible - make your way back to the Haligtree Roots Site of Grace and prepare yourself for a difficult boss battle.
Malenia, Blade of Miquella

As soon as you emerge through the fog door, a cutscene will play. After a self-introduction and some exposition from Malenia, Blade of Miquella, she charges at you immediately and the boss battle begins. Malenia has quick attacks and though she mainly fights in melee range, her attacks allow her to travel great distances, making it difficult to keep your distance if you're a range or magic-user. On top of this, she heals a portion of her health each time she manages to land a hit on you or your Spirit Ashes. This, along with her quick multi-attacks make for a difficult fight.
Bleed is your best friend here. It is easy to apply on Malenia and the damage it deals somewhat offsets her healing. She can be staggered, allowing you to perform a critical hit on her, but due to how quickly she recovers unless you're right next to her when it happens, it's unlikely that you will be able to perform the critical hit. If you're having difficulties with this boss fight, consider bringing Black Knife Tiche with you. They're a top-tier Spirit Ash who has access to a long-range Bleed and whose quick unpredictable movements prevent Malenia from healing off of them. Deplete Malenia's health bar completely and another cutscene will play, marking the beginning of the second phase.

The second phase starts with her regaining about 80% of her health and crashing down on you like a meteor. In this phase, her attacks become more deadly and she gains access to two extra moves, both of which start with her flying up in the air. One move is what she performs at the start of this phase. When she crashes down and the scarlet flower blooms (explodes), she is immobile for a few seconds, creating the perfect opportunity for you to spam attacks on her. If you're a melee user, make sure to have Preserving Boluses on your hotbar as the scarlet bloom will inflict Scarlet Rot on you.

With the other move, she stays up in the air and sends multiple clones after you, after which she does a charge attack towards you herself. These clones home into you, so having unpredictable dodge patterns help to avoid getting hit. For more specific tips and information on her moveset, visit Malenia's boss page.
Defeating Malenia nets you 480000 Runes, the Remembrance of the Rot Goddess and Malenia's Great Rune. The Malenia, Goddess of Rot Site of Grace also spawns in the boss room and with that, Elphael, Brace of the Haligtree is complete.
Elphael, Brace of the Haligtree Map

2nd Upper Level
1st Upper Level
Middle Level
1st Lower Level
Drainage Channel
2nd Lower Level
Haligtree Roots
Elphael, Brace of the Haligtree Videos
Speed Run Walkthrough
You can get to Elphael, Brace of the Haligtree by beating Loretta, Knight of the Haligtree at Miquella's Haligtree, and taking the lift down. While there is a quicker way to finish this dungeon than what is about to be recommended, it misses some key items, including a Talisman for an achievement. Here we'll outline the quickest way of grabbing the essential goodies and getting to the boss.
Cross the bridge to get to the Prayer Room Site of Grace. From here continue forward and keep descending the staircases in front of you. Note the second door to your left with a stairway in it, we'll backtrack here later. After going down the third staircase, instead of continuing down the fourth one, keep going straight. At the end of the path is an imp statue with the Triple Rings of Light incantation behind it.
Now up backtrack to the room, we asked you to keep a note of. Head up the stairs and scale the big tree branch/root to get to a bell tower. Under the bell is the Miquellan Knight's Sword. Head down the ladder and jump down onto the eastern walkway. Up north is a room with a Smithing Stone (9) guarded by a Lesser Crystalian. Head back south and if you fancy yourself the Rotten Staff, defeat the Erdtree Avatar. Otherwise, run past it to the end of the walkway, picking up the Numen's Rune and Somber Ancient Dragon Smithing Stone on the way.
(Alternate route: You can jump down the elevator shaft. It is a lethal drop, but if you position yourself correctly, your corpse can land on the elevator button on the bottom. This will activate the lift and serve as a shortcut directly to the Haligtree Roots Site of Grace, skipping the rest of the loot on the way.)
Turn right and jump down to the nearby building. From here, you can jump down again to get to the lowest section of the castle. Summon any tanky Spirit Ash here - you'll need it to run past the Revenants in the area. Looking south, you'll find the Marika's Soreseal locked behind an imp statue. After picking it up, turn around and keep running, following the path.
Near the end of the path, there will be a ladder to your right. Climb up it and in the room, turn left to go up the stairs. In front of the large goblet to your right is the Haligtree Soldier Ashes and to your left, in between the two ballistae, is a Smithing Stone (8). Connected to a pillar next to these two ballistae, you'll find a buttress you can climb up. When you get high enough, face west and jump into the room on the upper level. The corpse here has a Haligtree Knight Helm. Continue west and jump down to the lower level. To your right is a Smithing Stone (6) and to your left, is the Elphael Inner Wall Site of Grace.
Head forwards from the Site of Grace. After going through the doorway, you'll find the Rotten Crystal Sword guarded by three Lesser Crystalians behind a giant tree root on your left. The path forward is to your right, with a Hero's Rune (5) at the very end. After looting, climb the large tree root you passed by earlier and it'll take you through a hole in the wall to a new section.
The water here inflicts scarlet rot, so bring some Preserving Boluses. Keep running forward, getting to a small island in the middle of the waterfall, then down onto a branch to the right of the cliff ahead. Follow it and when you get back on land, head through the doorway on your right. Down the ladder and in the little room is the Drainage Channel Site of Grace.
Head through the doorway taking you back outside, and follow the tree roots and castle support beams until you get to a roof with a hole in the wall. Jump down to the building's wooden beams and your left, you'll see a balcony with the Dragoncrest Greatshield Talisman surrounded by Lesser Kindreds of Rot. After you grab the talisman, jump down to the lowest floor of the building and head through the southwestern doorway to get to a lift going down.
When you get off the lift, turn left into the room with a large scarlet flower to grab the Traveler's Set and activate the shortcut to the bell tower at the top of the stairs. Head back out of this room and interact with the Haligtree Roots Site of Grace.
Through the fog door ahead is Malenia, Blade of Miquella. This is a tough boss fight so feel free to visit her boss page for strategies on how to beat her and more info on her moveset. Upon defeat, she drops the Remembrance of the Rot Goddess and Malenia's Great Rune. The Malenia, Goddess of Rot Site of Grace also spawns and with that, this dungeon is complete.
Gallery

Elden Ring Walkthrough - Crumbling Farum Azula
Elden Ring Main Quest Guide - Crumbling Farum Azula Points of Interest
- Navigate Crumbling Beast Grave
- Obtain several Key Items and Upgrade Materials
- Navigate the Dragon Temple
- Obtain a Stonesword Key
- Defeat the Godskin Duo
- Explore the Dragon Temple Lift area behind the imp statue
- Collect a Golden Seed & other Key Items
- Navigate the Dragon Temple Rooftops
- Defeat Dragonlord Placidusax
- Collect the Old Lord's Talisman
- Defeat Beast Clergyman/Maliketh, the Black Blade
Nearing the End - Crumbling Farum Azula
Crumbling Farum Azula is a Legacy Dungeon in Elden Ring. Crumbling Farum Azula may also be considered a very small region, which can be reached through the Site of Grace at the Forge of the Giants in Mountaintops of the Giants, either by talking to Melina or listening to the flame, depending on your prior decisions in the game.
A smaller portion of the area can be reached through one of the waygates in The Four Belfries. In this part, you can find the Pearldrake Talisman on a corpse after dropping down a few ledges.

General Information
- Previous: Leyndell, Royal Capital
- Next: Miquella's Haligtree
- Recommended Levels: 100+
- Bosses: Dragonlord Placidusax, Godskin Duo, Maliketh, the Black Blade
- Sites of Grace:
- Beside the Great Bridge [Map Link]
- Crumbling Beast Grave Depths [Map Link]
- Crumbling Beast Grave [Map Link]
- Dragon Temple [Map Link]
- Dragon Temple Altar [Map Link]
- Dragon Temple Lift [Map Link]
- Dragon Temple Rooftop [Map Link]
- Dragon Temple Transept [Map Link]
- Dragonlord Placidusax [Map Link]
- Maliketh, the Black Blade [Map Link]
- Tempest-Facing Balcony [Map Link]
Crumbling Farum Azula Walkthrough Video
Crumbling Farum Azula Maps

Top Level

Upper Level

Middle Level

1st Lower Level

2nd Lower Level

Bottom Level

NPCs in the area
- Iron Fist Alexander (final part of his questline)
Bosses
Items
Talismans
Consumables
- Golden Arrow
- Golden Rune (9)
- Golden Rune (10)
- Golden Rune (11)
- Golden Rune (12)
- Lightningproof Dried Liver
- Lightning Greatbolt
- Lightning Grease
- Dragonwound Grease
- Hero's Rune (2)
- Rejuvenating Boluses
- Rune Arc
- Hero's Rune (5)
Weapons & Shields
Armor
Spells
Upgrade Materials
- Somber Ancient Dragon Smithing Stone
- Ancient Dragon Smithing Stone
- Somber Smithing Stone (9)
- Somber Smithing Stone (8)
- Somber Smithing Stone (7)
- Smithing Stone (8)
- Smithing Stone (7)
- Smithing Stone (6)
- Gravel Stone
- Golden Seed
- Great Grave Glovewort x2
Enemy Drops
- Beast Champion Set (Recusant Bernahl)
- Blasphemous Claw (Recusant Bernahl)
- Devourer's Scepter (Recusant Bernahl)
- Malformed Dragon Set (Draconic Tree Sentinel)
- Remembrance of the Black Blade (Maliketh, the Black Blade)
- Remembrance of the Dragonlord (Dragonlord Placidusax)
Keys & Other
- Ancient Dragon Apostle's Cookbook (4)
- Ash of War: Black Flame Tornado
- Azula Beastman Ashes
- Fulgurbloom
- Glovewort Picker's Bell Bearing (3)
- Nascent Butterfly
- Old Fang
- Smithing-Stone Miner's Bell Bearing (4)
- Somberstone Miner's Bell Bearing (4)
- Somberstone Miner's Bell Bearing (5)
- Stonesword Key
Enemies
- Azula Beastman
- Banished Knight
- Crucible Knight
- Draconic Tree Sentinel
- Farum Azula Dragon
- Lesser Crucible Knight
- Lesser Wormface
- Recusant Bernahl
- Rotten Stray
- Skeleton
- Warhawk
Notes
- Notes go here
Full Crumbling Farum Azula Walkthrough
Getting to Crumbling Farum Azula
Once you commit to "the cardinal sin" by talking to Melina from the Site of Grace found at the Forge of the Giants, your character falls asleep during a cinematic and then wakes up in Crumbling Farum Azula. Alternatively, if you've interacted with the Three Fingers, Melina does not help you get there. Instead, while resting at the Forge of the Giants Site of Grace, select the 'Listen to the sound of the flames' option and a different cutscene will play, but take to you to the same spot in Crumbling Farum Azula.
Crumbling Beast Grave

Crumbling Farum Azula is mazelike, consisting of multiple branching paths, each with different loot. Following the introductory cutscene, the player will wake up at the south bridge of Crumbling Farum Azula. The path to follow is linear for now. At the end of the bridge, you'll find a Smithing Stone (8). Continue down the ruins to your right and pick up the Golden Rune (9) on the way. Keep following the path and you'll get to a platform overlooking several Azula Beastmen. Engage them one at a time from stealth, or lure them with ranged attacks to avoid being overwhelmed by their high-damage attacks. Defeat the Azula Beastmen in this area to pick up three Old Fangs from the corpse here. Head inside the building, where you'll find more Azula Beastmen and a Lightningproof Dried Liver. Before continuing, enter the first doorway to the left and activate the Crumbling Beast Grave Site of Grace, which then enables quick-travel to the rest of the map.

Head back through the hallway and you'll emerge back outside. You will encounter the first Farum Azula Dragon at the large curved bridge right in front of you. The dragon takes some time to land and perform its first attack, leaving enough time to run past it and collect the Smithing Stone (6), Smithing Stone (8), and Dragonwound Grease if you'd rather not fight it. Defeating the dragon awards an Ancient Dragon Smithing Stone, and Spirit Ashes are available for this fight. Head up through the archways to your left at the end of the bridge, making sure to pick up the Smithing Stone (8), then continue forward to reach the Crumbling Beast Grave Depths Site of Grace.

In the room ahead are two Azula Beastmen and a Smithing Stone (7). Head through the northwestern hallway, and you'll find a three-way split. To the left is a dead-end and straight ahead is a large hall. The right path takes you to an upper ledge that has two Azula Beastmen on the way, but eventually circles back to the hall ahead. Laying on the stairs right ahead of you is a corpse with fourteen Lightning Greatbolts. Continue straight and out the doorway you see ahead of you to get to an outdoor balcony with a Golden Rune (12) on a corpse dangling off of the left side.
Backtrack to the room that had two Beastmen right after the site of grace, and go onto the balcony of this room. On the right side of the balcony, you can hop onto the roof and enter back into the building on a higher level. On the left side of the room are three Gravel Stones on an altar. You can find a Smithing Stone (6) on a corpse in the middle of the room, and in the far end you'll find a Great Grave Glovewort on an altar guarded by an Azula Beastman Mage flanked by two melee Beastmen. Head back into the hall and down the main stairs, where you'll find more Azula Beastmen and the Ancient Dragon Prayerbook. Immediately out the door to the northeast is the Temple-Facing Balcony Site of Grace and the Somberstone Miner's Bell Bearing (4).

Before continuing forward, head back into the building and out the southwestern door. To the right of the stairs going down is a corpse hidden by pots holding a Hero's Rune (2). Hop onto the elevator by the base of the stairs and you'll be taken down to lower exterior levels of Crumbling Farum Azula. Immediately down the slope a Lesser Wormface will ambush you from the left. You can lure it out or avoid the ambush entirely by dropping from the ledge above behind it. then continue down the left-most path going upwards when the path splits. Here you'll find a corpse with four Fulgurbloom guarded by another Lesser Wormface.

Continue forward and you'll emerge at a lake with three Lesser Wormface. Take care as one of them is much larger and more dangerous than the others. Ranged combat is viable from the stair-like cliffs as the enemy will easily get stuck on trees and will have a more difficult time spitting blight upwards. If you head down the slope to the east of the lake, you'll find five Gravel Stones on a corpse hidden in a corner of the outside of the ruins here. Back at the lake, you'll find the Glovewort Picker's Bell Bearing (3) in the gazebo at the far end of the lake. The Lesser Wormface here are distracted and you can easily sneak past them while grabbing the Smithing Stone (8) and Rejuvenating Boluses from the corpses beside them.

Head back up the slope you came from at the side of the mountain, and you'll find a ladder at the side of the arch ruins guarded by another Lesser Wormface. Head up the ladder to find a Lesser Wormface keeping watch over a corpse with a Smithing Stone (8). Head back down the ladder and turn left, going through the arches. On your way back up, you'll find several more Lesser Wormface and a Somber Smithing Stone (9). Continue from here to circle back to the lift from the balcony.
Facing the lift now, look to the left and a side path leading to a large circular platform with an item is visible. Jump from rock to rock avoiding the sloped rock on the right to get to the larger platform, but be aware that a Farum Azula Dragon will engage you after a brief delay. The corpse on the far edge holds a Smithing Stone (8), which can be grabbed quickly before the dragon attacks. Defeating the dragon only awards runes, so you may choose to fight it here or attempt to disengage. Follow the same path back, again avoiding the sloped rock that is now on the left, then take the lift back up and return to the Tempest-Facing Balcony Site of Grace through the doorway to the northeast.
Dragon Temple

From the Site of Grace, you will be able to see a Farum Azula Dragon in the far distance. Though you may not be able to reach it at this time, it will breathe fire towards you while you jump to the platform under it. However, if you've advanced Iron Fist Alexander's questline to its final step, he will be standing on the building instead of the Dragon.
Head down the floating rocks and ruins west, where you'll get to a makeshift bridge occupied by Skeletons. The skeletons here in Crumbling Farum Azula look to have similar features and wield the same weapons as Azula Beastmen but have the same respawn mechanic as regular in-game skeletons. At the top of this first large chunk of ruin, you'll find a Golden Rune (9) on a corpse behind one of the pillars. Continue jumping across the floating ruins north, being sure to pick up the Somber Smithing Stone (7) and fourteen Golden Arrows, and jump into the hole in the corner of the next large chunk of ruin, right beside where you land.
Down the hole, to the southwest is a corpse with a Golden Rune (10). Head forwards to the northeast and before going through the first doorway to your left, go through the second one for an item protected by a Skeleton. At the end of the hallway through the first doorway, you'll emerge out onto a balcony. Turn left, scale the ruins up, and then head up the ladder you find at the end. On the altar up ahead is another Great Grave Glovewort. Three skeletal beastmen spawn after you pick it up. When you're done dealing with them, head out of the room and look down to your left to find a safe path back down to the large chunk of ruin with the hole you went down earlier. Following the path, pick up three Gravel Stones and a Somber Smithing Stone (9) on the way, and you'll eventually find the Dragon Temple Site of Grace.
From this Site of Grace, turn around back towards the ruins you came from and look down. There are floating stair ruins that you can jump down. At the base of these stairs, turn back around again and jump down to the lowest platform here. On the left is a corpse with a Rune Arc on it. If you head into the building and turn right at the corner, you'll find the Azula Beastman Ashes right ahead on an altar, guarded by several Banished Knights. Look to the right of the altar with the ashes and pass through the doorway to find a corpse with a Somber Smithing Stone (9). Head back into the building and jump off onto the lower ruin to the east. Here, you'll find the Dragon Temple Transept Site of Grace. Don't head into the room to your left yet - that's a boss fight we'll come back to. After you're done with all that, teleport back to the Dragon Temple Site of Grace.

This next area is the Dragon Temple. After heading into the building, turn left and head to the edge of the ruin to find a Golden Rune (11). Head back the other way to find a Smithing Stone (6). Continue down the stairs and further into the temple. When you get to the hallway, turn right, and before going down the stairs, head left to another hallway. Following this path takes you outside, where you'll find a Stonesword Key by the edge of a cliff. Head up the stairs here, being careful of the enemy right by the doorway, and head into the temple ruin to find two Dragonwound Grease at the far end. From the ledge this corpse is on, you can safely jump down to the stone steps. Head to the top to find a Golden Rune (12), then head back down to enter the main hall of the temple.
Miniboss: Godskin Duo

The main hall is an arena to fight the Godskin Duo and you must defeat them to be able to advance in Crumbling Farum Azula. If you had taken the stairs down in the first hallway earlier, you would've also ended up in this room. Being one of many duo bosses, this boss can be difficult to track and defeat solo. Make sure to use the pillars of the arena to your advantage and try to focus fire on one of them. As of Patch 1.03, Bernahl can be summoned to aid you, making this fight less frustrating. His summon sign can be found in front of either of the boss room entrances.
After defeating them, you will be rewarded with 170,000 Runes, the Smithing-Stone Miner's Bell Bearing (4), and the Ash of War: Black Flame Tornado. Interact with the Dragon Temple Altar Site of Site of Grace that spawns after their defeat and now we can move forward.
Completing the dungeon

Head out the northeastern door and jump down to the lower platform. Take the way to the left, heading down the stairs westward, and you'll find a Golden Rune (11) guarded by a Rotten Stray. To your left are some ruined windows. Before jumping through them, you should defeat the enemies if you have a ranged build as they can swarm and overwhelm you easily. On the corpse here are five Old Fangs, and if you check behind the ruin walls, you'll also find a Hero's Runes (5).

Continue heading north through the ruins and at the very end, ignore the doorway to your right for now and emerge back outside, noting a staircase to your right. Head forward to find a Smithing Stone (7) behind a fallen pillar, then turn left and follow the outer wall of the ruin to find five Lightning Grease. Backtrack back to the staircase and head up them. There's not much besides a Azula Beastman down the right hallway, however, if you head straight ahead, you'll find a Somber Smithing Stone (9) and an imp statue. You can use a Stonesword Key to gain access to an elevator that takes you to the Dragon Temple Lift Site of Grace. The area up here is quite large and completely optional, but you'll find some interesting loot.

At the top of the lift, turn left to get to a courtyard full of Skeletons. In the middle of the courtyard is a fountain with a Lord's Rune in it. Head down the stairs going east by the side of the cliff on the left side of the courtyard. The corpse at the base of the tree here has two Nascent Butterflies. Continue forward, hopping up rocks positioned like stairs, and you'll get to another Skeleton-infested area. Be careful while moving/fighting near the nearby tree as the skeletons hanging off of it will drop down and attack you. If you've got ranged abilities, you can target and hit them while they are still hung up on the tree.

Move forwards towards the south, and head up the stairs to the elevated platform. On the east side of the platform is a corpse by the edge of the cliff that has a Smithing Stone (8). Head westward next to find a Rune Arc and a Golden Seed close to each other. Continue southwest, down the slope, and you'll find a Teardrop Scarab that drops the Golden Lightning Fortification Incantation. On the same cliff, you'll find a sleeping Farum Azula Dragon, which you can sneak towards to grab a Smithing Stone (8). If awaken, the dragon will breath fire and flies off. It is, however, possible to kill this dragon (12682 HP) to get about 21600 runes and 3 Gravel Stones after resetting the area by visiting a grace site.
")
Backtrack back up the slope towards where you found the Golden Seed & Rune Arc and at the top, turn hard left. There is a series of collapsed archways and crumbled tower pieces stretching to the west to traverse. Platform over the tower pieces and you'll reach a large open area. If you've reached the end of his questline this is where you face Iron Fist Alexander in his final duel. Defeating Alexander here gets you Shard of Alexander and Alexander's Innards. Otherwise, this is where you can kill the fire-breathing Farum Azula Dragon from earlier.
Continue ascending the floating rubble, and pick up the Ancient Dragon Apostle's Cookbook (4) inside an enclosed area at the end. Two large undead beastmen are hiding here - one in the shadows around the outside of the tower, and one in pieces on the ground behind a block of rubble. They will attack you when you pick up the cookbook, so it is better to take out the one behind the tower first, then goad the second one into attacking before defeating it in single combat.

Once you've got the cookbook, look north of the collapsed building it was in for another platform you can jump down to, containing a corpse with a Somber Smithing Stone (8). From there, you can drop down to another floating platform just below it for a Smithing Stone (8). From there, fast travel back to the Dragon Temple Lift Site of Grace and head down the elevator. Turn right towards the east, walk through the archway, then turn right again towards the south. You will be able to see a column that is floating diagonally, close enough for you to jump on and climb up. Up here, you'll find an Ancient Dragon Smithing Stone guarded by a Farum Azula Beastman and Rotten Stray. From here, there's a way back to the Godskin Duo boss arena if you look down towards the northeast and jump down to the floating platform below you. There's nothing of value on the way, however, so simply backtrack down the stairs and we'll go back to the doorway we ignored earlier.

At the bottom of the stairs, turn left to enter back into the ruins and left again to go through the doorway. Continue forward, jumping down the ruins here, where you'll be able to pick up the Dragoncrest Shield Talisman (+2) hidden behind and a Golden Rune (12). Keep following the path and you'll get to an open area where you will meet a Crucible Knight, like the one you can find in Limgrave.

After you've defeated it, the Crucible Knight won't respawn. Your next course of action is to head southeast. There are two choices to take - you can simply jump over the banister of the balcony overlooking the Dragon Temple Rooftop Site of Grace ahead, or you can jump to the floating rock on the right, which requires a very tight jump, where you'll be rewarded with a Smithing Stone (8). If you can't take on the Crucible Knight in a straight fight, you can make the save jump straight to the Site of Grace and then pick it off from afar.

Once you go down, you will encounter a seemingly harmless Eagle laying on the floor near an open elevator shaft. Beware, however, of another eagle waiting to ambush you inside the round tower at your left. The corpse here has a Smithing Stone (6) on it.
(Optional side path to Drake Knight Set): Go down the ladder to the south and immediately turn left to find a floating platform behind the corner, hop on it and then jump down to a circular lift area. Run around it to the other end to find Drake Knight Set in a chest. Then take the elevator up to encounter an Azula Beastman across the small bridge. Loot the Lightning Greatbolt here and safely drop back down to grace.
After going back to the ladder where you encountered two eagles, looking to the south, you'll see a hostile pale Dragon casting red lightning bolts all over the rooftops. Keep in mind that before hitting the ground, bright red flames mark the areas the lightning is about to strike. By staying away from these flames, you can avoid being hit by these attacks.
Descend by using the ladder in front of you, or by jumping down from the roof on your right, and keep moving ahead in direction of the Dragon. On the way, you'll come across another couple of large Eagles. Using long-range attacks, like magic or archery, is a good strategy here, as there seem to be certain spots where the lightning won't land. As you approach the Dragon, you'll notice it is in quite low health. You can defeat the Dragon the normal way or cause it to flee by landing a few good hits or by backtracking a short distance. In its place eight Fulgurblooms and a Golden Rune (12) at his position, and the gazebo behind it holds a Somber Ancient Dragon Smithing Stone.
(Optional side path to Boltdrake Talisman +2 & Dragon Towershield): Left of the gazebo, in the eastward direction, if you look down, you'll see platforms down below. Keep dropping down and then drop down to another platform by the right side, next to the building. Drop below, left again to find a doorway. Enter it and to your left, you'll fight through a Banished Knight. Continue to find an Eagle and a ladder. Be careful as you ascend the ladder as there is another knight with a spear patrolling above and another soldier with two swords standing on the left. The Dragon Towershield can be found in the chest directly left from the ladder. Right across the ladder, there is an elevator. Take it up to find a path going west which takes you into the building right below the birds that you fought earlier on your way to the Dragon. Enter this set of ruins and you should encounter a Crucible Knight fighting Beastmen. If you are quick enough, you can run past them and take the ladder up at the end, otherwise, you can choose to defeat the Crucible Knight. After ascending the ladder, to your right, you can finally pick up Boltdrake Talisman +2 from the corpse. Drop down to find yourself back at the area with Eagles where the Dragon was using his lightning and make your way back to the Dragon's location where this side path started.

Next, head southwest and fight through a total of five Beastmen. Cross north to the other side by using the fallen structure as a bridge (mind the Beastman with thrown axes on the other side), and focus on the next building to your right. You can see a Beastman that's standing over a corpse with the Somberstone Miner's Bell Bearing [5]. Take care when you approach, as on your right there is a Beastman with a greataxe and on the left is a Beastman that can cast lightning. Take out the Beastman you can see from range, step in and lure out the greataxe Beastman, but bear in mind that the caster Beastman can call down lightning from behind the walls.
Once you've dealt with or escaped from the foes, move forward through the stairs located to the right of the chapel's altar. The path will take you to an elevator, after which, you'll reach the Beside the Great Bridge Site of Grace. Moving further up the stairs you will then reach the Great Bridge. You'll be situated now at the middle of the bridge, and facing the choice to either go right (South) or left (North). The Bossfight takes place at the coliseum-like structure located upwards, so if you want to enter the last stage of your journey at Crumbling Farum Azula you can head this way. Please note that there is also another optional boss fight (Dragonlord Placidusax) that can be accessed by going back down the elevator from Beside the Great Bridge Site of Grace. If you'd like to fight the boss now, click here. However, this section of the guide will first cover what lies at your left, that is, heading north.


This route takes you directly to the Dragon Temple, and the path is as straightforward as it gets. After descending through a set of stairs and heading through the door you'll reach a terrace. You'll find the ladder to move forward located on your right. But first turn left, as you'll find a corpse holding a Somber Smithing Stone [8]. There are numerous Beastman corpses here, but a few are merely resting. They will not attack you unless damaged first. If you still wish to kill them, use lock-on to identify the living from the dead. Once that's taken care of, you may resume the previous route and head south for the ladder you encountered when arriving at this terrace.

Now, the next area after going down the ladder is a bridge leading you to one of the towers. Inside, you will find a coffer guarded by three Beastmen, but upon reaching the tower you are invaded by Recusant Bernahl, previously known as Knight Bernahl. You don't want to take them all at once, so your best bet is to defeat the invader first.

Recusant Bernahl wields a Devourer's Scepter Warhammer and his fight style consists mostly of melee attacks. However, the skill on his weapon, Devourer of Worlds, allows him to charge it with magic and strike it against the ground to steal your HPs. Once defeated, Recusant Bernahl drops the entire Beast Champion Set as well as the Devourer's Scepter Warhammer and x1 Blasphemous Claw.
Once the area is cleared, you may loot the coffer inside the rounded tower. This chest contains the Old Lord's Talisman, which extends the duration of effects caused by sorceries and incantations. Now that this area has been exhausted, return to the Beside the Great Bridge Site of Grace to refill your health and flasks, and go back onto the Great Bridge and head for the boss fight.

Before you take on the boss of this area, there is a Draconic Tree Sentinel that will intercept you when attempting to reach the gates. Be aware of his devastating downward Mace attack, and try to avoid it by sticking close on his left side. Upon losing 50% of his life bar, he enters phase 2 and calls down powerful red lightning to course through his Mace. His attacks become more violent and gain the ability to summon a small controlled storm around him, similar to the dragon you came across earlier. It is recommended once he starts sparkling to fall back until the lightning has cleared away.
Fighting this Sentinel is duly compensated as it rewards you with the Malformed Dragon Set. Head up towards the fog door, grabbing the Somber Smithing Stone (7) on the way.
NOTE: Upon defeating the following boss, much of Leyndell, Royal Capital will become unavailable, as will many of the weapons, items, spells, and armor located there. Plan to collect any items you want from Leyndell before completing the fight, in particular the legendary armament the Bolt of Gransax.
Beast Clergyman/Maliketh, the Black Blade
Once you've reached the coliseum-shaped structure, you'll begin fighting Beast Clergyman. His attacks mainly consist of close-range swipes and various rock throws. Since his quicker and more deadly attacks are done in melee range, magic and ranged users will have an easier time dealing with him as they can fight back while keeping their distance. Melee users should look for opportunities where the Beast Clergyman is vulnerable before committing to any attacks. One such attack that is safer to punish is one of the rock throws where he plunges his knife into the ground. You can find more details and strategies on his boss page.
After taking the Beast Clergyman's HP to about half, it will reveal itself to be Maliketh, The Black Blade. Maliketh has a different skill set than the Beast Clergyman but has the same 'quick and hard to punish' characteristic. If you've finished Bernahl's questline and have defeated Recusant Bernahl, be sure to make use of the Blasphemous Claw that he drops. You can use the item to counter Maliketh's attacks that make his weapon briefly glow yellow. You can find more details and strategies on his boss page and the Blasphemous Claw page.
After you have defeated Maliketh, you will be teleported to the Leyndell, Capital of Ash Site of Grace. After activating that grace you can teleport back to Beside the Great Bridge Site of Grace and return to the boss fight arena to touch Maliketh, the Black Blade Site of Grace if you wish to do so. However, the main point of focus here is to go to the optional boss fight.
Dragonlord Placidusax
To find Dragonlord Placidusax, head back down the lift from the Beside the Great Bridge Site of Grace. Leave the temple down the curbed stairwell and through the shallow water room with red lightning enemies. When you exit the building, head straight ahead towards the cliff's edge and slightly to the left. If you look down, you'll find some floating platforms you can jump down to. Follow the path down to get to a large empty chunk of ruin. Find the arch on the ground without bones, and you'll get prompted to lie down. When you do so, a cutscene will play and you'll get teleported to the boss arena. Dragonlord Placidusax is not a very nimble boss, but many of his attacks have large areas of effect that can be difficult to dodge out of if you've animation locked yourself. At about 50% health, it gains access to a divebomb-like attack. It's relatively easy to track, but do be careful of its large hitbox.
Upon defeat, this boss drops 280,000 Runes and the Remembrance of the Dragonlord. Interact with the Dragonlord Placidusax Site of Grace that spawns here, and you're done with the area.
If you have Miquella's Needle and have come into contact with the Three Fingers, you can use the Needle while in the arena to cure yourself of the Fingers' influence. You do not need to defeat Placidusax; you just need to be in its arena to do this.
Crumbling Farum Azula Maps

Top Level
Upper Level
Middle Level
1st Lower Level
2nd Lower Level
Bottom Level
Crumbling Farum Azula Videos
Speed Run Walkthrough
Interact with Melina at the Forge of the Giants Site of Grace to teleport to Crumbling Farum Azula. If you've interacted with the Three Fingers, you have to select the 'Listen to the sound of the flames' option at the Site of Grace instead to teleport here. Cross the bridge, and at the end, you'll find a Smithing Stone (8). Turn right and follow the path down. When you get inside the building, head into the first doorway to your left to interact with the Crumbling Beast Grave Site of Grace.
At the end of the hallway, you'll be back outside and will see a makeshift bridge in front of you. When you get to about halfway through, a Farum Azula Dragon swoops down to try to attack you. It takes a while for it to attack you, however, and you can easily run past it to get to the Crumbling Beast Grave Depths Site of Grace on the other side. On your way here, you can pick up a Smithing Stone (6) and Smithing Stone (8).
In the next room, you'll find a Smithing Stone (7) on one of the altars. Head through the northwestern hallway, ignoring the left and right splits, and go straight ahead to reach a large hall. Turn right and head down the main stairway to find the Ancient Dragon Prayerbook on the floor. Immediately out the door to the northeast is the Temple-Facing Balcony Site of Grace and the Somberstone Miner's Bell Bearing (4). If you want some extra loot, including the Glovewort Picker's Bell Bearing (3), two Smithing Stone (8), and a Somber Smithing Stone (9), head back into the building and out the southwestern door. You'll find a lift taking you down to an area infested with Lesser Wormface. The path here circles 'round back to the lift, so there are no worries about getting lost just yet. Once you're done, head back to the Temple-Facing Balcony Site of Grace.
Head down the floating rocks and ruins west, where you'll get to a large floating ruin chunk occupied by skeletal Azula Beastmen. Grab the Somber Smithing Stone (7) here, then jump down north to the next large ruin chunk. Jump down into the hole in the corner of this chunk (should be to your right when you land on it) and go through the first doorway to your left. Follow the path, head up the ladder when you get to it, then you'll find a Great Grave Glovewort on the altar ahead. Head out of the room and look down to your left to find a safe path back down to the large chunk of ruin with the hole you went down earlier. Continue north, picking up a Somber Smithing Stone (9) on the way, and you'll eventually find the Dragon Temple Site of Grace.
From this Site of Grace, if you turn back around from where you came from, you'll see a set of stairs you can jump down to. At the base of these stairs, turn around again and head into the building to grab the Azula Beastman Ashes. Turn left from this altar and jump down the ledge to activate the Dragon Temple Transept Site of Grace. When that's done, teleport back to the Dragon Temple Site of Grace.
Head through the temple's doorway, then turn right. You'll find a Smithing Stone (6) at the end. Turn left and head down the stairs, then take a right again when you get to the hallway. Before going down the steps, turn left into another hallway to find a Stonesword Key. Backtrack back to the stairs and head down to get to the main hall, or go to the Dragon Temple Transept Grace and ascend the stairs to the same hall. Regardless of your entry route, you'll fight the Godskin Duo in this large room, and upon their defeat will receive the Smithing-Stone Miner's Bell Bearing (4) and the Ash of War: Black Flame Tornado. The Dragon Temple Altar Site of Grace spawns here too.
The way forward is out the northeastern door. Jump down to the lower platform in front of you, then head left down the stairs. When you emerge back outside, head through the ruined windows to your left. Jump down the ruins to the north and take note of the doorway on your right at the end of the hallway. Back outside, check behind the pillar in front of you for a Smithing Stone (7) then head up the stairs to your right.
At the top of the stairs, turn left and you'll find a column that is floating diagonally, close enough for you to jump on and climb up. Up here, you'll find an Ancient Dragon Smithing Stone guarded by a Rotten Stray. Back track back to the top of the stairs and head west, where there will be a Somber Smithing Stone (9) and imp statue in the area. The imp statue here locks off a large, but completely optional area. If you unlock it, you can take the lift behind it to the Dragon Temple Lift Site of Grace. Explore the area and you'll be able to find valuable loot such as a Rune Arc, Golden Seed, the Golden Lightning Fortification incantation, Ancient Dragon Apostle's Cookbook (4), and various Smithing Stones.
When you're done with that area, head back down the stairs and back to the doorway, you took a note of earlier. Continue forward, jumping down the ruins here, where you'll be able to pick up the Dragoncrest Shield Talisman (+2) hidden within the ruins. Keep following the path and you'll get to an open area where you will meet a Crucible Knight. Once you defeat it, it will not respawn again.
You'll want to head southwest next. There are two viable ways to get to the Site of Grace you see ahead. One is by simply jumping over the banister of the balcony, and the other is by doing a tricky jump onto the floating ruins where you'll find an item. Once you've interacted with the Dragon Temple Rooftop Site of Grace, jump down the roofs and you'll find a Smithing Stone (6). Go down the ladder in front of you and if you look to the left, you'll find a floating platform behind the corner that you can jump to. Follow the path here to get the Drake Knight Set and you'll be able to circle back to the Dragon Temple Rooftop Site of Grace.
Head back down the ladder and head south towards the Farum Azula Dragon. You'll find a Somber Ancient Dragon Smithing Stone in the gazebo behind it. To the left of the gazebo, you'll see platforms down and to the east. If you follow this path, you'll be able to find the Boltdrake Talisman (+2) & Dragon Towershield and from here, you will eventually circle back to the rooftops. Head back to where the dragon was sitting and head southwest.
Go up the slope then turn right, crossing the ruins here going north. You'll find a temple to your right with the Somberstone Miner's Bell Bearing (5). Be careful in this temple as you will get ambushed by two strong Azula Beastmen. On the south side of the temple, you'll find a path and an elevator taking you to the Beside the Great Bridge Site of Grace.
From here there are multiple options to take. To go and fight Dragonlord Placidusax, head back down the elevator and exit the temple. Head straight ahead towards the edge of the cliff, and if you look down, you'll find some floating platforms you can jump down to. Follow the path down and in the arch on the ground without bones, you'll get prompted to lie down. A cutscene will play, after which you'll find yourself in the boss' arena. Defeat it for the Remembrance of the Dragonlord and interact with the Site of Grace hereafter it spawns.
Teleport back to the Beside the Great Bridge Site of Grace. Follow the stairs up and you'll get to a large crumbling bridge. For even more loot, head north down the bridge. Head into the building and when you emerge back out, turn left to find a Somber Smithing Stone (8). On the right of the doorway is a ladder you can descend. If you've completed Bernahl's questline and defeated Rykard, Recusant Bernahl will invade you when you reach about halfway across the bridge here. Defeat him for a Blasphemous Claw, the Devourer's Scepter, and the Beast Champion Set. In the building ahead, you'll find a chest with the Old Lord's Talisman guarded by multiple Azula Beastmen.
After you're done with that area, teleport back to the Beside the Great Bridge Site of Grace and back to the bridge. Head south, going up the bridge this time and you'll encounter a Draconic Tree Sentinel. You can choose to run past this enemy, however defeating it nets you the Malformed Dragon Set. Continue up the bridge, collecting the Somber Smithing Stone (7), and head through the fog door.
You'll start by fighting the Beast Clergyman. Once you get him down to 50% health, a cutscene will play and he'll transform into Maliketh, the Black Blade. On his defeat, you'll be given the Remembrance of the Black Blade and get teleported back to Leyndell, now in a different state. If you head back to Maliketh's boss area, you can interact with the Maliketh, the Black Blade Site of Grace.
Gallery

Elden Ring Walkthrough - Leyndell, Ashen Capital
Elden Ring Main Quest Guide - Leyndell, Ashen Capital Points of Interest
- Explore the Subterranean Shunning-Grounds
- Grab the Somber Ancient Dragon Smithing Stone
- Complete Brother Corhyn/Goldmask's quest
- Defeat an old ally, now boss
- Defeat Godfrey, First Elden Lord/Hoarah Loux, Warrior
- Defeat Radagon of the Golden Order/Elden Beast
Leyndell, Ashen Capital is an instance of Leyndell, Royal Capital after it falls into ruin. This version of the capital is accessible only after making significant story progress and is geared towards high-leveled players. The Capital of Ash features the same structures and landmarks as its intact counterpart, albeit altered in slight or significant ways. Previously open paths may not be accessible and vice versa. The Capital of Ash also features its own set of enemies, bosses, and collectibles with varied placement distinct from the regular version of the city.
To get to the Capital of Ash, defeat Maliketh, the Black Blade at Crumbling Farum Azula after the events at the Forge of the Giants, and after a cutscene plays, you'll get teleported right to the Leyndell, Ashen Capital Site of Grace. Most of the progression in the Capital of Ash involves beating various bosses and after defeating the final boss of this area, you can reach the ending of the game.
From the Site of Grace, if you haven't explored the Subterranean Shunning-Grounds in Leyndell, Royal Capital yet, you can find a sewer hole in the ruined road southwest to access it. If you jump down from here, you can access a wooden beam with a corpse holding the Crimson Amber Medallion (+2) hanging off of it. Teleport back to the Site of Grace and head south to find a corpse with a Rune Arc on it. In the area, you may also find corpses with a Tarnished Golden Sunflower and a Golden Sunflower within some of the ruins. Make your way southwest from the Rune Arc to find a set of stairs.
Subterranean Shunning-Grounds Walkthrough
After completing the Crumbling Farum Azula (defeating the main boss there) Leyndell... will have changed. You'll want to return there, Leyndell, to gain access to areas that you couldn't access before. One location is found at the center of Leyndell; a hole where you can fall into. Make sure you ease your fall by aiming at the wooden platform, then outside the small hole, then the wooden beam, and then the platform next to it.
- Alternatively, you can reach this area earlier in the game. From the Avenue Balcony site of grace, head down the stairs and through the door. Take a left immediately outside the door to avoid the archer and hop over onto the roof below. Drop down into the courtyard to your right, where you will be ambushed by a few crawling enemies. In the dark corner of this courtyard is a well with a ladder that leads down to the Subterranean Shunning-Grounds.
If you have a ranged build, you may kill the hostiles below before you go all the way down. Go down the ladder, walk the hallway, there's a door that can't be opened from your side to the right, and a Site of Grace to the left called Underground Roadside.
Go to the room, with the big pipes, expect Fanged Imps. Walk over the pipes to the end of the way. There's a room with a dead body sitting with an item guarded by an Ogre ready to surprise you, and to the right, there's a lever that will open the gate that leads to the previous area before you enter the pipe room. The dead body item is a Shadow Bait.
Go back to the Pipe Room, there's a big pipe lower than the pipes you are standing on, and you can jump on it safely to then jump below. Use the pipe sections to find safety when the Giant Lobster attacks you. You can skip the lobsters by running into these pipe parts. Head to the southeast, there's a hole in the wall where you can enter a dungeon area.

Go forward to head into an elevator, follow the linear path to go back to the first main area of the Underground.
If you head to the opposite way of the main hall at the beginning of this location, you will see a piece of grid missing on the ground, go down into the sewers.

The Sewers are a labyrinthine series of interconnected pipes. These are filled with easy hostiles (rats, slugs) until you reach the Omens near the end. After dropping into the missing grate hole, you can either follow the tunnel as it turns to the left or turn right into an adjacent pipe. To reach the Dung Eater's corporeal form, follow the tunnel—you will need to run past three Giant Poison Flowers to reach a ladder at the end (the last of these flowers will use a magic attack, but it will not strike you while climbing.) In the room at the top of the ladder, be wary of enemies—there are several small Fingercreepers as well as a large one hiding near the center of the room (strike the visible nails to thwart its ambush.) If you have the Sewer-Gaol Key, you can open the cell at the other end of the room to speak to the Dung Eater and advance his quest.
Returning to the original tunnel, enter the pipe that is now on our left—this leads into a maze of pipes. Be wary of holes—the first hole you encounter will drop into a lower pipe, while the second will deposit you in a mucky room full of corpses, with a surprise appearance by a Royal Revenant at one end of the chamber. If you fall in, make a mad dash for the exit pipe in the corner. If you successfully avoid the holes, the pipes will eventually lead to a room with an item on a corpse and a ladder at the far end. There is an Omen waiting at the top that will jump down to engage as you approach, so be prepared for melee combat or use ranged attacks as you back up into the pipe. You can run past the Omen rather than fighting, but it can (and will) climb ladders to pursue you. Next, move up the ladder and go forward, opening the large doors ahead into a room with a great precipice and stairs leading down to the right. Collect the items down the stairs, but note that these stairs are broken—return to the top of the stair and look down to the left, and you will see a safe location to drop onto the next level of stairs.
You will find a tall ladder that leads to the door that you were not able to open before right in front of the Site of Grace. Open it so you can use this path as a shortcut in case you are defeated or if you want to refill your stats and flasks.
with that door now open, start at the Underground Roadside Grace and proceed straight through the door you just opened, follow the pipe to the right of the opposite doorway to the end, and proceed to jump off to the left of the wooden platform(beware the imp directly below you). proceed to go to the nearby doorway, beware of the imp that will jump out swinging from the said doorway, go through the doorway, but DO NOT TAKE THE LADDER, it is a trap, jump down into the mouth of the open sewer pipe, and follow it the direction of the bend, until you hit a fork in the pipes, it is a loop. taking the left will have a hole in it, drop down and kill the commoner, you can open the nearby gate to open a shortcut back here from the much earlier pipe maze. proceed down the slope and climb down the ladder to find a room full of living jars, one of them is a large jar, so be careful. proceed down the elevator to the right of this room to find the Forsaken Depths Grace, and directly ahead is the room you fight Mohg, the Omen.
The Remains of the Royal City
To the west, you'll find a ruined part of Leyndell's walls with an illusory tree marking a Golden Seed (you've probably already grabbed this if you've fully explored Leyndell, Royal Capital). From this illusory tree, head down the stairs directly north, and when you emerge back outside, head northwest to find a Valiant Gargoyle. You'll find a Somber Ancient Dragon Smithing Stone tucked in a corner if you check behind the wall it's standing in front of.
If you're doing the Brother Corhyn questline, head back to the curved staircase, and to the right of it, between the stairs and the ruined wall is an ash-covered slope going down. Run across the large tree branch to find a Smithing Stone (6) and follow the cliff face east. You'll find Goldmask sitting right up against it not too far ahead, and can receive the Mending Rune of Perfect Order from him. If you reload the area, you'll be able to get his armor set, Goldmask's Set, minus the mask.
Backtrack to the staircase and at the top, take the lift to go up onto a higher level. Here, you'll find Sir Gideon Ofnir, the All-Knowing who is adamant about stopping you from becoming Elden Lord. Defeat him and you'll be rewarded with the All-Knowing Set and the Scepter of All-Knowing.
Interact with the Erdtree Sanctuary Site of Grace that spawns after Gideon's defeat, and head east out to the main balcony. Turn left and scale the tree root here up and to the west. When you get up onto the balcony, you'll see an item on a hanging chair to your south. Head outside and instead of following the path, immediately turn left. Jump down onto the roof around the corner and head into the one open window. Run across the large tree root here to be able to grab the Golden Order Principia, then head back down to that balcony where you first saw the item. This time, follow the path north and you'll get to the Queen's Bedchambers. Here, you'll find the Erdtree Heal incantation in the middle of the 'bed'.
Continue out the door east and up the stairs, you'll encounter a fog door. Beyond this door is Godfrey, First Elden Lord in his physical form rather than the golden spectral form you encountered earlier in the game. After taking him down to about 33% health, he turns into Hoarah Loux, Warrior, and defeating him nets you the Remembrance of Hoarah Loux.
Interact with the Elden Throne Site of Grace that spawned and head up the stairs to the southeast. Touching the golden light at the top teleports you to the final two bosses of the game, the first of which is Radagon of the Golden Order. Defeat him and the next phase against the Elden Beast starts immediately after the transitional cutscene. Defeat them both to be rewarded the Elden Remembrance and to be able to interact with Fractured Marika, ending this playthrough of the game. For a list of the other endings, you can visit the Endings page, be warned for spoilers. Congratulations on completing your first playthrough of Elden Ring. You can also visit the New Game Plus to learn more about the different features and changes that carry over upon starting NG+.
 Anonymous
- Anonymous
Thanks for the help it imensily helped me throught the play thorugh
- Anonymous
but seriously there's not a chance in hell i could have got through this game without this wiki......................
- Anonymous
The part describing the auriza side tomb is wrong. There is only one teleporting chest (pair) between room set A and B. The other link between the two rooms sets is a ladder.
You have the starter room with the site of grace, you go down from there to the room with the boss door. Down from there is the room with the window you can drop down or you can go to the other side to the first teleporting chest. This chest takes you to the room under the room with the window (literally under, not on the other side of the window and then down, but actually under that room with the window). The room under the window room also has a chest which takes you right back (all the chests take you to a room with a chest that will take you right back to where you were). The room under the room with the window only has one exit which is to the room you would end up in if you jumped out the window. So coming in you can do either one (teleport or jump the window, it doesn't matter). This room besides having the window high up also has a smaller ledge above which contains the level to open the boss door and then another exit leading down.
Going down there you end up in the cells/sewer. It's just one room which is split with a larger area behind some bars that you can't get to from here and a ledge above where you enter. There is another exit to the right which you will have to take. This room has a ledge above and to the right of where you enter that connects to the ledge in the cell/sewer room. It also has a fake wall in the left and a chest at the far end. The chest takes you to the other side of the cell/sewer room which has a few enemies and some loot. The only way out of there is the paired chest which just brings you back right here. The guide suggests this is the cell/sewer room in the B set of rooms, but it's not, it's still in room set A.
Going through the secret passage and down you come to another chest and this one does take you to the other room set. It drops you into the room with the hidden passage up on the higher ledge, but in room set B. The chest in this room takes you to the cell/sewer room in set B, but leave that for now. Instead follow the ledge and go up the ladder and you will be in the room you can get to by jumping through the window (but still in room set B). Nothing much special here but you can kill and loot some stuff, go through to the room under the room with the window and loot and kill there too. There is no chest in this spot in room set B, so go back to the room with the hidden passage and use the chest at the bottom. This chest will take you to the room which in room set A contained the first chest (the room connected to the window room). From up here you can kill some more and loot some more and when done I would just jump out the window and make your way back the room B version of the room with the secret passage again and open the chest.
Now you should be in room set B behind the iron bars in the cells/sewer room. Kill everything but in this version you will see you have a ladder to climb. Do so and you will end up on the ledge in room set A where you jump through the window. The switch to open the boss door is here. Once pulled hop down, go up the steps to the room under the window room and use the chest. Trace your way back to the boss door and enjoy the boss.
- Anonymous
( Note: Getting this dialogue will effetively 'break' the Ranni questling, at least until after the festval..) is this true? so why put it in the guide this early? poorly explained.
- Anonymous
to my friends following this (mostly) excellent guide on the caelid walkthrough page, I'm here too and noticed the note "oh yeah just pop on over to the isolated merchant's shack and while your there kill the bell bearing hunter, no worries, she'll be right." (I'm paraphrasing). I'm just here to tell you that as soon as you jump over that gap of the ravine east of the caelem ruins, you've now just entered dragonbarrow and everything is now MUCH harder. good for farming runes from the big head dog things but equally good for getting completely f*cked up. especially from old mate merchant's shack bell bearing hunter who is more than happy to crush you 8 ways from Tuesday without breaking a sweat. you hit him 26 times to scratch his armour and he OHK's you. just don't waste your time here yet. come back when you're weapon hits harder and teach these cheap bastards a lesson. same goes for the Colosseum up the ravine with the rad big jar invader challenge thingo. just thought I'd comment because this guide was a little bit misleading. otherwise I'm very grateful and we're all very lucky to have this excellent wiki. thank you my friends
- Anonymous
great guide, really appreciate it, the help is immense and invaluable!! just throwing it out there though that confusion about the writer's lefts and rights is starting to creep in at this point. here's some tips: left is the hand that you wear your watch on and your wedding ring if you're married. it's also the hand that you write with if you're left handed. another clue is in the equipment menu, equip things to your left and right hands and see where they go. Another tip is extending your index finger and thumbs of both hands, the one that makes an "L" when you're looking at it is your left hand. The opposite one is the one that you should put to your forehead to indicate that you are a loser, so that it creates an "L" for onlookers. I feel like some confusion has been cleared up here and I'm glad to be of assistance and hope it helps in future, thank you once again for your excellent guide my friends and praise the huge golden tree thing \{T}/
- Anonymous
This guide is missing chunks of the map like all of mistwood and weeping peninsula. How do you call this a 100% walkthrough when you miss ENTIRE SECTIONS OF THE MAP?!?!?!
Hey i'm trying to edit the stormhill section so that it includes the three secret location you can find gostoc stalking you but that section isn't editable for whatever reason.
- Anonymous
Great guide for everything I needed anyway. I loved reading through the chapters I just cleared. Basicly after exploring and beating a boss in that area or dungeon. I go back and see what was missed.
- Anonymous
I‘m not sure why, but even with finding Seluvis‘ secret room, having multiple starlight shards, AND completing Sellen‘s questline, I couldn‘t get the dialogue to ask Seluvis about the puppet room / get the puppet shop. It only became available once I no longer had the potion, which occurred fairly late for me as I gave it to Dung Eater. So if you‘d rather not delay Ranni‘s quest (and by extension Fia‘s quest) until after you‘ve cleared the Capital, then you might as well just give the potion to Gideon (or Nepheli if you prefer that for some reason) right away.
- Anonymous
Hello Fextralife. I just want to emphasize the importance that you have on my From Software Games. Without your guides I wouldn't be able to finish these games or maybe I will lose 50% of the information. You have my deepest appreciation and I highly recommended any of these guides to any player that want to experience these masterpieces called From Software. Keep it going, you really are a light for some of us!
- Anonymous
try using a combination of the walkthrough and the game progress guide and you should be able to find everything. I also watch "what you missed in x area" on youtube and "bosses in x area" and that has cleaned up anything the guides missed
- Anonymous
Please change these awful directions, "Follow the road north exiting the Erdtree Valley and once you reach the elevation after the villagers attack you go right until you are in front of a watchtower to collect a Golden Seed".... To these better directions:
Go north of the minor erdtree through a small village area. Take a right on the cobblestone path at the intersection. Continue through the small wooded area, be careful of a ballista/catapult that will be shooting at you. On your left there is a lookout tower. Near it you can find a golden seed.
- Anonymous
So when you get to the spot with the Omen and his mangy dog. You see a statue laying on its side with a glow inside.
You need to coax the troll up by the gates to come down and smash it open to get at smithing stone (2) inside.
The statue stays smashed even if you die.
- Anonymous
The whole guide is missing the lakeside crystal cave, slumbering wolfs shack and Latenna the NPC
- Anonymous
Ok so everything came back for a couple of days but now it’s gone again. I looked on both mobile and desktop sites and it’s the same. Idk if it’s something I did or if it’s genuinely messed up.
- Anonymous
The guide does not say where to get the third grape for the quest. It just assumes you've got it, even though it's on the far west side of Liurnia Lake, which the guide does not direct us to. So, bad information.
- Anonymous
A couple of these sections seem to be not working, which is a little frustrating. But I will say, the pages that do work have been super helpful.
- Anonymous
Murkwater Catacombs Grave Warden Duelist no longer drops Battle Hammer, and instead drops Banished Knight Engvall Ashes
Something is missing from the guide. After "underground" there is no clear way to progresso. Links are wrong and we haven't done both medallions for the lift.
- Anonymous
There's also Protection of the Erdtree incantation scarab east of the Road of Iniquity side Path site of grace.
- Anonymous
Roads End Catacombs is missing an illusory wall where you go down the stairs. Make a hard left and there is a double illusory wall and the Watchdog Staff item.
- Anonymous
if i understand correctly, following this walkthrough means i cannot get dung eater as a puppet because i would give ranni the blade before getting to altus plateau which is needed to even see dung eater for the first time?
Guide for Altus says
[...]
Entering from Ruin-Strewn Precipice is better as you can obtain several crafting materials, including a Dragon Heart and Golden Seed within it. You will head up to the plateau from Magma Wyrm Site of grace and can pick up the Ruler's Set shortly after.
You are now at the Abandoned Coffin site of grace
[...]
It doesn't say HOW to get to ruin-strewn precipice, doesn't even mention anything about Magma Wyrm Makar, it's like someone forgot about the whole thing. It wasn't even traumatizing...
- Anonymous
I don't know if this is common knowledge now, but the hardcover collectors edition strategy guide for elden ring is now available to order, either direct from namco bandai or amazon. its in two parts, which is a first but not surprising given the size of elden ring compared to previous From Software games. it is a bit spendy though, each part is £35 from amazon in the uk part one is either end of june or july, part two I think is september. I've ordered mine regardless of price, the guides for the dark souls games and bloodborne are the nicest I've seen for any game, very high quality.
- Anonymous
When in this guide are we supposed to go to Deep Siofra Well? Im not seeing it anywhere and it seems like a big place to skip over with an important Talisman, "Great-jar Arsenal."
- Anonymous
How are you going to call this a 100% guide when it doesn't include 100% of the locations, catacombs, item pickups, etc.?
- Anonymous
So if i follow this walkthrough am i automatically do all npc side quest? Or am i must read the separate guide for that?
- Anonymous
Thanks to the people who put together the guide, I appreciate it. I followed it to a T, and I'm at 98% completion, and can't find out what I'm missing. Some crook decided to lock the checklist to go along with the guide progression behind a paywall, and there's no way I'm paying for a checklist.
- Anonymous
"e Patches, a veteran From Softwater character"
whats a softwater?
- Anonymous
- Anonymous
It keeps telling me at the church of vows that I have nothing to atone for. What's up with that?
- Anonymous
Awesome Walkthrough, but, for the Claw Talisman… “The place with Guards”… In… The castle… There’s a few… I have no idea where I’m meant to head from Rampart Tower. Even a simple direction might help. Haha But “The place with Guards” just isn’t helpful, like, at all…
So today after beating Mog I traveled back to Altus to visit Sages Cave. After defeating the black knight I didn’t receive the Concealing veil. I just assumed I did so I didn’t check back until I was summoned multiple times before getting back to the consecrated snowfield town. I wish I could recreate it but as this is my first play through it seems I will rather wait. Anyone else have this issue? Possibly I was being summoned to another world while the items are dropping. I believe this is what happened. It took me too long to notice but I do know a update or patch was released yesterday.
- Anonymous
When it comes to retractable traps in catacombs it’s much easier to shoot with long range attacks Such as an arrow than run past. Unless you are using them to kill possible enemies that you can lure in front of them.
- Anonymous
this guide is written with their feet, its BUllshiiiit!!!!!!!!!!!!!
- Anonymous
- Anonymous
Invaders not spawning after you clear the area's bosses is straight up BAD game design, or rather having said invaders drop unique items. Missed on on Hammer Talisman, because I was scouring the interactive map (and not mentioned in the walkthrough).
I just wanted to mention that for anyone using this walkthrough as a 100% guide, DON'T. What I mean by that is that there are entire areas glossed over and skipped. My suggestion is to use Fextralife's detailed map alongside this walkthrough and ensure that you can collect all of the items and weapons in the area before you move on. DO NOT defeat the area bosses before you tackle any invaders. I learned this the hard way by following this guide, but if you want to get the HAMMER TALISMAN, you will need to head to northern Limgrave and be invaded by RECUSANT HENRICUS before defeating Margit or progressing too far into the game. That is just one example.
Another tip is to watch out for who you swipe at in certain areas! I accidentally killed BLOODY FINGER HUNTER YURA just south of the Murkwater Caverns after he helped me with BLOODY FINGER NERIJUS thinking he was an enemy. Once he is dead, there is no bringing him back and you miss out on his entire questline. The same goes for Gatekeeper Gostoc who is perched on top of the chapel in Stormcastle -- I accidentally knocked him off and once he is dead you miss out on buying the Ancient Dragon Smithing Shard from him (only 12 total per playthrough) which isn't even mentioned in this walkthrough.
This walkthrough either isn't complete as others have pointed out or it simply doesn't intend on holding your hand. That being said, we all know that Soul's games are notorious for gating/locking you out of quests/items/weapons if you miss a detail, talk to a certain NPC out of turn, kill a certain NPC, kill bosses in a certain order, etc. If you want to be thorough, you can use this walkthrough as a starting point, but if you notice areas on the Fextralife interactive map (https://eldenring.wiki.fextralife.com/Interactive+Map) that are skipped close by, check them out, especially caves/mini-dungeons, the Evergaols, and night bosses such as the Deathbird's and Night's Cavalry.
- Anonymous
- Anonymous
You have to attack Duke Deynemn first, on the two islands where the Duchy of Grillo controls, who are an entire family of albinos. Going back 200 years, almost every patriarch of the family has been an albino. It began when the Grillos split off as a separate branch from the Krimoni.
- Anonymous
Maybe something usefull: If you follow Rya’s quest. After using the dectus lift she will be waiting at the exit and ask to transport you to volcano manor (note: the second half of the medallion is in dragonville Caelid), once you are in Volcano Manor, go back outside to get the map fragment. This will make the part of following the guide at Altus Plateau alot easier.
Hopefully this is to some use to someone! And don’t forget: you dont have the right O you dont have the right
- Anonymous
- Anonymous
Unless I missed it, this walkthrough doesn't mention anything about the sewer. It also should really add any parts where you need to go back to the roundtable.
- Anonymous
Castle Sol first paragraph:
“Carefully traverse the top of the castle walls in the northeast and pick up the Golden Rune (10) on the corpse in the corner.”
The path they are referring to starts southwest of the ladder, not jumping down to the elevated catwalk to the southeast.
- Anonymous
Be cautious of killing the Eld Tree Avatars as it causes NPC invasions to no longer happen in their area rending some quests at a dead end. This warning is not given in walkthrough pages, but is on quest pages.
- Anonymous
The glowing golden sapling on the right as your leaving the tutorial area has a golden seed for increasing your number of flasks, doesn’t it?
- Anonymous
- Anonymous
- Anonymous
The first illusionary wall is to the right of the main doors as soon as you enter the ACADEMY with the window. Don't know why I couldn't grasp where it was with how it was explained in this walk through. But here it is if anyone else is having the same issue.
- Anonymous
I killed the fire giant and the Gracie won't appear on the forge what I do wrong
- Anonymous
Is there a condensed version of this? In my first playthrough I missed numerous questlines, and now I'd like to experience it all. I'm looking for a list of the stuff that should be done, not a thorough explanation of how to do it (and I mean no disrespect to this amazing walkthrough).
- Anonymous
Murkwater Catacombs no longer has the Battle Hammer as a boss drop after the patch, now it's a spirit summon
- Anonymous
Murkwater Catacombs no longer has the Battle Hammer as a boss drop after the patch, now it's a spirit summon
For anyone confused after Caelid, when the walkthrough jumps to Underground, there's a whole section missing on Nokron and that's why Renna's Rise is not accessible yet. Please follow the Game Progress Route page to continue and then come back here.
- Anonymous
I think there's a typo it should be Begin from North-West Liurnia of the Lakes. Take the stairs to the very top of Ranni's Rise and take the waygate there (and not Renni). It confused me for hours.. eventually watched a Youtube video...
- Anonymous
In the Road's End Catacombs, there is actually another illusionary wall to the side of the second staircase (if you're coming from above) in which you can find the Watchdog's Staff.
- Anonymous
Mountaintops of The Giants not mentioned and it's in main story
- Anonymous
You guys are awesome, I don't care what anyone says in a game this massive your walkthrough is excellent.
- Anonymous
- Anonymous
FYI if you kill a silver tear before it transforms you never have to worry about it. I tend to 1 shot them with Loretta's Greatbow.
- Anonymous
"You'll find Edgar discovering that Irina has been killed" why it is always spoiler
- Anonymous
Best guide I've found by FAR, succinct and with minimal spoilers. Really appreciate the work that went into it!
- Anonymous
- Anonymous
The Grave Warden Duelist didn't drop me the Battle Hammer, I got a Banished Knight Engvall Summon instead.
- Anonymous
- Anonymous
If you choose Stonesword Key as your starting Keepsake, it gives you 2 of them so you can open the Dungeon at the very beginning if you wish.
- Anonymous
first time player, so lost and overwhelmed :( games fun to play and looks good :/
- Anonymous
It's "Boc the SEAMSTER", not seamstress, which is the female equivalent, and Boc is clearly male.
Limgrave walkthrough "Defeating it yields 260 Runes and drops x1 Partisan and x1 Godrick Knight Greaves." this is false, it just has a chance to drop the items
- Anonymous
I love free exploring and all, but a good walkthrough is so fulfilling. Thanks for the great work.. am at Margit now.
When riding the lift down there is an area you can get off about half way down that has Avonette Ashes
- Anonymous
You don't need to fight any boss to get to the round table go to the dragon burnt ruins use the trap chest to get transported sellia crystal tunnel get to the first site of grace and then you should get transported to the roundtable
- Anonymous
Latenna of albinauric +4 ash alone is enough to destroy glintstone dragon smegma. just place her atop of the rocks near dragon where you and her cant get hurt by the flames and let her do the work.
- Anonymous
Came here also to ask when the next part of the walk through will be completed
- Anonymous
When will the complete Walkthrough be completed approx? Loved your bloodborne one.
- Anonymous
Melina invites you for the Roundtable after you fight Margit, either you dying or not, it's not triggered by map exploration. I have the Roundtable the minute I set foot in the game, as I went straight from Church of Elleh to Margit and after dying (lmao) , when I rested in a site of grace, the roundtable was triggered. Correct that if you wish.
- Anonymous
- Anonymous
much more in depth than IGN walkthroughs this was very helpfull
- Anonymous
thank you that was an in depth walk though and i am greatfull
- Anonymous
I spoke to the sorcerer then the walkthrough says to continue to a stable type area. I cant find it.
After first living jar go up to sets of stairs killing sorcerer's on the way. At the top of second set of stairs there is a bookshelf on the left with no books. Hit it to reveal secret.
After looting the secret look for the ladder in the same room.
Go to the railing on the left after leaving the ladder and jump over the center part of the railing it'll put you in between two walls.
Walk to the end and there will be a hole in the floor to drop down into a new room with a big pile of crystals, 6 mini living jars and a Graven-School Talisman.
- Anonymous
Give them time guys. The game is absolutely massive and gargantuan. It's going to take a week or two to get a proper walk-through on the Caelids, Lyendell, and the Mountains. Those areas are massive and more complicated than Limgrave or Lucaria.
- Anonymous
Thank you for all of your hard work. I’ve used your site for years. Your work goes to great use. I love the interactive map!
- Anonymous
(Locked Door) right after you run up this ladder (with sorcerers and a large living jar), go right. up the next stairs. THE FIRST BOOKSHELF ON THE LEFT WITHOUT BOOKS. it's an illusory wall, burst it. enter the room and take the chest, then go to the balcony along the wooden stairs right there in the room. and jump over the parapet into the gap in the beams, it will lead you straight into a locked room with loot and a bunch of living cans. There is that locked door!
- Anonymous
right after you run up this ladder (with sorcerers and a large living jar), go right. up the next stairs. THE FIRST BOOKSHELF ON THE LEFT WITHOUT BOOKS. it's an illusory wall, burst it. enter the room and take the chest, then go to the balcony along the wooden stairs right there in the room. and jump over the parapet into the gap in the beams, it will lead you straight into a locked room with loot and a bunch of living cans. There is that locked door!
- Anonymous
Come on guys, can we have the next bit please. Some old dudes like me are sad and can only follow a walk through !!!
- Anonymous
- Anonymous
it seems that the author never came back to the locked door where you fight the living jar. would really like to know how to get to the other side.
- Anonymous
will there be a detailed walkthrough for the rest of the areas like the other souls games?
- Anonymous
- Anonymous
hi when is the next part of the walkthrough updated as i have finnished it to that point cheers
- Anonymous
Where is the section for storm hill and the rest of the area? Or is this a work in progress?
Please correct this: the two Spirit Jellyfish only appear at night.
- Anonymous
- Anonymous
- Anonymous
anyone know where does the scream come from when you stand near the church of elleh at nighttime?

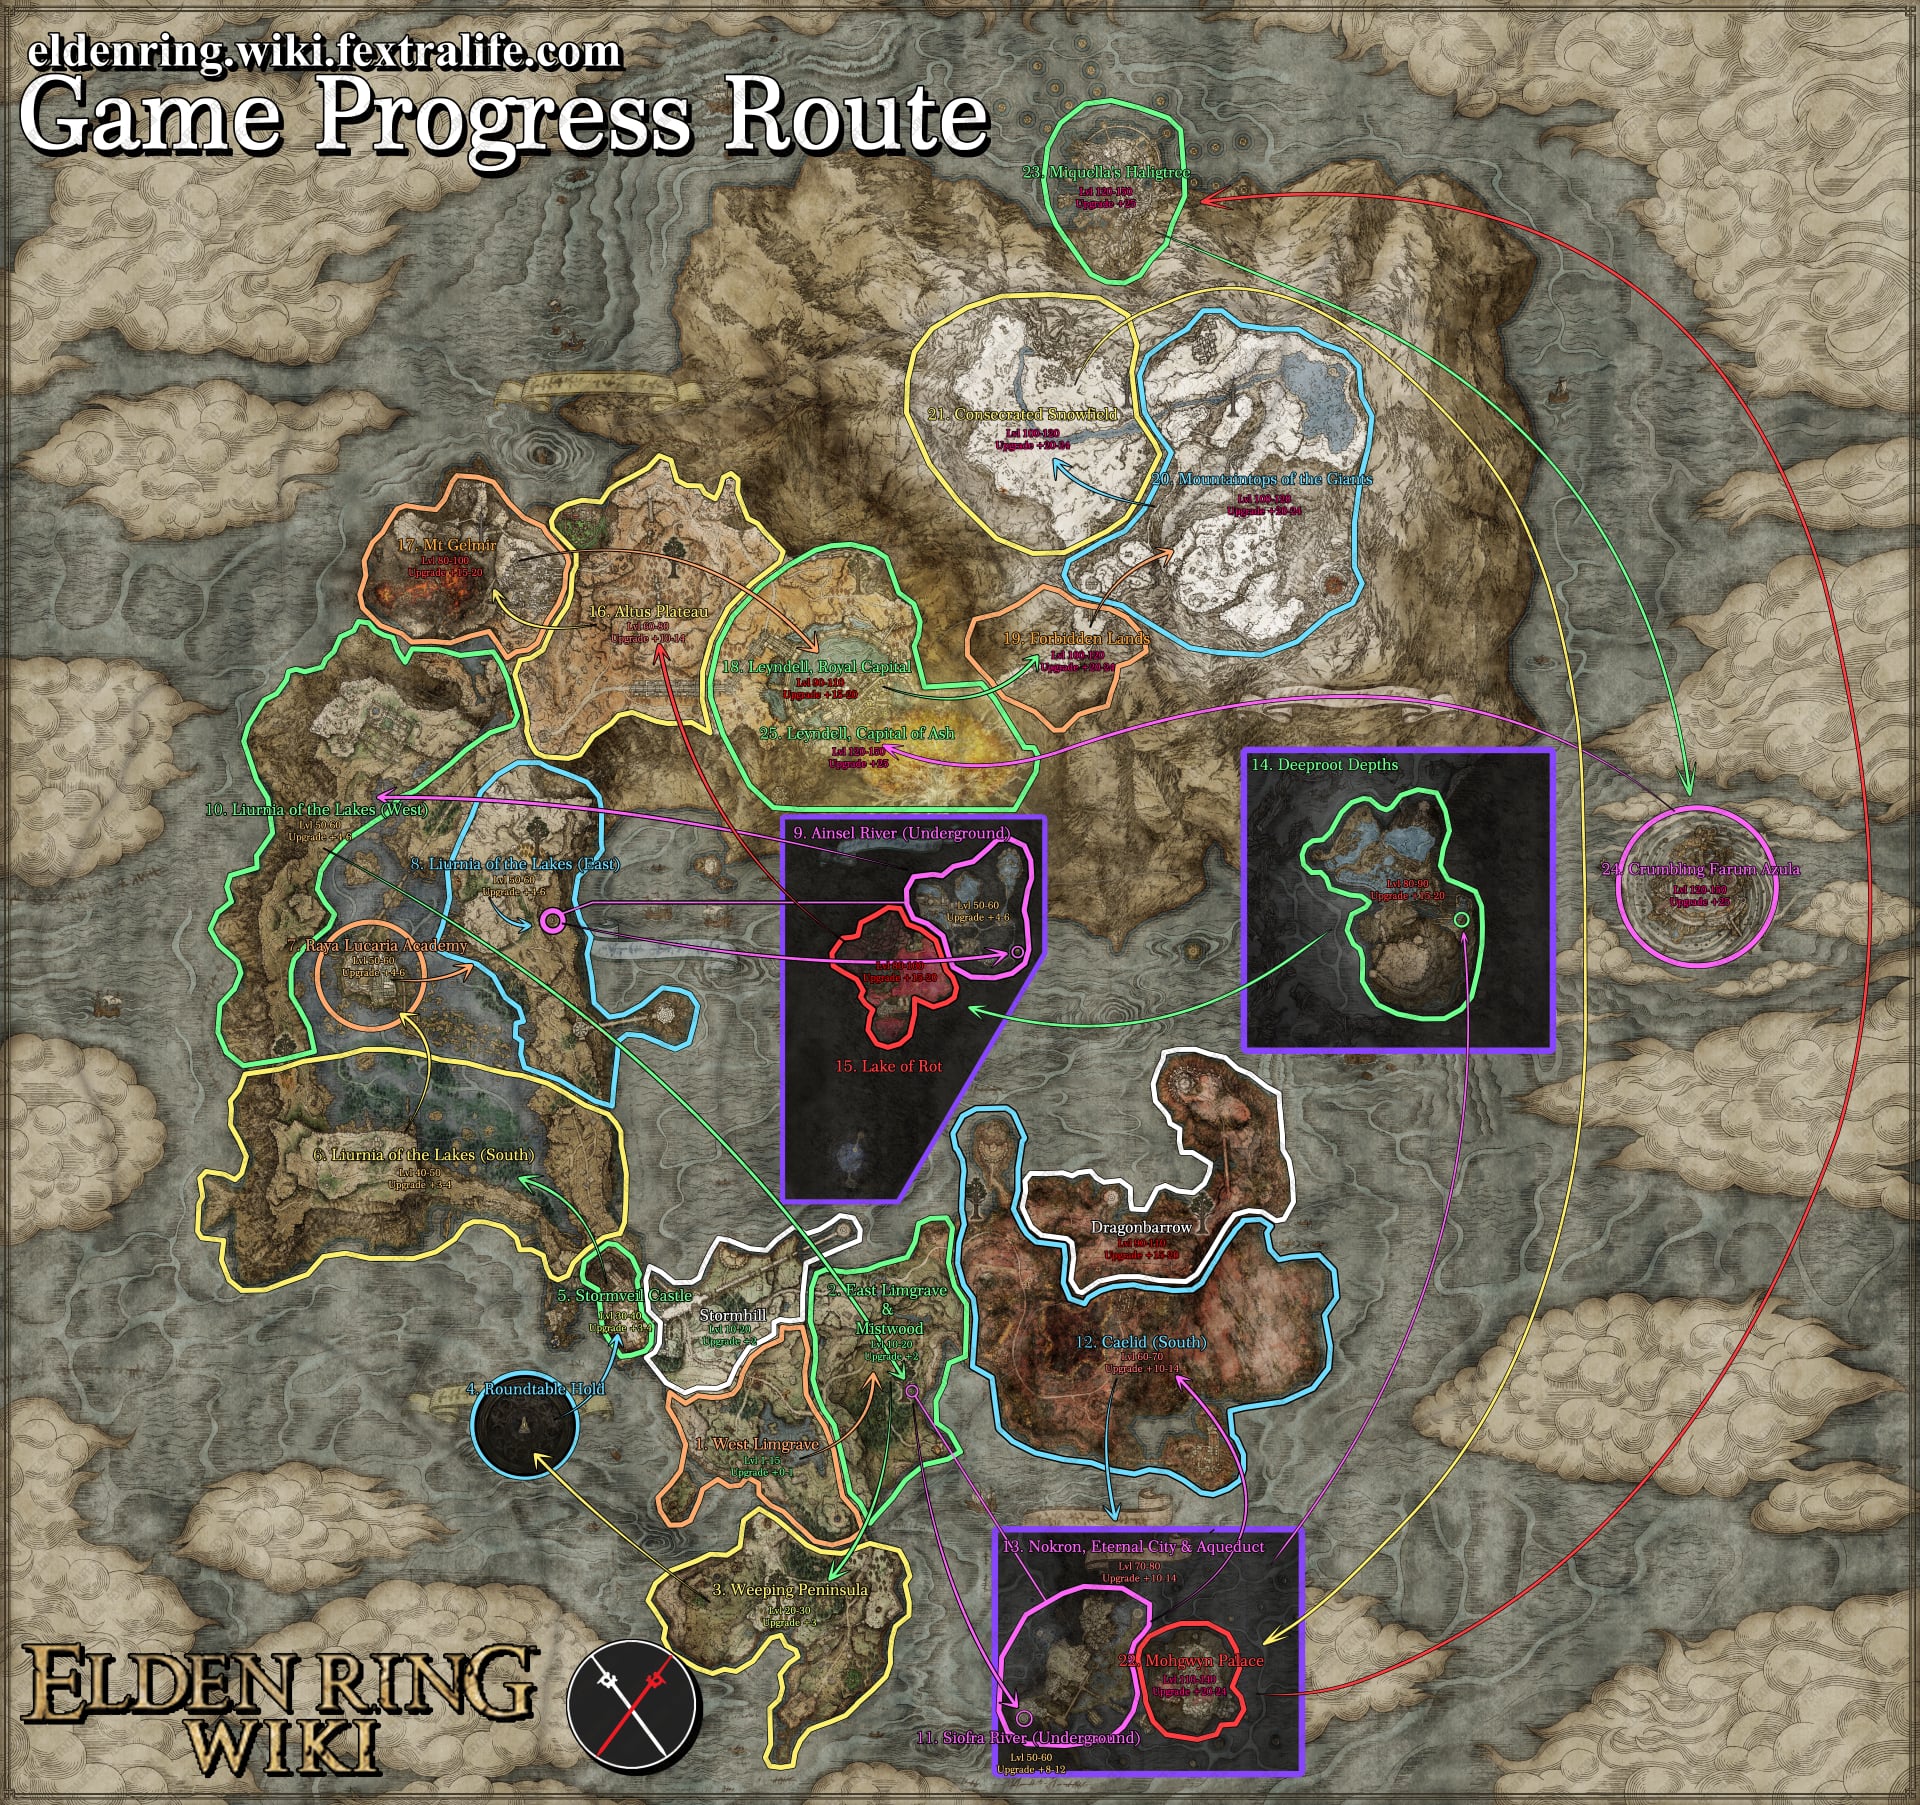
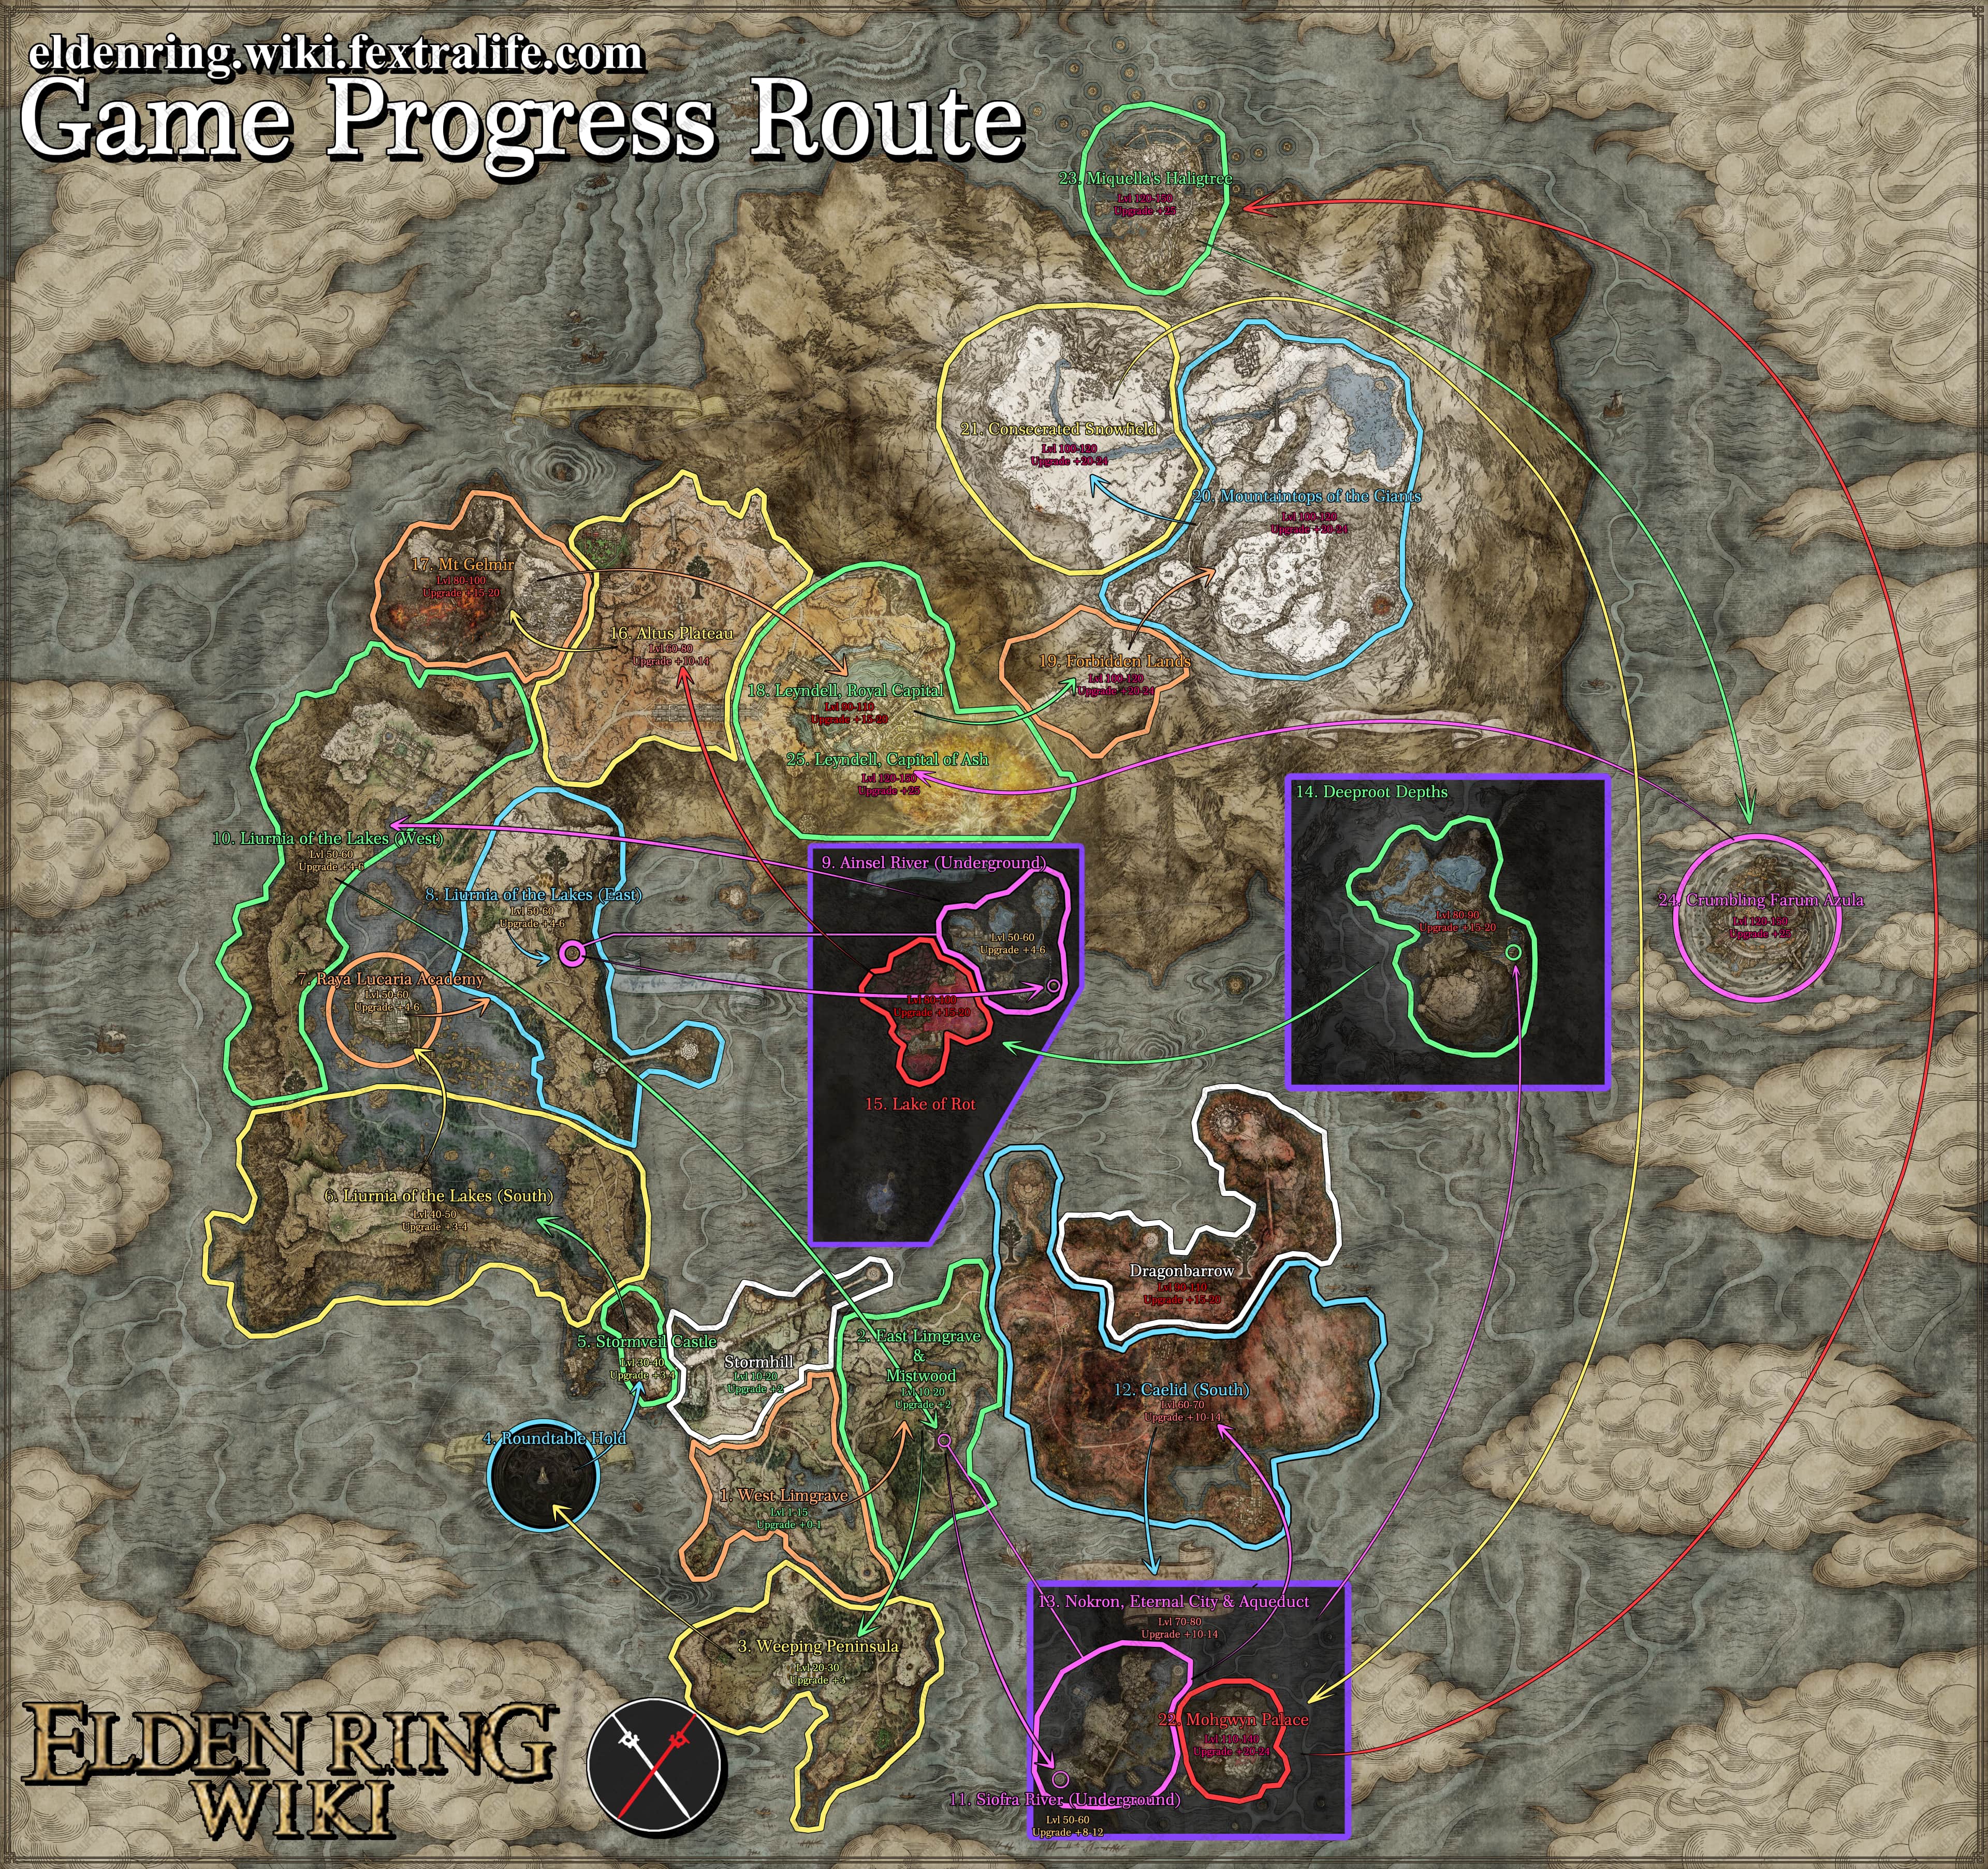
Only missing the Mountaintops/Snowfield Guide, these are the part I struggle the most, they're massive and mostly clueless. Really enjoying the slow paced guide so far, helped me a lot.
0
+11
-1