

Caelid Catacombs |
|---|
 |
|
A labyrinth of Scarlet Rot-soaked floors and tunnels. |
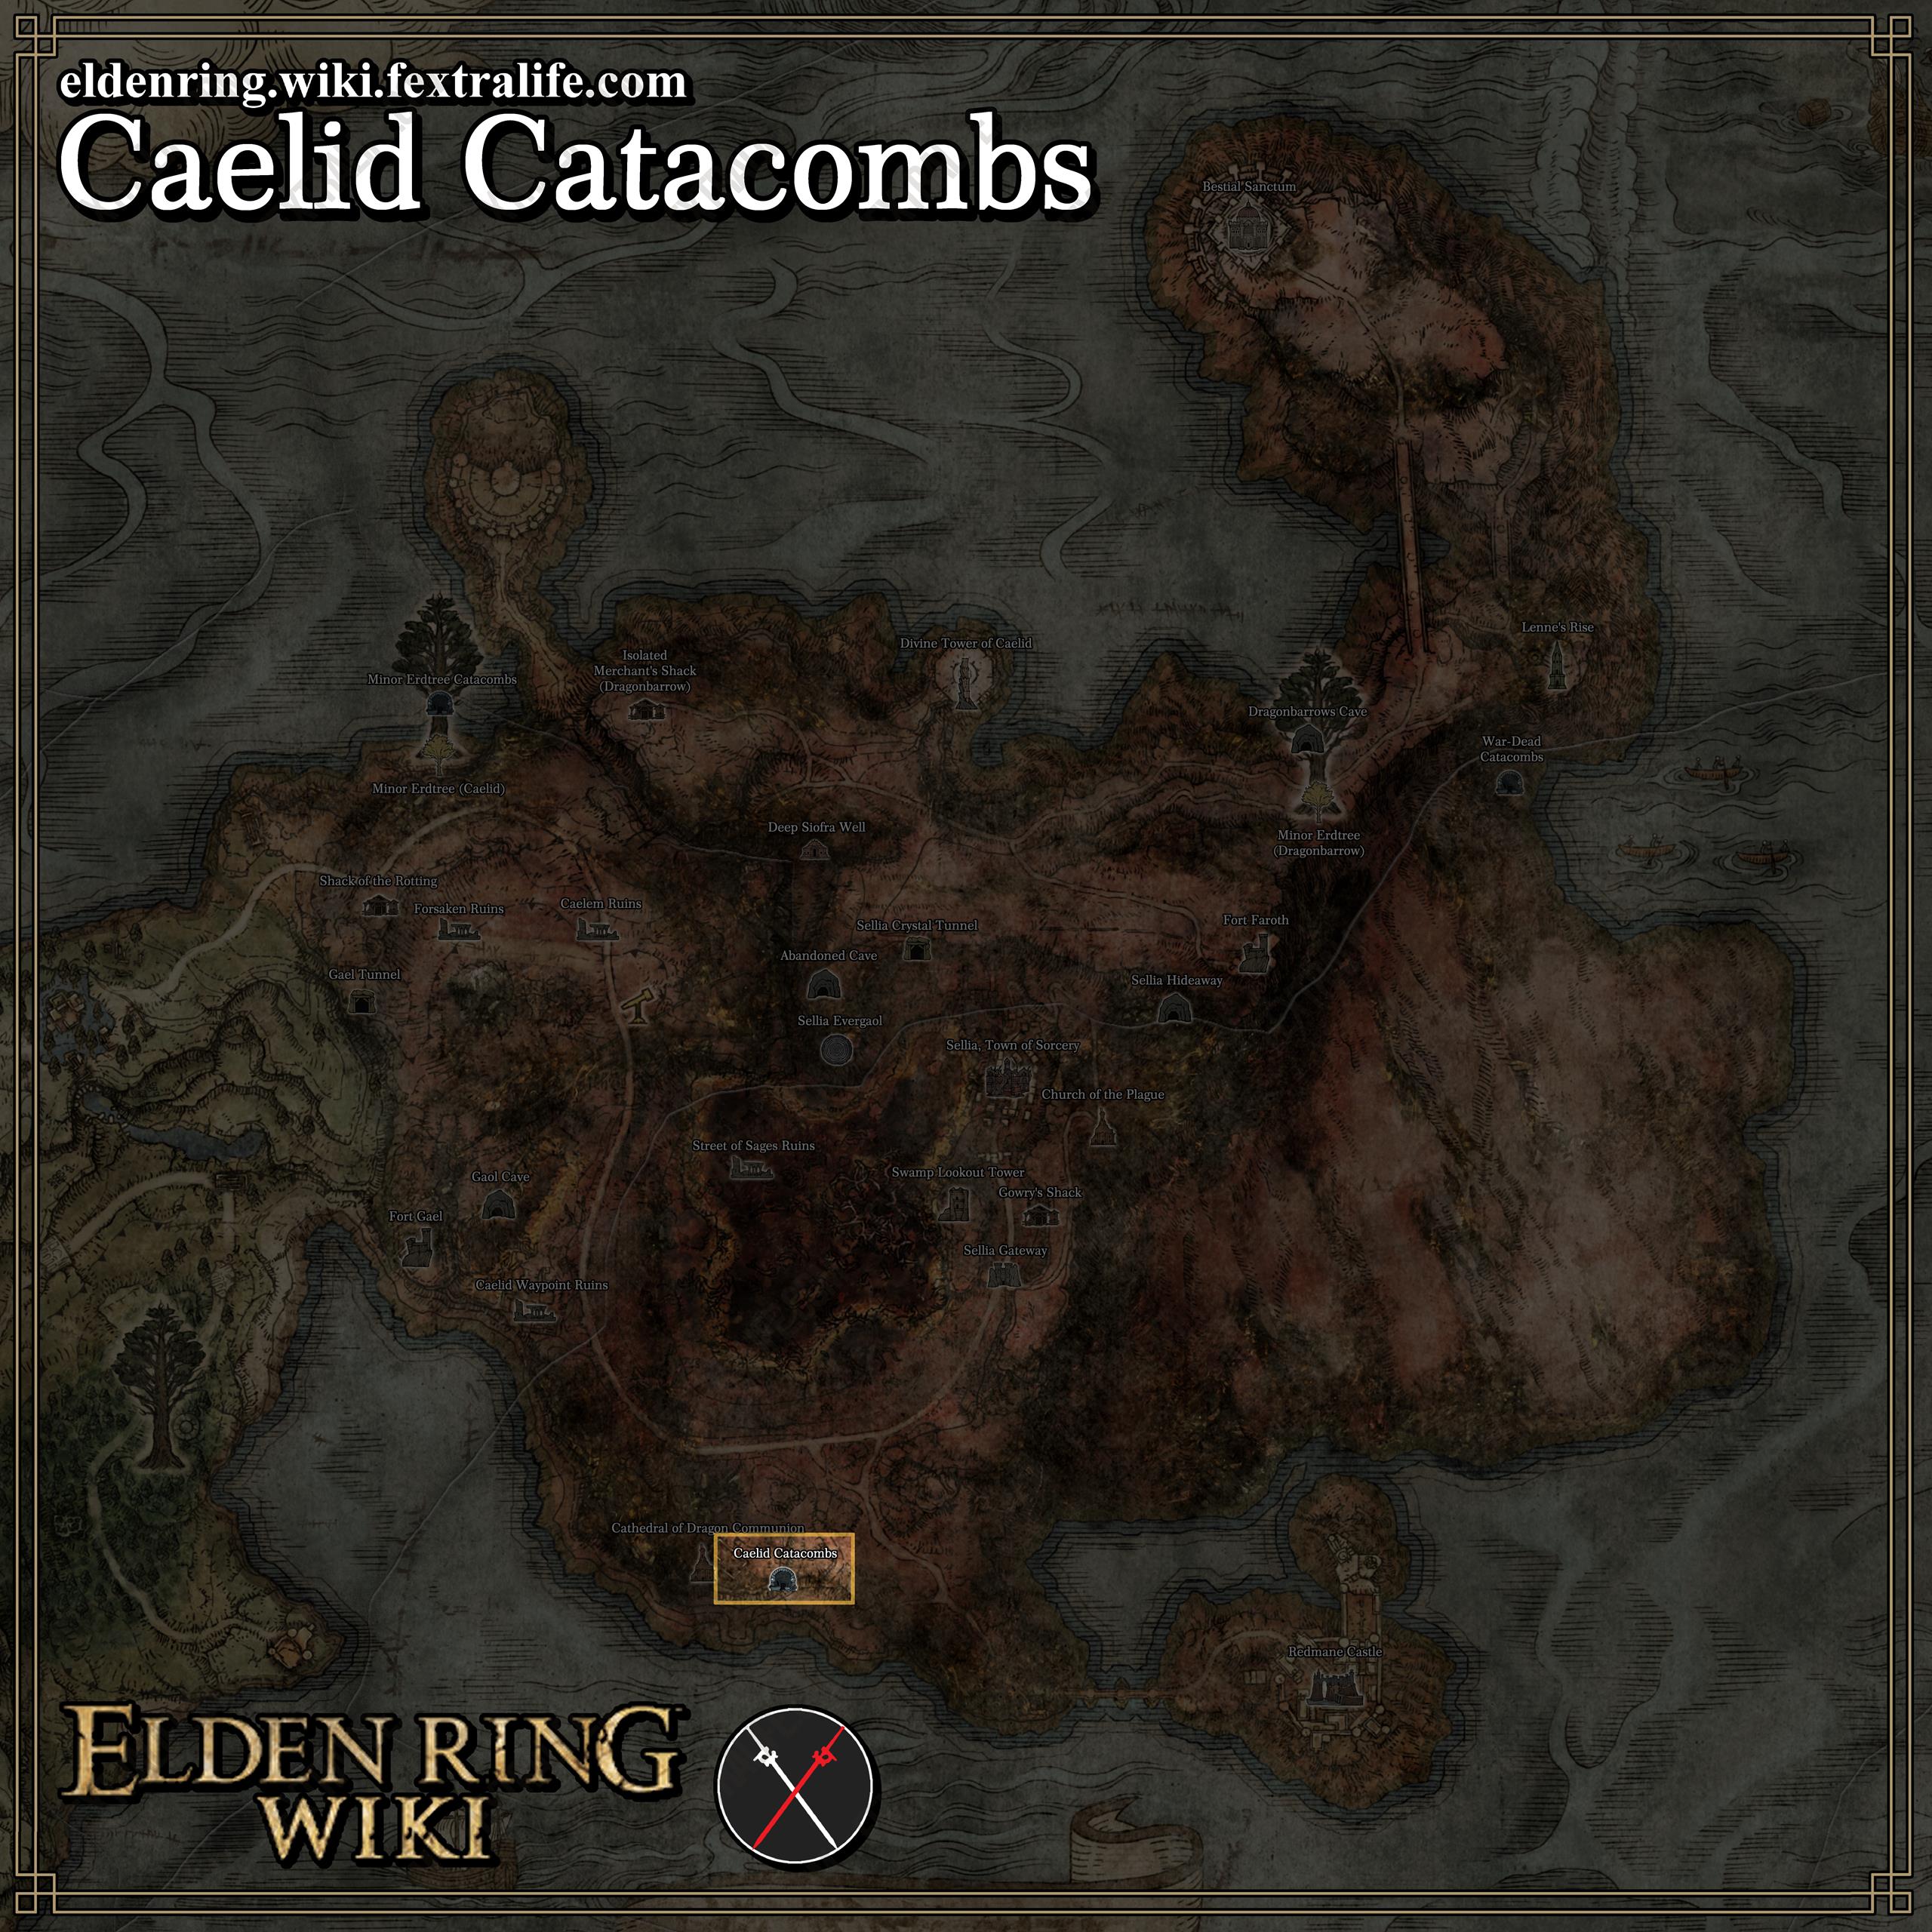
Caelid Catacombs is a Location in Elden Ring. The Caelid Catacombs is found in Caelid. It is west of the Impassable Greatbridge site, and the entrance to the catacombs are just southeast of the Cathedral of the Dragon Communion. The path leading to the entrance is bordered on one side by the sea.
Caelid Catacombs Map
Caelid Catacombs is found due East from the Cathedral of Dragon Communion in Caelid. See it on the Elden Ring Map.
All NPCs and Merchants in Caelid Catacombs
- NPC Name - Role and Location
- Merchant Name - Role and Location
All Items in Elden Ring's Caelid Catacombs
Upgrade Materials
- Ghost Glovewort [3]
- Ghost Glovewort [4]
- Grave Glovewort [3] (x2)
- Grave Glovewort [4] (x3)
- Grave Glovewort [5] (x2)
Equipment and Magic
- There are no equipment and magic here
Elden Ring Caelid Catacombs Creatures, Enemies, and Bosses
Regular Creatures and Enemies
- Miranda Sprout
- Giant Miranda Sprout
- Skeletons (1x Heavy Swordsman and x1 Archer)
Field Bosses and Bosses
Caelid Catacombs Walkthrough
The catacombs are very straightforward, without any forks. All you'll need is some way to deal with Scarlet Rot and perhaps some fire or frostbite damage to deal with the Rotten Giant Miranda Sprout.
Two secret areas hidden by walls to be on the lookout for:
- After descending the staircase that leads onto a swamp, turn to the right, go under the platform where the Archer Skeleton was, and hit the wall on the right corner. There is a Miranda flower enemy there, as well as the Miranda Sprout Ashes and 2x Grave Glovewort [5].
- At the end of the dungeon, there will be a locked door. Once you see it, turn 180 and then attack the wall on the column in the middle of the previous room to reveal a switch.
Heading down the stairs away from the Site of Grace, follow the hallway right into a small room covered in Scarlet Rot. Before you enter, be sure to grab the Grave Violet on the left of the hallway. Once you do actually enter, (3) ">Miranda Sprouts will spawn. Take them out while avoiding the buildup of Rot on yourself. Be sure NOT to roll in the sludge on the ground as it will cause the Rot-meter to continue rising, even after leaving the liquid. Sticking to the dry patches on the sides of this room will allow for easier traversal. Here to loot, there is a Grave Glovewort [4], some Root Resin, and whatever drops may come from the killed Sprouts.
Once ready, continue northeast into the hallway. Take caution when approaching the next turn left, as a Heavy Skeletal Swordsman is waiting around the corner to ambush you. Kill it and dispense with its remains before grabbing the Grave Glovewort [3] in the corner here. Head northwest down the stairs and loot the Grave Violet on the left side of the corridor. In this next room, you are faced with a bit of a conundrum. On the platform the hallway lets you out on, a Skeletal Archer will spawn, but only after you go further down the stairs to the left and enter the swampy area below. Doing this however will also trigger the Giant Miranda Sprout that is waiting for you around the corner to the right. My best advice is to watch the platform while going down the stairs until you see the Skeleton forming, then rushing back up the stairs to deal with it. With any luck, this will then cause the Sprout to come around the corner, allowing you to more safely fight it from the stairs without incurring the Scarlet Rot penalty.
As you have probably seen, there is a Grave Glovewort [3] to loot at the bottom of the stairs. Before continuing on, there is a Illusory Wall here found under the platform the Archer was standing on. Turning directly around from the looted Glovewort, keep left of the stairs on the ground floor until you come to the last section of the wall on the right. Hit it in some way to reveal its illusory nature as well as hopefully injure the Miranda Sprout hiding on the other side. Be careful as exploring this small area will cause 3 more Miranda Sprouts to spawn. Within the hidden area, you are able to find 2x Grave Glovewort [5] and the Miranda Sprout Ashes. At this point, one may want to take a small break on the stairs to allow their Scarlet Rot meter to deplete. When ready to continue, head northeast from the bottom of the stairs to the hallway, being sure to grab the Ghost Glovewort [3] and Ghost Glovewort [4] to the right of the hall's entrance.
The Ghost Glovewort [3] and Ghost Glovewort [4] can be found behind the Giant Miranda Sprout, lure it away or kill it and grab them.
Follow the hall northeast and loot the Grave Glovewort [4] within the sludge of the next room next to the central pillar. Keeping to the right, make your way around the central column while being sure to avoid the Scarlet Rot trap that can be triggered by stepping on the rotten debris. In the eastern corner, you can find another Grave Glovewort [4]. Going into the next hall, still heading northeast, you should see a locked door. Turn immediately around and attack the wall of the central column in the previous room that you are now facing. This should reveal a lever which you can pull to open the locked door. This door leads directly into the final boss of this mini-dungeon. The room directly preceding the now-open door contains Root Resin to pick up.
Your final boss through the fog gates is the Cemetery Shade, which can be back stabbed and when cleared gives you Kindred of Rot Ashes. This fight can be challenging as the Shade's ranged attack can paralyze you, leaving you open to its stunlock combo. Summoning of Spirit Ashes is highly encouraged, as the shade is truly only strong against one target at a time.
Elden Ring Caelid Catacombs Gallery and Notes
[other images go here]
Honestly, it's significantly easier to get to the Caelid Catacombs from the Impassable Great Bridge site of grace. Warp to it, and turn around, it's almost a straight line.

- Anonymous
There are a couple of wiki pages giving wrong or half right information about the cemetery shade. They have a relatively small health pool but it means nothing if it kills you before you get a chance to take advantage of it.
There is no mention anywhere about the way it can poise through a hit from a fully charged, two handed R2 then stun-lock and quickly kill you. For new players wanting to get Lhutel's spirit ashes as soon as possible will get the impression its a weak or easy boss, nothing could be further from the truth.
- Anonymous
I don't know where the person that wrote this page got the idea the cemetary shade can be back stabbed? maybe if using one of the bloodhound AoW that makes it easier to get behind the shade boss when you target lock him. I struggled with this boss for a little while, it kept catching me out by not flinching when I was hitting him, then he'd use a nasty combo that did a lot of damage to me earlier in the game, but I had to keep trying if I wanted the lhutel headless knight spirit ash. Another thing I found harder than it should have been to deal with was the teleport thing he does to get into melee range for a combo.
- Anonymous
- Anonymous
Use imps or wolves to keep him occupied and Rock Sling from afar. He can break aggro and come after you but if you keep moving away the imps will be able get his attention again.
- Anonymous
"Cemet**a**ry shade" link is broken in the walkthrough section. Changing it to cemetery without an A works.
- Anonymous
- Anonymous
No reason to look for or do this reskin. Dont waste your time
- Anonymous
Then cave door is very dark and hard to find. Down by the beach guarded by a super annoying baby bird I can't seem to ever sneak up on
- Anonymous
- Anonymous
Hi all, i know how to open the door. The lever to door is behnind you. Just turn 180 degres and you will see it.
- Anonymous
So there's this hole on the ceiling with light shining through. Very bright, you'd assume it's daylight. But I marked it on the map and there's no hole in the ground above, just plain dirt.
I think that's really weird. I would only ever find it weird in a From game.
Right next to the giant poison flower, look up and you can't miss it. I've checked every wall, but maybe it's a hidden room somehow, and not a mistake?
- Anonymous
Be warned if you are terrified of spiders avoid this boss. It does not bother me but the boss has a spider head and will paralyze you and go up to you and basically eat your head off with its spider head and legs.
- Anonymous
Sorcery “Rock Sling” destroys the Cemetery Shade boss in 2-3 hits.
- Anonymous
As odd as this sounds after you backstab boss do not try to charge attack it. Simply use that time to back up, a lot, and heal or buff, or prepare to nuke with a ranged attack. The boss has a very high chance of heavily combo you after your charge attack before it ends due to it poising through charge attacks which will often be fatal.
Update on the green spit paralyzation attack you might be able to dodge it by running sideways, or even walking in my attempt, without even rolling. I can't verify it works every time or at certain ranges as I killed it on that attempt.
- Anonymous
The green spit ball can be blocked by pillars. Dodging, while possible, is simply too risky to bother with due to the fact the boss can teleport to you and instantly kill you rather than walking so if you get hit it can result in an instant death.
- Anonymous
Boss can surprisingly be backstabbed.
Boss is extremely melee unfriendly due to its extremely rapid teleportation coupled with the fact that it will almost always far out trade you in melee due to its insane combos and massively bleed, assuming you can even hit it due to teleportation.
Spamming Sacred Blade weapon art on boss is very viable tactic due to the holy element, high damage, and wide arc.
- Anonymous
Boss appears to take incredible damage from holy attacks. It teleports a lot and is probably related to dark Goku, or not. Boss spools up a green ball on its head which you should always dodge because it will paralyze you for an extended period of time which allows it to use what appears to be an instant kill attack if it gets close to you after.
- Anonymous
In the sheltered section below the Archer Skeleton, under the stairs, there's an invisible wall with Miranda Sprout Ashes along with 2 Glave Glovewort [5].
This might be the worst catacomb/dungeon in the game
4
+12
-1