

Game Progress Route for Elden Ring covers a recommended progression path for the main campaign of the game. This progression guide maps out the optimal path to take to avoid missing objectives, important NPCs, Items, and many more without too much backtracking. This page only contains an overview of the game's main quest that will lead the player to reach the ending of the game. For a detailed guide on fully completing the game, visit the Walkthrough page.
- Please note: The recommended level is not a determination of how hard an area is. It's following available materials and the natural progression of the walkthrough so far.
- This playthrough doesn't follow every NPC and doesn't mention all Roundtable Hold interactions.
Elden Ring Progression Helpful Links
- Please see Interactive Map and Maps for specific location details on all items.
- Please see Side Quests for NPC questlines.
- Please see Recommended Level by Location for level-based advancement
- See Level for Farming Tips.
- Dragonbarrow can be done out of order but recommended level is 80+

Elden Ring Game Progress Route
- West Limgrave ↵
- East Limgrave & Mistwood ↵
- Weeping Peninsula ↵
- Roundtable Hold ↵
- Stormveil Castle ↵
- Liurnia of the Lakes South ↵
- Raya Lucaria Academy ↵
- Liurnia of the Lakes East ↵
- Ainsel River (Underground) ↵
- Liurnia of the Lakes West ↵
- Siofra River (Underground) ↵
- Caelid South ↵
- Nokron, Eternal City & Siofra Aqueduct ↵
- Liurnia West & Deeproot Depths ↵
West Limgrave
- Buy Essential Gear
- Obtain Limgrave West Map Fragment
- Obtain Whetstone Knife
- Unlock Torrent & Spirit Bell
- Do Boc the Seamster's Quest
- Defeat Night's Cavalry.
- Find Sorceress Sellen (if you're a mage)
- Talk to Roderika
- Find Ashes of War Merchant
- Meet Potboy (Alexander)
- Talk to D, Hunter of the Dead
- Complete Murkwater Cave
Elden Ring Map: Limgrave Region starting point. Limgrave has a lot of places to visit, but only a few of them are essential. Right next to the First Step Site of Grace you'll find White Mask Varre. Exhaust his dialogue for some info about the world and to start his quest. Your first step will be to head to Church of Elleh and meet Merchant Kale, one of the Nomadic Merchants of the game. Patrolling between the starting point and the church is a Tree Sentinel boss. He will be extremely difficult at this stage of the game, so it is strongly suggested to avoid him until you unlock your horse and become stronger. Defeating him rewards you with his Golden Halberd. At the church, buy the Crafting Kit Kale offers, a Torch, and the Telescope. Also make note of the nearby upgrade bench. You can do optional cave and catacomb objectives to gain talismans and materials as needed.
Head over to Gatefront Ruins and obtain the Limgrave West map fragment for the area. Also pick up the Whetstone Knife so you can use Skills in your weapon, and get Ash of War: Storm Stomp from an underground chest.
Visit 3 sites of grace, or rest in the Gatefront Site of Grace to speak with Melina and unlock Torrent, your mount. After this, teleport to the Church of Elleh Site of Grace to meet Renna, and unlock the Spirit Calling Bell and get the Lone Wolf Ashes.
South-east from Gatefront Ruins (past east of the telescope on the map), you'll hear a shout belonging to Boc the Seamster. He's been transformed into a small red tree, so hit the small tree once and talk to him to begin his questline (see Side Quests for other quests). This quest will take you to the Coastal Cave (southern portion of the western beach), which also unlocks access to the Church of Dragon Communion (if you continue further in the cave without exiting it via portal). Defeat the demi-humans in the Coastal Cave, then go back to Boc at the entrance to return his Sewing Needle and Tailoring Tools. South-east from Boc's first location, a Night's Cavalry will spawn during night right on the bridge. Defeating him awards the Ash of War: Repeating Thrust.
If you are a mage or intend to learn sorceries, you will want to unlock Sorceress Sellen in Waypoint Ruins - follow the road south from Gatefront Ruins to find it. She's past the Mad Pumkin Head Boss fight.
Head towards Stormhill (past the Gatefront grace leading west) and talk to Roderika to begin her quest and receive the Sitting Sideways gesture, alongside the Spirit Jellyfish Ashes. If you want to see Roderika's quest in it's entirety, make sure to complete Stormveil Castle before visiting the Roundtable Hold for the first time. You will pick up a Golden Seed just before arriving at Stormhill Shack. There's also a Stonesword Key here that you will want to start collecting.
Follow the road East from the Stormhill Shack in Stormhill and you'll come to Warmaster's Shack, where you can purchase Ashes of War from Knight Bernahl. At night, Bernahl will be gone, and a Bell Bearing Hunter boss will spawn as you enter the shack. Note that this boss may be extremely challenging at this point in the game. Defeating him awards the Bone Peddler's Bell Bearing. Similar to ashes hunter badges in previous games, Bell Bearings unlock new items in the game's primary shop when given to the Twin Maiden Husks after you arrive at Roundtable Hold. Just south from here in the hills where the trolls are, you can visit at night and be invaded by a Deathbird mini-boss and get the Blue-Feathered Branchsword talisman.
Continue northeast along the road from Warmaster's Shack and turn right as you see a bridge and hear someone shouting. There is a small path to take up the cliff to your right hand side. You will meet Alexander (Potboy) and can free him to begin his quest and earn the Triumphant Delight gesture and 1x Exalted Flesh. You have to hit him with a heavy attack or several times from behind.
Before we proceed, there's another dungeon nearby with useful loot, especially if you're going for an assassin type class. Return a bit west, to the barricades you passed through where you just fought the dog and commoners. Leave the barricades and head east along the road towards the bridge again. This time stick to the left of the road. Before the bridge, follow the path next to the cliff and you will find Deathtouched Catacombs. Inside there will be gathering/farm materials, upgrade materials, an Uchigatana, the talisman Assassin's Crimson Dagger and a Deathroot.
Further down the road, past the bridge, you can meet D, Hunter of the Dead, and begin his quest (if you already reached the Roundtable Hold before this point, he will not show up since you would have first met him at the hold instead of near past the bridge, but quest progression remains the same).
You will now want to return to the lower area of Limgrave, to go up the ravine from Agheel Lake until you find Murkwater Cave that has a special surprise, and then Murkwater Catacombs. You will get invaded here, so be careful! If you wait a bit to defeat the invader, Bloody Finger Hunter Yura will show up to help you defeat him. You can meet him back north of Murkwater Cave afterwards, where you can exhaust his dialogue to start his quest.
East Limgrave
Level: 10~20 Upgrades: +1 ~ +2
- Talk to Kenneth Haight
- Get the Flask of Wondrous Physick
- Get Limgrave, East Map Fragment
- Get Flask Materials from Minor Erdtree
- Activate Siofra River Well
- Trigger Blaidd event.
- Liberate Fort Haight
- Get Reward from Kenneth Haight
- Complete Summonwater
- *Teleport to Bestial Sanctum
Elden Ring Map: East Limgrave Starting Point. East Limgrave doesn't have a lot of objectives, but the Rune Bears in the area are more than a challenge, so you should avoid them at all costs. Your plan for this area should be to loot and go when possible, as it's likely that you are underleveled for it.
First you will head to some broken structures along the northern cliff of the area (easiest place to start would be at the Artist's Shack grace, or follow the road North from the Gatefront Ruins after passing the bridge). A group of demi-humans must be dispatched, then you can talk to Kenneth Haight atop the ruins, and agree to serve him. He asks you to liberate his keep to the south.
Continue following the road northeast from here until you reach the Third Church of Marika, where you can loot the Flask of Wondrous Physick and the Crimson Crystal Tear. This is an important flask for your journey so don't miss it!
Follow the road south until you find the area's map fragment. Beware of Rune Bears, but just by the map fragment you'll also find an altar with the Greenspill Crystal Tear and Spiked Cracked Tear. There's also a Teardrop Scarab nearby that drops Ash of War: Ground Slam.
Once you have looted the above, go inside the structure. Take the lift down all the way to the Siofra River, activate the Site of Grace down there, and head back up - you will come here later as it's very above your current level.
Nearby is the Mistwood Ruins, there is a howling wolf that you will hear. Once you hear him you can go back to the Church of Elleh location and talk to Merchant Kalé who will give you a gesture. Do the gesture (Finger Snap) to the wolf and he will jump down and you can talk to Blaidd and start his quest.
Continue south from here, you can take a detour to meet the Nomadic Merchant of the area if you wish. To the very south, you will encounter Fort Haight. There's a Golden Seed to be picked up before you go in. Then kill all the enemies within, and loot the tower on the right side from the entrance to obtain the very important key item: Dectus Medallion (Left). There's also Nomadic Warrior's Cookbook (6) and Ash of War: Bloody Slash.
Now that the fort is free, report back to Kenneth in the northern area. He will reward you with Erdsteel Dagger and offer you the opportunity to enter into his service, choice is up to you. You'll next find him back at Fort Haight, where you fought the knight that dropped the Ash of War.
Once this is done, head to Summonwater (northwest from the Third Church of Marika), where you will face a Tibia Mariner boss. Defeat it to gain your second Deathroot and the Skeletal Militiamen Ashes, which will enable a discussion with D, Hunter of the Dead at the Roundtable Hold (you may also find him instead near the Summonwater Village Outskirts grace west of here if you didn't reach the Hold yet). In a chest in an underground area you will find the Green Turtle Talisman.
Afterwards, go back to the Third Church of Marika. In the back there will be a portal that will take you to your next location. Open the door and rest at the site of grace. Melina will offer to take you to the Roundtable Hold (which again, if you have not already reached yet earlier from resting at enough graces, since activating them alone isn't enough).
* If you have access to the Roundtable Hold, after that discussion a gateway will be marked on your map that allows you to teleport to the Bestial Sanctum in eastern Caelid. You don't need to do this now so don't worry about it if you haven't been to Roundtable Hold!
Southern Limgrave & Weeping Peninsula
Level: 20~30 Upgrades: +2 ~ +3
- Meet Yura & Take on Dragon
- Obtain Sorcery Scroll
- Talk to Irina
- Defeat Night's Cavalry
- Obtain memory slot
- Get Sacred Tears
- Get Flask Materials from Erdtree
- Complete Castle Morne
Elden Ring Map: Southern Limgrave Starting Point. You are now ready to explore Southern Limgrave. Travel northeast to the underpass (directly west of the Artist's Shack, down at the ravine underneath a ruin) and talk to Bloody Finger Hunter Yura, then proceed to Lake Agheel to challenge and defeat the dragon in this area, Flying Dragon Agheel. You can summon players or use Spirit Ashes to help with the fight. Using Torrent is suggested. The Dragon Heart you obtain can be traded for Incantations at the Church of Dragon Communion accessed by traversing through Coastal Cave.
If you are a sorcerer, you will want to get the Royal House Scroll, that you can bring to Sorceress Sellen to unlock more inventory at her shop. Head southeast from the Agheel Lake South site of grace, toward the top of a cliff and you'll see a statue of an object that looks like the half piece of a bowl or a circle. Face the other way, to see a Knight. Keep going to a structure to see a man standing watching over the big structure, alongside a dead body. In that body, you will find the Royal House Scroll.
To continue Blaidd's quest, head to the Forlorn Hound Evergaol and summon Blaidd for the fight against Bloodhound Knight Darriwil. Back outside he'll reward you with a Somber Smithing Stone (2) for helping him.
Proceed south into the Weeping Peninsula and you'll meet Irina by the road. She will ask you to talk to her Father at Castle Morne. You will get there later so for now just continue down the road and rest at the Castle Morne Rampart site of grace. A miniboss roams the area at night. This is a Night's Cavalry and defeating him will give you the Ash of War: Barricade.
Take the jump spring near the Site of Grace to gain access to a tower. Oridy's Rise is a mage tower and contains an item that increases your memory slots, the Memory Stone. There are multiple of these to be found throughout the game, and they are usually in towers such as this one. You have to find and hit 3 turtles to unlock the entrance. See the Oridy's Rise page for details on where they are. After that, head north of the tower to find a site of grace, and a few enemies. Further after that, you'll find a corpse on a chair holding a Stonesword Key, and a statue which points to a catabombs to complete.
Southwest from the Bridge of Sacrifice grace, there is a Forest Lookout Tower which rewards a Hand Ballista. Directly south of here is a grace named South of the Lookout Tower. If you play as a mage, your next stop is Demi-Human Forest Ruins (following the path west from this grace), as their leader drops the Demi-Human Queen's Staff which is quite good at low levels (you could also fast travel to the Sellia Crystal Tunnel grace you found earlier in Caelid, and find the Meteorite Staff in the Swamp of Aeonia on a corpse in the Street of Sages Ruins).
From here you will head North to find a Faith-knot Crystal Tear guarded by some hostile plants. Directly west is a church containing a Sacred Tear for your flask. South from here leads to both the Tombsward Catacombs and the Minor Erdtree, which contains both the Crimsonburst Crystal Tear and Opaline Bubbletear for your flask. Down the plains, you can see a Mausoleum: these are used to replicate Remembrances, which are the "Boss Souls" of the main bosses of the game.
Several points of interest are also west of the Minor Erdtree, including another church holding another Sacred Tear, and the Isolated Merchant's Shack, which you can buy a Lantern to avoid needing a torch for dark areas. Note that in the Witchbane Ruins north of the shack, the Sorceress Sellen is there, but there is no way to interact with her for now. Keep the location in mind, though, because it will become important in the later stages of her quest.
It's now time to take on Castle Morne south of where Night's Cavalry was. Note a golden seed right hand side on the path towards castle (which also leads to a map fragment of Weeping Peninsula). This is a simple souls-style dungeon, with a lot of verticality. Notable points are to not miss the drop to meet Irina's Father. From Take the lift to the castle proper and from the entrance go straight past a Pumpkin Head and to the right. Take the ladder, defeat nearby enemies and cross a bridge. With the bridge to your back look LEFT for some barrels. Break them to reveal a ladder and drop down below. Follow this path past some enemies and up a tower to meet Edgar.
Once you complete the boss of the area, return to Irina's father, and finally back to Irina to finish their quest. You can also go straight back to Irina without speaking to her father, in which case you skip out on some dialogue. (Note that I would advise against completing this quest too soon until your weapon upgrade is at least +8, because you'll obtain a+8 weapon after progressing enough in this questline, which may affect your ability to interact with other players since matchmaking is affected by weapon level).
Roundtable Hold
- Head up from Stormhill into Stormveil
- Defeat the Boss
- Visit Roundtable Hold
- Talk to all NPCs
- Upgrade your Weapons
Go into Stormveil and defeat Margit the Fell Omen at its gates to ensure you unlock a conversation with Melina that takes you to the Roundtable Hold. Once here, you should talk to all NPCs and familiarize yourself with the many locked doors.
There are several NPC quests you can start and continue here in the Roundtable Hold:
Roderika & Hewg: You'll find Roderika here once you've given her the Chrysalids' Memento (found in Stormveil) at Stormhill Shack, or have rested at any grace in Liurnia. She'll reward you with a Golden Seed if you have given her the memento - if not, you'll find a Golden Seed back a Stormhill Shack where she used to sit. Once Roderika is in the hold (this will be after Stormveil if you are following this route exactly), go back and forth speaking to Roderika and Smithing Master Hewg, choosing options that try to convince Hewg into taking Roderika as his apprentice. After you've exhausted all their dialogue, reload the Roundtable Hold and Roderika will now become your Spirit Tuner and the two will have additional dialogue. Return to the place you found the Chrysalids' Memento and you'll find the Crimson Hood in it's place. (Note: If you hadn't found the Chrysalids' Memento prior, it will be completely replaced by the Crimson Hood. The Memento is only used to progress Roderika's quest if you hadn't aquired the Liurnia of the Lakes Site of Grace early.)
D, Hunter of the Dead: After defeating the Tibia Mariner in Summonwater Village, D can be found and spoken to at the Roundtable Hold if you haven't already in Limgrave. He'll show you the way to find another NPC, Gurranq, the Beast Clergyman. Once you visit Gurranq, D will sell his wares to you.
Gurranq can be found at the Bestial Sanctum in Caelid. If you teleport there as soon as you're given the waygate location by D, you may be a bit too underleveled to defeat the enemies there. Head straight into the building and don't fight the gargoyle here until you're strong enough to. His quest involves giving him Deathroot, and each time you give him one, you unlock a new item in his shop. After giving him the fourth Deathroot, an event triggers the next time you visit Gurranq. Damage your attacker until they've been pacified, but don't defeat them. Gurranq's quest ends after you've given him nine Deathroot.
Fia: You can start Fia's quest by speaking to her in her room in the Roundtable Hold. She'll only speak to you in secret if you let her hold you. Doing so will give you Baldachin's Blessing, which decreases your maximum HP while it's in your inventory.
Brother Corhyn: Corhyn's quest won't be started until a little later, but you can speak to him now for introductions and to purchase some incantations.
Diallos: You can start Diallos' quest by speaking to him here. Simply exhaust his dialogue then he'll show up in another location later on.
The most important thing to do here right now is to ensure that you Upgrade your weapons as much as possible as Stormveil Castle is a difficult endeavor and you will need all the help you can get.
Stormveil Castle
Level: 30~40 Upgrades: +3 ~ +4
- Take the alternate entrance to the Stormveil Castle
- Ascend the Castle and clear Enemies in your path
- Defeat the Banished Knight and retrieve the Rusty Key
- Obtain the Stonesword Key
- Use the Key to dispel the fog in front of the gates and enter
- Locate Nepheli Loux and speak to her
- Clear the Castle
- Fight the Lion Guardian Mini-boss
- Prepare for a Boss battle and summon Nepheli
- Face Godrick the Grafted
- Restore Godrick's Great Rune at the Divine Tower of Limgrave
Right before you head for Stormveil Castle, head northeast of the Stormhill Shack to pick up the Strength-Knot Crystal Tear guarded by a giant. Now head for the castle. There will be a site of grace named "Castleward Tunnel" right before a mini-boss inside the tunnel.
Once you reach the main gate, head to the left side and go down to grab a couple items and make your way around back on the main path. Once near the gate, interact with the grace nearby, then head left and speak to Gatekeeper Gostoc. Take his suggestion by entering through the alternate route. Outside near the summoning pool, loot the body to obtain Golden Rune (1). Atop another concrete beam nearby is another lootable body which will give you 3 Ruin Fragments. Another body towards the alternate entrance will carry a Smithing stone. After looting the area, you can continue to make your way into the castle. Clear the Bladed Talon Eagle that may intercept you from above. You will come across another Site of Grace to the right called Stormveil Cliffside. Head up on the wooden platforms and loot the body on the path to obtain a Marred Leather Shield. Continue, but be wary of the three Castle Guards. Clear them to continue inside and there will be another body at the edge of the platform and another Castle Guard. Clear him and loot the corpse to obtain a Golden Rune (2).
The next room, the wine cellar, clear the enemies by the barrels and keep heading through the castle, clearing Enemies and guards on your way. Loot the bodies as you progress down this route and you should be able to obtain Throwing Dagger x5, St. Trina's Arrow x10, and Smoldering Butterfly which could help you through the castle. Head down from the hole and continue down the narrow path. Break boxes and barrels to make sure you don't miss anything. An extra enemy awaits you if you head through the wooden platform to the left where the commoner was. A Banished Knight will be through the door on the right. Loot the Rusty Key and find a chest to loot a Curved Sword Talisman. The key will open the door down on the second level near the hole in the wall with vines. Use the key to unlock the door and the other door will be a ladder to reach the top level of the Cellar.
There will be Commoner enemies here, and you will be able to loot Fire Grease off a body in the area. Jump across a platform leading outside, and deal with the two red-hooded enemies, then proceed down-left until you obtain the Brick Hammer. Jump off, then take the ladder again accessed by the Rusty Key to lead back up to the path to the stairs on the left reaching an upper platform to loot another body with Silver-Pickled Fowl Foot. Now go left to find the castle steps and head up. Once you reach the top, the room to the right will have another Banished Knight. You'll be able to reach a Site of Grace up the stairs, then heading in the room to the left.
Go back outside the room, and continue upstairs to fight two hooded enemies, and loot Throwing Dagger 5x and Drawstring Fire Grease. Continue the journey upwards and clear any enemies you come across, mainly Castle Guards. For a Talisman, jump up the ledge towards the sandbag piles and jump down toward the wooden platform and cross the rooftop towards a destroyed pillar. There will be a narrow platform and an open section with a ladder. More enemies will be in the area. Clear the area and climb the ladder to obtain x1 Claw Talisman looted from a body. Fast travel to the Rampart Tower grace.
Outside, you'll see a Summoning Pool, and encounter four Bladed Talon Eagle, (with the 4th hidden to the left behind a pile of explosive barrels). Head downstairs onto a roof with a corpse containing a Golden Rune [2]. Make your way to the entrance of a chapel where you will find Sorcerer Rogier. Speak to him, make your purchases, then make your way to an armory room. Towards the left you can head to the upper area, go to the opposite wooden platform, loot corpses in the area and you will reach the castle courtyard and more Castle Guards. These guards will be hard to evade. Clear them for a chance to obtain Exile Armor and Exile Greaves. Other bodies will contain x1 Magic Grease, x1 Golden Rune (1), x2 Golden Rune (2), x1 Pike, and x5 Smoldering Butterfly. North of the area, you will also encounter the Omen. Check the guardhouse to the right and loot the area to obtain x1 Wooden Greatshield and Furlcalling Finger Remedy. There will be a Site of Grace as well in this area. You might encounter a Blade Talon Eagle.
You will eventually find your way to the Castle Rooftops. In this area, take note there will be a place to hop down where you can loot a body and find a Stonesword Key. Then continue till you find an exit to your left, coming down on a rooftop where you will encounter a Bladed Talon Eagle. You'll see another corpse in the area sitting against a wall on the roof that you can pillage to find a gesture x1 Dozing Cross-Legged.
Head left and there will be a door blocked with white fog below. Make your way down. You may use a Stonesword Key if you wish. Through the gates, you will encounter the Grafted Scion. Sneak to the right to activate the lift back to the Rampart Tower Site of Grace. Once the lift is activated, you may defeat the Grafted Scion and loot the area to obtain Lump of Flesh, Chrysalids' Memento, Golden Rune (1), Stanching Boluses, Highland Axe. Clearing the guardian is optional but will earn you 1176 Runes.
Head up the stairs where there will be another Castle Guard and a Banished Knight. A locked door will be to the right. Head up the podium and loo the chest to obtain a Mimic's Veil. Go through the arch doorway on the other end and through the adjacent arch doorway and through another narrow hallway towards the west and you'll end up in a storeroom where you can loot x2 Golden Rune (2).
Head to another armory room where you will have a Liftside Chamber Site of Grace and a lever with a lift that will take you up. Take the lift, follow the path until you reach a room with jar enemies.. There is a Teardrop Scarab below; defeat it to obtain the Ash of War: Stormcaller, then head back up - remember this room, as you will have to return to it shortly to follow Rogier's questline. Jump down and you will find Secluded Cell Site of Grace inside. small armory. This is also the fog gate entrance leading to the main boss.
You will need to clear the castle before you can enter. clear the Troll. Use the archway to your advantage. Kill the Troll and the Castle Guard in the area. Head out to the main courtyard. Loot the tree to the left to obtain a Golden Seed. More enemies will be here. Head left and you will find yourself in a small room where Nepehli Loux will be. Speak to her and she will be available to fight alongside you for the final loss battle of the Castle. Had back out and make your way through the barricades and enemies and you will come back to Omen and the Zombie Dog enemy. Defeating this ogre enemy yields 451 Runes and you can loot its body to acquire the Omen Cleaver. After defeating the enemy, on the west side, you'll find a study room that has a painting surrounded by an aura in the middle. Examine it to acquire x1 Prophecy Painting. Make your way to the castle grounds.
This is where you'll encounter the Lion Guardian. Defeating the guardian yields 1428 Runes, x1 Somber Smithing Stone (1), x1 Beast Blood, and x2 Old Fang. Head to the center where there is an arched doorway that can lead you to some statues. This goes to another area where you can rest at the Limgrave Tower Bridge Site of Grace. Loot the corpse atop the stairs to find x1 Boltdrake Talisman. Clear the rest of the enemies near the gate and go through another arch doorway with a Site of Grace and loot the area to obtain x1 Golden Rune (5) and Commoner's Simple Garb. In the room there is a lever to push to open the castle's main gain. Head to the main gate to loot x5 Ballista Bolt, x1 Golden Rune (2), and x1 Golden Rune (1). From here, you can now head back to the Secluded Cell Site of Grace and make further preparations before facing Godrick the Grafted.
Finally, face Godrick. Remember to use the summon sign to summon Nepheli. Clear the boss. A boss guide can be found on the Godrick the Grafted page. The second phase will be indicated with a cutscene where he grafts a dragon arm and can now deal additional Fire Damage. Clear both phases and you will defeat Godrick. You will be rewarded with Godrick's Great Rune and x1 Remembrance of the Grafted, as well as 15000 Runes.
Now you can make your way to the Throne Room. The west room will have a set of steps leading to the basement. Climb down the ladder and you can approach the praying spirit. loot the item next to it to obtain x1 Shabriri Grape. Turn back and you will arrive at Liurnia of the Lakes.
To use the newly obtained Godrick's Great Rune, you will need to fast travel to the Limgrave Tower Bridge site at Stormveil Castle. More enemies and Colossal Statues will be here. You need to reach a waygate then a large door to the tower and activate the lift inside. Here, you can discover a new Site of Grace. Continue to ascend and there will a glowing sigil. Restore the power of the great rune. Godrick's Great Rune blesses the player's character by raising all attributes
Multiple things happen if you return to the Roundtable Hold at this point. Nepehli Loux will also be available at the Roundtable Hold. Speak to her so that she can give you x1 Arsenal Charm. You can also speak to Gideon about her.
Sorcerer Rogier will also move to the Roundtable Hold. Exhaust his dialogue and he'll give you Rogier's Rapier (+8). (WARNING: If you plan on doing online matchmaking with other players, this may hinder your ability to do so, depending on how early you get this weapon and what your current Rune Level and weapon level are). In the room opposite the Secluded Cell site of grace, where you found the Ash of War, jump onto the narrow ledge from the wooden platform in the North-West, and follow this around until you are above the jars. Following this path you will find a message from Rogier, from which you can descend and unlock a shortcut to the Liftside Chamber site of grace. Descend further, fight the Lesser Ulcerated Tree Spirit, and behind this you'll find a large face. Interact with the bloodstain next to it and return to Rogier at the Roundtable Hold. Exhaust his dialogue then talk to Fia about Rogier to get the Knifeprint Clue.
Return to Varre's spot by the First Step Site of Grace and interact with his message to get the "Bravo" Gesture.
Liurnia of the Lakes South
Level: 40~50 Upgrades: +3 ~ +4
- Talk to Boc the Seamster
- Meet Sorcerer Thops
- Obtain Academy Scroll
- Obtain Fire Monk's Prayerbook
- Get Map Fragments
- Get Cookbooks & Ritual Pot
- Start Rya's Questline
- Meet Patches and Get Flask Upgrades
- Visit Rose Church
- Find Lakeside Crystal Cave and Latenna
- Complete Malefactor's Evergaol
- Loot Sacrificial Twig
- Obtain Raya Lucaria Academy Key
Elden Ring Map: Liurnia of the Lakes Starting Point. You can meet Boc the Seamster and exhaust his dialogue at the first Site of Grace of the area. You'll also find Hyetta here, who'll ask for the Shabriri Grape you found in Stormveil Castle. Nearby, a church houses Thops, who will teach you some basic sorcery and ask if you can help him get into the academy.
Northwest from their position, a graveyard hides the Academy Scroll, that can be given to Sorceress Sellen to unlock more inventory at her Shop. Follow the road south, collecting Glintstone Craftsman's Cookbook [1], and talk to the Nomadic Merchant of the area. Head into the water and north until you come to Laskyar Ruins, where you can loot two key items: Glintstone Craftsman's Cookbook (2) and Ritual Pot. Stairs in the northwest corner of this area lead to a chest containing the Wraith Calling Bell. The waygate here will transport you directly outside of Raya Lucaria Academy and the South Raya Lucaria Gate Site of Grace, but you won't have the key yet.
Find the Telescope icon to meet Rya, who asks you to retrieve her necklace that was stolen from her. North-west from her location you can find Boilprawn Shack, here Blackguard Big Boggart resides. Talk to him and purchase Rya's Necklace (1000 runes) and you can also buy some Boiled Prawn so he will move to his next location. Do note that if you move him now, he won't be available as a merchant in the later half of your playthrough. This will be explained later in the guide. Return to Rya and she will invite you to the Volcano Manor (for later!)
If you visit this area at night, just north from Rya's spawn a Deathbird will appear and drop the Red-Feathered Branchsword if defeated.
Your next stops will be to get the Dexterity-Knot Crystal Tear from a small island found north-west from the Telescope icon - and you can access Patches for his shop by the Scenic Isle Site of Grace. This is before you reach Academy Gate Town, where you should search for a Golden Seed.
Take a brief detour north and west, until you find Rose Church and get the Nomadic Warrior's Cookbook (12). You'll also be able to find and talk to White Mask Varre. If you choose the first dialogue option, talking to him again will net you five Festering Bloody Fingers. He wants you to use these invade other players. Use three of them then return to Varre and exhaust his dialogue to get the Lord of Blood's Favor.
To find Latenna, we will now travel to the Scenic Isle site of grace in southern Liurnia, then head directly south to find land and the Lakeside Crystal Cave. Defeat the Bloodhound Knight within to gain access to the Slumbering Wolf's Shack. Here, you'll find Latenna who, upon showing her the Haligtree Secret Medallion (Right), will agree to aid you in finding the second half. You will get this medallion later so activate the site of grace here.
Up ahead on the previous road, there's Malefactor's Evergaol that you can complete before continuing.
Return to Academy Gate Town where you should have gotten the Map fragment of the area, and make it past the many enemies guarding the town to the magic-sealed entrance of the Academy. Here, there is a note showing you a map to a Key that will let you through the magic barrier. North of the Academy Gate Town Site of Grace, you'll also find Diallos. Exhaust his dialogue here then return to the Roundtable Hold and exhaust his dialogue there.
Back at Liurnia, if you follow the map directions for the key, they will bring you north and west from this position, to the left side of the Raya Lucaria Academy on your map. The Academy Glintstone Key is guarded by a Dragon that is also magic resistant, so you can either pick it up and run or prepare for a difficult fight.
Once you have the key, return to the Academy Gate and go through.
Raya Lucaria Academy
Level: 50~60 Upgrades: +4 ~ +6
- Acquire the Academy Glintstone Key
- Pick up Several Ashes
- Obtain Gravity Well Sorcery
- Get Carian Knight Set
- Get Conspectus Scroll
- Get Olivinus Glintstone Crown and Ritual Pot
- Defeat Red Wolf of Radagon
- Access Secret Radagon Upstairs Area
- Get Stonesword Key, Golden Seed and Karolos Glintstone Crown
- Explore Upper Rooftops
- Get Imbued Sword Key
- Loot Academy Glintstone Key
- Defeat Moongrum, Carian Knight
- Deal with Iron Ball Trap
- Defeat Rennala, Queen of the Full Moon
To enter Raya Lucaria Academy, you must have an Academy Glintstone Key to pass through the barrier. To find it, grab the map that has the coordinates of the key or travel to an island that is situated on the west side from the academy. On that island, you'll find that it is guarded by a field boss, the Glintstone Dragon Smarag. Fighting this dragon is optional since you can simply sneak behind it and loot the key from a lucarian sorcerer corpse. Once you have it, return to the South Raya Lucaria Gate and you can pass through the barrier. The nearest site of grace is the Crystalline Woods site [].
At the Academy Gate Town Site of Grace, check the northwest section and you can find a glowing sapling where you can pick up x1 Golden Seed [Map Coordinates Here], next, go west and you'll see a Giant Crab that you can kill, this drops x1 Crab Eggs. At the same section where the Giant Crab was, you'll find a body that can be looted to find x3 Smithing Stone (2) [Map Coordinates Here]. In the same section, look behind and you'll see a couple of Poison Pods, and above it is a Teardrop Scarab hanging on the wall. Killing the Teardrop Scarab drops Ash of War: Charge Forth.
Upon entering the academy, find the Church of the Cuckoo Site of Grace. In the Northwest corner of the church, hit an illusory wall and collect x1 Rune Arc from the room. Next, you'll be exploring the graveyard section that's infested with Glintstone Zombies. When you cross the wooden bridge, at the other end, make a hard left and drop down to the path below. Circle around where you'll encounter two Marionette Soldier enemies. In front of it is a body that you can loot to find Marionette Soldier Ashes. Continue through the graveyard, but as you reach the doorway that leads into the next section, go left and you'll find a path that is lit with a torch. You'll see another Teardrop Scarab there, kill it to acquire the Ash of War: Spectral Lance.
Head through the doorway to enter the next section where you'll find a large rotating lift. By the entrance, turn right, hug the wall, and drop down to the path below. Walk along the narrow path and you'll see another group of Glintstone Zombies that are worshipping a large tombstone, kill the group and pick up the glowing item near the tombstone to find the Carian Knight Set. You can turn around, walk up a bit and then head left through a gap in the wall, bringing you back to the doorway you just walked through. Go back to the section where the large rotating lift is. The Schoolhouse Classroom Site of Grace is at the top of the lift if you need a site with easy access to the lift, but otherwise don't ride it yet. Instead, go straight where you'll see some maiden statues and a monolith at the center. Defeat the Slender Wayfarer that is guarding the monolith to acquire the Gravity Well sorcery and pick up the smithing stone on the monolith.
Next, ride the lift and head to the lower-most section where you'll encounter a Pendulum Statue enemy. Defeat it and make sure to loot the corpse here to find the Longtail Cat Talisman. In the Noarhwest, climb up pile of crystals and collect Lost Ashes of War. Go to east corner and ride the lift again and head to the top section, kill the enemies along the way and enter the next section where you can find the Schoolhouse Classroom site of grace. From the site, enter the hallway and go to the room on the left. There's a corpse that you can loot to find the Conspectus Scroll and a treasure chest containing the Glintstone Craftsman's Cookbook [5].
Don't leave the room yet, in front of the body you just looted, make sure to hit the door in front of it to reveal the illusory wall. Pillage the body on the right of the balcony to find a Smithing Stones and then jump off the balcony from the left side. Grab the materials there and jump up the rocks on the narrow sideway, along the way, before jumping down and returning to the Schoolhouse Classroom site, there's a body that can be looted to find the Olivinus Glintstone Crown. Now continue exploring the hallway.
Take note that the Raya Lucaria Sorcerers enemies have a chance to drop the Academy Glintstone Staff. At the other end of the hallway where you encountered the giant Living Jar, you'll find a chest containing x1 Ritual Pot. On the second floor that is guarded by more Raya Lucaria Sorcerers, make sure to check the balcony to find another corpse that can be pillaged to acquire Furlcalling Finger Remedy - head up the third floor. Before you enter through the mist wall, there is another reveal the illusory wall to the left. Go through a secret passage way and collect Comet and Stonesword Key from the room. Now climb up the stair and drop down into another hidden passage way which leads to Graven-School Talisman. Open up the door on the right which leads back to the room with giant Living Jar. Go back upstairs and if you are prepared, pass through the mist to fight Red Wolf of Radagon.
Defeating Red Wolf of Radagon rewards you with 14000 Runes and x1 Memory Stone, you'll also find the Debate Parlor Site of Grace in this arena. As you exit through the doorway, you'll enter the main courtyard of the institute. From the entrance, turn right and jump over the fence. Climb up the ladder and go through the broken glass window to reach the second floor of the Debate Parlor. Go to the left, and you'll find a body that you can pillage to find x5 Crystal Bud. Head to the opposite side on the right, and you'll find a treasure chest containing x1 Radagon Icon. Head back down and start exploring the courtyard section.
On the fountain, you can find x1 Stonesword Key. Make sure to go around the courtyard to find some materials. Head west of the courtyard and you'll see a glowing sapling that is guarded by three Noble Zombies. Kill the enemies and check the glowing sapling to find x1 Golden Seed on the ground. Also on the west, there's a Crystallized Crab hiding around the corner, by the bush, kill it to acquire x1 Karolos Glintstone Crown.
After clearing the west side of the courtyard, return to the center area where the fountain is and you'll see a slope of rubble on the right (facing the doorway leading back to the Debate Parlor, along the building). At the top, there are multiple enemies here such as more Raya Lucaria Sorcerers, Noble Zombies, and a different-looking zombie enemy called the Aristocrat. You'll see the Noble Zombies kneeling, the Aristocrat standing on the steps, two Sorcerers standing by the balcony fence at the top of the steps, while another sorcerer inside the room in front of the kneeling zombies. Kill all the enemies and go inside the small room to find a body that is hanging on the fence of the window balcony - the body contains x1 Glintstone Whetblade.
Now traverse the rooftops section of the academy. Make sure to check every corner and some platforms that you can jump on or can drop to find some materials. There's x1 Imbued Sword Key as well that can be looted off a body located on another towering building. Eventually, you'll end up finding a broken glass window that leads to the ceiling of the Church of the Cuckoo. Loot the body that's on the narrow beam and drop down until you land on the chandelier where you can take another Academy Glintstone Key from the corpse.
Jump down to the second floor and clear the area of Raya Lucarian Wardens and Raya Lucarian Sorcerers. Check the northwest side after killing the enemies to find a corpse that is sitting against a wall, you can pillage the body to find x1 Shattering Crystal. Head east, out the balcony, and check the right side by the corner of the scaffolding to find another Crystallized Crab, kill it to acquire the Twinsage Glintstone Crown. Also, there's another doorway here that is guarded by a single Page. Inside the room that is being guarded, you'll find the Azur's Glintstone Staff on the ground - after clearing the second floor, make sure to kick the ladder to unlock a shortcut to the Church of the Cuckoo site.
Go back to the courtyard and go east where you'll encounter the large iron ball trap. Make sure to loot the bodies on the stairs and the broken beam to find items such as x8 Crystal Dart, x1 Smithing Stone (5) and x1 Furlcalling Finger Remedy. As you enter the next section, you'll encounter a hostile enemy NPC, Moongrum, Carian Knight that's guarding the lift leading to the main boss of this legacy dungeon. Defeating Moongrum drops the Carian Knight's Shield. Before riding the lift, check the west side, by the gate, turn left and jump over the fence as you walk on the narrow beam of the wall. Climb up the ladder, defeat the Lesser Pumpkin Head and Raya Lucaria Sorcerers. There's a treasure chest that you can open to find x1 Glintstone Scarab - climb back down, open the closed door and ride the lift.
Beyond the large door is the Grand Library where you will fight Rennala, Queen of the Moon in two phases. Defeating her yields 40000 Runes and rewards you with x1 Remembrance of the Full Moon Queen and x1 Great Rune of the Unborn. Make sure to discover the site of grace here before leaving.
One of the items you've found in the academy is the Academy Glintstone Key. This is to be given to Thops who can be found at the Church of Irith. [Map Link]. Just make sure that you were able to buy everything that you need from him before or after giving him the key. Reload the area after delivering the key to spawn a Teardrop Scarab, which drops Ash of War: Thops's Barrier. After collecting the ash of war, travel to the Schoolhouse Classroom site of grace of the academy—then go outside and turn right, you'll find him sitting in a chair. You can loot his body to find x1 Thops's Bell Bearing, x1 Thops's Barrier, and x1 Academy Glintstone Staff.
Liurnia of the Lakes East
Level: 50~60 Upgrades: +4 ~ +6
- Get Kaiden Sellsword Ashes
- Get Shabriri Grape and Talk to Hyetta
- Get Cookbook & Staff
- Defeat Night's Cavalry
- Defeat Tibia Mariner
- Obtain Dragon Cult Prayerbook
- Visit Artist's Shack and Jarburg
- Visit Church of Vows
- Obtain Flask Upgrades from Minor Erdtree
- Unlock Bell Walking Mausoleum
- Get upgrades from Raya Lucaria Crystal Tunnel
- Visit Frenzied Flame Village
- Obtain powerful spells from Converted Fringe Tower
- Unlock Ainsel River Well
Elden Ring Map: Liurnia of the Lakes East Starting Point. We'll tackle this area from the bottom heading up, just to make it easier to navigate. Head southeast from the Liurnia Highway South site of grace and collect the Treespear weapon (found on the Caravan left at the edge of the collapsed bridge). From here head to Cliffbottom Catacombs (located east of the Liurnia Highway North grace, then follow the path south) to gather valuable upgrade materials Grave Glovewort (2) and Grave Glovewort (3) as well as the Kaiden Sellsword Ashes that is excellent for early game tanking. Slightly North-West from here, Purified Ruins has a Shabriri Grape and Hyetta's second location.
Head further north and stop by Highway Lookout Tower to obtain Carian Glintblade Staff and Glintstone Craftman's Cookbook (3), then return to the main road. You will encounter a group of undead fighting soldiers, and a giant Spirit Skeleton. You can fight them or run by, your destination is the Gate Town Bridge site of grace. Hyetta's third location is by the Site of Grace, but you won't find the next Shabriri Grape until a little later. Wait until night to fight a Night's Cavalry that drops the Ice Spear Ash of War.
Backtrack south to Liurnia Highway North and head further east up the slopes until you come to a Tibia Mariner boss, a valuable Deathroot, and can pick up Skeletal Bandit Ashes. Further north, defeat a patrolling knight to obtain the Dragon Cult Prayerbook. Beware of his lightning strikes! Further north from here, visit an Artist's Shack to obtain a Painting item: the "Resurrection" Painting and a Site of Grace. Loot a Smithing Stone (4) from a corpse East of the shack before heading to Jarburg south from here.
In order to get to Jarburg, go back to the tower north of where you fought the Tibia Mariner. Go to the edge of the cliff directly south of the tower and look down. You'll be able to see some stone platforms you can safely jump down to (for a more successful descend, jump down by foot instead of using Torrent). Head to the very bottom to reach Jarburg. Don't attack the Living Jars here, they're peaceful. Speak to Jar Bairn, the little jar sitting at the edge of a stone structure, to start his quest. Keep exhausting his dialogue and reloading the area until he talks about Alexander not returning to the village - that'll be his last piece of dialogue until the next part of his quest.
You must now go back to ground level to the Eastern Liurnia Lake Shore site of grace (if you didn't reach this grace yet, just head Northeast from the Academy Gate Town grace). Follow it East and then north to continue exploring this area. (To the south, Carian Study Hall cannot yet be completed as you are missing a key item you will obtain later from this NPC). The road north has two paths: One has a Golem that is guarding access to Ainsel River Well. We will go there later. Take the other path up the slopes and unlock the Eastern Tableland site of grace. The area to the south-west of the site of grace will have an Incantation (Flame, Cleanse Me!) and the enemies here have a chance to drop items from the Fire Monk Set. Stay the road and access the higher ground to arrive at the Church of Vows and meet Miriel, Pastor of Vows who can teach you both Incantations and Sorceries, receive Scrolls and Prayerbooks, and give you Lore information. This location is important because it allows you to cleanse your SIN (aggro'd NPCs) by using Celestial Dew and performing an "Absolution" at the altar. You will also find Gold Sewing Needle and Golden Tailoring Tools (key items for boss armor alteration)
Now follow the road east and north to unlock two minor Walking Mausoleums and visit the Minor Erdtree. Here you will fight the Erdtree Avatar, and can loot Lightning-Shrouding Cracked Tear, Holy-Shrouding Cracked Tear and Magic-Shrouding Cracked Tear. Once these are obtained, follow the road west until you hit the cliffside and find the gravestones that allow you to drop down to ground level. You should find the spirit spring that is alongside the cliffs of this area and time your jump so you land atop the big Bell Mausoleum to destroy the white skulls and unlock it. From here, go east toward the red spot marked on your map to find and complete Raya Lucaria Crystal Tunnel. Within the tunnel you will find Smithing-Stone Miner's Bell Bearing (1) as well as upgrade stones level 2 and 3.
Exit the tunnel and find your way up and north into Bellum Highway. Take the eastern side of the map and follow it north until it opens up. This will be your first encounter with the Madness effect. Stay out of sight of the "Eye of Sauron" you can see in the distance! Increase your Focus stat with equipment or use a Rune Arc and Godrick's Rune to make madness buildup slower. If you want to put an end to the madness, stick to the west side as you approach the slope toward the flames, and use the spiritspring to jump into Frenzy-Flaming Tower and defeat the rats and villagers within.
Unlock the nearby site of grace called Frenzied Flame Village Outskirts, then set south into Frenzied Flame Village: Pick up Frenzied's Cookbook (1) and the Shabriri's Woe talisman. Press on west and up the slopes and defeat a Teardrop Scarab for the incantation Frenzied Burst and head further north-west toward the Church of Inhibition. On the way, you'll get invaded by Festering Fingerprint Vyke, who'll drop the Fingerprint Grape upon defeat. This is used for Hyetta's questline so make a note of it.
Head into the Church of Inhibition to get the Finger Maiden Set. On the same body you get the armor set from, you can dye the Lord of Blood's Favor with blood. Whenever next convenient, you can return to Varre and exhaust his dialogue to receive a Bloody Finger and the Pureblood Knight's Medal (don't use this item yet, the place it teleports you to is tough and should be done later).
Return to the Frenzied Flame Village Outskirts Site of Grace, and travel further east from it, going around the edge (you'll encounter a Glintstone Troll) leading to the Converted Fringe Tower. Equip any Glintstone Crown helm, stand in front of the seal, and perform the Erudition Gesture to break the seal. Make your way to the top of the tower to loot Cannon of Haima and Gavel of Haima sorceries.
Go back down the tower and move over to the cliff nearby west of here. You'll see some platforms that you can use to get down. Do this to access Black Knife Catacombs guarded by a Phantom Knight with a death-enchanted blade. Inside, you'll get Grave Glovewort (2), (3) and (4), a Deathroot, as well as Twinsage Sorcerer Ashes. Fight the Black Knife Assassin in these catacombs to get the Black Knifeprint. Give this item to Rogier at the Roundtable Hold, exhaust his dialogue, then reload the area and exhaust his dialogue again. You can then speak to Fia if she's still at the hold to receive a Sacrificial Twig.
If for any reason you skipped this step earlier: Travel back to the Main Academy Gate Site of Grace and head north past the seal. You'll find an invasion sign from Yura asking for assistance. Defeat the target, then exhaust Yura's dialogue when you return to your world. Go back to examine the seal you ran past. It'll teleport you to the East Raya Lucaria Gate Site of Grace. After you rest at it, Boc will appear next to it. We'll hold off giving him the Gold Sewing Needle and Golden Tailoring Tools until he's reached his final location to make sure his quest doesn't inadvertently end. Exhaust his other dialogue, then you can speak to Melina at the Site of Grace to talk about him. Head north to find Bellum Church, where you'll find a Sacred Tear.
Go back to Eastern Liurnia Lake Shore site of grace and find the previous road north with the two divergent paths. The one we want has a golem and is guarding access to Ainsel River Well. To find it, just follow the road east from the grace site and then north until you find a golem. Defeat it and enter Ainsel River.
Ainsel River (Underground)
Level: 50~60 Upgrades: +4 ~ +6
- Collect Upgrade Materials
- Find Nomadic Merchant
- Collect Immunizing Horn Charm
- Defeat Dragonkin Soldier of Nokstella
- Loot Boss Room
Elden Ring Map: Ainsel River Starting Point. This is a pretty easy area to tackle even earlier on, however it makes sense to visit it now because it follows a "natural" path from Liurnia East. You will be able to loot several Smithing Stone (3) here that allow you to upgrade your weapons to +9, making Liurnia West easier. Head left from the Site of Grace and defeat the many Ants you'll encounter until you arrive at an open area with many Clayman humanoid enemies. Here, loot several Upgrade Materials and then you should take a non-obvious path to the RIGHT of the wall blocking your progress, as this will enable you to hide from the lazer-beam bug that would terrorize other approach. Use this right path and the broken pillars to quickly make your way across and get BEHIND the giant monster (Malformed Star). From here you'll be able to tackle it much easier and not be overwhelmed by other enemies. It will not respawn once defeated.
Loot Map (Ainsel River) and talk to the Nomadic Merchant to check out his shop. There's a curved sword (Wing of Astel) that can be looted from a chest in the upper area if you want to explore around (This upper area can only be accessed later during Ranni's sidequest). Once you've gathered materials take the path downstream and confront several more giant ants and basilisks, then get the Immunizing Horn Charm. Keep following the river until you arrive at a boss room where you can fight the Great Enemy: Dragonkin Soldier of Nokstella and get the Frozen Lightning Spear incantation. There's nothing else that can be done in this zone right now so we'll head back up to Liurnia of the Lakes and explore its western shores.
Liurnia of the Lakes West
Level: 60~70 Upgrades: +8 ~ +12
- Begin Exploration from South to North
- Find Village of the Albinaurics
- Talk to Nepheli Loux
- Loot Secret Medallion Key
- Talk to Latenna
- Complete Optional Objectives
- Loot Flask Upgrades
- Visit The Four Belfries
- Obtain Map Fragment
- Talk to Smithing Master Iji
- Complete Caria Manor
- Meet Ranni and her allies
Elden Ring Map: Liurnia of the Lakes West Starting Point. Begin Exploration by accessing the Site of Grace: Folly on the Lake (Map coordinates here). Ride Torrent to avoid being poisoned and explore the cavernous swamp. From the Site of Grace, head south and then hug the wall and keep going north. Eventually, you will notice a road heading up into a town - this is Village of the Albinaurics and has a VERY important item you don't want to miss. As you make your way up the slope, you can talk to Nepheli Loux to progress her quest. If she dies for any reason, there will be 2x Stormhawk Axe in her location. Ahead from here, you can loot 1x Larval Tear from a coffin, and you'll come to a well and an NPC ghost that talks about Albus. Activate the site of grace and put the well to your back and go forward and left up a slope toward the Perfumer enemy. Past the perfumer, there's a suspicious POT. Hit the pot and it will transform into Albus, who gives you the Haligtree Secret Medallion (Right). This item is ESSENTIAL to access a later area of the game, but it can also be used to advance Latenna's quest. Travel to Slumbering Wolf's Shack and talk to her, show her the medallion and agree to help her to progress her questline.
Return to Village of the Albinaurics to loot other interesting items in the area: there is a Crystal Sword across the rackety wooden bridge. If you go across the other stone bridge and past the Teardrop Scarab, you can fight field boss Omenkiller and obtain the Crucible Knot Talisman. After defeating the boss at the village, Nepheli has new dialogue for you at the Roundtable Hold as well. Exhaust her dialogue, speak to Gideon about her, then return to her and exhaust her dialogue one more time. There are more items to be gathered here and in the swamp, so take a moment and look at the Interactive Map for details.
If you return to the Roundtable Hold, you'll get invaded by Ensha. Defeat them to receive the Clinging Bone then reload the area and head to Gideon's room. You'll find the Royal Remains Set and if you speak to Gideon about Ensha, he'll give you some tips about finding the second half of the Haligtree Secret Medallion.
Go back to the Folly on the Lake site of grace and this time head west and north. You will eventually come to the entrance to Converted Tower, perform the ERUDITION Gesture to loot a Memory Stone. From here you should follow the road north toward the Minor Erdtree, defeat the Erdtree Avatar and loot Flask Upgrades: Cerulean Crystal Tear and Ruptured Crystal Tear.
Return to the Converted Tower site grace and head down the ravine (northeast) and then stay to the left, hugging the Minor Erdtree cliff, to find the Road's End Catacombs. You will see some jellyfish and belfry bats on the path leading to the catacombs. You will find some Spirit Ashes and Upgrade Materials in the catacombs. Further north, Revenger's Shack will have an invasion by Edgar the Revenger if you completed Irina's quest in Weeping Peninsula. He drops Shabriri Grape and Banished Knight's Halberd (+8). You should now make sure to give the Shabriri Grape to Hyetta at the Gate Town Bridge Site of Grace. Reload the area and exhaust her dialogue afterwards so she'll move to Bellum Church. You should travel to Bellum Church, and give her the Fingerprint Grape from earlier and exhaust her dialogue again to progress her quest.
Return to Western Liurnia now and proceed north from Revenger's Shack to challenge the Cuckoo's Evergaol for the Greatblade Phalanx Sorcery. Keep following the road north and then take right to go up to The Four Belfries. Loot the Imbued Sword Key at the top and activate the site of grace. You can explore this destinations to get a sneak peak of later areas in the game. It's possible to range the enemies you come across, and also you get to take revenge vs the Grafted Scion that defeated you in the tutorial in the Chapel of Anticipation. In the same chapel, you'll find The Stormhawk King at the top of the chapel. You can return to the Roundtable Hold now and give them to Nepheli to progress her quest, or wait a little until you've met Seluvis to keep his quest options open.
Once back at The Four Belfries, take the lower road north and loot the caravan for the Carian Knight's Sword. Further ahead you can loot Map (Liurnia, West) and proceed through Kingsrealm Ruins. Hit the Illusory Wall at the end of the road to reveal the Road to the Manor Site of Grace and then talk to Smithing Master Iji. He can upgrade your weapons and sells valuable materials. If you summoned Blaidd at the Forlorn Hound Evergaol, you can mention it to him and he'll sell you the Carian Filigreed Crest. The road north leads to a small Legacy Dungeon called Caria Manor. Unlock the site of grace at the entrance, go into the Gardens and hug the right wall and loot Glintstone Craftsman's Cookbook (6). There will be magic traps that attack you constantly, so keep on the move!
Caria Manor is a large location so please see the Caria Manor page for a walkthrough of the area. There's a Golden Seed and NPC merchant Pidia, Carian Servant. Mages will absolutely want to defeat the boss Royal Knight Loretta to obtain the Loretta's Greatbow sorcery.
Once through the manor, you will come to an area guarded by Glintstone Dragon Adula. You don't have to defeat this dragon. This area has 3 towers called "Rises". Only one of them is accessible at the moment: Ranni's Rise, which you can find to the west.
Go all the way to the top and talk to Ranni the Witch to begin her questline: The Hidden Treasure of Nokron. If you've progressed Rogier's quest at this point, you'll be given to option to tell her about his findings. Exhaust her dialogue, return to Rogier to exhaust his dialogue, then come back to Ranni to enter into her service. Return to Rogier and exhaust his dialogue, then reload the area to check up on him. After some time has passed, return to him to receive the Spellblade Set, Rogier's Bell Bearing, and Rogier's Letter.
Return to Ranni at Ranni's Rise and speak to her. Agree to her request to find the hidden treasure of Nokron and she asks that you speak with three people in her service: War Counselor Iji, Blaidd and Seluvis. These three will then appear in spectral form on the first floor of her tower. After you talk to everyone, talk to her again to be able to leave this destination.
BE WARNED: If you follow Preceptor Seluvis' questline, you will betray Ranni and fail* her quest. You can do it all the way up to the final step without consequence towards Ranni's questline, but if you follow through, you will have to perform an absolution at the Church of Vows to pick her quest back up. To start his quest, speak to his at Seluvis's Rise and he'll hand over Seluvis's Potion. Three different people can be given this potion - Nepheli, Gideon, and Dung Eater.
Who you give the potion to will not affect Seluvis' response when you return to him later. At this point in the guide, both Nepheli (if not yet given The Stormhawk King) and Gideon are in the right stage to be given the potion. Dung Eater can only be given the potion when you've progressed his quest to just before the end. If you give the potion to either Nepheli or Dung Eater, their quests end immediately and you won't be able to get their rewards.
In between Ranni's Rise and Renna's Rise, you'll see a ruined building and a set of stairs that go down hidden by an illusory floor. Look around and find the illusory wall in the area. Return to Seluvis, exhaust his dialogue, buy a puppet from him, then exhaust his dialogue again.
At the upper level of Seluvis' tower there is a chest with a memory stone that you can loot.
From now this walkthrough will guide you to complete Ranni's quest. Blaidd will be waiting in the Siofra River area, and will reveal that he suspects that Seluvis knows more than he lets on. Seluvis will inform you that Sorceress Sellen has some information, and provide you with Seluvis's Introduction. Sorceress Sellen then informs the player that Starscourge Radahn stopped the stars, and that defeating him is the key to Nokron's secrets.
Therefore the first step is to visit Siofra and complete it.
Siofra River (Underground)
- Obtain Map Fragment
- Light the Fire Pillars
- Collect Spells & Talismans
- Collect Key Items
- Defeat Dragonkin Soldier
- Obtain Golden Seed
- Unlock Deep Siofra Well
- Defeat Ancestor Spirit
Elden Ring Map: Siofra River Starting Point. Head to Mistwood and go down Siofra River Well - unlock the Site of Grace here if you haven't. This area is filled with Ancestral Follower enemies that are generally best to take at a distance, but be VERY mindful of their incredibly powerful arrows. The area has lots of useful materials for weapons level 10+, so check out the interactive map for exact loot locations. You should make sure to pick up the Armorer's Cookbook (6) and the Map (Siofra River) before exploring further.
You will find Blaidd standing on the cliff edge northeast of Hallowhorn Grounds, you can talk to him to advance his quest. After you've spoken to Seluvis and then Sellen and learnt about Radahn's involvement with Ranni's fate, you can return to him to tell him about it.
This area has a mechanic to summon a special boss: you must light altars scattered around the zone. There's a map for their location in the Siofra River page. You should then proceed to locate and activate the pillars in the area:
- First Pillar is by the site of grace Siofra River Bank. [Map Link]
- Second Pillar is in a corner west from the first pillar. [Map Link]
- Third Pillar is in a small island in the watery area with the lightning whisps. [Map Link]
- Fourth Pillar is by a cliff on the eastern area of the map. [Map Link]
- Fifth Pillar is just south from Worshipper's Woods site of grace. [Map Link]
- Sixth Pillar is west from Worshipper's Woods site of grace. [Map Link]
- Seventh Pillar is to the right on the path toward "Below the Well" site of grace. [Map Link]
- Eight Pillar is on the left on the path toward "Below the Well" site of grace. [Map Link]
Once you have lit all pillars you can challenge the Ancestor Spirit boss fight.
As you explore, you can also take a gateway (see on map) to access the Dragonkin Soldier boss fight. The gateway is on top of ruins, which will require some jumping. This Great Enemy drops the Dragon Halberd, and players can loot the Marika's Scarseal talisman from nearby. Dropping down from here and going north will also bring you to a Golden Seed and the "Below the Well" site of grace.
Caelid (South)
Level: 60+ Upgrades: +10 ~ +12
- Complete Smoldering Church
- Obtain Flask & Spirit Upgrades
- Get Golden Scarab talisman
- Find Iron Fist Alexander
- Clear Fort Gael
- Obtain Map Fragments
- Unlock Zone Merchants
- Defeat Dragon, Deathbird & Night's Cavalry
- Loot Sellia Crystal Tunnels
- Meet Gowry and Millicent
- Complete Sellia, Town of Sorcery
- Complete Redmane Castle
- Defeat Starscourge Radahn
- Complete War-Dead Catacombs
- Head to Altus Plateau (optional)
Elden Ring Map: Caelid Starting Point. Exploring Caelid can be a challenging task for players. The western area is quite easy at this point, but the east area is tough and the north (Dragonbarrow) is best tackled later on. Many players may prefer to take the path North from Liurnia of the Lakes and through the Ruin-Strewn Precipice to explore the Altus Plateau first (especially if you want to access the Sealed Tunnel as early as possible for the Smithing-Stone Miner's Bell Bearing [2] to freely upgrade any normal weapons up to +12, which you would need to tackle both at Altus Plateau and Caelid). You can even go to Mt Gelmir before coming to Caelid. The reason this walkthrough opts to visit Caelid first is because there is little of consequence in Altus for the story, some NPC questlines start in Caelid, you find the Dectus Medallion (Right) in Caelid which leads Altus Plateau being a natural progression point after Caelid, and Mt. Gelmir is intended as higher level (upgrades there are +15-20 and +6-8 while Caelid is +10-14 and +4-5).
If you decide to tackle Caelid, then continue reading from here. If you want to do Altus, then scroll down to it using this handy click. We will include a way to return to this point from the end of Altus as well.
To get into Caelid, you can start from the Summonwater Village Outskirts site of grace and head Northeast past the Summonwater Village and follow the path until you get to the Rotview Balcony site of grace. There are some items in the buildings around the site of grace with some surprise attacks waiting when you grab them. Kill the monsters, loot the items, and head northwest to the Smoldering Church.
Your first objective as you enter is to complete Smoldering Church. There's an NPC invasion here by Anastasia, Tarnished-Eater who drops a talisman, but the church also has 2 cookbooks that you want: Nomadic Warrior's Cookbook (14) and Missionary's Cookbook (3). From here you will want to activate the site of grace at the Shack of the Rotting to make sure you have an easy respawn if things go badly.
Follow the road forward from the Smoldering Church and you will come to the Minor Erdtree of the area. Defeat the Putrid Avatar and get Flame-Shrouding Cracked Tear and Greenburst Crystal Tear. You can then opt to explore the nearby Minor Erdtree Catacombs, you can loot Grave Glovewort (5) and the Mad Pumpkin Head Spirit Ashes from a duo boss within. After this continue following the road and you can loot the Greatsword from the travelling wagon. Ahead there are some ruins with a duo of Pumpkin Head mini-bosses that let you loot the Visage Shield.
Grab the Smoldering Wall site of grace near the telescope icon on the map. Travel east from the telescope icon and head towards the canyon. Look for exposed tree roots to jump onto and cross the canyon to the Abandoned Cave. Make sure to use gear with Immunity to fight against the pools of Scarlet Rot, and have some Preserving Boluses at hand! The Cleanrot Knight boss duo within can be challenging, but they drop the Gold Scarab talisman that can make rune farming a lot faster. There's also the Serpent Bow and Venomous Fang claw weapon to loot here.
Return to the Smoldering Wall site of grace just south of the telescope icon. To the west of this location, back toward Limgrave but on the lower level, you can find Gael Tunnel and challenge the Magma Wyrm to get 1 Dragon Heart and Moonveil (the Katana all PvPers love!). Explore thoroughly and find rear Gael Tunnel entrance to trigger your second encounter with Alexander. There are several upgrade materials to be looted in and out of the tunnel so make sure to check the Elden Ring Map. You can also kill an invisible Teardrop Scarab near the tunnel's exit to loot Ash of War: Flame of the Redmanes. NOTE: The invisible Teardrop Scarab that offers Flame of Redmanes can be found just northeast of the Fort Gael North site of grace. Listen for a tinkling bell sound, and then a trail of sparkles on the ground running around in circles. Get in the path of the circle and time your attack correctly to hit it and get its Ash of War.
Further south from here you will be able to explore Fort Gael. There's Starscourge Heirloom, a Katar and Ash of War: Lion's Claw inside the fort building. At the top of the fort building, there is a gateway leading to a location east of the Impassable Greatbridge site of grace in South Eastern Caelid near Redmane Castle. Don't take it right now if you want to continue exploring naturally, but you can progress this way if you want to. Behind the building, there are two flame thrower vehicles and between them there's a body on which you can find the Flame, Grant Me Strength incantation.
Find Gaol Cave to the northeast in the canyon and unlock it with Stonesword Keys. Within you will find some upgrade materials, a shield, and a Frenzied Duelist boss that drops Putrid Corpse Ashes. The rear entrance of the cave allows you to drop down to an item that's technically in Limgrave: Regalia of Echoid (Straight Sword).
Make your way southeast, and loot the Meteoric Ore Blade in Caelid Waypoint Ruins. Go back to the road and follow it south to the Caelid Highway South site of grace. Just south of the site of grace is a dragon with Scarlet Rot breath named Decaying Ekzykes. Killing him is optional, but provides another Dragon Heart and makes a Scarlet Rot breath incantation, Ekzykes's Decay, available at the Churches of Dragon Communion. Further along the road, find the area's Map. Near the map site, you will find a merchant here that sells Stonesword Key and Nomadic Warrior's Cookbook (15). The Southern Aonia Swampbank site of grace is just Northeast of the merchant. Visiting this location at night will let you challenge the Night's Cavalry of the area and obtain his drop: Ash of War: Poison Moth Flight. Slightly east from here, a Death Rite Bird also spawns at night, and drops the Death's Poker greatsword.
Explore the road South from the fork by the merchant and loot a Golden Seed, then go westward to find the Cathedral of Dragon Communion, that allows you to buy special Dragon Incantations based on the dragons that you have defeated. Loot the Ancient Dragon Apostle's Cookbook (3) before leaving. Explore nearby to find the Caelid Catacombs, which is directly east near the road following the cliffs nearby, then following a right U-turn heading west, past which you'll encounter a Teardrop Scarab holding a Somber Smithing Stone [4]. Inside the Caelid Catacombs there's an illusory wall that hides Miranda Ashes, and the Kindred of Rot ashes can also be obtained within, alongside upgrade materials.
You can now opt to follow the road south and east to visit and complete Redmane Castle, or go north toward the swamp and explore Sellia.
To complete exploration, start the swamp from the Astray from Caelid Highway North site of grace that is just south of the Telescope icon on your map. There's a teardrop scarab that drops Ash of War: Lifesteal Fist, and a merchant with some uninteresting consumables. Go into the swamp and slightly north to find several useful items, including the Meteorite Staff and the spell Rock Sling, in the Street of Sages Ruins. The very north of the swamp has Sellia Crystal Tunnel - you may have been teleported here earlier by the trap chest in Dragon-Burnt Ruins. Get your revenge on the enemies within and defeat the Fallingstar Beast to get Somberstone Miner's Bell Bearing (1) and unlock Somberstone purchases at the Roundtable Hold.
To the east of the Swamp is Sellia, Town of Sorcery. This is an important location with many items to pick up. Notably, you will meet Gowry at his shack just north of Sellia Gateway, who will task you with defeating Commander O'Neil in the swamp to obtain the Unalloyed Gold Needle. Commander O'Neil can be found in a large clearing within Aeonia Swamp in eastern Caelid. Players can easily reach his arena by traveling southwest from Sellia, Town of Sorcery (a further up north), looking for a large group of trees in a circular formation and jumping over the mutated growths with Torrent.
After you defeat Commander O'Neil, return the Unalloyed Gold Needle to Gowry so he can repair it. Reload the area and talk to him again to get the repaired Unalloyed Gold Needle. Next we should visit Church of the Plague to meet Millicent., however we must first make a little progress inside Sellia, Town of Sorcery before we can reach the church.
Read the Sellia, Town of Sorcery page for a proper walkthrough of the area. There is useful loot in there but of particular note is a Golden Seed and Imbued Sword Key.
After finishing Sellia, Town of Sorcery, you can take the path north, up the stairs and up the mountain, to the Church of the Plague and talk to Millicent and hand over the Unalloyed Gold Needle to her. Be sure to loot the Sacred Tear in the church. Reload the area and speak to her to obtain the Prosthesis-Wearer Heirloom.
Return to Gowry's Shack to find Millicent again. Don't forget to exhaust her dialogue to move her to Altus Plateau for later.
It is now time to take on Redmane Castle. See the Redmane Castle page for information on how to navigate and loot it, and challenge Starscourge Radahn to progress the game. Be sure to speak to Iron Fist Alexander and Blaidd before fighting Radahn.
(Note: After defeating the duo bosses at Redmane Castle, if the Old Geezer has a dialogue loop where he mentions that he "no use for you yet", assuming you've accepted Ranni's quest earlier in the walkthrough, go speak to Iji at the Road To The Manor grace, nearby Caria Manor. He should talk about the Festival. Exhaust his dialogue, and fast travel back to Redmane Castle Plaza grace, where all the NPCs now should have gathered at the Plaza. Now you can challenge Starscourge Radahn. Good luck!)
After you defeat him, you can talk to Iron Fist Alexander and Blaidd near the site of grace. You can now explore the War-Dead Catacombs to the north of the arena (you may want to leave them for later as they are quite challenging maybe level 80+).
Note: If you want to save Nokron Eternal City, Liurnia of the Lakes (West), Nokstella Eternal City / Lake of Rot, and the Deeproot Depths for later and instead tackle Atlus Plateau, you may do so since it will be level-appropriate for your character, and there's no consequence for it. Otherwise, continue reading from here.
Nokron, Eternal City & Siofra Aqueduct
Level: 70+ Upgrades: +15 ~ +20
- Access Nokron from Mistwood
- Loot Ghost-Glovewort Picker's Bell Bearing (1)
- Obtain Larval Tears
- Defat Mimic Tear
- Get to Night's Sacred Ground
- Loot Black Whetblade, Celestial Dew
- Obtain Fingerslayer Blade
- Collect Ancestral Infant's Head
- Defeat Regal Ancestor Spirit
- Enter Siofra Aqueduct
- Collect Missionary's Cookbook (5)
- Trade Twinned Set for Gesture
- Defeat Valiant Gargoyle & Valiant Gargoyle (Twinblade)
Elden Ring Map: Nokron Starting Point. With Starscourge Radahn defeated, a new region underground is now accessible. If you go back to Iji, he has some dialogue about Blaidd. Head back to Mistwood and south-east of the Mistwood Ruins, Blaidd has left a message near the edge of the newly formed crater. These next few steps are completely optional. Head back to Forlorn Hound Evergaol to find Blaidd. After you choose to let him out or keep him in there, you can head back to Iji to talk about it.
When you're done with that, teleport back to Mistwood and make your way south until you find a huge crater in the area west of Fort Haight. Descend down the crater using platforms found in its the eastern side and eventually you'll arrive at Nokron, Eternal City. On the way, make sure to keep an eye out for corpses that have a Golden Rune [5] and two Soporific Grease on them.
At this point you're just in the outskirts of Nokron. This Eternal City shares a map fragment with Siofra River, so navigating this area may get confusing; even opening your map right now shows you're outside of the map. From here though, getting to the main part of the city is pretty straightforward. Carefully, navigate the jumps downward while on Torrent and eventually head through a tunnel that initiates a no horse zone.
Up past the tunnel there is a plank way and then a pillar top that you can jump on. To the right, you will notice an item on the roof, but the jump is just a little too far. You may even see a white spirit appear to make the jump. However, if you try the jump, you will likely fall. An option is to wield the Winged Scythe that you found in the Tombsward Ruins and use its special attack to make the jump across the gap, make another special attack jump to get across a second gap to get to the rooftop, and eventually pick up the item which is a Ghostflame Torch.
Now, jump down and get the Rune Arc off a corpse laying up on the roof. Head north scaling up the building, and go through one of the windows on the side of the standing building that opens into a cavern. Before dropping down to where the Fallen Hawks Soldiers are, make sure to loot the corpses on this ledge for a Furlcalling Finger Remedy and a Smithing Stone [5]. After clearing out the enemies and collecting the Ghost Glovewort [3], head through the doorway to the north to interact with the Nokron, Eternal City Site of Grace and you will now emerge into the heart of the city.
Right ahead, lying on the steps of a gazebo is a corpse that has the Ghost-Glovewort Picker's Bell Bearing [1] on them. There are corpses strewn around that have various levels of Smithing Stones and Somber Smithing Stones on them, as well as Ghost Gloveworts that you can collect. If you head east, next to the stairs going down, you'll find a small graveyard where you can collect the Greatshield Soldier Ashes, and two Ghost Glovewort [3]. In the building opposite to this graveyard, you'll find a corpse inside with a Larval Tear guarded by two Fallen Hawks Soldiers.
When you're done collecting items in this area, descend down the stairs going eastward and turn right at the corner. You'll be able to see a fog door in the distance. Head towards it, looting the corpses on the way for another Larval Tear, a Ghost Glovewort [3], and a Golden Rune [7]. At the bottom of the crumbling steps turn around for a Rune Arc on a dead body. When you're ready to face the boss, transverse through the mist.
You'll find yourself in a large temple ruin with no boss to be seen. Approach the center of the arena and the slime puddle will reveal itself to be the Mimic Tear, transforming into your character. Defeat it for the Silver Tear Mask, two Larval Tears, and to be able to progress further into Nokron, Eternal City.
Upon exiting the arena, cross the bridge and as soon as it's safe to, turn left and get off the bridge. Walk westwards until you reach the Ancestral Woods Site of Grace. Facing south-west, jump down to the roof of the building. Don't worry about collecting items in the north-east yet, we'll be back here later. Jump down to the next building's ledge and turn right, then jump down to the corpse hanging over the banister. You've reached Night's Sacred Ground, but the safe way down might not be too obvious yet. Continue following the edge of this building and you'll find another Rune Arc on a corpse at the top of the large stairs to your right. Turn back around and jump down to the next building where there's two Silver Tears hanging out. Head east after defeating them, following the building's edge, then walk across the wall ruin to reach the open windows on the other side.
You should now find yourself in the main temple of Night's Sacred Ground. On the corpse slumped in front of the altar, you'll find the Black Whetblade. Head through the hallway to the east and you'll find an imp statue next to a door that has to be unlocked with a Stonesword Key. Within, you'll find a Swordstress, a chest containing the Mimic Tear Ashes, and a Smithing Stone [3]. Head back through the hallway and head down to the bottom floor of the temple. The large silver ball is actually a Silver Tear in disguise, and it drops a Larval Tear upon defeat. You'll be finding a few more of these disguised Silver Tears in Nokstella, Eternal City if you're looking for more of these drops. Head out the entrance of the temple and descend the stairs to find a Site of Grace to your left.
After you've rested, continue northeast up the road, defeating enemies and pillaging corpses for loot, including a Celestial Dew, along the way. It should be noted that the Silver Tear right at the base of the stairs transforms into a Troll. At the top of the stairs and underneath the massive skeleton on it's throne, you'll find a chest containing the Hidden Treasure of Nokron, the Fingerslayer Blade, as well as a Great Ghost Glovewort. The waygate next to this giant statue will take you back up to the Ancestral Woods Site of Grace.
Feel free to explore this hilly part of Nokron and it's ruins to collect valuable items such as a Clarifying Horn Charm (+1), Mottled Necklace (+1), Celestial Dew, and the Ash of War: Enchanted Shot. While you explore, you may have noticed that there's another Hallowhorn Grounds here with unlit obelisks, like that in Siofra River. The altars you need to activate can be found in the following places:
- First Pillar is by the cliff's edge, next to the broken bridge you took to get here. [Map Link]
- Second Pillar is by the side of the brick road. [Map Link]
- Third Pillar is up on the ledge next to the brick road with an Ancestral Follower singing by it. [Map Link]
- Fouth Pillar is found by a large rock. [Map Link]
- Fifth Pillar is by the cliff's edge, next to a submerged ruins and guarded by some Giant Rats and chanting Ancestral Followers. [Map Link]
- Sixth Pillar is behind a deer carcass in a ruin right beside the Hallowhorn Grounds. [Map Link]
When you get to the Fifth Pillar, it may be worth taking a detour to the submerged ruins down in the water. You'll find a Ghost Glovewort (5), and the Ancestral Infant's Head in a chest at the far end of the ruins. Once all six altars are lit, head back to Hallowhorn Grounds to challenge the Regal Ancestor Spirit and obtain the Remembrance of the Regal Ancestor.
Now, head over to the cliff behind the Hallowhorn Grounds where there's a bunch of spirit jellyfish. If you look down, there's a small ledge you can jump to. To your right is a corpse with a Stonesword Key on it, and to your left a cavern with the Aqueduct-Facing Cliffs Site of Grace. Follow the path further down to the end of the cave and look down to see a support structure you can jump down to.
This long structure is the Siofra Aqueduct. There are some branching platforms on the outer walls of the aqueduct with valuable items such as the Order Healing spell, a Rune Arc, and Missionary's Cookbook (5). You'll also find an NPC sitting on the outer section of the aqueduct who gives you the Inner Order Gesture in exchange for the Twinned Armor Set.
Navigate your way to the lowest level of the Siofra Aqueduct, and exit the structure to emerge into a cavern at the base of a large waterfall. As you approach it, the Valiant Gargoyle will jump down from the ceiling, and after taking him to about half health, the Valiant Gargoyle (Twinblade) jumps down to join him in the fight. Defeat them both and you'll be rewarded with the Gargoyle's Greatsword and Gargoyle's Twinblade. The Great Waterfall Basin Site of Grace will be accessible after this boss fight. Resting in the coffin north of the site of grace will deliver you to the secret area of Deeproot Depths, in which you can progress Fia's quest. But first visit Ranni to obtain the Cursemark of Death.
Liurnia of the Lakes West
Level: 70+ Upgrades: +15 ~ +20
- Get Reward from Ranni
- Access Carian Study Hall Hidden Area
- Obtain the Cursemark of Death
- Help Iron Fist Alexander.
You're going to be finishing up the underground areas next. But before that, return to Ranni's Rise to hand over the Fingerslayer Blade Ranni asked you to retrieve.
[ ! ] Please Note: If you want to do Seluvis' questline, Or if you want to give his potion to Dung Eater, you should hold off on delivering the Fingerslayer Blade until this is completed. You should also be aware that a choice must be made at the end of Seluvis' questline and you'll be given the option to betray an associated character. Nothing will be gained from this attempted betrayal and you'll antagonize that character, but absolution can be found at the Church of Vows.
You'll have to seek absolution or not do the final step if you wish to continue Ranni's quest after doing Seluvis's. Since nothing can be gained from the betrayal, it is reccomended to avoid it.
Give the treasure of Nokron (the blade) to Ranni and she'll reward you with the Carian Inverted Statue, which when reading the description tells you to head to the Carian Study Hall (big tower in Central Eastern Liurnia, near Jarburg). You may recall a tall globe just by the entrance of the study hall. Interact with the pedestal just in front of it to place the Carian Inverted Statue and a cutscene will play.
Note: If you have not visited the Carian Study Hall before this point, you may wish to explore it before interacting with the pedestal and using the inverted statue. This gives you the opportunity to get some loot, and you can also snipe some fingercreepers on ledges so that you won't have to fight them later.
Head to the elevator shaft and enter the secret area through the small window. Right off the bat, Preceptor Miriam will start attacking you. Fight back with ranged attacks or close the distance by turning right and heading down the side of the walls. After you've defeated her and taken her loot, you can find a Mask of Confidence on a corpse on the left side of the room, opposite to where you came down from. Continue heading down by jumping down platforms and beams until you reach a button on a platform in the middle of the room.
The platform takes you down to a bridge, with the Liurnia Tower Bridge site of grace at the beginning, guarded by a large enemy. Whether you choose to defeat it or simply run away from it, crossing the bridge takes you to the Divine Tower of Liurnia. Following the ladders and stairs up to the top will take you to a body that can be looted for a Stargazer Heirloom and a Cursemark of Death, a key item for Fia's quest.
Finishing this step in Ranni's questline unlocks other collectible items. Ranni herself disappears from her tower and speaking to Iji gives you insights on where she's gone. If you head to Seluvis's Rise, you will find that you now have access to Seluvis' armor set, the Preceptor's Set, and other items related to him, and you can find Ranni's armor set, the Snow Witch Set, in a chest up the ladder in Renna's Rise. If you head back to Pidia in Caria Manor, you can witness an interesting scene and pick up Pidia's Bell Bearing & Dolores the Sleeping Arrow Puppet.
While you are in Liurnia, make sure to explore the area in the East where you found the Tibia Mariner just south from the Carian Study Hall and meet Iron Fist Alexander. Use an Oil Pot to free him. (See it on the map). Note that if you found Alexander in Mt. Gelmir where the Magma Wyrm is prior to seeing him near the Jarburg village, this part of his quest will be skipped, but will still proceed as normal.
From here, we will visit Deeproot Depths to advance Fia's questline.
Deeproot Depths
Level: 70+ Upgrades: +15 ~ +20
- Defeat Erdtree Avatar
- Loot Upgrade Materials
- Talk to Palm Reader
- Obtain Area Map
- Activate Walking Mausoleum
- Defeat Crucible Knight Siluria
- Defeat Fia's Champions
- Talk to Fia
- Defeat Lichdragon Fortissax
Elden Ring Map: Deeproot Depths Starting Point. This is a special location only accessible by teleporting in from the coffin in Siofra Aqueduct, so it's easy to miss. The area is important to progress Fia's questline, and gives the player a chance to align with a specific faction for the Endings. The area offers Smithing Stone (4) to (6) and Ghost Glovewort (4) to (6), so you should have your upgrades over 15 or +6 for special.
You will spawn in a watery area in the underground beneath Lyndell. This is Great Waterfall Crest. Nearby, defeat an Erdtree Avatar enemy and loot Staff of the Avatar and Ash of War: Golden Land. From here, cross the ravine to the west by carefully following the roots. Following one of the roots towards the northwest leads into a cave with a large amount of ants and the Elden Stars incantation at the end. Cross the ravine afterwards and head past the square with the flying ants to meet the Palm Reader near the Deeproot Depths site of grace for some lore of this location.
Navigate the roots north toward the flooded ruins, past what seems like an army of Basilisks, until you find a gazebo with a corpse that holds Map (Deeproot Depths). The building nearby has Ash of War: Vacuum Slice within it. From here, you will want to ignore most enemies and travel northwest to "The Nameless Eternal City" site of grace. A coffin nearby teleports you to Ainsel River main, but your objective is to get to the Walking Mausoleum roaming nearby and deactivate it, as it will de-spawn all the Mausoleum Knight and Mausoleum Soldier enemies.
To deactivate the Mausoleum, go to the lower area north from the site of grace and all the way to the west. Loot the Stonesword Key while you're here, then take the spirit spring up. You will land by Crucible Knight Siluria, which should be a straight-forward fight at this point. Defeat it and loot the Crucible Tree Set and Siluria's Tree. Now head east toward the branches and quickly navigate across them to a point here you can jump ONTO the mausoleum. There are basilisks and archers that will interrupt your progress so it's best to dismount from Torrent as you get closer to the mausoleum. Once on it, hit the white skulls until it stops. This will de-spawn all Mausoleum-type enemies.
You are now free to roam and loot any other objects in the area, before heading back up to "The Nameless Eternal City" site of grace and heading east to take the main branches up. You will deal with some fire-breathing Broken Statue enemies as you attempt to cross, and you will then arrive at the "Across the Roots" site of grace. Nearby, an entrance gives you access to the Fia's Champions boss fight. Fia's Champions are five randomized invader enemies and are found in Deeproot Depths. This is an optional boss as players don't need to defeat it to advance in Elden Ring. Fia's Champions spawn in three waves: single invader, single invader, three invaders. Each wave begins after previous one is defeated. Defeating all five enemies grants you the Fia's Mist sorcery.
Approach Fia (sitting to the left of the waygate you approached to trigger the boss fight) and talk to her proceed with her quest. If you visited the Divine Tower of Liurnia in the previous step, you will have the option to hand over the Cursemark of Death. After you give it to her and exhaust her dialog, reload the area and talk/exhaust the dialogue one more time. Upon reloading the area once again, she'll be asleep at Godwyn's side. Inspecting her will let you enter Godwyn's dream to fight Lichdragon Fortissax and defeating it grants you the Remembrance of the Lichdragon. When you return from the dream, receive the Mending Rune of the Death-Prince from Fia to unlock an alternate ending, then reload the area again to loot her armor set, Fia's Set.
If you gave D's Twin Brother the Twinned Set in Nokron, he'll appear by Fia after her quest ends. Exhaust his dialogue then reload the area to retrieve the Twinned Set and also receive the Inseparable Sword.
Nokstella, Eternal City & Lake of Rot
Level: 80+ Upgrades: +15 ~ +20 (Lake of Rot)
- Enter Ainsel River Main
- Collect Miniature Ranni
- Enter Nokstella, Eternal City
- Collect Key Items & Spirit Ashes
- Talk to Miniature Ranni
- Enter Lake of Rot
- Obtain Map Fragment
- Use the Discarded Palace Key
- Defeat Dragonkin Soldier
- Enter Grand Cloister
- Defeat Astel, Naturalborn of the Void
Elden Ring Map: Nokstella Eternal City Starting Point. Begin from northwest Liurnia of the Lakes. Take the stairs to the very top of Renna's Rise and take the waygate there. It will teleport you to Ainsel River Main, that northern part of Ainsel River that was inaccessible last time you were there. Inside an open coffin you'll find Miniature Ranni. Hold on to that doll for now, you'll need it later. If you haven't been progressing Ranni's quest, the waygate at Renna's Rise will be inaccessible to you. Instead, you can take the coffin found at the edge of the waterfall in northwestern Deeproot Depths to get here. Interact with the Ainsel River Main site of grace and follow the path through the river, where you'll get to another section of the Uhl Palace Ruins. Clear the enemies out and collect the loot here that includes Ghost Gloveworts [6] & [7], Smithing Stone [4], and a Stonesword Key.
Continue west and keep following the path up, making sure not to fall back down into the lower floors of Ainsel River, and eventually you'll reach Nokstella, Eternal City. Feel free to explore the city to collect equipment and valuable upgrade materials. Items to note are Archer Ashes, Nightmaiden & Swordstress Puppets, and Ghost-Glovewort Picker's Bell Bearing [2], all of which can be found in buildings near the entrance to Nokstella. There's also a the Moon of Nokstella, a Talisman that increases your memory slots found in the north-west of the city. As you explore you'll find two Larval Tears and a Golden Seed. These are limited items for each playthrough, so make sure to find them.
When you're done exploring, head to the far western side of Nokstella to find a lift that takes you back down to Ainsel River Main. You'll find a Site of Grace here where when resting at, you'll be given the option to talk with the Miniature Ranni doll. She'll ignore you the first two times, but keep at it and she'll eventually give in and ask you to defeat a Baleful Shadow. Luckily, if you continue forward you'll find him right ahead in an open cavern. Defeat him and you'll be rewarded with the Discarded Palace Key.
Head south and find a building that houses a lift taking you down. This lift will take you to Lake Rot. At the water's edge, just slightly past the Site of Grace, you can loot a corpse that holds the Map fragment for the Lake of Rot, making navigation easier.
Now that you've got the map and a Site of Grace to teleport to, we're taking a quick detour for Ranni's quest. Feel free to skip this part if you've chosen not to provide your services to her. Teleport back to the Raya Lucaria Grand Library. There is a small chest next to a bookshelf north-west of where Rennala is sitting that can be unlocked with the Discarded Palace Key that Miniature Ranni handed over to you. Inside you'll find Ranni's ring, the Dark Moon Ring. And with that out of the way, you can teleport back to the Lake of Rot.
The waters here are treacherous, quickly applying the Scarlet Rot Status Effect each second you stand in the water. It is recommended to have many Preserving Boluses on hand to remove the status effect immediately and even equip Talismans and Armor that can help alleviate its build up. Also, be aware that Basilisks may come out of the waters to ambush you.
- Since Preserving Boluses can't be bought in large quantities and they require a rare item to craft, you may not want to them at this point. The best option if you want to breeze through this lake is to use the incantation Flame Cleanse Me, which requires 12 faith. If you don't have the necessary faith you can equip the Two Fingers Heirloom that gives you +5 faith. In alternative, you can also use a Rune Arc with Godrick's Great Rune equipped. Both of these together will you give +10 faith, which should make any class able to use Flame Cleanse Me.
- If you don't have Flame Cleanse Me already, it can be found in one of the corpses at the Fire Monk camp, southeast of the Church of Vows (Map Link). As an incantation, Flame Cleanse Me requires a Sacred Seal to cast. If you don't have one you can easily afford one at The Roundhold Table, in which the two mummies will sell it for a small amount of runes. As a final tip, it's also recommended to change your flask allocation to at least one or two mana flasks, so you can use Flame Cleanse Me more sparingly
If you look out into the lake, you may be able to see four pillars standing on their own small island in the distance. These small islands have buttons on them that raise land masses in the lake, giving you safe platforms to stand on while navigating through the Lake of Rot. The nearest pillar to you right now at the starting island should be to your south-west, and after that, the next one should be south of the first pillar. You may notice a familiar-looking boss in the middle of the lake. Ignore him for now and find the next two pillars to raise all the landmasses in the lake and make collection and boss fighting easier and much safer.
With all the landmasses raised, we can go deal with the boss. In the middle of the lake, next to three raised islands, sits the Dragonkin Soldier once again. Defeat him, being careful not to get knocked down in the water. From here you can choose to loot bodies scattered all around Lake Rot to obtain items, many of which are Somber Smithing Stones [7] & [8]. An item of note is the Nomadic Warrior's Cookbook [22] obtained from a lone chest in a large ruin in the south-western section of the map. There's also an enemy in the southwestern region, in one of the raised platforms, that drops the greatsword Alabaster Lord's Sword.
After you're done with this area, head over to the southern section, where you'll find a waterfall. Climb down the stairs next to it to reach the Grand Cloister. If you're not planning to explore the area, head west and then south by a group of enemies, where you'll find an open coffin at the tip of the waterfall. Interact with the coffin to rest in it and a cutscene will play.
If you open your map now, you will find yourself in an isolated area south of the Lake of Rot. Through the mist door, you'll fight Astel, Naturalborn of the Void, and with his defeat, all the underground areas have been explored. Head north past his boss room to find a lift that takes you back to the surface at Deep Ainsel Well.
Regardless of whether or not you fought Glintstone Dragon Adula earlier near Ranni's Rise, it'll appear here again at the entrance of Moonlight Altar. Discover the grace inside and then head North East to the Cathedral of Manus Celes. Follow the Cathedral of Manus Celes walkthrough.
After the events at the Cathedral of Manus Celes, you can go back to Ranni's Rise, and speak to Miniature Ranni at the Site of Grace. If you head down and exit the tower, you'll find Blaidd mumbling to himself. Defend yourself against your attacker and you'll be rewarded the Royal Greatsword and Blaidd's Set, minus the helm. Visit Iji and exhaust his dialogue. When you reload the area, you can pick up Iji's Mirrorhelm and Iji's Bell Bearing.
IMPORTANT: From this point onwards, you should be strong enough to take on Dragonbarrow. The Dragonbarrow area of Caelid doesn't have any specific story influence besides your visits to the Bestial Sanctum, but there are Golden Seeds, Talismans, Ashes of War and Crystal Tears to be looted. See the Dragonbarrow page for the loot of the area.
Altus Plateau
Level: 60+ Upgrades: +10 ~ +14
- Get access to the Altus Plateau
- Complete Western Altus Objectives
- Talk to Millicent
- Defeat Tibia Mariner
- Complete Old Altus Tunnel
- Complete Shaded Castle
- Talk to Millicent
- Complete Golden Lineage Evergaol
- Boc the Seamster
- Obtain Zone Map & Talk to Boc and Corhyn
- Complete Second Church of Marika
- Get Minord Erdtree Flask Upgrades & complete valley objectives
- Complete Dominula & talk to Millicent
- Explore Eastern Altus Heights
- Meet Goldmask and report to Corhyn
- Unlock Mt Gelmir's site of grace
Elden Ring Map: Altus Plateau Starting Point. The Altus Plateau, northeast of Liurnia, is your next destination. There are two ways to access it: fight your way up through the cliffside dungeon at Ruin-Strewn Precipice (the red-outlined hole on the map, accessed from northern canyon of Liurnia of the Lakes), or use the left and right halves of the Dectus Medallion at the Grand Lift of Dectus. If you don't have the right half of the medallion, it can be found in Caelid:
- Fast travel to Dragonbarrow West site of grace and head east until you find Fort Faroth.
- Skip or kill all the enemies and the right half of the medallion will be inside a chest on the top.
Once you've found your first Site of Grace in Altus, head back to the Roundtable Hold to speak to Brother Corhyn. He'll leave the Roundtable Hold and from here, his quest starts.
Note: If you decide to take the Grand Lift to Atlus using the Dectus Medallions, you'll meet up with Rya the Scout, who will offer to take you to Volcano Manor, but it's recommended to put this off until later. For now, activate the grace directly North of her, then you may obtain the two map fragments for Atlus before continuing down this guide.
Ruin-Strewn Precipice can be accessed through Ravine-Veiled Village. Entering from Ruin-Strewn Precipice may be preferable as you can obtain several crafting materials, a Dragon Heart and Golden Seed within it. If you don't have access yet to Ravine-Veiled Village:
- Fast travel to Caria Manor (Royal Moongazing Grounds site of grace), exit the manor to the west, make a u-turn to the right so you end up heading east (grab the Behind Caria Manor site of grace as you go past).
- Head south-east from the Behind Caria Manor site of grace to an outcropping of rock (visible on the map) that will allow you to cross to the other side of the ravine, north of Bellum Church.
- Turn north (i.e. left after jumping off the rock outcropping), and follow the downhill slope into the ravine. You will see a Golden Seed in the middle of the ravine ahead after you reach the bottom.
- Not far beyond the Golden Seed you find the Ravine-Veiled Village site of grace.
- From here, you can find your way through to Ruin-Strewn Precipice.
You will have to fight another version of Magma Wyrm and afterwards, head up to the plateau and you'll find the Ruler's Set shortly after.
You are now at the Abandoned Coffin site of grace (see it on the map here). Head West from this site of grace and defeat a Teardrop Scarab to loot Ash of War: Sacred Order.
Further west, Perfumer's Ruins has the Omenkiller Set, Perfumer's Cookbook (1) and Perfumer's Talisman. Nearby, Unsightly Catacombs has valuable Ghost Glovewort (5) and Grave Glovewort (4) to loot, as well as the Perfumer Tricia spirit ash from the dual boss of the dungeon. In the lake area you can find Sage's Cave in the northern part. Inside you'll be able to loot a a bunch of gear. There are many illusion walls in this cave. One of them hides an optional boss battle with Necromancer Garris that drops the flail Family Heads. At the end of the cave, you can fight the boss Black Knife Assassin, who will drop Concealing Veil. To find all loot and all bosses, check the guide at Sage's Cave.
Return to Abandoned Coffin and follow the road north toward Lux Ruins, Ancient Dragon Lansseax will stand on your way but it's an optional fight as you can just run by if you prefer, heading to meet Millicent and the Erdtree-Gazing Hill grace site. There's a Golden Seed just ahead as well. Veer slightly south to Erdtree-Gazing Hill and Lux Ruins. Ash of War: Shield Crash can be looted from a teardrop scarab here, and the Greatshield Talisman from a chest further east.
- Note: if you can't find Millicent on the road, that means you need to progress her questline. Just go back to Gowry's Shack in Caelid and she should be there.
- Fast travel back to Erdtree-Gazing Hill grace site and look north. She should be there now. Exhaust her dialogue and move on.
From the Erdtree-Gazing Hill site of grace, go straight north and up to arrive to Wyndham Ruins and Wyndham Catacombs. There's a Tibia Mariner here to defeat and earn a Deathroot as well as Tibia's Summons spell. The catacombs boss drops Glovewort Picker's Bell Bearing [1], which enables you to purchase low level grave glovewort from the Roundtable Hold.
From Erdtree-Gazing Hill grace site go east to the encampment there guarded some commoners, ballistas and a Pumpkin Head. You can find the colossal sword Troll's Golden Sword in the back of a black carriage in the center.
From the encampment turn north and and make way in to the canyon. Keep the cliff immediately on your left until you find a troll. Just ahead there's Old Altus Tunnel that requires two Stonesword Keys to unlock. Inside you'll find Smithing Stone (4) and (5) as well as Somber Smithing Stone (5) and (6). The Stonedigger Troll boss within drops the Great Club, and a Troll's Hammer. Boldrake Talisman +1 can also be looted from sheds within the tunnel.
Exit and continue following the canyon north until you come to a poisonous area. This is the Shaded Castle. Please see the page for a proper walkthrough of the area. Notable items include Perfumer's Cookbook (2) and the Valkyrie's Prosthesis that you need to advance Millicent's quest. To the west of the castle, an invasion by Maleigh Marais, Shaded Castle Castellan gives you the House Marais Set and Antspur Rapier.
Teleport back to the Erdtree-Gazing Hill. Talk to Millicent and exhaust her dialogue. You can return to Gowry in Gowry's Shack to hear new dialogue and buy a new incantation if you wish. Afterwards, travel south from Millicent's position and east until you are at the road by the Grand Lift of Dectus. To the east of here and down the slopes, the Golden Lineage Evergaol has the optional boss Godefroy the Grafted, that drops the very useful Godfrey Icon talisman for charged spells and skills.
You can follow now follow the main road north and activate the Altus Highway Junction site of grace. Nearby you can meet Boc the Seamster (map link) and speak to him. If he's not in this area, it means you need to progress his questline. A Night's Cavalry appears in this road at night. Kill him for the ash of war Ash of War: Sacred Order.
North from the site of grace, the road takes you to a Golden Seed and Map (Altus Plateau) to reveal the region. Slightly north, talk to Brother Corhyn who is looking for the Goldmask. Directly east from the Altus Highway Junction Site of Grace, follow the road until it breaks off north into an open cave in the cave the Amber Starlight will be sitting below a statue surrounded by octopus ball creatures. Head back out this cave, then continue east to find the Perfumer's Grotto cave being blocked off by a large hostile plant. The boss within holds the Great Omenkiller Cleaver.
Map Link - you need Amber's Starlight for Seluvis's quest if you are doing it. Whenever next convenient, return to Seluvis to hand over the Amber Starlight and he'll reward you with the Magic Scorpion Charm. Stop here if you don't want to betray Ranni. Reload the area and speak to Seluvis to receive the Amber Draught. Go to Ranni to giver her the concoction, then return to Seluvis and collect his loot.
Back to the road where you found the map of this area, head northwest and down the slopes to visit the Second Church of Marika and loot the Sacred Tear there. Bloody Finger Hunter Yura will be here, and if you talk to him you will trigger an invasion from Eleonora, Violet Bloody Finger, who allows for the acquisition of Purifying Crystal Tear alongside Eleonora's Poleblade. This is a VERY useful item for an upcoming Boss fight, and doing Yura's quest is not necessarily required for her to spawn, but the triggers are unclear at this time.
Return to the road and follow it all the way north to find the Finger Reader Crone and the Forest-Spanning Greatbridge site of grace (map link), as well as a teleporter that takes you further north and a nomadic merchant nearby with the Ancient Dragon Apostle's Cookbook [2]. Use Torrent to jump across the broken gaps of the bridge leading down to the valley, then head southwest for the Bower of Bounty site of grace. Head northeast from here to the Minor Erdtree.
The tree is protected by Wormface, a boss that drops Speckled Hardtear and Crimsonspill Crystal Tear. There's also a Golden Seed slightly north (map link). In this area, to the northeast of the Minor Erdtree you'll find the greatshield Icon Shield near the Woodfolk Ruins, guarded by slugs and a wormface enemy.
Within this valley, you will find Mirage Rise to the very west, that asks you to find symbols in the valley to unlock the tower. Follow the steps contained in the [image] to unlock the tower in order to gain the Unseen Form and Unseen Blade spells:
- The first is (obviously) immediately in front of the Imp Statue.
- The second is south-south-west in an alcove.
- The third is further east near the broken bridge, hidden underneath an illusory rock with a feint glow that disappears when attacked.
Directly south of Woodfolk Ruins, Altus Tunnel has Smithing Stone (5) upgrades and the Somberstone Miner's Bell Bearing (2). Near the tunnel, before or after you enter, search the ruins nearby to find an underground cellar guarded by wormface enemies, with Wrath of Gold in a chest. Left to loot in this general valley, there's the Woodfolk Ruins where you can find Nomadic Warrior's Cookbook (19) and a teardrop scarab with Ash of War: Golden Slam.
Follow the road north exiting the Erdtree Valley and once you reach the elevation after the villagers attack, near a windmill, turn east towards the city gates. After a while, you'll find a Golden Seed (map link) to your right. From this point East, enemies will shoot at you with deadly ballistas and catapults. Instead of going East toward the capital, go north into Dominula, Windmill Village. Here you can defeat the Godskin Apostle boss that drops the Scouring Black Flame incantation, which will allow you to progress Millicent's quest. Unlock the site of grace after defeating Godskin Apostle and reload the map. Millicent can be found nearby [Map Link]. Exhaust her dialogue to continue the quest. The area also has the Godskin Peeler twinblade and Celebrant's Skull warhammer.
If you return to the road, there's the option to head East into Lyndell, Capital City outskirts. We will leave this for later, and instead take the lower road south-east. This will bring you to an unnamed ruins where a noble will transform into a Lion Guardian. Defeat it to get a Larval Tear, then continue following the road until you come to an elevation with lightning and the second part of the optional Ancient Dragon Lansseax if you fought her earlier at Mt. Gelmir - map link .
- NOTE: Lansseax is glitchy with its spawn, so if she doesn't appear where she's supposed to, just reload the game by resting or passing the time at the nearby grace site.
West from here there's another boss encounter with a Black Knife Assassin just outside the Sainted Hero's Grave, which drops the unexpectedly-faith-scaling Black Knife. The grave has the Crimson Seed Talisman and Dragoncrest Shield Talisman +1, as well as the Ancient Dragon Knight Kristoff spirit ashes. South from here, Stormcaller Church has a Sacred Tear to loot, as well as the Dragonbolt Blessing incantation.
You have now successfully looted the eastern part of Altus Plains, so backtrack to Dominula, Windmill Village and head west instead. Follow the main road west and then south to find the collapsed bridge. You can find Goldmask at the end of the bridge, and speak to him. He won't have any dialogue for you, but he's a part of Brother Corhyn's questline that opens up more incantations to buy. Though not required for the quest, you can find the Radiant Gold Mask helm nearby that is located in the third section of the collapsed the bridge. To find it, go to the beginning of the collapsed bridge and face south. From here, you can jump down to your left to find the Road of Iniquity Side Path site of grace. Then go south and east to where the terrain and the second section of the collapsed bridge connect (use the map for reference). Use Torrent for the double jump and finally find Radiant Gold Mask. Fast travel to Brother Corhyn near the Altus Highway Junction site of grace and tell him of your findings. He will then move to Goldmask's location.
Travel back to Goldmask and Corhyn will have more incantations to sell, and dialogue that you should exhaust to progress his quest. To the north from here, in the higher areas, the Windmill Pastures (East and West) hold the Noble's Set, Battlemage Set and Giant Rat Ashes. You can do a quick sweep of this before dropping back to the road and taking the Great Stars Warhammer from the enemy caravan traveling here. Following this road West leads you directly to Mt. Gelmir.
To finish this area, you can travel back to the Road of Iniquity Side Path site of grace and follow the road west and then south to find Writheblood Ruins and the optional boss Sanguine Noble guarding the sword Bloody Helice.
From the ruins, keep traveling directly west until you find the Bridge of Iniquity site of grace. There's nothing in the area to explore. Keep following the road west until you hit a dead-end at the location Corpse-Stench Shack, where you'll be invaded by Anastasia, Tarnished-Eater and where you can find the Golden Vow (Spell).
By now, you should be at least level 80, so it would be a good time to complete the optional area Dragonbarrow if you so choose to. There's nothing mandatory, but good loot and bosses to defeat, so you can take your time and explore at your own pace. Some notable loot is the Godskin Apostle set, Ash of War: Sky Shot and Gravity Stone Peddler's Bell Bearing.
To progress the game, read on below to explore Mt Gelmir.
Click here to return to Caelid if you haven't completed that location.
Mt Gelmir
Level: 80+ Upgrades: +15 ~ +20
- Collect Golden Seed
- Complete Fort Laiedd
- Defeat Magma Wyrm
- Talk to Iron Fist Alexander
- Obtain Memory Stone & Comet Azur
- Complete Gelmir Hero's Grave
- Trigger Patches event
- Defeat Full-Grown Fallingstar Beast
- Loot Golden Seed & Map Fragment
- Complete Volcano Manor
Elden Ring Map: Mt. Gelmir Starting Point. Fast travel to Wyndham Catacombs site of grace then go west and down to the canyon floor to find Seethewater River site of grace. Begin your ride northward, a teardrop scarab nearby drops Ash of War: Barrage. Continue your way north avoiding the waves of heat until you come to a Golden Seed. Further ahead, you can loot 1x Smithing Stone (5) before arriving to an Imp Gate defended by Basilisks that needs a Stonesword Key - this is Seethewater Cave, and you can get the peculiar Mushroom Set and Kindred of Rot's Exultation talisman.
Follow the road north until a fort comes into view, this is Fort Laiedd, and it's UNDER the area with the map fragment so don't fret that you aren't up there yet!. Activate the Seethewater Terminus site of grace and head inside the fort to collect Armorer's Cookbook (7) and the Fire Scorpion Charm. You can also loot a Stone Sword Key by the jellyfish to the east of the fort it you needed one for the cave we mentioned before.
South from Fort Laiedd, the road converges to a magma pool with a Magma Wyrm boss. Defeat it to earn a Dragon Heart and unlock the Magma Breath spell at the Cathedral of Dragon Communion. You will also meet Iron Fist Alexander for the fifth location of his questline. Exhaust his dialogue to be given the Jar. Beware that you will lose health while talking to him if you are in the wrong spot, so keep in mind Alexander can be spoken to from the safety of the rock in the lava lake. Follow the road south past some enemies and a graveyard that can be looted for runes, until you come to the Hermit's Shack. Defeat the demi-humans here to loot Roiling Magma. You can also use the giant Rune Bear to destroy the statue and get some more smithing stones.
Continue following this road to arrive at Craftsman's Shack. You can obtain the Pulley Crossbow as a treasure here as well as activate a convenient site of grace. Up ahead is Hermit Village, that is barricaded and has several enemies for you to deal with. Loot the Hierodas Glinstone Crown from a corpse in the southern area of the village, and the Prattling Pate "You're Beautiful" from a door nearby. The north of the village has the miniboss Demi-Human Queen Maggie, who will drop a Memory Stone upon defeat. Slightly north around the corner, you can get Comet Azur from Primeval Sorcerer Azur and activate the site of grace.
Traverse the beam by the sorcerer to cross the canyon and drop down. You can activate the lift to Gelmir Hero's Grave. This location has a Deathroot, as well as the Bloodhound Knight Set, Gelmir Knight Set, Bloodhound Knight Floh spirit ashes and the Mantis Blade curved sword. Once you complete the location, return to the entrance and explore north to continue. You will be ambushed by a pack of wolves and then arrive at a fortification defended by a Mad Pumpkin Head and some soldiers. The Pulley Bow can be looted here, and you can opt to follow the Rainbow Stones glowing on the ground and if you dismount and get close to the edge, Patches will knock you to the ground level near the entrance to Seethewater Cave, to prevent you accessing the Volcano Manor. The road south from the patches encounter takes you to the First Mt. Gelmir Campsite site of grace, that has a staircase leading you down to the dead-end road toward Corpse-Stench Shack.
You should instead cross the beam leading to the other side of the canyon and begin making your way up the ladder behind a Grafted Scion mini-encounter. This next section is a continuation of ladders and optional drops to loot. One of the rests has a Nomadic Merchant, before leading you to an encounter with the Full-Grown Fallingstar Beast that drops Fallingstar Beast Jaw. From the crater of this boss encounter, you have to take some broken pillars to the west and jump across to the other side to land successfully near the Road of Iniquity site of grace. You will be attacked by Marionette Soldiers to be careful. You can loot a Golden Seed and kill an invisible Teardrop Scarab to obtain Ash of War: Through and Through.
You are now in the right level to obtain the map shard, but be careful as you approach the pillar as there are deadly Fingercreeper enemies ready to ambush you. Activate the site of grace first! Go down the road toward the pillar and run past all the hands and map to rest at Road of Iniquity, then loot Map (Mt. Gelmir). You now have revealed the zone and are ready to head into Volcano Manor, that is just above. There different ways to deal with the location, so see Volcano Manor for details. The final Volcano Manor quest requires access to the Mountaintops of the Giants. You can do the rest of the quests, as well as the dungeon, until then. Do note that all the Volcano Manor's NPC questlines, including Tanith's, should be completed before defeating Rykard, Lord of Blasphemy or you'll get locked out of rewards until NG+.
There are a few NPC quests you want to keep a note of while there. Tanith gives you three requests on behalf of the Volcano Manor. Speak to Rya, Bernahl, and Diallos each time you return from completing one. After completing the first request, Patches appears at the manor's entrance and gives you the Letter to Patches detailing a manor quest. Completing his quest for him nets you the Bull-Goat Set and the Magma Whip Candlestick. Rya will also move to a new room in the manor after the first request is complete. Speak to her in her new form, find the Prison Town Church Site of Grace and open the doors out, then return back to her to progress her quest. Speak to Tanith about Rya to get an optional item later on.
After completing the second Volcano Manor request, speak to Bernahl to receive the Letter to Bernahl. Help him with his manor quest and you'll be given the Raging Wolf Set and Gelmir's Fury sorcery. You'll also probably want to continue Rya's quest. In the Volcano Manor dungeon, retrieve the Serpent's Amnion after defeating the Godskin Noble. Take it back to Rya and she'll leave her room, then speak to Tanith to receive the Tonic of Forgetfulness. The tonic can be used for this quest, or another one later on. You'll find Rya within the dungeon, close to the Temple of Eiglay Site of Grace. Speak to her and from here, you have three options. If you do as she asks, she'll give you Daedicar's Woe. If you give her the Tonic of Forgetfulness, she falls asleep and after defeating Rykard, you'll find her at her old spot in Volcano Manor's drawing room. Reload the area and she'll leave behind Daedicar's Woe. Finally, you can choose to do nothing. Defeat Rykard, then return to her and exhaust her dialogue. Reload the area to get Zoraya's Letter and Daedicar's Woe.
After completing the third Volcano Manor request, exhaust Diallos' dialogue and upon reloading the area, he will have left.
After the events at the Volcano Manor, Patches can next be found in the Shaded Castle, on the bridge leading up to Elemer's boss room. Exhaust his dialogue to receive the Dancer's Castanets. You can hand them over to Tanith, who will now be found in Rykard's boss room.
When you're done with that, head back to Jarburg and speak to Jar Bairn. He'll mention Diallos is in town, so find him and exhaust his dialogue as well. Reload the area (you may have to do it a few times) or go exploring then come back to Jarburg. Jar Bairn and Diallos will have moved locations. Exhaust their dialogue then reload the area a final time and exhaust their dialogue again.
Since you've interacted with Primeval Sorcerer Azul earlier, you can finish Sorceress Sellen's questline. Do note that this requires a lot of backtracking to previous areas. After going back to speak to her, head to the Sellia Hideaway to interact with Master Lusat, then return and exhaust her dialogue again. Next, head to Witchbane Ruins and follow Sellen's instructions, then head to Seluvis' secret underground puppet room to use the item she gives you. Head back to Chamber Outside the Plaza Site of Grace and head north to meet Witch-Hunter Jerren. Meet him back at the Witchbane Ruins then head to the Raya Lucaria Grand Library. Right outside the main gate, you'll be given a choice to help either Sellen or Jerren. If you help Sellen, exhaust her dialogue here at Raya Lucaria Academy, then reload the area and she'll permanently stay here as a merchant. If you help Jerren, speak to him outside the library's entrance and exhaust his dialogue to receive your reward.
Leyndell, Royal Capital Outskirts
Level: 90 ~ 110 Upgrades: +15 ~ +20
- Defeat Tree Sentinel duo
- Collect Map & Golden Seed
- Complete Sealed Tunnel
- Collect Golden Seeds & Fight Margit
- Complete events in Hermit Merchant's Shack
- Loot Flask Upgrades
- Visit Blackguard Big Boggart
- Complete Auriza Hero's Grave & Auriza Side Tomb
- Defeat Draconic Tree Sentinel
- Complete Legacy Dungeon
Elden Ring Map: Leyndel Royal Capital Starting Point. There are two ways to access Leyndell, Royal Capital, but we will approach it from South to North in order to procure the map fragment as soon as possible. You will thus begin from the Altus Highway Junction site of grace, and take the large bridge up to the gates. Here you will have a duo of Tree Sentinel bosses that drop the Erdtree Greatshield. They are optional, so you can run by and get to the Outer Wall Phantom Tree site of grace instead. Here you can collect 2x Golden Seed and Map (Leyndell, Royal Capital).
From this site of grace, if you go south to a small military camp, you can fight a Lesser Ulcerated Tree Spirit that drops a Golden Seed. Giant-Crushercan be looted from a chest there. Further East, you will come to the Minor Erdtree Church and can loot Missionary's Cookbook (4) as well as the Golden Order Seal. From here, we will travel north and slightly east and down into the watery area. On the southern point of it there's the "Sealed Tunnel", that requires you to hit an illusory wall to enter. The tunnel has secret areas to explore, so check out the Secret Tunnel page for details. Notable loot is the Smithing-Stone Miner's Bell Bearing (2), and the Smithing Stone (5) and (6), Somber Smithing Stone (6) that you can find. The boss Onyx Lord drops the Onyx Lord's Greatsword as well. The point of this tunnel (besides the loot) is that it acts as a passageway to Divine Tower of West Altus, where you can activate Rykard's Rune. If you don't have it yet you will have to come back later.
Return to the Outer Wall Phantom Tree site of grace and take the road North. You can opt to fight a Gargoyle or press forward until you see another Golden Seed and the Palm Reader of this area. A teardrop scarab nearby will drop you Ash of War: Golden Parry. Take the road north-west from this point and listen for a familiar voice saying, "I see you, tarnished." This is Margitt, who will drop the Viridian Amber Medallion +1 if defeated. Press on along the road and activate the Outer Wall Battleground site of grace.
You will now want to turn eastward until you find a road heading further east. If you take a small detour north on this road, you can follow it on a u-turn to arrive at the Hermit Merchant's Shack. There's a merchant here as well as two nighttime invasions: Bell Bearing Hunter (drops Medicine Peddler's Bell Bearing) and Deathbird (drops Twinbird Kite Shield). From here, we'll take the road east and north. Don't go to the Minor Erdtree yet, as an altar at the top of the road has the Winged Crystal Tear. After collecting, visit the Minor Erdtree and loot Twiggy Cracked Tear and Crimson Crystal Tear.
Travel directly south until you see moat at the base of the wall. If you followed the instructions in Liurnia and talked to this merchant, you will now meet Blackguard Big Boggart. You can now purchase Boiled Crab from him. This moat will also have an invasion from Dung Eater that we'll cover later on. If Boggart is here when Dung Eater is ready to invade, you'll get some extra dialogue from him. Reload the area and speak to him again, then reload the area a final time to pick up a Seedbed Curse (this particular Seedbed Curse is entirely optional and not required to finish the NPC quest it's a part of).
Follow the path east from here and the road will diverge north and south. To the South, you can take on Auriza Hero's Grave and loot several heavy armor and weapons. To the north, Auriza Side Tomb has the Soldjars of Fortune Ashes that summons "potboys" to fight alongside you as well as Grave Glovewort (5), (6) and Ghost Glovewort (6) and the Perfumer's Cookbook (3).
Turn back toward the Minor Erdtree and return to the main higher road. This time follow the higher path east until it turns into an open-field boss fight with the Draconic Tree Sentinel. Defeating this boss will reward you with Dragon Greatclaw, Dragonclaw Shield and access to the Legacy Dungeon of this area: Leyndell, Capital City.
The path within the legacy dungeon is challenging so it's advisable that you upgrade everything you can and optimize your setup before heading in. A full walkthrough for the area is found here: Leyndell Royal Capital (Legacy Dungeon)
- Enter Leyndell.
- Go to the Erdtree Sanctuary.
- Defeat Godfrey, First Elden Lord (Golden Shade).
- Get in the Queen's Bedchamber.
- Defeat Morgott the Omen King.
- Barrier in the Capital Outskirts is no longer.
- Proceed to the Forbidden Lands.
At the entrance to Leyndell, by the East Capital Rampart Site of Grace, you'll find Boc. This will be his final location until you're given a big choice in his quest. Hand over the Gold Sewing Needle and Golden Tailoring Tools to Boc. Exhaust his dialogue and stop after you've listened to the "Have you ever thought so?" dialogue. From here, you'll have two options. The first option is to give him a Larval Tear to help him be reborn. If you choose this option, he'll next be found next to Rennala in the Academy of Raya Lucaria. You can interact with him and upon reloading the area, you'll see the result of his rebirth. The second option is to continue his dialogue (don't give him the Larval Tear) and when you've exhausted it all, use the Prattling Pate "You're Beautiful" next to him. Exhaust his dialogue again and he'll stay in this room.
While you're in Leyndell, make sure to grab the Golden Order Principia found close to the Erdtree Sanctuary Site of Grace. You'll find Brother Corhyn and Goldmask up on a cliff next to the coliseum. Give the Golden Order Principa to Corhyn and learn the Law of Regression incanation. Exhaust Corhyn's dialogue about Goldmask then head back to the Erdtree Sanctuary Site of Grace. Head west, take the lift down and then descend the stairs, and you'll find a white message left on the ground close to a statue of Radagon. Cast the Law of Regression while standing on the message, then read the new message that appears in front of it. Return to Goldmask to report your findings and exhaust Corhyn's dialogue.
After defeating Morgott, speak to him for some additional dialogue. Head back to the Godrick the Grafted Site of Grace and you'll find Nepheli, Kenneth, and Gostoc all in one room (you need to complete Nepheli and Kenneth's quest). Exhaust all their dialogue and you'll be given an Ancient Dragon Smithing Stone by Nepheli. In addition, Gostoc now sells one as well.
When returning to the Roundtable Hold at any point after entering Leyndell, you'll be able to find the Dung Eater as an invader in his own room. He doesn't attack but you can speak to him to start his quest. Speak to Roderika every time he returns to the Roundtable Hold to hear new dialogue. If you've followed through the Leyndell, Royal Capital walkthrough, you'll have picked up a Seedbed Curse. Speak to the Dung Eater with this in your inventory, and he'll give you the Sewer-Gaol Key to look for him.
The Subterranean Shunning-Grounds can also be accessed from Leyndell, Royal Capital, but this area is covered much later in the guide as the enemies are quite tough and you can come across it naturally again later in your playthrough. However, parts of Dung Eater and Hyetta's quests take part in this area. If you'd like to tackle the area now and find these two NPCs, click here.
Forbidden Lands
Level: 90+ Upgrades: +20 ~ +24
- Enter from Leyndell Royal Capital
- Defeat Night's Cavalry
- Collect Golden Seed
- Defeat Black Blade Kindred
- Activate Grand Lift of Rold
Elden Ring Map: Forbidden Lands starting point. The Forbidden Lands are a small stretch that connects Leyndell Royal Capital with Mountaintops of the Giants. There isn't much to do in this area, but there are two boss encounters to take on. The first one happens only at night, you can encounter a Night's Cavalry that drops Ash of War: Phantom Slash. Further north, there's a Golden Seed to be looted.
Before you gain access to the lift, you will face Black Blade Kindred, that drops Gargoyle's Black Axe and Gargoyle's Black Blades.
Talk to the Palm Reader near the lift for some lore, and then take it up all the way to the Mountaintops of the Giants.
Mountaintops of the Giants
Level: 90+ Upgrades: +20 ~ +24
- Obtain Area Map
- Talk to Shabriri
- Explore Zamor Ruins
- Access Ancient Snowvalley
- Obtain Golden Seed
- Complete Shack of the Lofty
- Talk to Brother Corhyn
- Complete Minor Erdtree
- Unlock Heretical Rise
- Complete Frozen Lake Objectives
- Complete Guardian's Garrison
- Obtain second Map Fragment
- Gather Flask Upgrades
- Unlock Foot of the Forge
- Complete Castle Sol
- Defeat Fire Giant
Elden Ring Map: Mountaintops of the Giants Starting Point. If you're doing the Volcano Manor/Tanith's questline, remember to return there after completing the final part of that quest here in this region. Unlike other areas, you begin this zone with an easy one-way forward that leads you straight to the first map fragment Map Mountaintops of the Giants, West. Activate the site of grace and talk to Shabriri for some quick information. If you've already interacted with Three Fingers at this point, you'll just find the Ronin's Set where he should be. You should now explore Zamor Ruins and find the stairs leading down to a chest to get Smithing-Stone Miner's Bell Bearing [3] as it will allow you to buy Smithing Stone (5) and (6) from the Roundtable hold. there's also Zamor Ice Storm (Spell) that can be looted here.
Follow the road east and north through a narrow passage that brings you about to a small landing with Fire Monk enemies. On the right side of the bridge, you can complete Giants' Mountaintop Catacombs (get Glovewort Picker's Bell Bearing [2] from the boss as well as the Fire Monk Ashes, and a Deathroot in the chest behind the boss fight). You can loot Briars of Punishment before braving the narrow road north past an Archer Golem. Just Don't stop running and make good use of double-jump! You will arrive at Ancient Snow Valley Ruins, and notice there is plenty to explore in a higher level than you are. Travel the canyon floor north until you reach a frozen river with Guardian Golems, then head EAST and take your first right to loot a Golden Seed. Backtrack to the spot you first reached the river and now instead travel West past demi-humans and bats until you discover Shack of the Lofty. Here you can loot Traveling Maiden Set, and fight Juno Hoslow if you're doing the Volcano Manor quests.
To the south of the shack, take the spirit spring to the higher ground and complete Stargazer's Ruins by summoning the Jelly Fish Spirit Ashes. You'll be rewarded with Primal Glintstone Blade. You should now also talk to Brother Corhyn before crossing the narrow bridge south-east, looting a Somber Smithing Stone (9) and arriving at the region's Minor Erdtree. If you still have the Tonic of Forgetfulness from Tanith, you have the option to give it to Corhyn here. Defeat the Erdtree Avatar and loot Crimson Bubbletear and Cerulean Crystal Tear before taking the northern bridge to cross over to the Snow Valley Ruins Overlook site of grace.
From here we will travel East and through the graveyard until we reach the Freezing Lake site of grace, located just to the right before the frozen lake. Now take a careful look upwards to the south-west of the site of grace. To the left, you'll notice a tower structure at the top of the cliffs, and to the right, a small piece of a broken bridge pointing towards the tower. Make your way back up the cliffs to the bridge, where you'll find some skeletal archers. Behind them, there's an invisible path off the ledge of the broken bridge, leading up to Heretical Rise. Use your torch or online bloodstains/messages to chart your way through the invisible bridge and you can obtain Founding Rain of Stars from within the tower (beware, there are enemies inside that will ambush you when entering). When finished with this area, you will now travel south and down the eastern slopes to the Frozen lake that is engulfed in a snowstorm (it will remain that way until you defeat Borealis the Freezing Fog). The very south-east of the lake has a site of grace and the First Church of Marika, so it's advisable to visit there first to get a Sacred Tear and Somberstone Miner's Bell Bearing (3). You can take on the dragon or not, and if you explore the mid-west section of the lake you can enter the Spiritcaller Cave for a rather annoying Boss Fight with Godskin Apostle & Godskin Noble that yields the Black Flame Ritual incantation. The cave also has the White Reed Set and Godskin Swaddling Cloth.
Once you are done with the lake, head south on the road leading down from Heretical Rise to unlock Whiteridge Road site of grace. You can opt to do the Lord Contender's Evergaol nearby or press on to complete Guardian's Garrison to loot the Giant's Prayerbook. From this point, you will cross a frozen chain to the south-eastern area of the region, where you'll find the Giant's Gravepost site of grace and Map (Mountaintops of The Giants, East). The area that follows has some challenging enemies with high reach, so feel free to ride by to expedite your progress.
Your first step will be to follow the cliff edge and go west until you spot an opportunity for a narrow jump across a gap that lands you above the starting point of Zamor Ruins.. The Giant-Conquering Hero's Grave here has a true wealth of high level ash materials (Grave Glovewort 7, 8 and 9!), as well as Giant's Seal and Flame, Protect Me. Come with 2 Stone Sword Key to unlock everything. The boss is the Ancient Hero of Zamor and will drop the Zamor Set and Zamor Curved Sword.
Teleport back to Giant's Gravepost and this time take the south road toward Church of Repose. You will be invaded by Okina before arriving, so be ready with some hemorrhage resistance and get the Okina Mask and the Rivers of Blood katana after defeating him. The church has a Sacred Tear to loot, and looking toward the south-east cliffs from the church, you'll see a massive cliff-skull. In the mouth of this skull you will find an Ancient Dragon Smithing Stone, and on top of the skull (reachable by a spirit spring found behind the cliffs) the Ash of War: Troll's Roar.
From the church, follow the eastern cliffs and go north, unlocking the Foot of the Forge site of grace. Across the chain is the Fire Giant boss fight, but before you engage you should travel north to loot a Golden Seed, and nearby the Crimsonwhorl Bubbletear (that converts damage received into HP) can be found. Visit the page for an in-depth description on how to find it.
We will now take a detour to complete Castle Sol, that we left unattended as the boss battle can be rather challenging, and this loop gave you an opportunity to loot upgrade materials and level up. Return to the Snow Valley Ruins Overlook and wait until nightfall. Far to the west from this point (north of the Shack of the Lofty, as seen on the map) Death Rite Bird will invade – that on defeat drops the Death Ritual Spear. From here, travel north and east toward the Walking Mausoleum of the area. Unlock the site of grace, then explore to defeat a Tibia Mariner and get a Deathroot before entering the Castle. If you spoke to Latenna earlier, she'll let you know when you're approaching Castle Sol.
See the Castle Sol page for a detailed walkthrough of the area. You will have to challenge Commander Niall to obtain the important item: Haligtree Secret Medallion (Left).
Once you have done this, you have a choice:
- Return to Foot of the Forge and Defeat Fire Giant, then backtrack to Consecrated Snowfield secret location
- Ignore Foot of the Forge and Fire Giant, backtrack to Consecrated Snowfield secret location
- Return to Foot of the Forge and Defeat Fire Giant, proceed to Fire Forge and be automatically teleported to Crumbling Farum Azula
For this walkthrough, we will pick 1 or 2 - the reason is that Consecrated Snowfield is a sub-region of mountaintop and the auto-teleport to Azula will result in a final auto-teleport to endgame later. So doing Snowfield first keeps the story flow better.
Consecrated Snowfield
Level: 90+ Upgrades: +20 ~ +24
- Unlock Secret Path at Grand Lift of Rold
- Complete Hidden Path to the Haligtree
- Loot Golden Seed & Cookbook
- Complete Consecrated Snowfield Catacombs
- Complete Enemy Caravan Events
- Complete Yelough Anix Tunnel and Ruins
- Frozen Waterfall Exploration
- Gather Map Fragment
- Minor Erdtree Event
- Golden Seed & Apostate Derelict Exploration
- Unlock Mohgwyn Palace
- Complete Ordina, Liturgical Town
- Unlock Miquella's Haligtree
Elden Ring Map: Consecrated Snowfield starting point. You will only be able to access this area after obtaining both halves of the Secret Haligtree Medallion. Bring them to the Grand Lift of Rold and select "switch" when standing in front of it to use the secret medallion instead of the regular one. This will land you at the Hidden Path to the Haligtree area. You don't have to complete this location to continue, but it's advisable to ensure you get the Grave Glovewort (9) in the area as well as the Deathroot, Blackflame Monk Amon Ashes and Silver Scarab and Spelldrake Talisman +2 loot before moving on.
Once out, you will be in an area overcome by a snowstorm and with very poor visibility. Latenna will speak up and let you know how to get to Apostate Derelict. But before that, you should head due north to unlock the first site of grace of the area, and continue on that same path along the barely visible road to collect Nomadic Warrior's Cookbook (23) and a Golden Seed. If you opt to stick to your right (east) and go north as you come out of the hidden path catacombs, you will find a teardrop scarab that drops Somber Smithing Stone (8) somewhere near the cookbook location. Continue hugging this cliff and proceed further into the storm until you arrive at Consecrated Snowfield Catacombs.
This location is highly recommended as it has a Great Grave Glovewort as a reward for defeating the boss, alongside some Grave Glovewort (8) and Grave Glovewort (9). These materials are very useful for the challenging endgame ahead. You can also get several consumables and Rotten Gravekeeper Cloak, Imp Head (Elder) inside this mini-dungeon.
Exit the catacombs and go west into the storm. You will find a traveling caravan of enemies that drops St Trina's Torch. Continue west from here, slightly south-west from the Inner Consecrated Snowfield site of grace and there will be another caravan, this time with the Flowing Curved Sword in its chest. If you visit this location at night, you will face a double boss of Night's Cavalry that drop the Night's Cavalry Set and an Ancient Dragon Smithing Stone.
West from here, you can grab the Stalwart Horn Charm +1 talisman before keep heading west into Yelough Anix Ruins to collect the Unendurable Frenzy incantation. Nearby, to the south you should explore and complete Yelough Anix Tunnel as it provides with Somber Smithing Stone (8) and Somber Smithing Stone (9), an Ancient Dragon Smithing Stone, and the Meteorite of Astel gravity sorcerer via the boss: Astel, Stars of Darkness.
Exit the tunnel and head north along the edge of the cliffs, past the hooded trolls in the ruins, and you will come to an area with Rune Bears and an invasion by Sanguine Noble that drops the Sanguine Set. A stone's throw north-west of this location (from the large tree with reddish foliage around it) you'll find a special gateway with some blood, which is the teleporter point to the underground Mohgwyn Palace. Make a note of the location as we will come back here later!
Return to the Inner Consecrated Snowfield site of grace (here). To the east, on the cliffs overlooking the frozen river, you can find Glintstone Craftsman's Cookbook (8) and the Albinauric Rise tower that requires you to summon Fanged Imp Ashes to unlock the Graven-Mass Talisman. Further east from here, you will be attacked by a pack of wolves and have the option to take a gateway to access the Minor Erdtree. Defeat the Putrid Avatar guarding it to loot Ruptured Crystal Tear, then follow the road sloping down and west.
Ordina, Liturgical Town comes into view, and you can get close and activate the site of grace if you want. We won't the do the town yet, so head slightly south and collect the Golden Seed of the area, before riding all the way to the frozen lake to find Map (Consecrated Snowfield). If you follow the frozen river all the way east to the waterfall, you will be able to loot Ancient Dragon Smithing Stone and explore the Cave of the Forlorn to obtain Dragon Heart and Grave Glovewort (7) alongsinde the Golden Order Greatsword. This is an optional location and unnecessary if you aren't looking to 100%.
Return to the Ordina site of grace but don't go into the town yet. Instead do a loop around it so you can loot the Black Knife Set from under an archway on the northern outskirts of the town. West from here you can challenge a duelist to obtain Rotten Greataxe and Rotten Duelist Greaves if you were hoping to complete that set. Your objective now is to get to the base of the river and follow it north, as this will allow you to bypass the attacks of the Walking Mausoleum. At the very end of the river, a Death Rite Bird spawns at night that will drop you Explosive Ghostflame. From that dead-end, find a narrow path along the cliffs heading north and west, and follow them upward using the cliff as a guard for the mausoleum attacks. Ride into Apostate Derelict and loot the Silver Mirrorshield within. You'll be given a prompt to summon Latenna here. After you speak to her and exhaust her dialogue, her quest is done. Leave the Apostate Derelict then deal with the mausoleum outside.
You should now go and complete Mohgwyn Palace from the gateway we found earlier, as Ordina, Liturgical Town unlocks the path to a VERY challenging endgame dungeon you won't want to do yet.
If you prefer, head into Ordina, Liturgical town and activate the evergaol system there to enter an instanced event. This is an INCREDIBLY annoying area as there are invisible enemies that will attack you relentlessly, plus archers that can see you from very far away. Your objective is to light 4 candles:
- Candle #1 is in the central square - beware though that you will most certainly be attacked by a shadow assassin. All other candles can be reached without the shadow assassin attacking you.
- Candle #2 is at the far west edge of the town, and there's a ladder up to it blending in with the stones. From the starting point turn right and jump over the balcony, turn left and go around the town until you reach the ladder.
- Candle #3 From the starting point, jump over the balcony to the south. Continue south and at the stairs, jump on the upper railing and onto the balcony on the left side of the stairs. There is a ladder to your direct left, next to a door. Climb the next ladder right in front of you and you will reach candle 3.
- Candle #4 This is probably the hardest Candle due to the archers. If you have Loretta's Greatbow or any other bow, first climb the stairs leading to the seal you try to open. From there you can get a shot on the archer on the right. If you're lucky you can finish him off right there or he'll jump to the other side of the roof. Now climb the same ladder you used to get to #3 and if the archer's still alive, finish him off from that corner. Now it's simple, follow the roof tops to where that archer was, climb the tower and light the final candle.
Once you have activated all the candles, you will leave the instance and the northern wall magic block at the top of the northern staircase will be gone. You can use that gateway to access Miquella's Haligtree.
Mohgwyn Palace
Level: 100+ Upgrades: +20 ~ +24
- Enter from Consecrated Snowfield or by using Pureblood Knight's Medal
- Obtain Area Map
- Loot Key Items and Upgrade Materials
- Navigate the caves of Mohgwyn Dynasty Mausoleum
- Defeat Mohg, Lord of Blood
Elden Ring Map: Mohgwyn Palace Starting Point. If you've been following Varre's quest, you may have already been given the Pureblood Knight's Medal, which allows you to teleport to Mohgwyn Palace earlier. It's not recommended to use it early on in your playthrough however, as the area is filled with many tough enemies. You should be strong enough to tackle the area once you've reached Consecrated Snowfield. When taking the waygate in Consecrated Snowfield, you'll get teleported to a set of caves southeast of Mohgwyn Palace. The caves here are linear, so simply follow the path out and down and you'll be able to get to the Palace Approach Ledge-Road Site of Grace. Make your way north-west, where the slope is littered with Albinaurics, and make sure to grab the Smithing Stone (6) on the way down. At the bottom, you'll emerge into the main blood lake of Mohgwyn Palace.
If you'd like to grab the map fragment before exploring the area, keep heading north-northwest until you get to a section with three hunting horn-wielding Albinaurics who can summon large spectral skeletons. Defeating them is much safer, but it is possible to run away from them. Once you get past them, head west to find a ruin, and the single corpse sitting in the middle here has the Map (Mohgwyn Palace). If you've used the Pureblood Knight's Medal to teleport to Mohgwyn Palace, you'll be placed right at the entrance to this ruin. Head up the stairs to quickly grab the Dynasty Mausoleum Entrance Site of Grace.
With your newfound map, running around is much easier. If you take a look it, you'll see that a majority of the eastern side of Mohgwyn Palace is this blood-red lake. While you explore the lake area, you'll be invaded by three Nameless White Masks, each at different areas of the lake. Defeating these NPC invaders nets you the War Surgeon Set. In the southern section of the lake, you'll be able to find the Haligdrake Talisman (+2), a Golden Seed, and the Nomadic Warrior's Cookbook (24). In the northern section of the lake, as well as the caves that line the eastern wall here, you'll be able to find the Ash of War: Blood Tax, the Swarm of Flies Incantation, and multiple valuable upgrade materials.
Make your way back to the Dynasty Mausoleum Site of Grace and head up the stairs in the southwest. In this area you'll be encountering a bunch of Putrid Corpses. Many of them are fairly docile, not minding even a shoulder bump, while some will run at you and attempt to explode in your face. Whether you decide to take them out or leave them alone, follow the linear path here, grabbing a Smithing Stone (7), Numen's Rune, and Stonesword Key on your way.
You'll eventually get to a group of Putrid Corpses praising the sky in front of a dark doorway. This doorway leads into a very dark cave, so get your lantern or torch ready. At various points while exploring the cave, you'll get ambushed by Sanguine Nobles. If you die to them, you can respawn at the Stake of Marika right outside the cave's doorway. If you've done Varre's quests so far, an invasion sign to invade his world appears right by the doorway. If you choose to invade him, you'll find him later at the end of the cave. At the first cave split you encounter, a Sanguine Noble will appear. Head down the south split before heading north to find the Imprisoned Merchant.
When you head north, you'll immediately find a Lord's Rune in front of you. Continue northeast to get to a ledge overlooking a Great Ghost Glovewort. If you shine you torch down, you'll see a hoard of Putrid Corpses gathering around it. None of them in particular are the 'explode in your face' kind, so you can simply run past them to grab the glovewort. Next, head west, where you'll encounter another Sanguine Noble and a Smithing Stone (8) among some gravestones. Continue following the path, picking up the Ghost Glovewort (9) on the way, and you'll eventually emerge outside to the Dynasty Mausoleum Midpoint Site of Grace. If you invaded Varre, he'll be found in the corridor right before you reach the midpoint Site of Grace. Exhaust his dialogue to get six Festering Bloody Fingers and Varre's Bouquet.
Right ahead are a group of Albinaurics and a Sanguine Noble facing up towards a large statue. Take them out one by one and right in front of the statue is a Somber Ancient Dragon Smithing Stone you can grab. If you take a peek on the lower ledge behind the statue, you'll find a Stonesword Key.
Turn around, facing northwest, and take the lift ahead up to a large ruined temple. When you walk in, a cutscene plays and the fight against Mohg, Lord of Blood commences. Defeat him and you'll be rewarded with the Remembrance of the Blood Lord and Mohg's Great Rune. The Cocoon of the Empyrean Site of Grace spawns here after his defeat as well.
Miquella's Haligtree
- Navigate the Haligtree Canopy
- Collect Key Items and Ashes
- Make your way through Haligtree Town
- Collect Talismans and an Ancient Dragon Smithing Stone
- Defeat Loretta, Knight of the Haligtree
- Enter Elphael, Brace of the Haligtree
- Navigate the Outer Wall
- Collect Equipment and Ashes
- Navigate the Inner Wall
- Defeat the Lesser Ulcerated Tree Spirit
- Complete Millicent's Quest (if you're doing it)
- Activate shortcut connecting bell tower and underground
- Defeat Malenia, Blade of Miquella
Elden Ring Map: Miquella's Haligtree Starting Point. This next section covers Miquella's Haligtree. While it is possible (and slightly easier) to complete Crumbling Farum Azula at this point, completing that Legacy Dungeon causes several changes in the world and gives you access to an endgame area, making the completion of that dungeon flow much better later on. Click here if you'd like to tackle Crumbling Farum Azula before Miquella's Haligtree.
Miquella's Haligtree is split into two main parts, the tree canopy area and the walled structure within the Haligtree, Elphael, Brace of the Haligtree. You can find details on each of these sections on their respective pages. After you get transported to the tree's canopy from Ordina, Liturgical Town, the way forward is mostly north-eastward. There are a bunch of branching paths here that make navigation difficult, but exploring them may be worth it as you can find interesting loot such as two Stonesword Keys, the Prattling Pate "My Beloved", the Envoy Crown, a Lost Ashes of War, and the Oracle Envoy Ashes. Be careful of the Oracle Envoys here however, as they have hard hitting, long-ranged, homing attacks.
Once you've gotten past the giant Oracle Envoy and headed down a ladder on the left side of a wide tree branch, you'll reach the Haligree Town Site of Grace. From here, the way forward is more obvious and the enemies less deadly. Start heading down the stairs and before going down the final flight of stairs, head up the ladder on the left to find the Pearldrake Talisman (+2). Continue forward, past am axe-wielding Misbegotten keeping watch over a Smithing Stone (8), past two Giant Poison Flowers, past a large Misbegotten guarding an Ancient Dragon Smithing Stone, and you'll eventually get to the Haligtree Town Plaza Site of Grace.
From the Haligtree Town Plaza Site of Grace, head south to reach some roofs occupied by Lesser Spirit-Caller Snails. If you look down and to your right, you'll find a building roof you can jump down to, and following the path here leads you to a chest with the Viridian Amber Medallion (+2). You'll find the way forward if you continue heading south and jumping down to the next platform. Up the ladder is a hoard of mushroom infested zombies. Continue going forward by heading down the ladder on the eastern side and then going through the building again in the east.
You'll get to a bunch of bridges connecting to a single gazebo guarded by Battlemages. Defeat the Battlemages to pick up the Smithing Stone (7) & (8) from the corpses here and by crossing one of the bridges here, you can activate a shortcut that leads back to the Haligtree Town Site of Grace. Head across another one of these bridges to reach a large promenade. When you enter, Loretta, Knight of the Haligtree spawns at the far side and defeating her nets you Loretta's Mastery, and her weapon, Loretta's War Sickle. Interact with the Haligtree Promenade Site of Grace and continue north down a flight of stairs. Before you enter the room with the elevator, head up the stairs to find an Ancient Dragon Smithing Stone. Backtrack back to the elevator and it'll take you down to Elphael, Brace of the Haligtree.
Elphael is the the second part of the Miquella's Haligtree Legacy Dungeon and features a different set of enemies and different scenery. Cross the bridge guarded by a Cleanrot Knight and you'll reach the Prayer Room Site of Grace. You'll find Millicent here after speaking to her in Dominula, Windmill Village. Exhaust her dialogue, then continue forward in Elphael.
There are multiple paths you can take here to continue moving forward so explore to your heart's content. Items of note are the Marika's Soreseal and Triple Rings of Light Incantation, each locked behind their own imp statue, Miquellan Knight's Sword just below the bell in the center bell tower, and the Haligtree Soldier Ashes, Cleanrot Knight Finlay Ashes, & two Seedbed Curses each further into the castle walls from the Prayer Room Site of Grace.
No matter which route you take, you'll eventually get to an Erdtree Avatar in a courtyard overlooked by multiple ballistae. Defeat the Erdree Avater and you'll be able to interact with the Elphael Inner Wall Site of Grace behind it. When you head through the doorway down the steps, on your left is the Rotten Crystal Sword in a chest behind the tree roots. Turn right instead to continue forward and climb up the tree root ahead to get through an opening in the wall.
This opens up to a cliffside with a waterfall. The water here inflicts scarlet rot, similar to the water in the Lake of Rot, and in the area you'll find several Lesser Kindreds of Rot skulking around. The path here is quite linear so make your way to the cliff on the other side of the water and you'll be able to either continue up the hill or through a doorway to the right. You may want to head through the doorway first, as following the path takes you to the Drainage Channel Site of Grace, and the next part will be challenging.
If you continue up the hill and cross the tree roots, you'll get to a large secluded lake. In the middle is a Great Ghost Glovewort, and when you go to pick it up, an Lesser Ulcerated Tree Spirit will ambush you from the water. Defeat it for a Golden Seed. If you're doing Millicent's questline, you'll also be able to finish her questline here by either interacting with the summon sign that lets you assist her in defeating her invaders, or betraying her and invading her yourself. Depending on the choice you've made, you will either receive the Rotten Winged Sword Insignia and Unalloyed Gold Needle, or Millicent's Prosthesis. If you've interacted with the Three Fingers and want to remove the Frenzied Flame, make sure to assist her. You can also return to Gowry in Gowry's Shack to hear new dialogue. What you find in his shack differs depending on whether you betray or help Millicent.
Back at the Drainage Channel Site of Grace, follow the tree roots and support beams outside to get to a roof with a hole in it. Jump down into the building and to your west is a balcony with the Dragoncrest Greatshield Talisman. Jump down to the lowest floor, and if you want to explore the courtyard for various levels of Ghost Gloveworts and the Ghost-Glovewort Picker's Bell Bearing (3), head out through the eastern door. Otherwise, head through the southwestern door to get to a lift taking you down.
Immediately to your left (southeast) is a room with a large scarlet flower and Melina's Set. Head up the stairs here to activate the shortcut at the bell tower then head back out the room to interact with the Haligtree Roots Site of Grace. Head into the fog door in front of you to challenge Malenia, Blade of Miquella. This is a difficult boss fight, so feel free to check her page on tips and strategies on how to defeat her more easily. Defeat her to receive the Remembrance of the Rot Goddess and Malenia's Great Rune. Interact with the Malenia, Goddess of Rot Site of Grace that spawns after her defeat, and with that, Elphael, Brace of the Haligtree, and by extension Miquella's Haligtree, is done.
If you want to remove the Frenzied Flame, reload Malenia's boss arena and return the Unalloyed Gold Needle to the Scarlet Aeonia to recieve Miquella's Needle.
At this point if you've already met him, Dung Eater's questline can be finished. Return to him at the Subterranean Shunning-Grounds and give him the five Seedbed Curses you've found to receive the Mending Rune of the Fell Curse, unlocking another alternate ending. If you reload the area, you'll find his armor set, the Omen Set, on him. You'll be given the option to give him Seluvis's Potion if you still have it at this point. Do note that giving it to him prevents you from getting the mending rune.
Crumbling Farum Azula
- Navigate Crumbling Beast Grave
- Obtain several Key Items and Upgrade Materials
- Navigate the Dragon Temple
- Obtain a Stonesword Key
- Defeat the Godskin Duo
- Explore the Dragon Temple Lift area behind the imp statue
- Collect a Golden Seed & other Key Items
- Navigate the Dragon Temple Rooftops
- Defeat Dragonlord Placidusax
- Collect the Old Lord's Talisman
- Defeat Beast Clergyman/Maliketh, the Black Blade
Elden Ring Map: Crumbling Farum Azula Starting Point. If you haven't done so already, head to the Foot of the Forge Site of Grace to fight the Fire Giant. You can summon Iron Fist Alexander to aid you and get additional dialogue when you next meet him. Upon defeat, the Giant drops the the Remembrance of the Fire Giant. Head east up the mountain and up the chain to get to the Forge of the Giants Site of Grace. Interact with Melina here to teleport to Crumbling Farum Azula. If you've interacted with the Three Fingers at the Subterranean Shunning-Grounds, you have to select the 'Listen to the sound of flames' option at the Site of Grace instead. This Legacy Dungeon is quite big and it's easy to get lost. For details on item locations and how to navigate through the area, see Crumbling Farum Azula Walkthrough.
When you get to Crumbling Farum Azula, cross the bridge, and at the end, you'll find a Smithing Stone (8). Turn right and follow the path down. You'll get to a platform overlooking some Azula Beastmen and a building up ahead. When you get inside the building, head into the first doorway to your left to interact with the Crumbling Beast Grave Site of Grace.
Head back out the room and at the end of the hallway, you'll be back outside with a makeshift bridge in front of you. When you get to about halfway through, a Farum Azula Dragon swoops down to try to attack you. It takes a while for it to attack you however, and you can easily run past it to get to the Crumbling Beast Grave Depths Site of Grace on the other side. On your way here, you can pick up a Smithing Stone (6) and Smithing Stone (8).
In the next room, you'll find two Azula Beastmen and a Smithing Stone (7) on one of the altars. Head through the northwestern hallway, and you'll get to a three-way split. To the left is a dead-end and to the right is a path circling back to the same place we're going, just with more Azula Beastmen. Go straight ahead and through the doorway right in front of you to find a Golden Rune (12) on a corpse hanging off of the left of the balcony. To the right of the balcony, you'll be able to jump onto the rooftops to gain access to a higher floor in the building. You can collect a Smithing Stone (6) and Great Grave Glovewort on this floor. Head back down to the balcony, into the room and down the main stairway to find more Azula Beastmen and the Ancient Dragon Prayerbook on the floor. Immediately out the door to the northeast is the Temple-Facing Balcony Site of Grace and the Somberstone Miner's Bell Bearing (4).
If you want some extra loot, head back into the building and out the southwestern door. To the right of the stairs going down is a corpse hidden by some pots, which you'll find a Hero's Rune (2) on. At the base of the stairs, you'll find a lift taking you down to an area infested with Lesser Wormface. The path here circles 'round back to the lift, so there's no worries about getting lost just yet. In the lake area here, you'll find the Glovewort Picker's Bell Bearing (3) and a Smithing Stone (8). On your way back up to the lift, you'll find a Smithing Stone (8) on some arch ruins accessed by climbing up a ladder, and a Somber Smithing Stone (9) on the ground next to some Lesser Wormface. Once you're done, head back to the Temple-Facing Balcony Site of Grace.
Head down the floating rocks and ruins west, where you'll get to a large floating ruin chunk occupied by Skeletons that resemble Azula Beastmen. Grab the Somber Smithing Stone (7) here, then jump down north to the next large ruin chunk. Jump down into the hole in the corner of this chunk (should be immediately to your right when you land on it) and head northeast. Through the second door to your left is an item protected by a Skeleton, but the way forward is through the first doorway to your left. Follow the path, head up the ladder when you get to it, and then you'll find a Great Ghost Glovewort on the altar ahead. Three skeletal beastmen spawn behind you after you pick it up. Head out of the room and look down to your left to find a safe path back down to the large chunk of ruin with the hole you went down earlier. Continue north, picking up a Somber Smithing Stone (9) on the way, and you'll eventually find the Dragon Temple Site of Grace.
From this Site of Grace, if you turn back around from where you came from, you'll see a set of stairs you can jump down to. At the base of these stairs, turn around again and head into the building to grab the Azula Beastman Ashes. When that's done, teleport back to the Dragon Temple Site of Grace.
The structure ahead is the Dragon Temple. Be careful of the knights that wander its halls as they are formidable foes. Head through the temple's doorway then turn right. You'll find a Smithing Stone (6) at the end. Turn left and head down the stairs, then take a right again when you get to the hallway. Before going down the steps, turn left into another hallway to find a Stonesword Key. If you continue down this path, you'll be able to find two Dragonwound Grease and a Golden Rune (12). If these items don't interest you, backtrack back to the stairs and head down to get to the main hall. You'd have ended up in this room no matter which route you took. In this large room, you'll fight the Godskin Duo, and upon their defeat will receive the Smithing-Stone Miner's Bell Bearing (4) and the Ash of War: Black Flame Tornado. The Dragon Temple Altar Site of Grace spawns here too and you can now continue further into Crumbling Farum Azula.
If you head out the southeastern door you'll find the Dragon Temple Transept Site of Grace. The way forward is out the northeastern door instead. Jump down to the lower platform in front of you with Azula Beastmen, then head left down the stairs. When you emerge back outside, you'll find some ruin windows to your left. If you've got any ranged abilities, it is recommended to snipe the Rotten Strays and Azula Beastman here from afar as they can easily swarm you. Head through the window and be sure to check behind the ruin walls for a Hero's Rune (5). Jump down the ruins to the north and continue forward, taking note of the doorway on your right at the end of the hallway. Back outside, check behind the pillar in front of you for a Smithing Stone (7) then head up the stairs to your right.
At the top of the stairs, turn left and you'll find a a column that is floating diagonally, close enough for you to jump on and climb up. Up here, you'll find an Ancient Dragon Smithing Stone guarded by a Rotten Stray. Backtrack back to the top of the stairs and head west, where there will be a Somber Smithing Stone (9) and imp statue in the area. The imp statue here locks off a large, but completely optional area. If you unlock it, you can take the lift behind it to the Dragon Temple Lift Site of Grace. The area past this Site of Grace is worth exploring as there is a lot of valuable loot to be found.
Turn left after going out the doorway from the Site of Grace to get to a courtyard full of Skeletons. In the fountain in the middle is a Lord's Rune. Continue forward, sticking to the right side of the courtyard, and you'll get to an elevated platform with even more Skeletons. On the east side of the platform is a corpse laying by the edge of the cliff that has a Smithing Stone (8). Head westward next to find a Rune Arc and a Golden Seed close to each other. Continue southwest, down the slope, and you'll find a Teardrop Scarab that drops the Golden Lightning Fortification Incantation, and a Smithing Stone (8).
Head back up the slope you can from and turn left to find a series of ruins you can run across. If you follow the path, you'll get to the Farum Azula Dragon that breathed fire on you earlier on the way to the Dragon Temple. Keep going, and at the end of the path is a ruined structure with the Ancient Dragon Apostle's Cookbook (4). Be careful of the two Skeletons that attack you when you pick the item up.
In the same area where the dragon is, you'll find Iron Fist Alexander. Speak to him and accept his proposal to finish his quest. He'll give you the Shard of Alexander and Alexander's Innards.
When you're done with the area, teleport back to the Dragon Temple Lift Site of Grace. Take the lift down and head back down the stairs to backtrack back to the doorway you took a note of earlier. Continue forward, jumping down the ruins here, where you'll be able to pick up the Dragoncrest Shield Talisman (+2) hidden within them. Keep following the path and you'll get to an open area where you will meet a Crucible Knight. Once you defeat it, it will not respawn again.
You'll want to head southwest next. There are two viable ways to get to the Site of Grace you see ahead. One is by simply jumping over the banister of the balcony, and the other is by doing a tricky jump onto the floating ruins where you'll find an item. Once you've interacted with the Dragon Temple Rooftop Site of Grace, jump down the roofs and you'll find a Smithing Stone (6) next to some Eagles. Go down the ladder in front of you and if you look to the left, you'll find a floating platform behind the corner that you can jump to. Follow the path here to get the Drake Knight Set and you'll be able to circle back to the Dragon Temple Rooftop Site of Grace.
Head back down the ladder and head south towards the Farum Azula Dragon. On the way, you'll have to fight some more Eagles and avoid the lightning striking down. You can easily tell where it's about to land based on the red areas that appear before the lightning. When you get to the Dragon, you'll find it's at low health. If you're quick enough, you can defeat it before it flees to get a Ancient Dragon Smithing Stone. You'll find a Somber Ancient Dragon Smithing Stone in the gazebo behind it. To the left of the gazebo, you'll see platforms down and to the east. If you follow this path, you'll be able to find the Boltdrake Talisman (+2) & Dragon Towershield and from here, you will eventually circle back to the rooftops. Head back to where the dragon was sitting and head southwest.
Go up the slope then turn right, crossing the ruins here going north. You'll find a temple to your right with the Somberstone Miner's Bell Bearing (5) in front of the altar. Be careful in this temple as you will get ambushed by two strong Azula Beastmen. In the south side of the temple, you'll find a path and an elevator taking you to the Beside the Great Bridge Site of Grace.
From here there are multiple options to take. To go and fight Dragonlord Placidusax, head back down the elevator and exit the temple. Head straight ahead towards the edge of the cliff, and if you look down, you'll find some floating platforms you can jump down to. Follow the path down to get to a large empty platform. In the arch on the ground without bones, you'll get prompted to lie down. When you do so, a cutscene will play, after which you'll find yourself in the boss' arena. Defeat Dragonlord Placidusax for the Remembrance of the Dragonlord and interact with the Site of Grace here after it spawns.
Teleport back to the Beside the Great Bridge Site of Grace. Follow the stairs up and you'll get to a large crumbling bridge. For even more loot, head north down the bridge. Head into the building and when you emerge back out, turn left to find a Somber Smithing Stone (8). On the right of the doorway is a ladder you can descend. If you've completed Bernahl's questline and defeated Rykard, Recusant Bernahl will invade you when you reach about halfway across the bridge here. Defeat him for a Blasphemous Claw, the Devourer's Scepter and the Beast Champion Set. In the building ahead, you'll find a chest with the Old Lord's Talisman guarded by multiple Azula Beastmen.
After you're done with that area, teleport back to the Beside the Great Bridge Site of Grace and make your way back to the bridge. Head south, going up the bridge this time and you'll encounter a Draconic Tree Sentinel. You can choose to run past this enemy, however defeating it nets you the Malformed Dragon Set. Continue up the bridge, collecting the Somber Smithing Stone (7), and head through the fog door.
IMPORTANT: Defeating the boss ahead causes irreversible changes in the world until NG+. Make sure to finish any outstanding NPC quests and collect any achievement-granting Items, namely in Leyndell, Royal Capital, before you do so.
You'll start by fighting the Beast Clergyman. If you've given Gurranq all nine Deathroot, his dialogue will be different at the beginning and end of the fight. Once you get him down to 50% health, a cutscene will play and he'll transform into Maliketh, the Black Blade. On his defeat, you'll be given the Remembrance of the Black Blade and get teleported back to Leyndell, now in a different state. If you head back to Maliketh's boss area, you can interact with the Maliketh, the Black Blade Site of Grace.
If you've skipped Miquella's Haligtree, click here to go back to that section.
Leyndell, Ashen Capital
- Explore the Subterranean Shunning-Grounds
- Grab the Somber Ancient Dragon Smithing Stone
- Complete Brother Corhyn/Goldmask's quest
- Defeat an old ally, now boss
- Defeat Godfrey, First Elden Lord/Hoarah Loux, Warrior
- Defeat Radagon of the Golden Order/Elden Beast
Elden Ring Map: Leyndell, Ashen Capital Starting Point. After defeating Maliketh at Crumbling Farum Azula, a cutscene will play and you'll be teleported to back to Leyndell, now in a different state. Interact with the Leyndell, Capital of Ash Site of Grace that's nearby. If you return to the Roundtable Hold, you'll notice that things have changed drastically. You can speak to Roderika and Hewg for new dialogue.
Return to Jarburg and speak to Jar Bairn to hand over Alexander's Innards. Exhaust his dialogue and reload the area. Back at Jar Bairn's spot is the Companion Jar and back at Diallos' spot is Hoslow's Petal Whip and Diallos's Mask.
From the Leyndell, Capital of Ash Site of Grace, if you haven't explored the Subterranean Shunning-Grounds in Leyndell, Royal Capital yet, you can find a sewer hole in the ruined road southwest to access it. You should clear it now before progressing in the Ashen Capital. Click here to go to the Subterranean Shunning-Grounds section. Once you're done there, teleport back to the Site of Grace and head south to find a corpse with a Rune Arc on it. In the area, you may also find corpses with a Tarnished Golden Sunflower and a Golden Sunflower within some of the ruins. Make your way southwest from the Rune Arc to find a set of stairs.
To the west, you'll find a ruined part of Leyndell's walls with an illusory tree marking a Golden Seed (you've probably already grabbed this if you've fully explored Leyndell, Royal Capital). From this illusory tree, head down the stairs directly north and when you emerge back outside, head northwest to find a Valiant Gargoyle. You'll find a Somber Ancient Dragon Smithing Stone tucked in a corner if you check behind the wall it's standing in front of.
If you're doing the Brother Corhyn questline, head back to the curved staircase and to the right of it, between the stairs and the ruined wall is an ash-covered slope going down. Run across the large tree branch to find a Smithing Stone (6) and follow the cliff face east. You'll find Goldmask sitting right up against it not too far ahead, and are able to receive the Mending Rune of Perfect Order from him. If you reload the area, you'll be able to get his armor set, Goldmask's Set, minus the mask. Corhyn can also be found at the Ashen Capital. Still in the southwestern side of the capital, look for the giant dead dragon. There should be a large spiral spear nearby. Corhyn can be found sitting by it's base. Exhaust his dialogue and reload the area for Corhyn's Robe and Corhyn's Bell Bearing. If you chose to offer him the Tonic of Forgetfulness at the Stargazers' Ruins, he'll be found back there instead. Same deal, exhaust his dialogue, reload the area and you'll be able to get the same items.
Backtrack to the staircase and at the top, take the lift to go up onto a higher level. Here, you'll find Sir Gideon Ofnir, the All-Knowing who is adamant about stopping you from becoming Elden Lord. Defeat him and you'll be rewarded with the All-Knowing Set and the Scepter of the All-Knowing.
Interact with the Erdtree Sanctuary Site of Grace that spawns after Gideon's defeat, and head east out to the main balcony. Turn left and scale the tree root here up and to the west. Follow the path north and you'll get to the Queen's Bedchambers. Here, you'll find the Erdtree Heal incantation in the middle of the 'bed'.
Continue out the door east and up the stairs you'll encounter a fog door. Beyond this door is Godfrey, First Elden Lord in his physical form rather than the golden spectral form you encountered earlier in the game. After taking him down to about 33% health, he turns into Hoarah Loux, Warrior and defeating him nets you the Remembrance of Hoarah Loux.
Interact with the Elden Throne Site of Grace that spawned and head up the stairs to the southeast. Touching the golden light at the top teleports you to the final two bosses of the game, first of which is Radagon of the Golden Order. Defeat him and the next phase against the Elden Beast starts immediately after the transitional cutscene. Defeat them both to be rewarded the Elden Remembrance and to be able to interact with Fractured Marika, ending this playthrough of the game.
Click here to jump to the endings section.
Subterranean Shunning-Grounds
- Navigate the pipe room
- Obtain Mohg's Shackle
- Navigate the Leyndell Catacombs
- Defeat Esgar, Priest of Blood
- Visit the Dung Eater in jail
- Navigate the sewer tunnels
- Defeat Mohg, the Omen
- Complete Hyetta's quest
Elden Ring Map: Subterranean Shunning-Grounds Starting Point. The Subterranean Shunning-Grounds is located underneath the city of Leyndell. The sewers here are maze-like and navigation can get tricky because it doesn't have it's own map. This section will only cover some key items and main NPC interactions to reduce confusion. This area can be done while in Leyndell, Royal Capital, however, it's infested with tough monsters and thus recommended to finish later in the game. You won't miss out on any bosses or loot if you visit here later as this area remains untouched.
The only thing that changes is how you get to the area. In Leyndell, Royal Capital, you can access the grounds by heading out the door from the Avenue Balcony Site of Grace and jumping down into the well underneath the large dragon wing. At the bottom, you'll find a Rune Arc and some gates you can open. Follow the path here and open the door at the end to reach a platform overlooking the ground's 'main hallway'. In endgame Leyndell on the other hand, from the first Site of Grace you encounter, head southwest to find a road with a hole in it. If you jump down from here, you can access a wooden beam with a corpse holding the Crimson Amber Medallion (+2) hanging off of it. Jump to the very bottom and you'll end up at the 'main hallway' as well.
This starting area is referred to as the main hallway because many shortcuts in the Subterranean Shunning-Grounds all lead back here. Be careful of the Ogres patrolling these halls. Head northeast, and in the first door to your left, you'll find the Underground Roadside Site of Grace. Leave the room and continue northeast, where you'll find the Bloodsoaked Mask and Bloodsoaked Manchettes on a corpse. Head back southwest and you'll find a ladder going down in one of the cubbies in the wall.
You'll be navigating some pipes here in the next room. There are Imps waiting to ambush you on the higher ledges that you can target and knock off if you've got any ranged abilities. Follow the pipes up to the southwest then turn left at the corner to get to a large wooden platform with wooden crates and barrels. From here, the pipes take you northwest and it splits into two paths. On the right, the pipe goes down and leads to a Somber Smithing Stone (6). On the left, there’s a small wooden platform and the pipes lead you to an upper ledge you can jump up to with a Smithing Stone (7) and a doorway.
Through the doorway, turn right and head up the stairs. The room here has the Shadow Bait Incantation. When you pick it up, the Ogre in the corner gets alerted and will start attacking you. To the northeast, is a gate you can open with the nearby lever, which opens up a shortcut back to the main hallway.
Head south from here and back down the ladder in the cubby in the left wall. This should take you back to the pipe room with all the Imps. Instead of going up the pipes, look down to the southwest and jump down to the pipe below. You may take a bit of damage jumping down, so make sure you're not too low on health. If you can, it'd be a good idea to kill the Giant Lobster from up here, and when that's done with, jump down onto the floor.
Turn left and you'll find another Giant Lobster. In this section of the sewers, you'll find a Teardrop Scarab in one of the hollow pipes that drops a Somber Smithing Stone (7), and sitting on the far wall is a corpse with Mohg's Shackle on it. After you've looted these items, head through the hole in the southwestern wall and turn right to find the Leyndell Catacombs Site of Grace. Head back up the stairs and turn right. You'll find a lift taking you up. Head into the room and hit the various illusory walls to the right of the stairs to reveal a Spirit-Caller Snail and the Haligdrake Talisman (+1) in a little cubby. Alternatively, you can simply run past the enemies and go straight up the stairs. Run to the very end of the hallway is a lever you can pull. This opens up a shortcut back to the main hallway to your northeast.
Now that you've got another shortcut, head back down to the Leyndell Catacombs Site of Grace. From here, head down the stairs and turn left. At the end of the hallway will be a flooded room. Head up the stairs and on the corpse ahead is a Ghost Glovewort (6). Head back out the room and into the southwestern hallway. Don't turn right yet but instead, hop onto the circular platform in the room ahead and it'll take you up to a higher floor.
In the room here is an Ogre guarding the Crucible Scale Talisman on the altar further in. Once you've grabbed it, head back down the circular platform and turn left into the hallway we ran past. At the very top of the two staircases, you'll find an Ogre and a Grave Glovewort (9). Head into the next room and jump down the middle to pick up the Grave Glovewort (8) from the altar. If you want a Ghost Glovewort (8) and Golden Rune (11), head down the hallway to the northwest and turn left into the room down the stairs. Be careful of the two Ogres hanging out in that room. Backtrack back to the room where you picked up the Grave Glovewort from the altar and head up the stairs to the southeast.
Turn right into the next hallway and you may notice that the layout of the area is strikingly similar to the area earlier. Head up the circular platform up ahead and take another right into another hallway. This next area has a couple of Imps. Follow the stairs down and head down the ladder. Continue following the path and in the next room, pull the lever in front of the statue. A message will pop up letting you know a new area has opened.
Jump down onto the lower level, then head down the hallway to the northwest. Turning right takes you back up the stairs to the Leyndell Catacombs Site of Grace and turning left takes you down to a fog door. Past the fog door is the Esgar, Priest of Blood boss fight, and defeating him nets you the Lord of Blood's Exultation.
Teleport back to the Underground Roadside Site of Grace and we'll go pay ol' Dung Eater a visit. If you've received the Sewer-Gaol Key from him, you'll find him here in the Subterranean Shunning-Grounds next. Back at the main hallway, head northeast and on the left, you'll see an open sewer grate. Jump down and head northwest. Ignore the opening in the wall on your right for now and head all the way to the end, turning left at the corner. There will be two Giant Poison Flowers here that you can run past, and at the end of the tunnel, there's a ladder you can climb up. Be careful when entering the next room as multiple Spider Hands will fall from the ceiling. Turn right into the room and the jail cell at the very end houses the Dung Eater. Here, you can tell him that he's free from his jail cell to continue his quest.
If you return to the Roundtable Hold at this point, you'll find he has left a message for you where has sat. Find and defeat him in the Capital Outskirts when he invades to receive the Sword of Milos. Return to the Roundtable Hold to speak to him and listen to his request.
You can teleport to the Underground Roadside Site of Grace or simply run back past the Giant Poison Flowers from this jail area, but either way you'll want to go back to that opening in the wall you ran past earlier. This is where navigation may get confusing. The tunnels here have numerous splits and turns and are infested by pretty squishy Slugs. To progress forward without worrying about looting, follow this path - from the opening in the wall, the tunnel will naturally turn left. Jump over the gap in the floor and keep going straight. You'll get to a corpse with a Glass Shard. Follow the corner turning right, and the tunnel will slope up. Jump over the gap in the floor again then at the split, turn right through an open gate. Keep going forward from here and the path should naturally turn slightly right and slope down. When you get to the end, you'll know you're at the right place if it opens up to a room with a Somber Smithing Stone (8) and an Ogre guarding a ladder up.
Up the ladder, head into the room and immediately turn southwest to open up another shortcut back to the main hallway. At the far east side of this room, you'll see two Ogres sitting idly in front of a statue. Before engaging with them , open the doors directly on the southern wall, directly opposite to the doorway you came from. This narrow doorway will help you deal with them. Pick up the Smithing Stone (7) in front of the statue to aggro the Ogres, then run through the southern door. The Ogres won't be able to fit through, letting you run away or deal with them easily.
From the doorway, turn left to reach the very top of the broken stairway and look down to find another section of the stairway you can jump down to. There will be a Teardrop Scarab here that drops the Somber Smithing Stone (6). Follow the stairs down, and at the end pick up the Silver-Pickled Fowl Foot before heading into the doorway to your right.
Turn left at the corner, then left again at the end of the tunnel. Head down the stairs here, but not the ladder. At the bottom of the stairs, turn completely around to find a little room underneath the platform you were on earlier. You'll have to navigate some narrow tunnels again, but instead of harmless slugs, these tunnels are infested with Basilisks. From the open gateway, turn left at the corpse with the Preserving Boluses, then right where the slope goes up. There'll be a Basilisk up ahead and one in the next cubby to your right. Deal with them then keep going forward in this tunnel. At the very end, turn right, and the tunnels will slope up, leading you to a large room with another Ogre.
If you loot all the corpses in this room, you'll get four Glass Shards, a Dappled White Cured Meat, and two Golden Centipedes. Head up the ladder in the room and go through the doorway to the northwest. Open the door across the wooden bridge to open the final shortcut back to the main hallway, this one being directly opposite to the Underground Roadside Site of Grace.
Turn around back to the wooden bridge, and hop onto the pipe to the southwest. Follow the pipe up and to the left, being careful of the Imps. At the very top, look northeast and jump down to the wooden scaffolding below you. Head through the doorway here but don't head down the ladder. You'll be back in the room with the one Ogre and the multiple corpses with the Glass Shards and Golden Centipedes. Jump down onto the pipe and head into the pipe's opening.
Time to navigate some narrow tunnels again! While you run through, you'll find some Giant Rats around. From the pipe opening, the tunnel will naturally turn right. Keep heading forward and the tunnel will naturally turn left. At the turn, immediately turn left again and the tunnels will slope down. Turn right at the split and fall into the hole in the ground. Make sure you're facing northeast and head forward where the tunnels slope down. Turn left at the very end and the path will slope down again. At the end, you'll find a ladder you can climb down.
In the next room, you'll find a Ritual Pot on a corpse within a group of Living Jars. Head northeast and take the cage lift down. At the bottom of the lift, you'll find the Forsaken Depths Site of Grace, and if you follow the path ahead, you'll get to the fog door opening up to Mohg, the Omen. You can use the item that you found earlier, Mohg's Shackle, to stun him twice during the fight. Defeat him to be rewarded with the Bloodflame Talons Incantation and to be able to interact with the Cathedral of the Forsaken Site of Grace. In the chest at the altar is the Erdtree's Favor (+1).
If you're doing Hyetta's questline or want to unlock an ending, attack the altar here and you'll open up a secret passage. Follow it and you'll get to a large shaft. You'll be able to jump down safely to two wooden beams. After that, you need to fall the rest of the way down to break the floor. You'll die in the process of breaking the floor, but if you go back and fall through the shaft again, there should be certain areas where you don't die to the fall. At the bottom, you'll find the Frenzied's Cookbook (2) and should be able to finish Hyetta's questline. At the far end of the corridor, you'll find a strange looking pair of double doors. Interacting with the doors while you have all your equipment unequipped triggers a cutscene and gives you access to one of the multiple endings. Go back and speak to Hyetta to get an item. Do note that after going through the door, Melina will leave you at the next Site of Grace and you will be locked to this ending until you get ahold of Miquella's Needle.
With all that complete, you're done with the Subterranean Shunning-Grounds. To return to the Leyndell, Royal Capital section click here. To return to the endgame Leyndell section, click here.
Endings
- The Three Fingers' ending
- Ranni the Witch's ending
- Fia's ending
- Brother Corhyn/Goldmask's ending
- Dung Eater's ending
- Default ending
There are 5 NPC questlines that lead to different endings - Ranni, Fia, Brother Corhyn, Dung Eater, and thought they have no individual questline, the Three Fingers. With the exception of the ending granted by the Three Fingers, when you go to interact with Fractured Marika after defeating the Elden Best, you are able to choose which Mending Rune you mend the Elden Ring with, and thus which ending you want to go with. For a detailed explanation of all these endings, visit the Endings page.
Interacting with the Three Fingers in the depths of the Subterranean Shunning-Grounds will give you access to the "Lord of Frenzied Flame" ending. You'll be given the option to "Become the Lord of Frenzied Flame" when interacting with Fractured Marika. While there are no particular NPC quests tied to this ending, speaking to Shabriri prior to receiving the Flame of Frenzy and completing Hyetta's questline gives you some direction towards and context behind the ending. Do note that receiving the Flame of Frenzy from the Three Fingers locks you out of the other endings (i.e. you cannot get the other five endings even if you have the mending runes for them).
To remove the Flame of Frenzy and have access to the other endings, you have to obtain the Unalloyed Gold Needle from defeating Commander O'Neil, and bring it to Gowry to have him repair it. Defeat Malenia, Blade of Miquella at Miquella's Haligtree and reload the area. There should now be a Scarlet Aeonia (a large red flower that has bloomed) in her boss room. Interact with it to receive Miquella's Needle. Next, head to Crumbling Farum Azula and make your way to the Dragonlord Placidusax boss fight. After the cutscene ends, you can immediately use Miquella's Needle in your inventory before fighting the dragon to remove the Flame of Frenzy. It is possible to do all these steps and complete Millicent's questline in the same playthrough. After giving her the Unalloyed Gold Needle, follow Millicent's quest until the end. Make sure that you assist her in defeating her invaders rather than betray her, and she'll return the Unalloyed Gold Needle to you.
Completing Ranni's questline and using the Dark Moon Ring on her body in the Cathedral of Manus Celes gives you access to the "Age of the Stars" ending. After defeating the Elden Beast, rather than interact with Fractured Marika, interact with Ranni's summon sign found in front of it.
Completing Fia's questline gives you access to the "Age of the Duskborn" ending. After giving her the Cursemark of Death and defeating Lichdragon Fortissax, you'll find the Mending Rune of the Death-Prince on her body. After interacting with Fractured Marika, choose the option to use this Mending Rune to get this ending. It is possible to get this Mending Rune and complete the questline of D's Twin Brother by giving him the Twinned Set after receiving the Mending Rune.
Completing Brother Corhyn/Goldmask's questline gives you access to the "Age of Order" ending. After reaching the end of their questline and completing Crumbling Farum Azula, you'll find Goldmask in Leyndell, Ashen Capital and can loot the Mending Rune of Perfect Order from his body. After interacting with Fractured Marika, choose the option to use this Mending Rune to get this ending.
Completing the Dung Eater's questline gives you access to the "Blessing of Despair" ending. After giving him five Seedbed Curses, the screen turns black and when the game comes back, you can loot the Mending Rune of the Fell Curse from his body. After interacting with Fractured Marika, choose the option to use this Mending Rune to get this ending. Do note that using Seluvis's Potion on him instead of the Seedbed Curse locks you out of this ending.
If you've beaten the game without completing any of these NPC's questlines or don't want any of their endings, the default ending is the "Age of Fracture". After interacting with Fractured Marika, simply choose the option to "Mend the Elden Ring" to get this ending.
 Anonymous
- Anonymous
i disagree that Subterranean Shunning-Grounds is that late. I did it before visit mountaintop and it was clearly more easy than mountaintop :D
- Anonymous
the sewers is not lvl 150 post-game bruh. ur supposed to explore it at like lvl 60 before fighting morgott. at lvl 150 u literally one shot Esgar
- Anonymous
I just finished my first play through of Elden ring. I just want to thank whoever compiled this guide. Very helpful. I personally had no problems with the directions and route it took me on. So again thank you, very appreciated.
- Anonymous
Why do you have Subterranean Shunning-Grounds as 150+ and dead last? why would you go there that late? That Mohg has less health and gives way less runes
- Anonymous
The sheer number of times East and West are completely backwards in this guide is unreal
- Anonymous
I think Dragonbarrow's difficulty is about equal as Mountaintop of the Giants or even Crumbling Farum Azula,
it's definitely not on par with Altus Plateau at all.
- Anonymous
- Anonymous
>Leyndell before MOTG, Haligtree, snowfields, farum azula, and moghwyn palace
This can not be serious
- Anonymous
holy this is not written that well. A lot of the cardinal directions are completely wrong, and tons of vague language makes this really confusing to follow. Take better care editing next time!
- Anonymous
This is a good guide. The levels are appropriate, BUT just as a first journey recomendation. When you get good at the game (2nd playthrough if u didn't use summons in the 1st), some areas are way overleveled. For example, Leyndell royal capital should be around 70. I don't mean to offend anyone. Just a heads up for ppl who want to keep the game fun and challenging enough.
- Anonymous
I really appreciate that this must have taken a lot of time to compile, but somebody needs to proof read this stuff. It can be really hard to follow at points. Not only from the grammar but it kinda jumps a bit during complex areas. At one part of the Stormveil walkthrough it just says "head to another armory", which is really terrible directions for a beginner like myself.
- Anonymous
The guide would be awesome if you divide in "drops section" and "progression section". Like, it would be nice to have a straightforward "progression" guide instead of having lots of information about where the drops are... Thank you for the guide!
- Anonymous
Missing Magnus the Beast Claw invasion in Altus, Writheblood Ruins
- Anonymous
I always go to Altus Plateu first - only the middle of the zone, which is named Altus Plateu - and Lake of Rot only after that, because there are a lot’s of sacramental buds across Plateu which makes significantly easier to discover Lake of Rot. If you clear up the middle of Altus first and you have a chance to enter into Lake of Rot with 50+ Preserving Blouses. Without discovering Altus Plateu first, you will have only 25-27 which is barely enough even if you don’t die a lot to the zone.
- Anonymous
just to recommend you guys should add map locations when clicking on the link of like where to find a grace or where to talk to kenneth I think it would help out a lot
- Anonymous
You should put Boc's quest after going to see Bernahl, otherwise you miss out on the oppertunity to summon him.
- Anonymous
I‘m not sure why, but even with finding Seluvis‘ secret room, having multiple starlight shards, AND freeing Sellen, I couldn‘t get the dialogue to ask Seluvis about the puppet room / get the puppet shop. It only became available once I no longer had the potion, which occurred fairly late for me as I gave it to Dung Eater. So if you‘d rather not delay Ranni‘s quest (and by extension Fia‘s quest) until after you‘ve cleared the Capital, then you might as well just give the potion to Gideon (or Nepheli if you prefer that for some reason) right away.
Shunning Grounds should be listed much earlier. It's scaled to around Mountaintops of Giants and Snowfields. The fact it's dropping Erdtree's Favour +1 and not Erdtree's Favour +2 should tell you that.
Just finished my first playthrough following this guide from start to finish. Completed all the quests and also got all the achievements. Thanks a lot for your amazing work!
- Anonymous
"At night, Bernahl will be gone, and a Bell Bearing Hunter " will only happen if you visited Stormveil castle already.
First of all thanks for the amazing guide, I'm following it for my first playthrough and you guys did an amazing job!
I want to make a clarification about the very beginning of Liurna of the Lakes West section.
The guide says:
[ ! ] Please Note: If you want to do Seluvis' questline, Or if you want to give his potion to Dung Eater, you should hold off on delivering the Fingerslayer Blade until this is completed. You should also be aware that a choice must be made at the end of Seluvis' questline and you'll be given the option to betray an associated character. Nothing will be gained from this attempted betrayal and you'll antagonize that character, but absolution can be found at the Church of Vows.
You'll have to seek absolution or not do the final step if you wish to continue Ranni's quest after doing Seluvis's. Since nothing can be gained from the betrayal, it is reccomended to avoid it.
I found a bit difficult understanding what I actually had to do in order to do Selvis' questline, it's not explained very well.
Follow this passages:
1) DO NOT give the Fingerslayer Blade to Ranni
2) follow the passages to complete BETRAYING RANNI questline in this page https://eldenring.wiki.fextralife.com/Preceptor+Seluvis and stop after completing this passage: "Handing over the Amber Starlight shard will reward you with the Magic Scorpion Charm"
3) NOW you can give the Fingerslayer Blade to Ranni and she will reward you with the Carian Inverted Statue
4) go back to Seluvis's Rise and you will find him death (it's ok, you completed his quest) and there will be some loot on his body (https://eldenring.wiki.fextralife.com/Preceptor's+Set and https://eldenring.wiki.fextralife.com/Seluvis's+Bell+Bearing)
5) if you want you can go to https://eldenring.wiki.fextralife.com/Pidia,+Carian+Servant 's location and you will found some loot on its dead body (https://eldenring.wiki.fextralife.com/Pidia's+Bell+Bearing , https://eldenring.wiki.fextralife.com/Nepheli+Loux+Puppet and https://eldenring.wiki.fextralife.com/Dolores+the+Sleeping+Arrow+Puppet)
6) now you can proceed with Ranni's quest following the Liurna of the Lakes West section. Start from where it says "Give the treasure of Nokron (the blade) to Ranni and she'll reward you with the Carian Inverted Statue, which when reading the description tells you to head to the Carian Study Hall" and do what it says to do
Following this passages you will be able to complete both Seluvis' and Ranni's quest without seeking any absolution
- Anonymous
- Anonymous
I've just finished the game after following this guide word-by-word for months now. ~80hours it took me - thank you for writing this and dedicating the time to make it great!
- Anonymous
The shunning grounds is more like +15 to +18. I did it before entering the snow mountains and yet I was no where close to dealing reasonable damage to NorthEast Caelid/Dragonbarrow. And all these level recommendations are terrible.
- Anonymous
Just want to say thanks for putting this guide together. Started following it once I got to Liurnia for the first time and got a tad anxious that I would start missing side quests or other cool content in the game if I was just exploring on my own. I know this isn't meant to be a 100% completion guide, but having just finished the game, I feel it allowed me to experience enough of the game that I was thoroughly satisfied with the entire experience after over a hundred hours of playtime. So thanks to all who contributed to putting it together.
- Anonymous
This game kicked my ass several times way on release, but I followed this guide and made it all the way to the end and had a blast doing it. One of my favorite games of all time. Thank you so much!
- Anonymous
I was able to inherit the Frenzied Flame and I still could choose the other endings. Is that a bug??
- Anonymous
The walkthrough for Elphael has one error.
Regarding the Erdtree Avatar with the ballistae after the Prayer Room, you do NOT have to defeat it to access the Elphael Inner Wall Sacred Grace. I was able to run past everyone and unlock it. Then, I was able to cheese the Avatar from the Grace, because I was struggling too much to clear that area.
If you pull him towards the Grace, you can run to the next room and he's too big to follow, and then he will despawn. Very similar to the Black Blade Kindred boss in Bestial Sanctum.
Hi all, to Nokron and the part how to get Gostflame Torch: „An option is to wield the Winged Scythe that you found in the Tombsward Ruins and use its special attack to make the jump across the gap, make another special attack jump to get across a second gap to get to the rooftop, and eventually pick up the item which is a Ghostflame Torch.“
There ist no need using the ability from Winged Scythe. Just do normal jumps from tower to tower, to the bean/small rooftop and to the last rooftop,
This is my first comment, and by the way: This wiki is awesome! There are tons of information and even more important: they are structured very well! Love it :-)
- Anonymous
Just finished my first play through and honestly cant thank you enough for this truly fantastic guide. An enormous amount of work must of went into creating this and I want to thank you for your time and effort!
- Anonymous
In Mt. Gelmir, right after climbing all the ladders and going through the small camp, Volcano Cave is off to the right. It's not even mentioned in the walkthrough. It has the Jar Cannon and the Demi Human Queen Margot boss fight.
- Anonymous
"You should be strong enough to do Dragonborrow." No, just no. This one is waaaay off.
- Anonymous
You forgot to mention Millicent's location in the Mountaintop of Giants. You need to talk to her in this location after Windmill before she will show up at the Haligtree.
For the Caria Manor section, it would be good to include what to do behind the manor aside from the Rises. There's another site of grace "Behind Caria Manor" and some spirt ashes and ashes of war back there! Definitely worth it to add to this and the dedicated Manor page :)
- Anonymous
Ranni's dark moon sorcery (legendary sorcery) and black knife tiche evergaol fight (legendary ashen remains) is not listed in the guide. Please add this as well
You guys got the progression map messed up in a lot of places dragon barrow is a late game area so is nokstella nokstella should be after the capitol and dragon barrow should be somewhere next to consecrated snow fields they have somber smithing stones 7 and 8 and the gear and the level of equipment their you don’t even get untill after lendeyl the royal capitol so I if you follow the loot you can easily tell which areas to go you shouldn’t be a level 80 or 90 and have level 8 somber smithing stones if you went just off of the level of smithing stones you could figure out very quickly which areas to go to next and I know you guys are trying to make it align with the story but somethings should be done untill late rannis quest should be dragged out untill closer towards the end
- Anonymous
This section in Liurnia of the Lakes (West) does not make any sense to me and I'm not sure how to proceed from here:
You can explore this destinations to get a sneak peak of later areas in the game. It's possible to range the enemies you come across, and also you get to take revenge vs the Grafted Scion that defeated you in the tutorial in the Chapel of Anticipation. In the same chapel, you'll find The Stormhawk King at the top of the chapel. You can return to the Roundtable Hold now and give them to Nepheli to progress her quest, or wait a little until you've met Seluvis to keep his quest options open
What am I supposed to give to Nepheli? Am I supposed to go to the Chapel of Anticipation?
- Anonymous
Miquella's Haligtree section is missing the mention of the somber ancient dragon smithing stone that's at the end of the outermost walkway with the patrolling putrid avatar
While it is well detailed in a lot of ways and actually does help, I do feel that a few times it seems to jump randomly, like specifying points in side quests you wouldn't have progressed, especially when it says "you haven't got the thing yet" if we haven't got it yet, move that to the section when you do have it.
Also, and this is totally minor, but what was the point in telling us to go to Ainsel River partway through the Luirnia section? It's not a "natural" progression as the guide put it, especially as we come back here much much much later for actual reasons.
- Anonymous
This zone order guide dont work on 1 point . You can not go Ansiell river before carla manor ( west Lurnia )
- Anonymous
In Altus Plateau, it suggests the following to get to the Ravine-Veiled Village Site of Grace.
"1. You can fast travel to Caria Manor (Manor Upper Level grace site)
2. Head west until you find a big cliff acting as a bridge to the other side of the terrain.
3. Afterwards head north (there is a Golden Seed in the path) until you find the Ravine-Veiled Village site of grace.
4. From here, you can find your way through to Ruin-Strewn Precipice."
However, Point 1 is completely wrong. You cannot access it from Caria Manor, you access it from Bellum Church. I have no idea what this editor was thinking.
On Mt. Gelmir, the way to get to the Fallingstar Beast is confusing. It jumps from the Merchant to the Beast without mentioning the bridge, the Ninth Mt. Gelmir Campsite Site of Grace or the spiritspring jump, so it's easy to get confused. I went up and down the ladders a gazillion times until I saw a YouTube video telling me where to find it.
- Anonymous
I'm not going to lie, I don't really think making guides is your forte here. This has actually thrown me off many times already in my gameplay. Your Liurnia of the Lakes "guide" assumes people know far more skips than is acceptable to be called a "guide." If there are not skips involved in completing your "playthrough" of Liurnia, please rewrite what you have written. I have literally needed to YouTube the skips to understand what you are even saying. This guide leaves out 60% of playing this game, and that makes it basically unusable. You can use this guide for a barebones course through the game, but expect to spend a lot of time looking things up on YouTube to be able to make this work for a playthrough beyond Limgrave.
- Anonymous
In Stormveil Castle. Halfway through. After you speak to Sorcerer Rogier you're supposed to "Make your way to an armory room." That makes no sense. There's no armory room connected to the chapel. There's no armory room directly near it at all. I think the person writing this may have switched the following bit and the next paragraph by accident because it feels like the whole thing jumps around weirdly.
- Anonymous
Something is up with the formatting of this page and all the text is scrunched to the right of the screen. None of the other pages have this issue.
- Anonymous
For the shunning grounds, there are some incorrect directions. After picking up Shadow Bait.
"To the northeast, is a gate you can open with the nearby lever, which opens up a shortcut back to the main hallway.
Head south from here and back down the ladder in the cubby in the left wall. This should take you back to the pipe room with all the Imps. "
You can't head soth from here without going back into the room with the pipes. You head northeast to get back to the ladder, which is on the right, not the left.
- Anonymous
There's a section for Azula where you say to go through a hallway, then through a doorway straight ahead that leads to a balcony with a golden rune, then you can jump to the right. This is incorrect. The balcony is before you go through the hallway with the 3 way split.
- Anonymous
If you turn Alexander innards to the jar in the village you get Champion Jar talisman .
- Anonymous
Several instances of being told to go west when the objective is in the EAST. very confusing if you don’t have dyslexia.
The progress route is so messed up:
1. The whole Nokron section needs to be placed AFTER Subterrenean Shunning Ground. Because Dung Eater is related to Selvulis' questline but doing Nokron (and picking up Fingerslayer Blade) completely blocks off his questline.
2. Shunning Ground needs to be BEFORE Leyndell Royal Capital so you can reach DE and gain access to him in order to complete both Selvulis and Ranni questlines.
3. Volcanic Manor should be AFTER completing Leyndell and AFTER reaching MotG because you need access to the area in order to do the Assassination requests in Volcanic Manor.
4. Since Ranni's quest is after Shunning Ground, Deeproot Depth should also be AFTER Shunning Ground.
5. Putting Shunning Ground at the end makes NO sense. The final area in the game should be Haligtree (after Azula and before Ashen Capital).
- Anonymous
A note about Boc and Liurnia of the Lakes: meeting Boc at the grace only happens at night. If you rest until nightfall he spawns.
- Anonymous
I've gone through this walkthrough a couple times and both times, by the time that the guide tells me to go to Volcano Manor, Rya has moved on and I have to go there on foot. I think the guide should tell the player to accept Rya's offer to teleport there, get the grace, and then go back later.
New to Souls games? Here's all you need to know:
(1) Weapons - Don't fall for the trap of wasting upgrade materials on the early game weapons. Any weapon you find before lendyll, Capital of Ash is trash, so save those precious upgrade materials until you get there. That's when you strike!
(2) NPCs. Kill all of them, immediately after meeting them. They drop loot, and loot is good. Loot is nice.
(3) Rolling is a meme. Real players don't roll because you look like a clown. No, you stand there and take an attack like a man. Just R1 through that sh-t. You'll be OK.
(4) Don't pour all your levels into one stat. Balance is key. Never get to a point where your highest stat level is more than 4 levels above your lowest one. Doing so will create a weakness, which enemies will exploit.
(5) You probably won't have to worry about this one, but if the game ever stops and you see big red letters that say "YOU DIED", don't freak out OK? It's alright. It just means maybe this game isn't for you.
(6) Most of all, have fun!
This guide should really take you over to fight Recusant Henricus at some point before fighting Margit. He drops a Talisman and if all the area bosses have been defeated, he won't spawn, making that Talisman unobtainable in that playthrough. In addition, items that are needed for some of the multiplayer features are in that area.
- Anonymous
Did I understand correctly that you can only complete volcano manor after you have completed leyndell to gain access to the forbidden lands?
I don't understand how this guide wants us to handle Blackguard Big Boggart. In the Liurnia section, it says,
"you can also buy some Boiled Prawn so he will move to his next location. Do note that if you move him now, he won't be available as a merchant in the later half of your playthrough. This will be explained later in the guide."
However, this explanation never comes. He isn't mentioned again until the Leyndell section, where it says,
"If you followed the instructions in Liurnia and talked to this merchant, you will now meet Blackguard Big Boggart. You can now purchase Boiled Crab from him."
This is contradictory. The instructions in Liurnia advise you to not buy the Prawns, but buying the Prawns is the only way to get him to show up in Leyndell and start selling Crab. When are you supposed to buy the Prawns? The guide never tells you. Ideally you'd want to buy them before going through the Ruin-Strewn Precipice so you can summon him for the Magma Wyrm Makar fight, but I have no idea when this guide actually expects you to buy them.
- Anonymous
wrong on haligtree, someone did some datamine whatever that calculates area scaling. ( clean rot knight in caelid w low scaling is very weak vs haligtree clean rot knight, with high scaling for high levels) The enemies right before malenia have the highest scaling in the game. Malenia is also the hardest boss in the game. Maybe for earlier parts of the halig tree, it can be 135 recommended, The branches until loretta, but malenia's spot should also be 150 like mohg.
The Roundtable Hold section says Roderika will be there even if you haven't given her the Chrysalids' Memento but, if this was true before, it doesn't seem to be anymore. I have access to Roundtable and Roderika is still waiting at Stormhill Shack.
- Anonymous
I don't see the Moonlight Altar. Does this mean it's not worth doing the side quests there and skip getting the Black Knife Tiche?
- Anonymous
Missing the Recusant Henricus invasion near the coliseum northeast of Stormhill Shack (hammer talisman drop) and the third Anastacia invasion in the Consecrated Snowfield (somber ancient dragon smithing stone drop).
- Anonymous
Right before the Night’s Cavalry, I didn’t see it mentioned (new) but I saw a one of those things rolling a ball that replenish your flasks… shortly after passing an area with a troll and a few dogs, right after the bridge with enemies going into weeping peninsula… if you kill it, it drops Ash of War: Mighty Shot. Not sure if you can buy it anywhere or it matters but I thought that would be nice to know.
- Anonymous
You know what, I do see some of these have elaborations, however they don’t have a link directing you to what it’s referring to. Give some of these have contributions I can somewhat let go of the fact it’s not set up that way, but still… the guide is here, it elaborates on every step here and there which I assume was the O.P, but still, it just seems weird to have to find whatever page it’s referring to if I even find it vs. just being informative right here right now.
- Anonymous
I’m just saying, it would help a ton if some of these things were more informative and specific as if you’re explaining it to someone that’s never played the game, because that’s who a majority of people reading this guide are.
Btw, in the peninsula south, that tower that mentions turtles, it should probably contain information on the proximity, how they appear and probably that a few are literally invisible. I found one accidentally because I ran into an invisible thing. I struck my sword and boom, it was a turtle.
- Anonymous
I appreciate the guide and will make as much use of it as I can, but I have to say some of these descriptions/directions/steps aren’t very descriptive. I’m still in the beginning but I noticed it said there’s a portal behind the third church of marika, it’s actually in the river behind the third church of Mariam in a spot with a lot of bushes. Well hidden if you don’t know where to look but s blue light shows you once you get close enough. Just think there needs to be clarity and as specific as possible. Less confusing ya know.
- Anonymous
Great write up. I hate that this game contains virtually no indication of who has a quest or where NPCS are or will be after speaking to them. Not to mention almost nothing in this game has name plates and too many bosses/npcs have similar names. Thanks G.R.R. Is it really that difficult to add names above health bars like they do for invaders? I'm still on my first playthrough with 150 hours of played time and I'm still going back to find things I missed entirely. I never played dark souls so this is all new to me. Still trying to figure everything I need to get done before defeating the Fire Giant.
- Anonymous
This is honestly a very awful guide when it comes to the entirely Caelid and the Lake of Rot. Talk about no sense of direction at all!
- Anonymous
Plz rework this guide so that Seluvius' questline is BEFORE opening the chest with the Treasure of Nokron
I was following the guide and not reading ahead and thus locked myself out of getting the magic scorpion charm :(
- Anonymous
This guide is amazing. It helped a ton. Only thing i would note is that when it gives you the option of doing the Altus Plateau before those other areas, go for it or in the very least make a detour to get the Amber Starlight first. When i finally got to the Amber Starlight, i was already done with Ranni's quest and i missed out on getting the Magic Scorpion Charm as Preceptor Seluvis was already dead.
- Anonymous
Subterranean Shunning-grounds are not that bad to do it as the last part. Difficulty wise it should be Miquella`s Haligtree
Wow! This walkthrough got me through the game. I just finished with the Age of Order ending. I made a few minor contributions to the walkthrough as I went along, adding some links and clarifying some of the prose. Thank you so much for this walkthrough. With the links to the more detailed walkthroughs and the map links there, I feel like I was able to run around and get as many items as I could. What a journey! Took me over three weeks to finish this game. In comparison, the most recent PC Release of God of War took less than two weeks. Lost a ton of sleep since I have to work in between gaming, but what a beautiful and incredible game this is. Incredible job compiling this walkthrough. I was often so busy being fighting monsters and collecting loot that I often missed what item I picked up as I was running around the world. Detailing what items are in which location must have been extremely challenging.
The map links were critical in filling in the blanks when I got lost while following the walkthrough directions. Also, links to the detailed walkthroughs for different areas were extremely helpful, as well.
Thank you for this walkthrough!
- Anonymous
"After defeating Morgott, speak to him for some additional dialogue."
Speak to him how? Where?
- Anonymous
oh btw you can get to most all the locations in the game, all except Mt of giants, went up to but not in Lendell Royal capital between lv35-40ish, and i don't know how to YouTube tricks i found yet so everyone can view, but ill figure it out and the best rune farm that hasn't been mentioned yet, this is one is so so awesome. quite a few mobs cant get past this 1 spot and i use maidens mist, and Bam tons of runes lol, oh and how do i become VIP ? and id like to donate a little to the person that wrote this guide, he's trying give him credit, if it wasnt for him where would most of us be in the game still cant find a English strategy guide, we would all be lost trying to figure it out our selfs
- Anonymous
this is a great guide, i found everything others did not and said this wasn't here that wasn't there, its here and plus more than what this guide said, sorry i cant remember what i found but there was tons of things, I'm offline up to where Ranni's Rise is, 155;08 hours, literally get everything wep/armor/ect ect. i have tons of RPG games and strategy guides for every one, only thing i wish is to find a English strategy guide for this game, sorry i just wanted to add these few things
- Anonymous
Would be nice to warn about the festival starting before doing Ranni's questline and missing out on items/boss fight.
- Anonymous
Dragonsbarrow is actually a level 90-110 area? That explains it. I've spent a combined total of five hours at level 35 being demolished by the Godskin Apostle like a proper idiot. Thanks for the guide!
- Anonymous
Dragonsbarrow is actually a level 90-110 area? That explains it. I've spent a combined total of five hours at level 35 being demolished by the Godskin Apostle like a proper idiot. Thanks for the guide!
- Anonymous
Wow! All these smart people pointing out any little detail they found wrong. Makes me wonder why they even here. They should be writing walkthroughs, not using them.
- Anonymous
FYI if you plan to get dung eaters ashes you need to deal with that _before_ giving ranni the Fingerslayer Blade. Otherwise she kills him and you don't get to finish that quest.
- Anonymous
Just found out i missed an encounter of npc invasion, Recusant Henricus, by solely following this progression guide. I wish this guide also cover 100% missable.
- Anonymous
Have to say, its very frustrating half of the directions are just wrong. Example:
Mt. Gelmir Starting Point.Go west and down to the canyon floor, to find Seethewater River site of grace. This is impossible and the wrong direction. You can simple teleport to Wyndham catacombs and drop down just outside to get to the same grace, so starting there would be silly anyway. I've noticed incorrect directions many times previously going through the guide as well.
- Anonymous
the part with the ghostflame torch is actually not really needed in that way.
- Anonymous
Thank you for the awesome guide. I'm still quite in the beginning, but I would like to point out some things that are not correct. I see some people here are downvoted for that, but the guide could use some updating.
For example the Stormveil castle:
1) The route guide to Liftside Chamber grace is 100 % not right. Currently it actually is guiding you more towards the Rampart Tower grace.
2) When you defeat Godrick, Fia does not offer you the Weathered dagger, as I've understood it, it comes later after the Radahn festival.
3) It would be nice that the guide would tell you about the snake beast thing in the basement because it gives you a Golden Seed upon defeating it.
4) The guide tells you that you get the Omen Cleaver from the ogre, but this is a chance drop, which means you have to farm for it.
5) The guide does not tell you how to get into the treasure inside the statue next to said ogre. You need the giant for that.
6) The guide does not tell you about the Crucible Knight and the Ashes of War you get before reaching it (you get there from Rampart Tower grace after the bombing birds).
Other points:
-The guide says that (on east Limgrave) Melina offers you to go to the Roundtable Hold, which is not true until you actually defeat Margit.
-I found it confusing when it says (on east Limgrave) that "Afterwards, go back to the Third Church of Marika. In the back there will be a portal that will take you to your next location." With this it is assumed that the guide is referencing to the starting location for southern Limgrave. This maybe my own confusion, but I never found such portal.
-It also sais that "If you have access to the Roundtable Hold, after that discussion a gateway will be marked on your map that allows you to teleport to the Bestial Sanctum in eastern Caelid", which is not true, as you don't need to have access to the Roundtable Hold (confirmed it with my playtrough so far).
-The guide says that (on west Limgrave) that "At night, Bernahl will be gone, and a Bell Bearing Hunter boss will spawn as you enter the shack." This is not entirely true. As the NPC will be there if you go there during the night. You actually need to sit on the grace next to the hut during the night before entering the hut to trigger this boss to appear.
Anyway, I would still think the guide is great, but there are things that could be updated. Good job and thank you!
- Anonymous
First of all i would like to thank you for creating this amazing wiki and progress route. I just beat Malenia but can not interact with her. It says you can interact with her after reloading Malenia grace arena but i see non interactable giant flower in the middle. How can i interact with Malenia after beating her?
- Anonymous
Thank you very much for this awesome guide! Im currently in mountain top of giants. seems you skipped/missed a lot of stuff here also someone earlier mentioned mt. gelmir minor erdtree missing in guide I did miss that too.. would be nice if you add it when you can. Anyway great guide big thanks :)
Just came here to say I became a VIP mostly because of this guide. I truly appreciate the amount of time and effort put into this.
Missing the Hammer Talisman you get by being invaded by the colosseum in Limgrave.
- Anonymous
- Anonymous
- Anonymous
- Anonymous
how am i suppoed to talk to fia in deeprot depths if according to the this route you don't reach altus plateau yet ._.
- Anonymous
The article doesn't mention the illusory wall before Red Wolf of Radagon mist in Raya Lucaria
- Anonymous
Little of consequence for the story by going to atlus so go to caelid instead says the site.
Atlus is 100% mandatory for the game, caelid is 100% optional, think you were very wrong there
- Anonymous
For those like me who interacted with Three Fingers and got the Frenzied Flames in the first playtrough, don’t worry as you can still get all 3 endings and trophies/achievements if you manage backups to return to the point after defeating the final boss.
Finish Millicent’s Questline, defeat Malenia, rest in the site of grace which spawns after fighting her, go to the flower and pick up Miquella’s Needle BUT DON’T USE IT !!!
Then, after defeating the final boss, rest in the site of grace “Stone Plataform” which spawns the final battle place.
NOW you will create a backup of your current data and you will have the Frenzied Flame Ending and the trophy will show up.
After this, you will substitute your current data with the one you’ve backed up earlier!!!
Now you need to defeat Dragonlord Placidusax in Crumbling Farum Azula to unlock it’s site of grace. There you will use Miquella’s Needle and free your Tarnished from the Frenzied Flames, being able to get the other two endings that were locked by the Frenzied Flames ending. Repeat the back up process and everthing will be fine.
- Anonymous
"Players can reach this location by getting up the cliffs east of Gowry's Shack from the south" Not sure this is possible at this point, and you may want to review. I've been trying to find a path up all along the cliffs and can get pretty close but keep getting "kicked" back down.
- Anonymous
This might be a big ask but is it possible to do a print ready thing for this page? I'd like to make a pdf copy of it
- Anonymous
I have been followign this guide and do not see where it comes back to cover Caelid North and the Beast Sanctum? it seems that's an important part to the Hunter D sidequest to get the outfit set to trade for the gesture without killing him. Where should this part fit the guide?


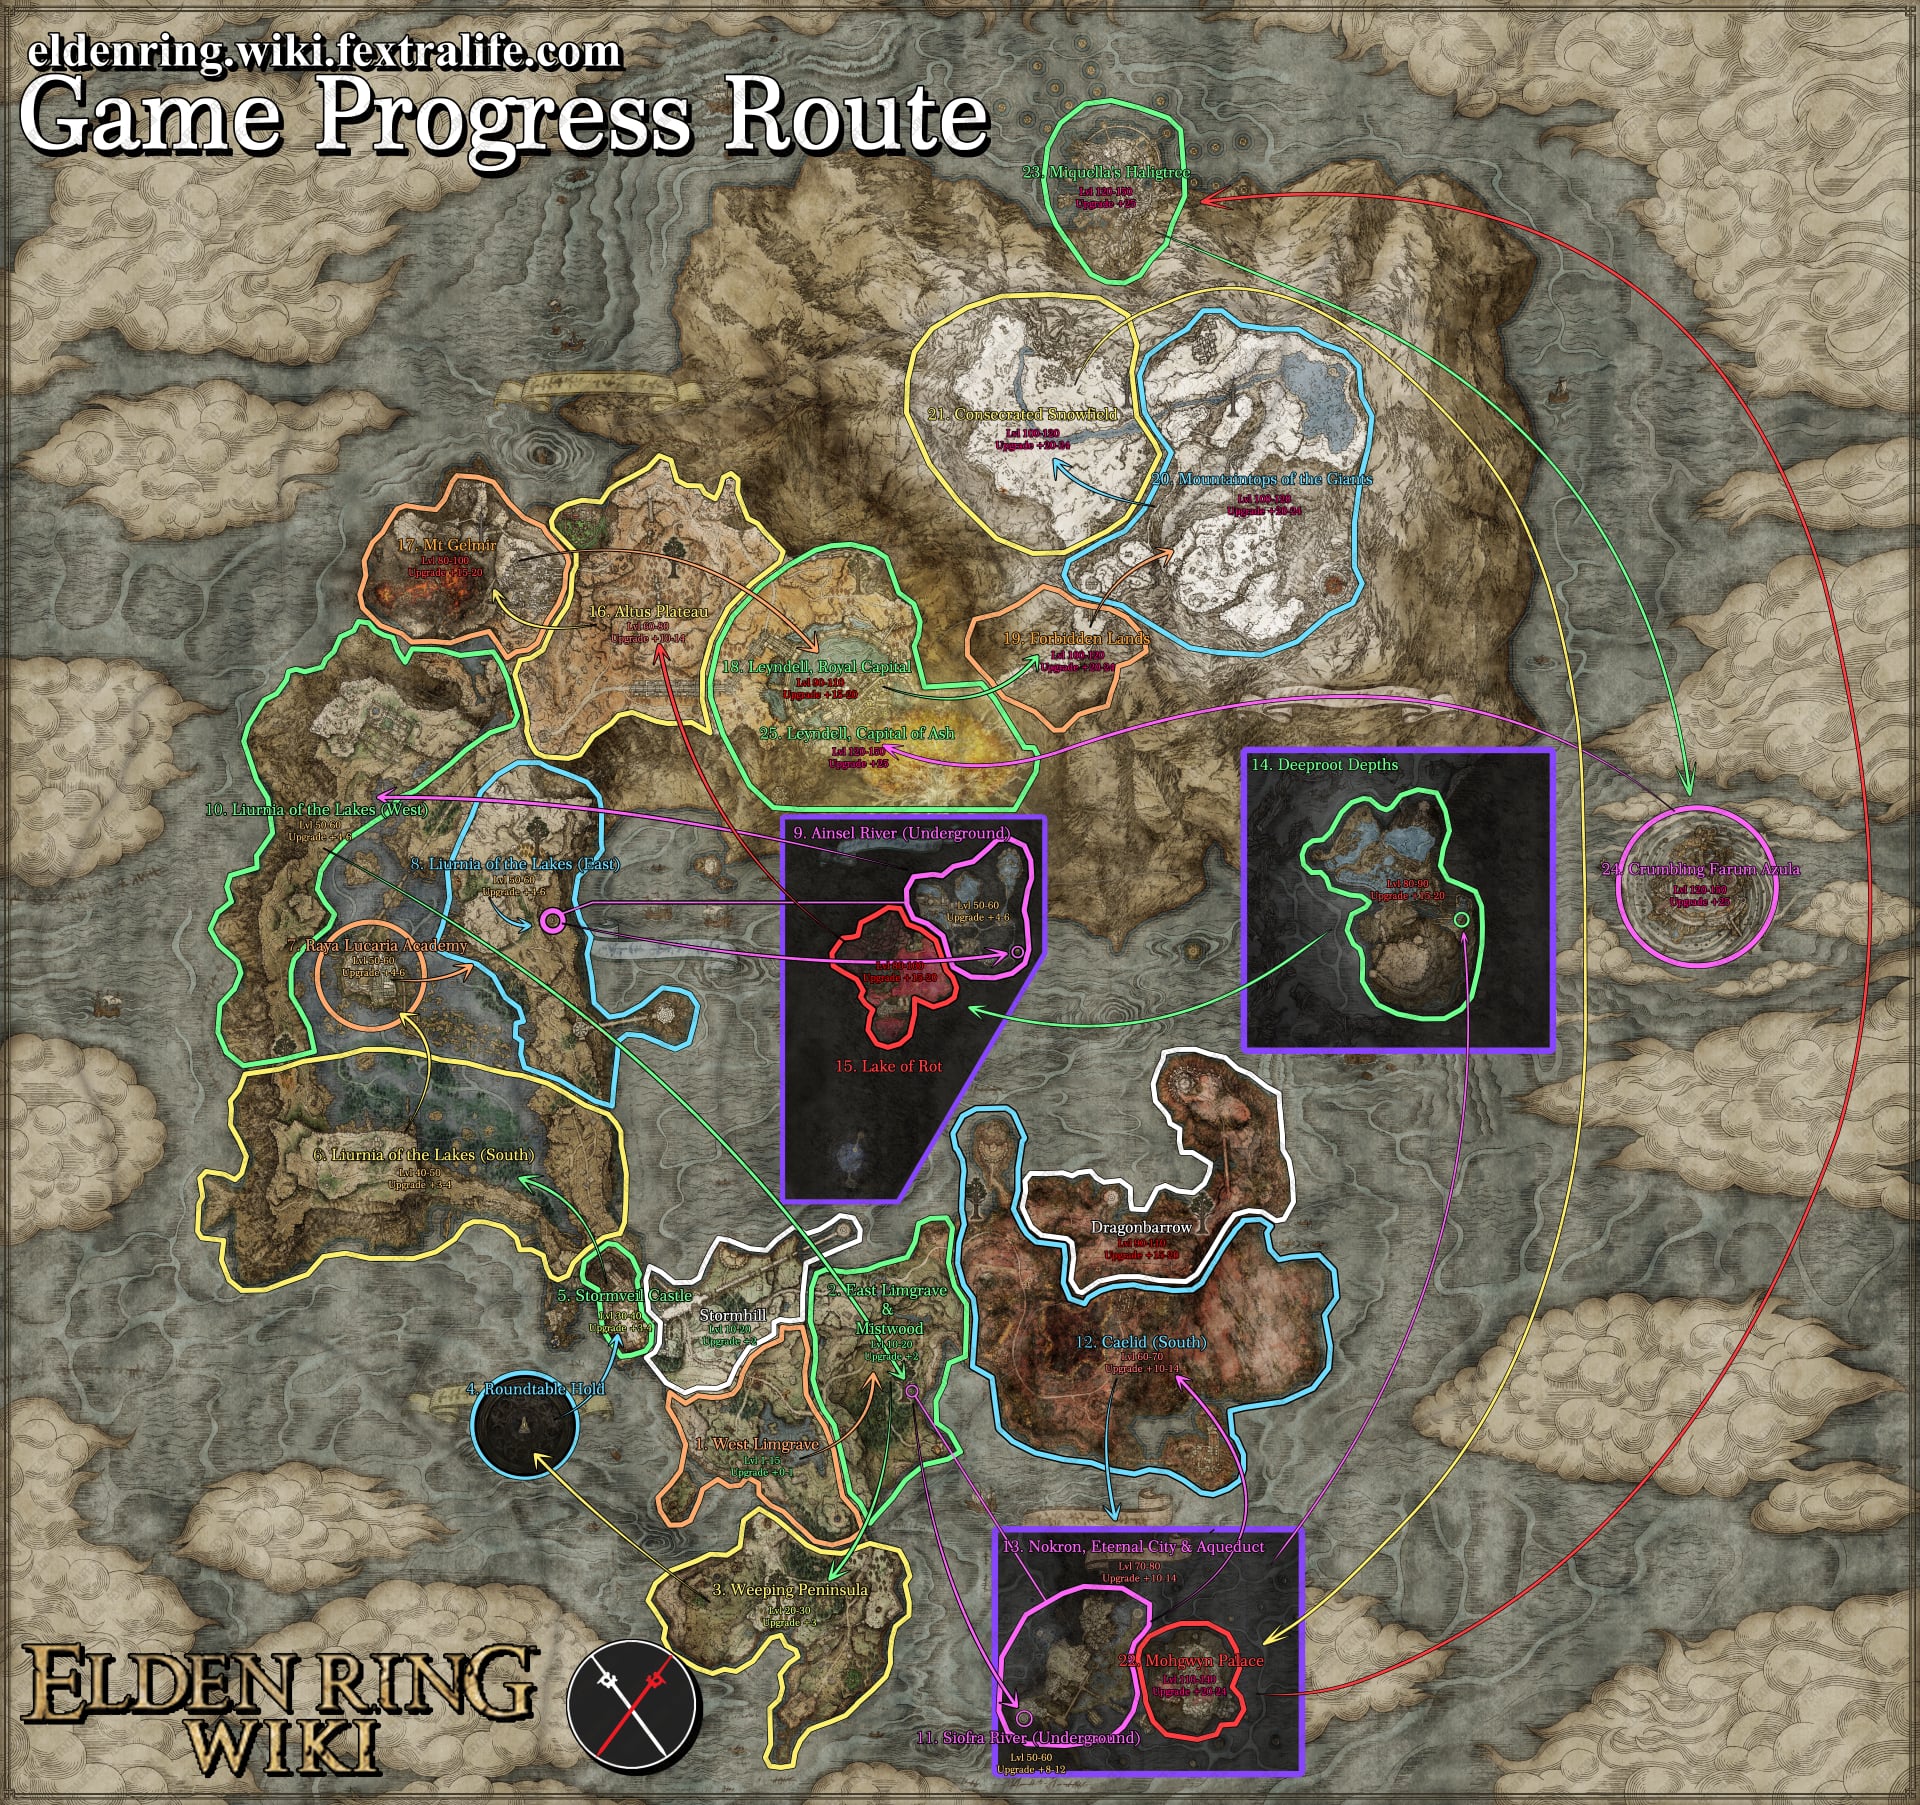
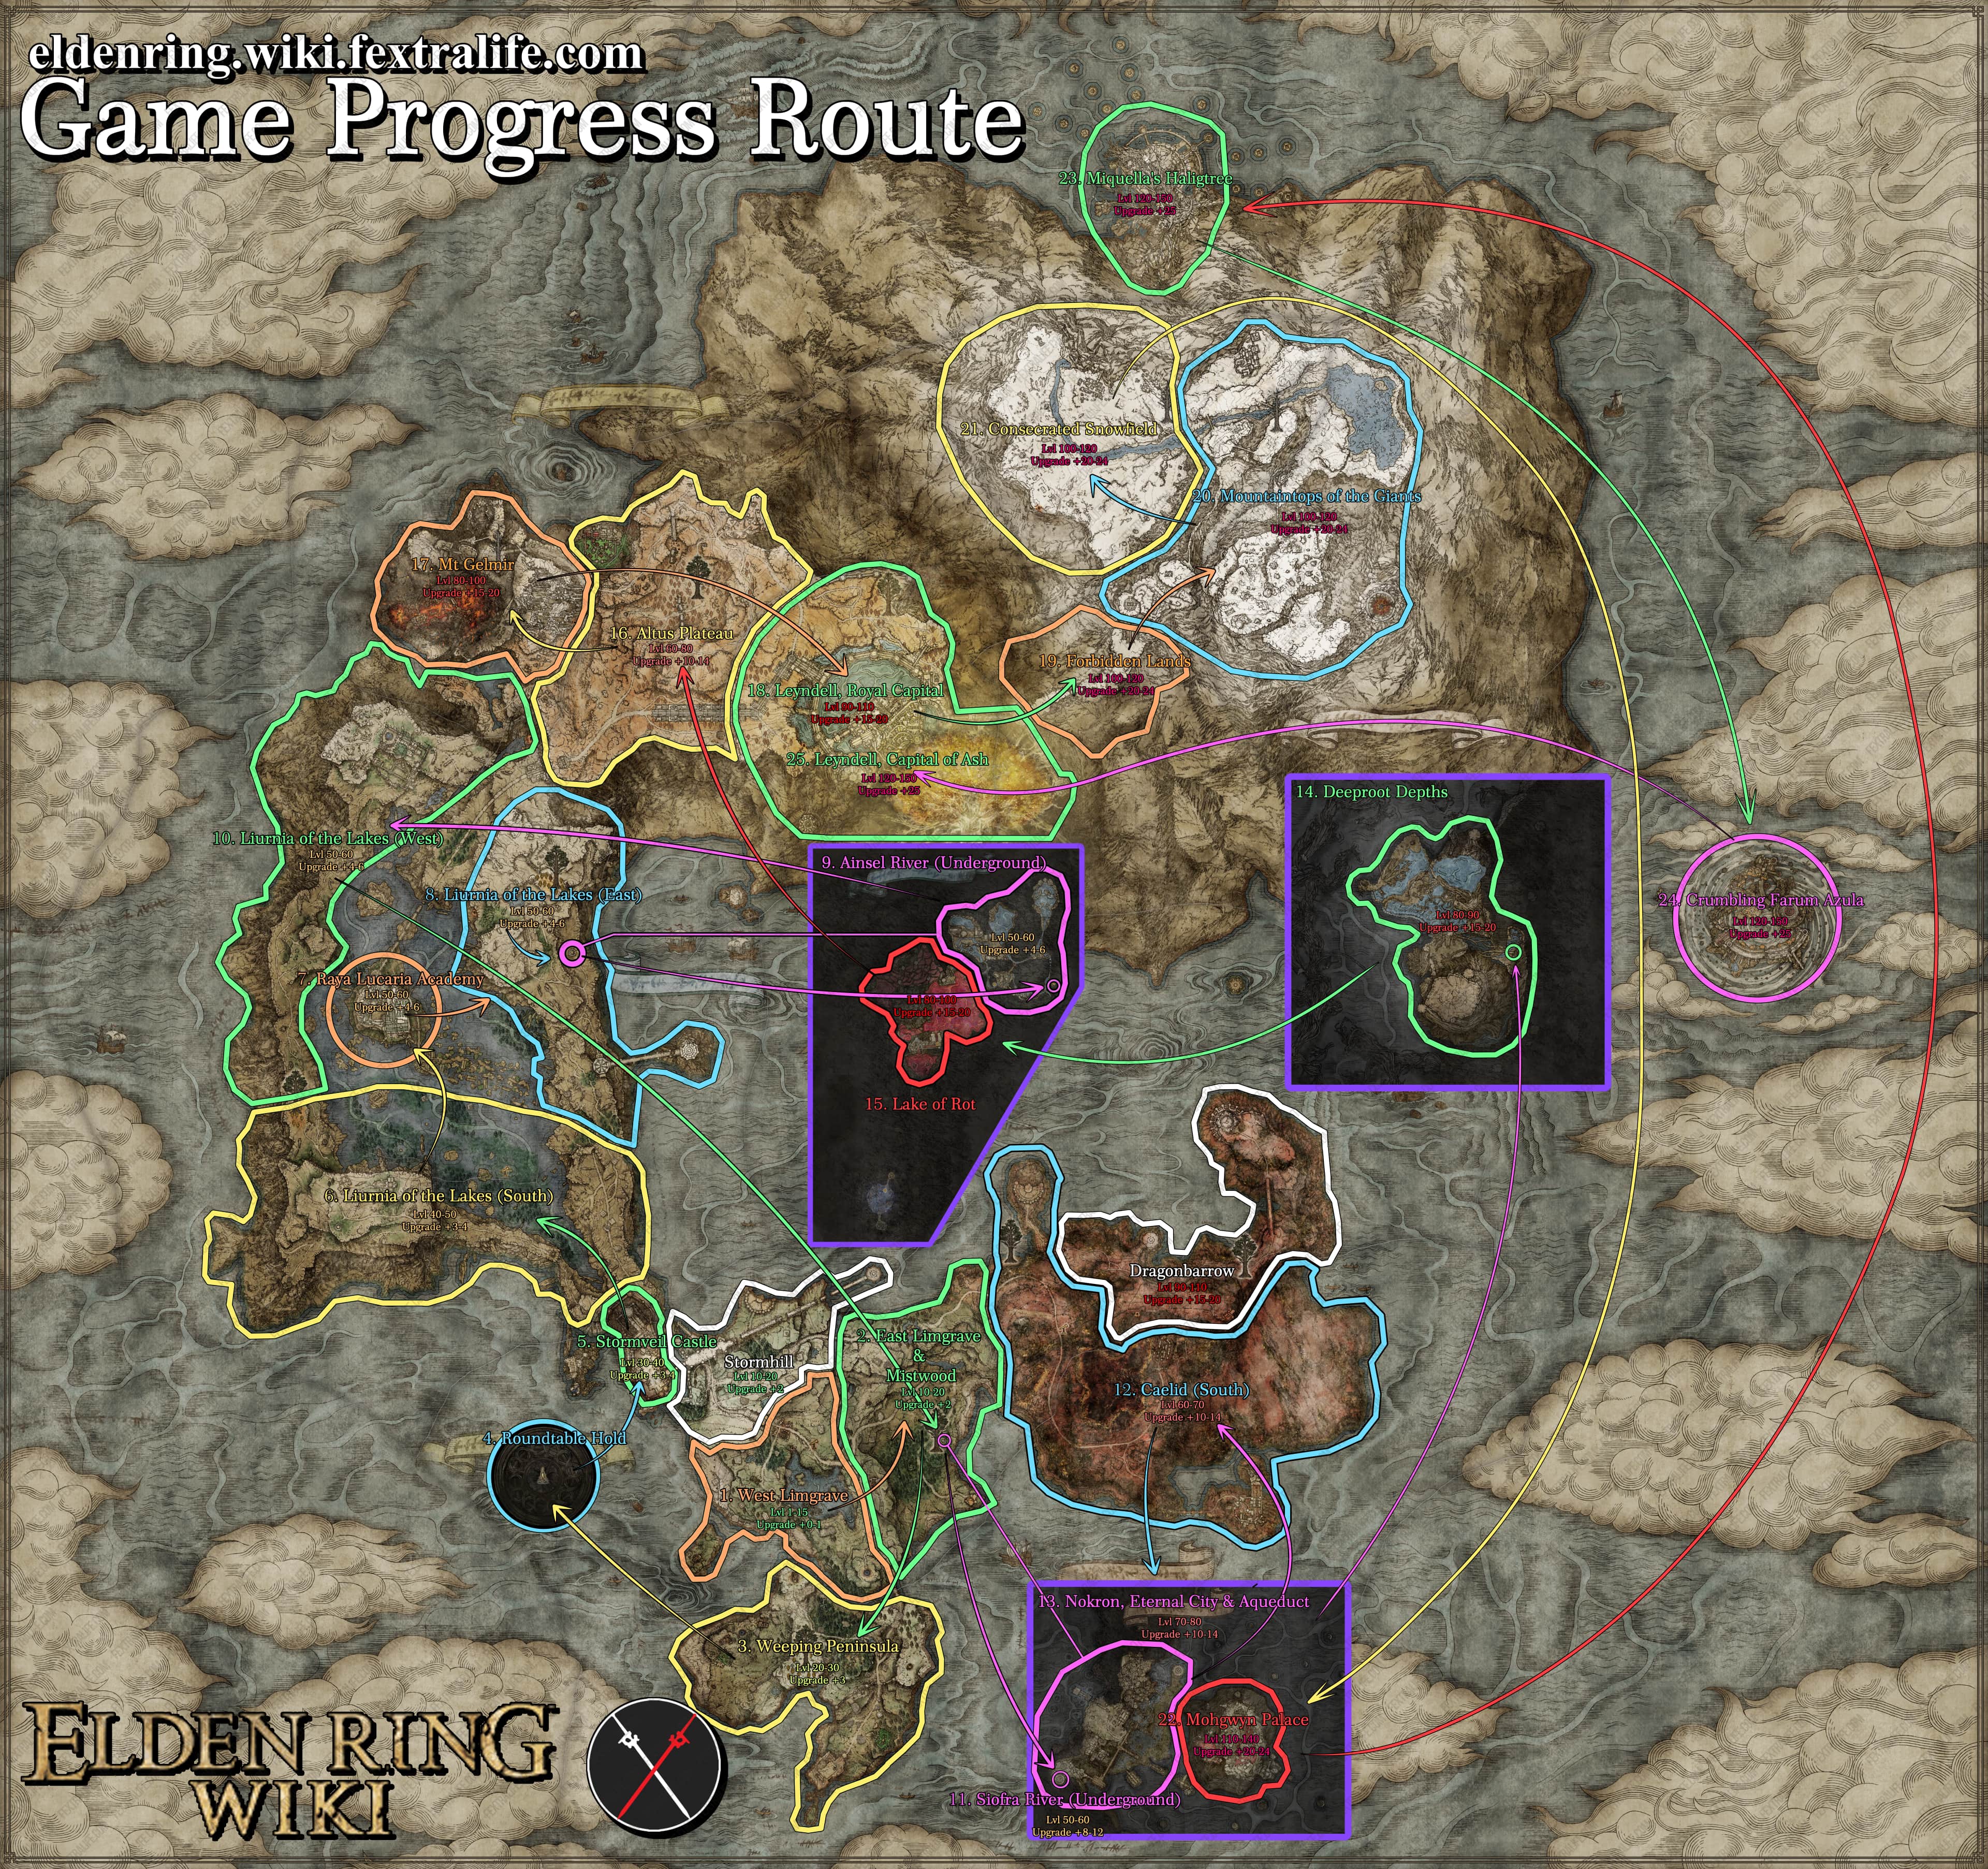
This page is a huge undertaking. Please feel free to contribute.
UPDATE: This now covers a FULL playthrough! We are working on adding the questlines within the progress as best as possible. HOWEVER please note that you will need to use your own discretion to remember to jump to the roundtable hold or go to give deathroots to gurranq, etc.
See https://eldenring.wiki.fextralife.com/Side+Quests to ensure you get all NPC locations and quests.
A lot of people asked about the order: Doing Caelid first gives a better "flow" to the game than hopping to Altus and coming back after. You can do it that way if you feel Caelid is hard, but there are quests that start in Caelid that make sense to progress before heading north. You can play however you prefer, this is just a recommendation to what I found worked the best balance of story, lore and difficulty progression.
Dragonbarrow: Since this area is "independent" of story progression, you can do it at anytime and likely after level 80.
5
+10
-1