Tombsward Cave |
|---|
 |
|
Hidden cave in the forest teeming with poison-filled creatures. |
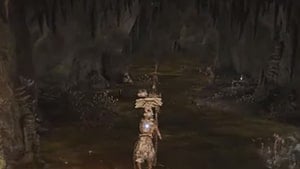
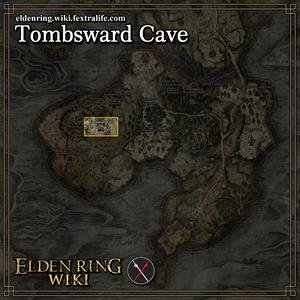
Tombsward Cave is a Location in Elden Ring. The Tombsward Cave is found in the Weeping Peninsula, just to the south of the Weeping Evergaol. It is hidden among a densely forested area of the cliff face. The cave features a large area with poisonous swamps.
Tombsward Cave Map
To see the location in our Interactive Map click on [Elden Ring Map here].
All NPCs and Merchants in Tombsward Cave
- No NPCs encountered in the area.
All Items in Elden Ring's Tombsward Cave
Gather & Farm Items
- Cave Moss
- Poisonbloom
- x1 Arteria Leaf
- x1 Immunizing Cured Meat
- x1 Golden Rune [2]
- x6 Poisonbone Dart
- x1 Furlcalling Finger Remedy
Upgrade Materials
- There are no upgrade materials in the area.
Elden Ring Tombsward Creatures, Enemies, and Bosses
Field Bosses and Bosses
Tombsward Cave Walkthrough
Once you reach the area, you'll know you've reached Tombsward Cave when you see a lit brazier just by the entrance of the cave. This is an optional dungeon area that is not as large as the regular Legacy Dungeons. Equip a torch before you enter the cave as it is almost pitch black upon entering.
Since a lot of enemies in this location inflict an additional Poison effect, an option would be to bring Neutralizing Boluses with you which could alleviate poison build up and cure you of poison.
As you move deeper into the cave, you'll see a Site of Grace. Beyond that, you'll find more cave moss by just following the path of the cave. You will then reach a cavern that's filled with poisonous liquid which will slowly build up your poison meter and once it's filled, you will receive damaging status effect continously. This can be a difficult area to traverse since there's also a couple of Servant of Rots patrolling the area, this type of enemy will often drop Toxic Mushroom. Also be wary of their poisonous projectile that shoots out of their staff as it is homing.
If you just follow a straight path, you'll see a corpse with the item Furlcalling Finger Remedy beside another entrance. Go through the entrance, there should be some Poison Flowers in the area and a corpse holding a Poisonbone Dart.
Exit the room by going through where you first entered, then turn left and proceed in following the path, jump down. There are multiple Poisonblooms in the area as you proceed, turn left on the next cavern you see, turn left again and you'll see two Poisonblooms just before you make your way up the slope. Continue following the path, you will come across a Cave Moss just before you enter another area.
Once you enter this area, you'll encounter three Poison Flowers and a Giant Rat. There's also a corpse holding an Arteria Leaf in the area. Now exit the area from where you came in, continue following the path and then turn left, you'll encounter a Rat and a Giant Rat guarding two corpses. The one in the middle holds the Nomadic Warrior's Cookbook [8], the other one holds an Immunizing Cured Meat.
Now go back and head right on the first corner and go up the slope again, you'll end up back in the room where you got the Arteria Leaf, jump down, go straight and down the slope til you reach a yellow mist blocking your way. Make sure to stock up on health as this will be the boss fight of the area.
Once you pass through the mist, you will encounter a boss fight, you will be fighting against Miranda the Blighted Bloom. There are also three smaller Poison Flowers surrounding Miranda. The best tactic is to take out the smaller enemies first before fully engaging with the boss. This boss only has two moves, the first one is a familiar move where it shoots out an AoE poison spray which will most likely cover the entire area in this. This is easily telegraphed as you will see Miranda closing her petals before releasing the toxic cloud. There's no counter for this attack and you will suffer the effects nonetheless, just see this as an opportunity to land your attacks. The other attack is where Miranda will start summoning white beams of light and shoot down the ground, this will most likely occur at the start when you enter the area. This is telegraphed as you'll see Miranda rear upwards but with her petals open, then beams o light will rise from the ground around your character's radius, then the beams will start to shoot down and deal massive damage. This can be easily dodge rolled. Miranda will unlikely repeat the second move and will continue to resort to the AoE poison spray.
After defeating Miranda, she will drop the Viridian Amber Medallion, you can then exit the cave go back to the Site of Grace at the entrance of the cave to remove the remaining poison debuff effects and fully heal your character.
Elden Ring Tombsward Cave Gallery and Notes
[other images go here]
 Anonymous
The room with the miranda boss is surprisingly small, much smaller than any other boss room I've seen so far. this page says the light beams miranda summons down can easily be dodged, and usually they can be, but I'm not sure if the smaller poison flowers in the room would get in the way if you tried to dodge roll around the miranda to avoid the beams. I think the best way to deal with this boss is to kill it as quickly as you possibly can, before it has a chance to use its light beam attack. I use a melee/incantation build, I put bloodflame blade on a greatsword, axe talisman, shrouded cracked tear in a physik and exalted flesh. two handing the sword I think it was done for after 2 full charged hits of R2.

Not to be confused with Tombsward Catacombs, which is on the opposite side of the valley.

 Anonymous
Where you get the cookbook the small rats around this area dropped a rune arc don’t know if it’s a random drop

 Anonymous
“You’ll know that you’re at the cave because you will be at the entrance”
Gee, thanks for nothing
 Anonymous
Anyone found her "Miranda's Prayer" consumable? Supposed to be a faith based item, like the ancestral infant's head that scales with int.

 Anonymous
There's two ways to cure poison right away. One is an incantation you get from Brother Corhyn, literally called Remove Poison. There's a stronger version that will remove sleep and blood loss build up as well, but obviously that needs more FP and more Faith to use. Your other option are the boluses. One for each status ailment.

 Anonymous
Setting Miranda on Fire will interrupt the AoE Poison that they do, fire arrows or darts are a good way to quickly apply the status while the boss is winding up the attack.

 Anonymous
"There's no way for you to completely get rid of the poison status"
Yea there is. Neutralizing Boluses. It's a craftable item.


Not sure if it'll help anyone, but a fire pot will interrupt the cast for the poison cloud, even mid-cloud. This applies for all enemies of this type.
5
+10
-1