

Auriza Hero's Grave |
|---|
 |
|
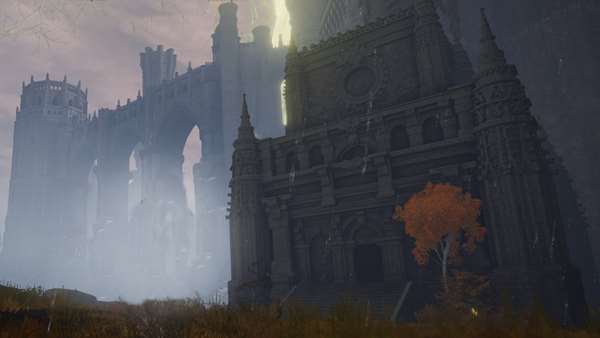
A tomb found on the outskirts of the Royal Capital. Larger than most catacombs, this was built to honor a fallen champion and is heavily guarded to this day. |
Auriza Hero's Grave is a Location in Elden Ring. The Auriza Hero's Grave is found in the eastern section of the Capital Outskirts. Players can reach this location by following the main path within the outskirt walls, all the way to the east.
Auriza Hero's Grave Map

All NPCs and Merchants in Auriza Hero's Grave
All Items in Elden Ring's Auriza Hero's Grave
Equipment and Magic
- Crucible Axe Set (Crucible Knights drop)
- Ordovis's Greatsword (Crucible Knights drop)
- Tree Sentinel Set (Chariot drop)
- Crucible Feather Talisman
- Golden Epitaph
Unique, Ashes and Keys
Elden Ring Auriza Hero's Grave Creatures, Enemies, and Bosses
Field Bosses and Bosses
Auriza Hero's Grave Walkthrough
Before heading here, make sure you have one Stonesword Key ready to use on an Imp statue. Upon arriving, you'll find the Site of Grace for this location. On the left side of an altar, you'll see an arch doorway that is blocked by a white fog. Use the Stonesword Key on the Imp Statue and inside that room, you'll encounter two Basilisk enemies. There's a corpse here that you can loot to find the Golden Epitaph weapon.
From the site of grace, head west where you'll need to traverse some slopes that head down to the lower section of this location. As you move towards the slope, a large environmental hazard, a Chariot, will appear. This isn't the only Chariot that will appear; there will be multiple ones as you progress.
Method 1
On this first slope sprint down and about halfway, move to the alcove on the left or right to take cover. The alvcoves are located just past the third torch down. There will be two Skeleton enemies that will reanimate when enter the alcove if you chose the one on the right. Wait for the Chariot to move past you and run all the way down till you reach the first set of pillars and arches. Stand directly under this arch for now.
Next, you'll have to go up a second slope. The two Chariots won't hit you if you're standing in between the pillars on the right or left side.
Wait for the second Chariot to go up, move up along with it to the flat top area and run into the far corner.
Method 2
Run down the slope on the right side, ducking into cover as needed. Wait for the Chariot to pass then run and jump down into the gap on the right side. You will have to fight some Basilisks. Proceed through and you will come to the double wide slope.
Clearing the Chariots

For the third slope, you'll notice that this slope is wide compared to the first two. There are two Chariots on the third slope that simultaneously moves up and down. Examine how both Chariots move so that you know which way to move.
In the middle of this large ramp, you'll notice that there is a gap that you can drop to. Use this to take cover. You'll find a body here that can be looted to find x1 Stonesword Key and x1 Ghost Glovewort [6] that is guarded by a single Skeleton enemy. As you continue heading down, if you need to take cover, just near the end of the slope, there's another alcove on the right side that you can use to take cover, but there's another Skeleton enemy here that will ambush you.
Make your way to the next row of pillars, sprinting in a zig-zag direction to dodge the chariots. Stand in between the pillars so that you won't get hit by the Chariot that will spawn ahead of you. Notice as well that there is a body hanging by the edge of the slope on the left, loot it to find x1 Golden Rune [7]. You should still be near the row of pillars.
Use the body as an indication of where to drop down. Before jumping, you'll notice the thin wooden plank structures over the large drop. This is is where you'll be dropping. Drop down the first short plank then onto the lower longer one directly underneath. Then you'll want to drop to the perpendicular plank and walk along it. You'll find the ashes here and another lower plank at the end perpendicular to the one you're on. Drop down one last time and make your way into the next area that it leads to. You should see a statue. Clear the toads in the area and you'll come across a corpse where you can loot Vulgar Militia Ashes. This area will also be filled with Basilisk Creatures.
Return to the wooden beams over the large drop. You should be able to drop down one more level onto a the narrow stone arches. Follow the narrow route all the way to the end. This area will have one large archway and a ladder. Ascend the ladder and you'll find yourself with another Chariot at the end of the tunnel. There's only one short slope left that goes up. You need to take cover by using the corner on the left side and then run up the slope to the right side into the chamber.
Collect the Grave Glovewort (6), then hit the fire-breathing pillar so that it's breathing fire out the way you came in. You can time things such that you can dive back into the safe spot on the left of the ramp without taking any damage, then race to the bottom of the path, and take out the Omen guarding the Crucible Feather Talisman. (If you die on the way, don't worry, you've already done the step you need to destroy the chariots. Return to the wide ramp with two chariots and watch the carnage unfold!) Take the elevator up from the branch in the path, and then navigate around the fire-breathing pillar that you've already raised. Collect the Grave Glovewort (6) and 3x Great Dragonfly Head on the way and drop into an alcove that's right next to the wide ramp with two chariots. You'll notice that raising the pillar has created a sigil that will summon a third chariot in this area causing the chariots to crash into each other, breaking and leaving you with Ash of War: Holy Ground and the Tree Sentinel Set. Go north further to open the door leading to the boss area. You are also free to explore the area without interruptions from this point forward.
(Alternate solution: As soon as you've reached one of the safe spots in the wide ramp with two chariots, use either Margit's Shackle or Mohg's Shackle. The range of these items can pass through walls, and it causes the fire-breathing pillar to be raised from your current location. This then places the summoning sigil right in the middle of this ramp, causing all three chariots to be destroyed and leaving you the freedom to explore the rest of the area without the tedium of navigating around the chariots.)
Boss Area
Beyond the door, simply head down the steps. This section is guarded by a few Skeleton enemies, it should be easy for you to fight and pass through them. At the bottom-section is a large archway that is covered with a gold mist. Beyond it serves as the arena for the bosses of this location, the Crucible Knight and Crucible Knight Ordovis. We suggest that when you are fighting them, to take out the spear-wielding Crucible Knight first and to use any of your upgraded or strong Spirit Ashes. This way, you won't have to fight the bosses on your own.
Successfully defeating them both yields 28000 Runes and rewards the Ordovis's Greatsword, as well as the Armor pieces for the Crucible Axe Set. There are some Root Resin materials that you can get in this boss arena - simply use the portal here to return to the entrance.
Elden Ring Auriza Hero's Grave Gallery and Notes

 Anonymous
This catacomb is proof that fromsoft doesn't grasp the concept of moderation.
- Anonymous
This catacomb is proof that fromsoft doesn't grasp the concept of moderation.
- Anonymous
ive died more times getting bullied by the chariots in this area than any boss in the game
So we really don't need to hit the pillar the first time it's encountered?
- Anonymous
I think I've just found another strategy to destroy the chariots:
1. reach the safe point at the mid of the second ramp and kill the skeleton
2. stand at the border of the safe spot aim for the head of the statue in the middle of the wall and trow a fire pot (or similar)
The pillar shoud rise and summon the third chariot
- Anonymous
just tell me where to go to get to the boss idgaf about how to get some useless flowers just tell me where to go
- Anonymous
How the **** are these mfs so powerful? Even with parrying and mimic tear I cannot get past these two mofos, and I already killed Maliketh!
- Anonymous
Haha, you cowards! Activate the summoning pool here. I want to summon friends!
- Anonymous
the good feeling when the Horses destroy themself and then the total despair when seeing the bosses and remember pain of the past :P
- Anonymous
- Anonymous
Raptor of the Mists makes Chariots unable to hit you
Just run through everything, and do the Ash of War when chariots come close.
You can completely ignore any and all chariots this way.
Kinda fun to run this way
- Anonymous
Wtf is this boss.. crucible knights have been tough but fun fights so far , fighting 2 at the same time is stupidly difficult.
Most of the fight is just running around the arena trying to separate them so you can get even 1 opening to hit. It's horrible.
- Anonymous
Destroyed the charior using margit shackle like every other time I came here, but this time no ash of war and no tree sentinel armor...tf?
- Anonymous
IDK if it is mentioned on this page anywhere, because I am not reading all of that. But if you have the Basilisks make a death cloud on the ramp where there are 2 chariots, and a chariot runs over the cloud, it will kill all the chariots in the instance.
- Anonymous
- Anonymous
so i get the armor set for destroying the chariots, then get the same armor set again for killing the boss, but only one is in my inventory? i'm very confused.
- Anonymous
- Anonymous
spent nearly 3 hours parry cheesing this duo boss. amazing gameplay.
- Anonymous
Wow the boss is trivial compare to how it used to be, when they were both on your ass at all times this was one of the most disgusting ganks in the game, but now they come at you like bond villain goons, one after the other.
- Anonymous
I missed the chariots crashing the first time. (didnt look up and see the beam of light)
I went back, did it again, and saw the chariots crash but didnt get any items. Was messing around thinking I had just missed the items last time, looking through my inventory and the chariots respawned / insta crashed and I got the items.
- Anonymous
Good news!
Apparently, Crucible Knights, particularly Ordovis, are almost helpless against the Stormhawk Deenha summon.
I guess that's a bit of an exaggeration, but having her distract Ordovis while I spanked the spear knight left her with probably 80% health when I finished him.
High mobility+no ground contact meant that she avoided all his slow, heavy hits, and just ignored the quick AoEs he uses which are all ground stomps.
- Anonymous
Most unfun and stupid place
DkS2 designer came back for those
- Anonymous
if you use one of the shackles, it makes the two chariots obsolete.
- Anonymous
Like most lazy game designers today they don't know when to use RNG (and when not to). If you get to the point where you have to run between the two chariots to get to the plank jump off point and the chariots are running next to each other and timed together you're screwed, might as well just die.
- Anonymous
Use beast repellent torch to make the frogs (Basilisk) easy. Use Greatshield Soldier Ashes adn a ranged attack to make the bosses easy.
- Anonymous
Smashed the pot on the right hand side of the safe platform beside the stairs after the basilisks, to the right side the two chariots, right before the glovewort, and they collided. Don't know if it's coincidence, or if I somehow triggered the fire pillar from there?
- Anonymous
Chariots, death blight, and to top it all off the bosses are 2 Crucible Knights, who are the strongest regular enemies in the game. Now that's what I call artificial difficulty.
- Anonymous
Elden ring have some questionable dungeon design in some places, but the ones i really hate are the "hero's graves". A entire dungeon series based on run from a Chariot is just painful. And just to make me extra salty, somehow the game buged and the set/AoW didn't drop when the chariots crash... Search the area for drops, even try to reload the save, but nothing. It only work when i died and returned to the place. The chariots crashed again and this time i got the drops.
- Anonymous
You can kite the death frogs over to where the chariots go overhead. If the frogs spit death it kills the chariot on contact. You only need to kill one to get the loot.
- Anonymous
I was literally sitting in this dung reading how to get the tree armor and idk wtf happened but the 2 chariots killed themselves???? Got the armor lmao
- Anonymous
- Anonymous
I hit each pillar once but the chariots just won’t destroy. What am I missing?
- Anonymous
Use Margit/Mohg shackle if you want to make this place a lot less cancer
- Anonymous
i destroyed the chariots after dying fifteen times on this run and i felt absolutely nothing from it. this place broke me. but at least i got some cool armor
- Anonymous
I love how sometimes standing under the arch will still get you hit by a chariot turning. Not always, but sometimes. Pretty cool
- Anonymous
I wonder what the significance of "Auriza" is - there is also Auriza Side Tomb in this area. Is it the former name of an existing location, an unused location, a person?
- Anonymous
I used margits shackle when I heard the fire pillar as I was cowering from the chariots just because I thought I might run into a flame jet as I was running for my life. Imagine my surprise when everything exploded and I got armor pieces.
- Anonymous
Loved this dungeon to be honest, completed it without a guide.
For the crucible duo, I summoned Black Knife Tiche so I can focus on the sword and shield crucible, easy to parry using Carian Retaliation ash.
- Anonymous
- Anonymous
- Anonymous
Use margits shackle on the big ramp with 2 chariots that you see after you pass the basilisks, it will destroy both chariots giving you the loot, good luck with the crucible knights!
- Anonymous
- Anonymous
Literally the worst dungeon and the worst boss so far in my playthrough
- Anonymous
No. That's a massive pillar stories tall that does have a fire shooter attached to it but more importantly also has the spotlight that shines the chariot spawning beacon on to the floor. You raising the pillar is why the spawn beacon location changes causing the collision of chariots.
- Anonymous
so moving a fire pillar will somehow change where the chariot spawn, very intuitive fromsoft
- Anonymous
- Anonymous
I’ll take a million poison swamps over this trash dungeon. Worse than Blighttown.
- Anonymous
Literally one of the worst dungeon designs. Chariots cost me 20k runes and the boss fight is pure cheese.
- Anonymous
They really need to rename the bosses to Craven Knights whatever cause nothing knightly about these jerks. Fighting one as the other for some reason holds back only to suddenly come at me as I'm getting my grove with the other.
Legit if they gonna gang up just keep ganging up don't do this sucker punch nonsense.
I slammed Margit’s shackle into the last spotlight just out of curiousity before the boss room and died. Nothing happened. Beat the boss, restarted the area and the two chariots at the big ramp randomly combusted and I got the loot. I have no clue what even happened.
- Anonymous
You don't even need to get to the second ramp, use one of the shackles in the first alcove on the first ramp once and when you get to the relevant point in the dungeon they will spawn, crash and destroy each other.
- Anonymous
Can someone please tell me what Auriza means/origins? I have a good idea of who the others were for but feel the ultimate clue for this one is in the name....
- Anonymous
The directions to make the chariots crash are overly complicated and totally unnecessary. None of the steps given here need to be followed, all that needs to be done is to use Mohg or Margit's shackle ONCE when you get to the second ramp and then forget about it. When you get far enough into the dungeon the chariots will spawn, almost immediately crash and destroy each other. That's it, all anyone need do to get the tree sentinel armour, which is very nice and well worth the trouble, holy ground is pretty good as well, a nice bonus to get with the TS armour.
- Anonymous
If your have trouble with the boss: summon a mimic (or any other high level ash) to take the agro of both knights. They need to be close together. Now roll behind them and start spamming Flame of the Redmaynes. If they are close enough, they will both be hit and constantly stance break, which keeps them locked in that place. Don't go in and attack on the stance break though, just keep spamming Flame of the Redmaynes untill at least one of them is dead.
- Anonymous
Got to the pillars. Moved up the slope to the next hiding spot. Moved over to the gap in the floor and hit Mohg's Shackle on a lark. It activated the fire pillar which triggered the third chariot to spawn right in front of me in which the two other chariots smashed into while destroying the just spawned chariot. No other chariots showed up the rest of the maze.
1 min of activity to save yourself some stress. Did I get lucky? Don't know but the result was well worth it.
- Anonymous
Easy just to get the Tree Sentinel armour (which is very good) and Golden Epitaph. Come back later when you can do the bosses.
- Anonymous
- Anonymous
- Anonymous
Of all the dungeons in Elden Ring, this is definitely one of them
- Anonymous
- Anonymous
The chariots had me for a while, the bosses I killed first try.
- Anonymous
- Anonymous
So is the little alcove near the top of the fire--breathing pillar thing just a red herring? As far as I can tell there's no way up to there, but if there was you could probably jump onto the pillar from it.
Tried to look up and see if the pillar went anywhere interesting but it's way too high and cramped for the camera....
Am I just being stupid here?
Srly this dungeon is one of the most annoying and hardest after 130 hours of my playing time. The chariots are fine with me, can easy to pass through after a few times, but the boss fight is really hard. I have just finished this dungeon right before writing these comments.
Suggest skeletons ash because if they are down and you can make the boss target you, the skeletons will respawn and continue to help you. Using fire pot/thunder pot is good too. Recommend thunder + fire AOW.
My level is 108 (when I write this cmt - mixed build don't ask) - using Uchigatana left hand (Thunder) + Nagakiba right hand (Fire) - dodge/roll play style - kill Spear first - Skeleton ash +0 - defeated bosses after around 25 times.
All in all, don't give up
- Anonymous
Fun fact! Furled fingers can also disable the chariots by using omen shackle
- Anonymous
Going by the comments there's a lot of dislike for Auriza but out of all the Hero's grave dungeons that have the chariot hazard this is by far the easiest, until you enter the boss room obviously. The beauty of this one is the chariots don't respawn after they crash, so if you die after you've made them smash into each other you can easily sprint past any skeletons straight to the boss room or take your time to get any items you want. The biggest bonus from the chariots not respawning is you don't cross the fog gate already at a disadvantage if you have had to use flasks on the way down to the boss, you start the fight with all your flasks and for a boss encounter like this one it will make a difference.
- Anonymous
Got through all the platforming and bullsh*t only to have start hovering in the corner you have run and start hovering. Death by doing what I’m supposed to, how I’m supposed to do it, and when I was supposed to do it. If you make something hard and unforgiving, you have to hold up your end. If I can jump between tiny 2x4s and fight death breathing frogs, you have to make the ****ing floor work!
Got away for time sufficient to use Comet Azur on one of the bosses while the other was fighting my Mimic. Then I did the same with the remaining one. But this was the fifth try or so... and the whole grave is a pain in the *** but manageable after some tries.
- Anonymous
for those of you wondering why the chariots won't crash after you hit the flaming pillar, go to the area with the duel chariots and use Margit's shackle.
it just works.
- Anonymous
At my game i didn't do anything with the lights, but all the chariots hit a light one after the other. I couldn't even count them, i think 4? They were all gone seconds later! This bug is in patch 1.06.
- Anonymous
- Anonymous
I hit the firebreathing statues, died and nothing happened. The statues returned to the same position before I hit them.
- Anonymous
- Anonymous
I made a faith based character and beat the boss solo by using lightning spear on the spear knight and running away. When he was dead you can solo the shielded knight
- Anonymous
One of the most memorable dungeons of my first playthrough, reminded me a bit of Sen's Fortress. A bit dissapointing that the boss is so easy...
- Anonymous
Perfectly designed to be needlessly annoying. No one likes these "sit and wait" set pieces, so they'll try to get through as quick as possible. This makes you die, which makes you frustrated, which makes you impatient and die more. The platforming may be better in Elden Ring, but let's face it, no one likes platforming in these games. When you finally make it past the two chariots, only to take your time to line up the drop and get killed by the third one you didn't notice, let's just say it's not fun.
Overall, not a hard dungeon if you take your time, but simply not fun.
- Anonymous
this dungeon is just obtuse and dumb
why does the light spawn chariots
why does the 3 chariots that get broken by the chariot that gets spawned also cause the first chariot in the dungeon to not spawn anymore
all the hero graves suck but this one in particular is just badly designed and way too specific
- Anonymous
I remember when I did this dungeon I was just appalled by the amount of stress it gave me
- Anonymous
There is an easy way to beat the Crucible Knights if you're a sorcerer. Summon a spirit ash (mimic tear will do fine), run around until both knights agro your spirit ash. Cast Terra Magica, drink wondrous flask with Cerulean Hidden Tear and Magic-Shrouding Cracked Tear and blast them with Comet Azur. They are very susceptible to Comet Azur when they aren't targeting you. I tried to fight them fairly (still with mimic tear ash) but it was too hard.
- Anonymous
I really want the crucible axe set, but I honestly can't see myself beating these two.
- Anonymous
I used the trick and killed the three chariots, but no loot dropped. Has anyone else experienced something similar?
- Anonymous
using either mohgs or margits shackle cause the flame pillars to rise, bypassing all the chariots and causing them to die from crashing into eachother
- Anonymous
I agree with a comment saying the dungeon itself isn't as hard as you might think, apart from the boss fight. Gelmir hero's grave is a lot worse. The chariots are easily dealt with and drop the tree sentinel set It was worth doing the dungeon just for that. There are a couple of nasty ambushes by basilisks in confined areas, not just one or two at a time either with multiple deathblight clouds to be wary of. So far though I've never been killed by that status effect from a basilisk my whole playthrough even when they are in groups, they don't seem to proc deathblight as quickly as the wormface.
- Anonymous
"Collect the Grave Glovewort (6), then hit the fire-breathing pillar so that it's breathing fire out the way you came in. You can time things such that you can dive back into the safe spot on the left of the ramp without taking any damage, then race to the bottom of the path, and take out the Omen guarding the Crucible Feather Talisman. (If you die on the way, don't worry, you've already done the step you need to destroy the chariots. Return to the wide ramp with two chariots and watch the carnage unfold!) Take the elevator up from the branch in the path, and then navigate around the fire-breathing pillar that you've already raised. Collect the Grave Glovewort (6) and 3x Great Dragonfly Head on the way and drop into an alcove that's right next to the wide ramp with two chariots. You'll notice that raising the pillar has created a sigil that will summon a third chariot in this area causing the chariots to crash into each other, breaking and leaving you with Ash of War: Holy Ground and the Tree Sentinel Set. Go north further to open the door leading to the boss area. You are also free to explore the area without interruptions from this point forward."
makes no sense
- Anonymous
One of the worst boss fights. Cheesiest way I found was Mimic, getting them both together and Rotten Breath away. If both of them get scarlet rotted (and Mimic is down), kite until rot wears off. One of them will be close enough to finish off in a few hits, then fight the other one normally (who will also be kinda low on HP). Recommend to focus Ordovis, because normal Crucible Knight is easier to read.
- Anonymous
- Anonymous
advise using raptor of the mist ash of war. Trivializes the chariots. Just watch your FP. As for the boss, parry the sword boy, use spirits to distract the spear guy. Good luck.
- Anonymous
Mimic Tear can aggro both bosses, especially if using AoE attacks, and is quite tanky if upgraded. I managed to land Azur on both of em at the same time twice that way for a first try win (with plenty of luck I'm sure). Hope it helps.
This dungeon is not as bad as everyone makes it out to be. Just be a little patient with the chariots and take your time.
- Anonymous
Duo scimitars +11, one frost and one poison. Used greatshield ash, took some rng to work
- Anonymous
- Anonymous
Use the shackles to turn the fire pillar from near the first drop where you fight the toads it will turn the pillar without you being there. The chariots will disappear
- Anonymous
The chariot just disappeared
Use the shackles Margit and wait about ten minutes and walah
- Anonymous
I keep dying trying to make the first drop, I never seem to be centered over the beam correctly...? Can anyone help? Is it directly lined up to the corpse on the overhang, or of it more to one side?
- Anonymous
I've helped two people defeat the boss but haven't myself :(
Somewhat easy to cheese aggro via melee. My strategy has been basically swap aggro by doing a quick stab and major attacks while both is turned. Unfortunately it is hard to find summons, and I just wanna beat the boss and never come back to this place. And I don't blame others for not wanting to come back with a summon lol
- Anonymous
- Anonymous
Try greatshield ashes 9+
Keeps them both busy whilst you gently circleroast them w giantsflame , winner!
- Anonymous
- Anonymous
My +10 mimic that can still solo most storyline bosses dies in about 30 seconds to the one crucible knight while I'm fighting the other one. Goes to show how goddamn tough these enemies are. mimic doesn't seem to be able to parry, which doesn't help.


Easilly worst Place in the game.
0
+10
-1