Giant-Conquering Hero's Grave |
|---|
 |
|
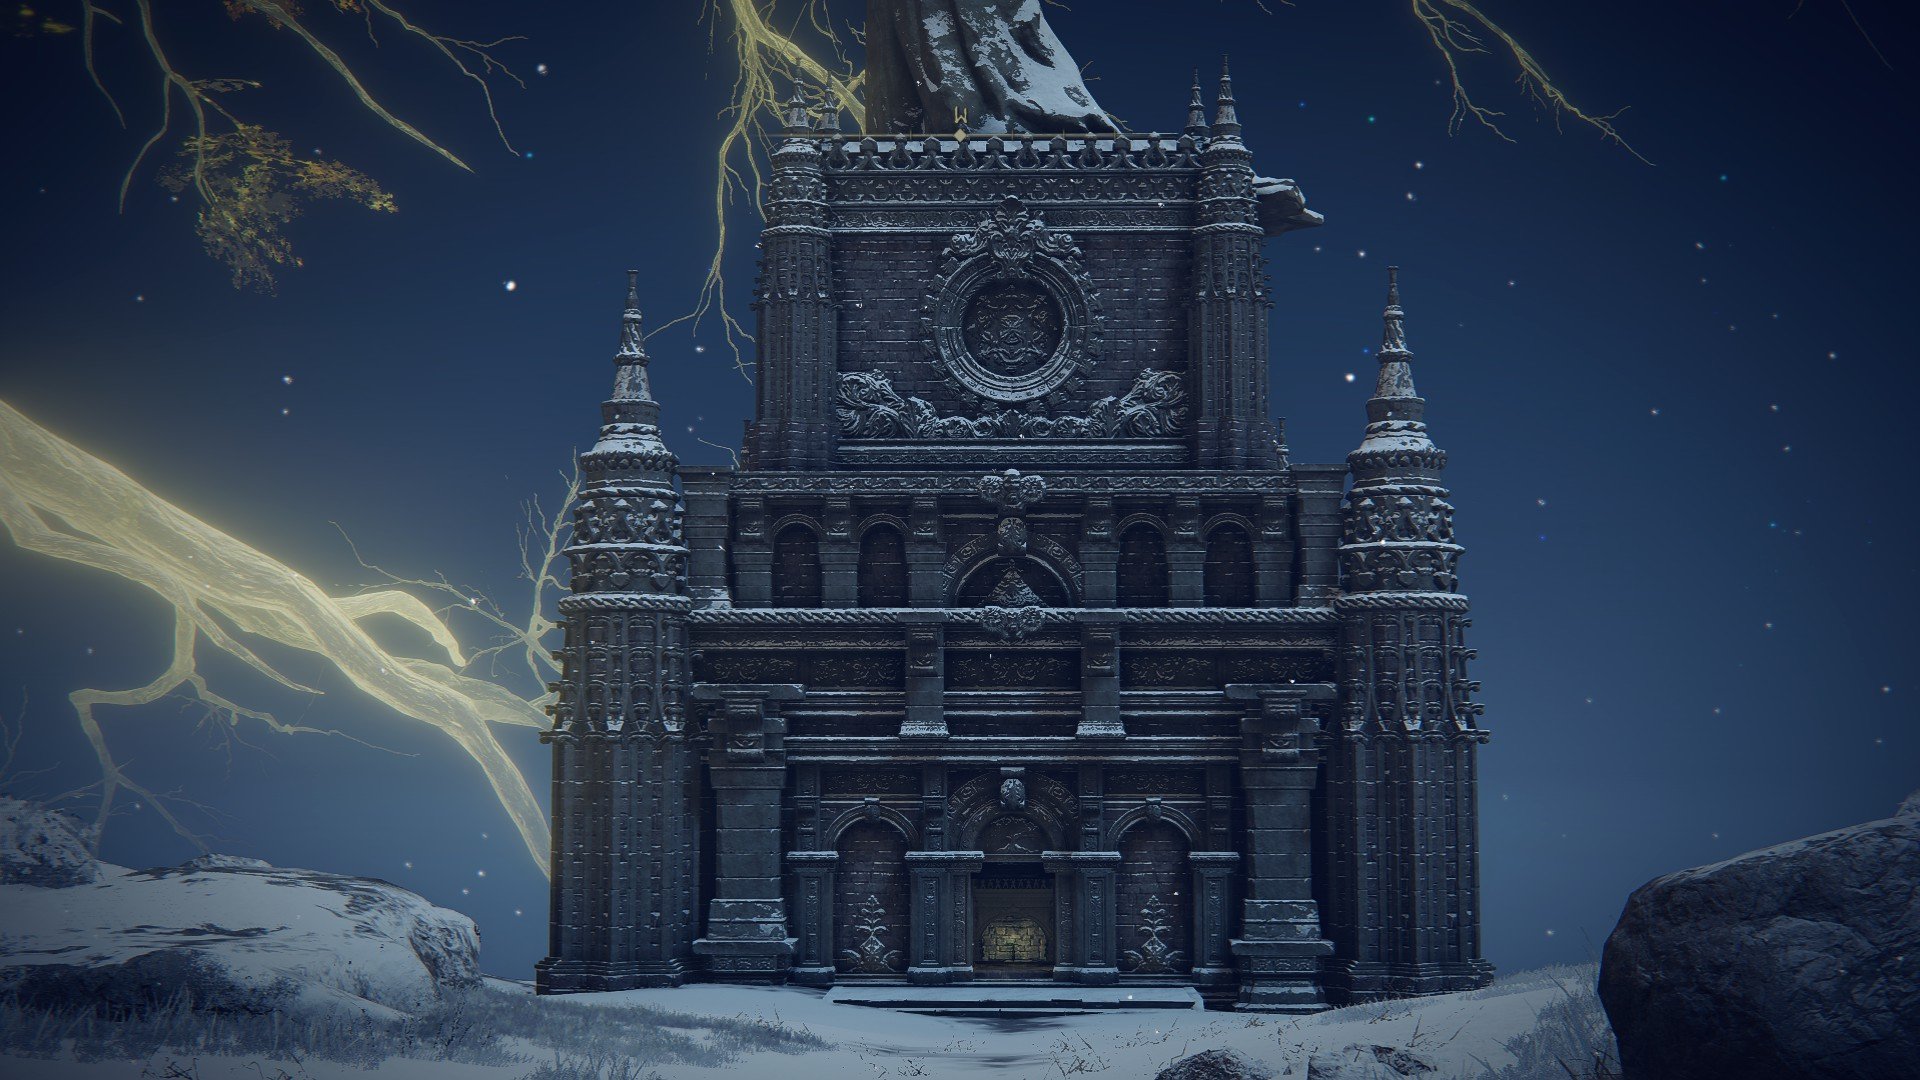
A complex dungeon filled with invulnerable enemies and strange golden floor seals. |
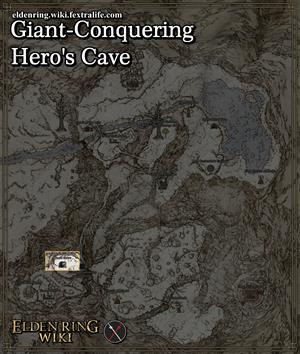
Giant-Conquering Hero's Grave is a Location in Elden Ring. The Giant-Conquering Hero's Grave is found in Mountaintops of the Giants. This location is found high atop a plateau in one of the earliest sections of the Mountaintops, but reaching it requires you to circle around most of the region's northeastern sections. See below for details.
Giant-Conquering Hero's Grave Map
All NPCs and Merchants in Giant-Conquering Hero's Grave
- There are no NPCs or Merchants at this location
All Items in Elden Ring's Giant-Conquering Hero's Grave
Gather & Farm Items
- Grave Violet x2
Upgrade Materials
Equipment and Magic
Ancient Hero of Zamor drops:
Unique, Ashes and Keys
- There are no key items in this location
Elden Ring Giant-Conquering Hero's Grave Creatures, Enemies, and Bosses
Field Bosses and Bosses
Elden Ring Giant-Conquering Hero's Grave Walkthrough
How to Reach
The Giant-Conquering Hero's Grave is found just northeast of the Zamor Ruins. However, it is high atop a plateau and reaching it will require some legwork and circling around most of the region's northeastern sections. Ride past the ruins and around the lower cliffs of the plateau towards the east until you reach a very narrow pathway/bridge heading northeast. Cross this treacherous path and continue heading northeast through the valley between Stargazers' Ruins and the Minor Erdtree. You should reach the narrow river section of the Freezing Lake shortly.
Continue northeast until you reach the Freezing Lake site of grace and then head southeast, keeping close to the western edge of the lake. Once you are able to get up the hill in the west, follow it down to the Guardians' Garrison in the southwest. From here, head south and cross the giant chain bridge to find the Giants' Gravepost site of grace. From here, ride southwest, keeping close to the cliff edges and watching out for Fingercreepers littering the area. At the end of the path, there should be a small gap you can jump across to finally get to the plateau where the Hero's Grave can be accessed. Watch out for the large Fingercreeper that pops out from the gap as you approach.
Walkthrough
Note: This Dungeon is similar to others in that enemies (Several Imps, as well as a few Lesser Burial Watchdogs) will appear in dark, ghost forms. They cannot be damaged, staggered, or affected until they step on the golden floor seal ('the light'). The Imps and Watchdog will be staggered as they touch the Seal and lose their invulnerability.
Stepping down from the elevator inside the Catacombs, players will immediately find a Site of Grace to use. Heading into the catacombs from the Site of Grace players will see a room sealed by an imp statue. You can choose to use a Stonesword Key here to open the seal for the Flame, Protect me incantation (Faith requirement: 24) within. On the left (coming from the site of grace) is a pathway to another area.
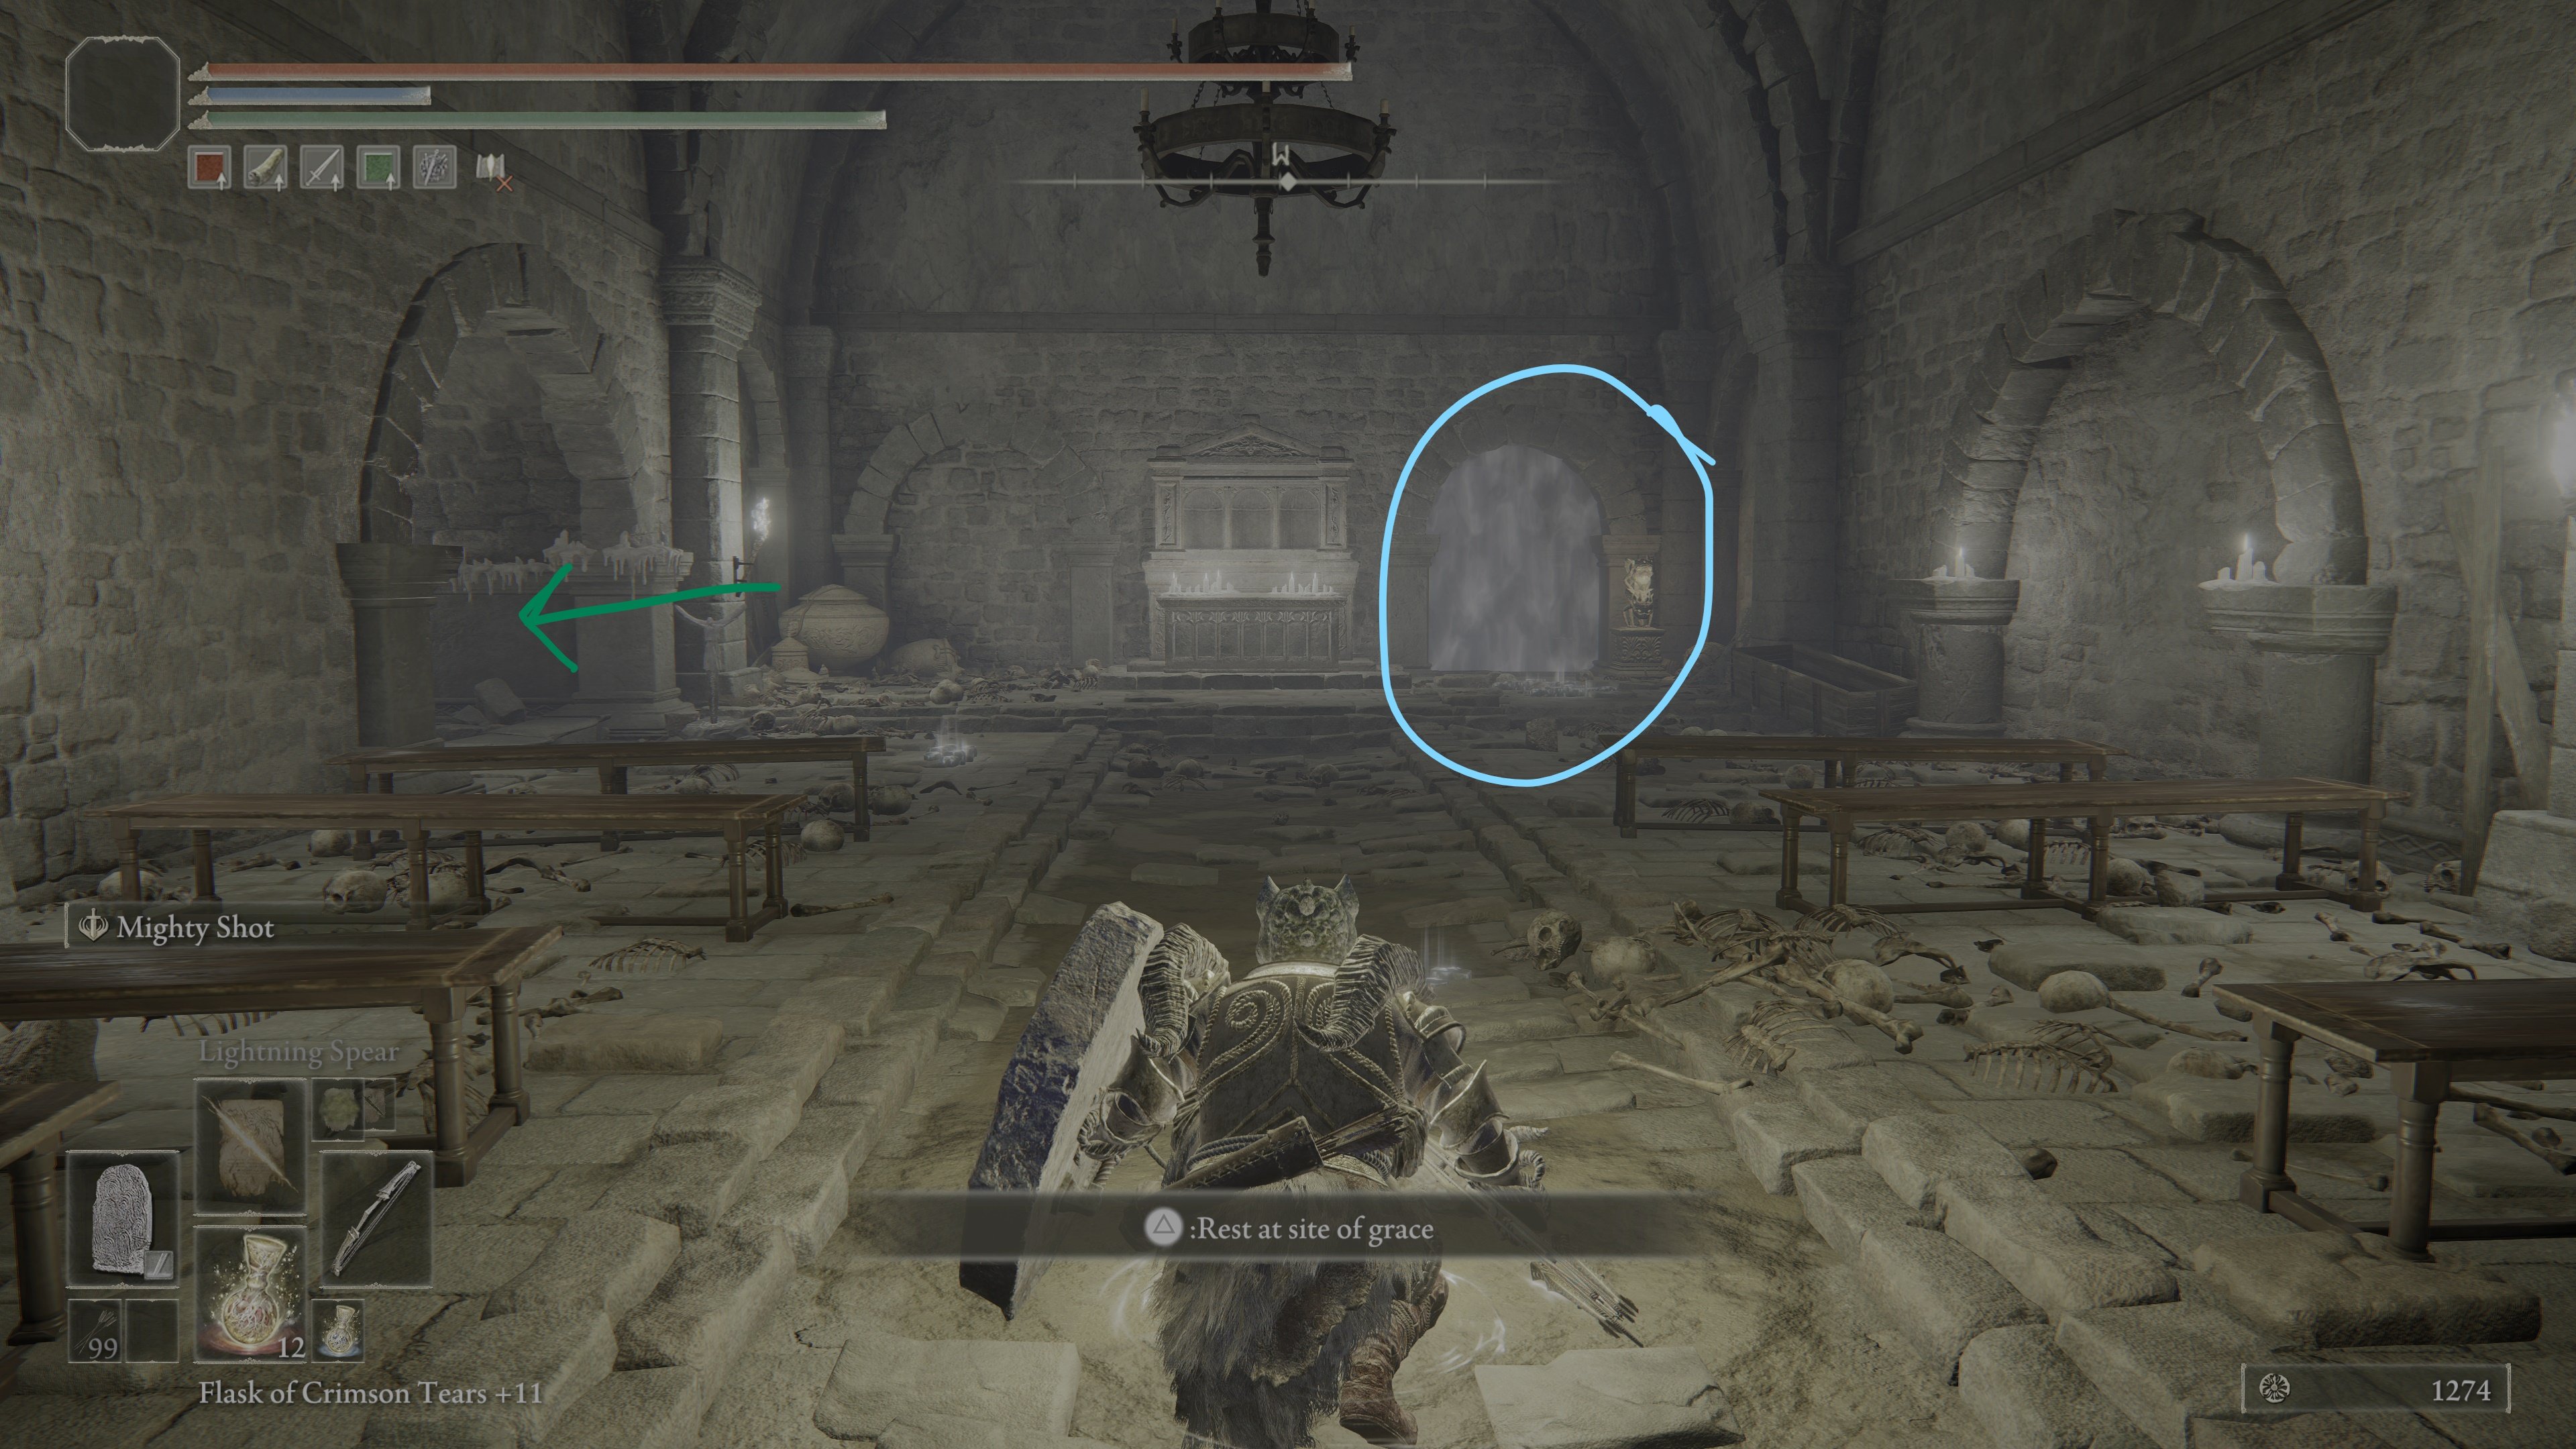
Proceed down this route, and your pathway will intersect with a perpendicular pathway where a Fire Monk is patrolling back and forth.
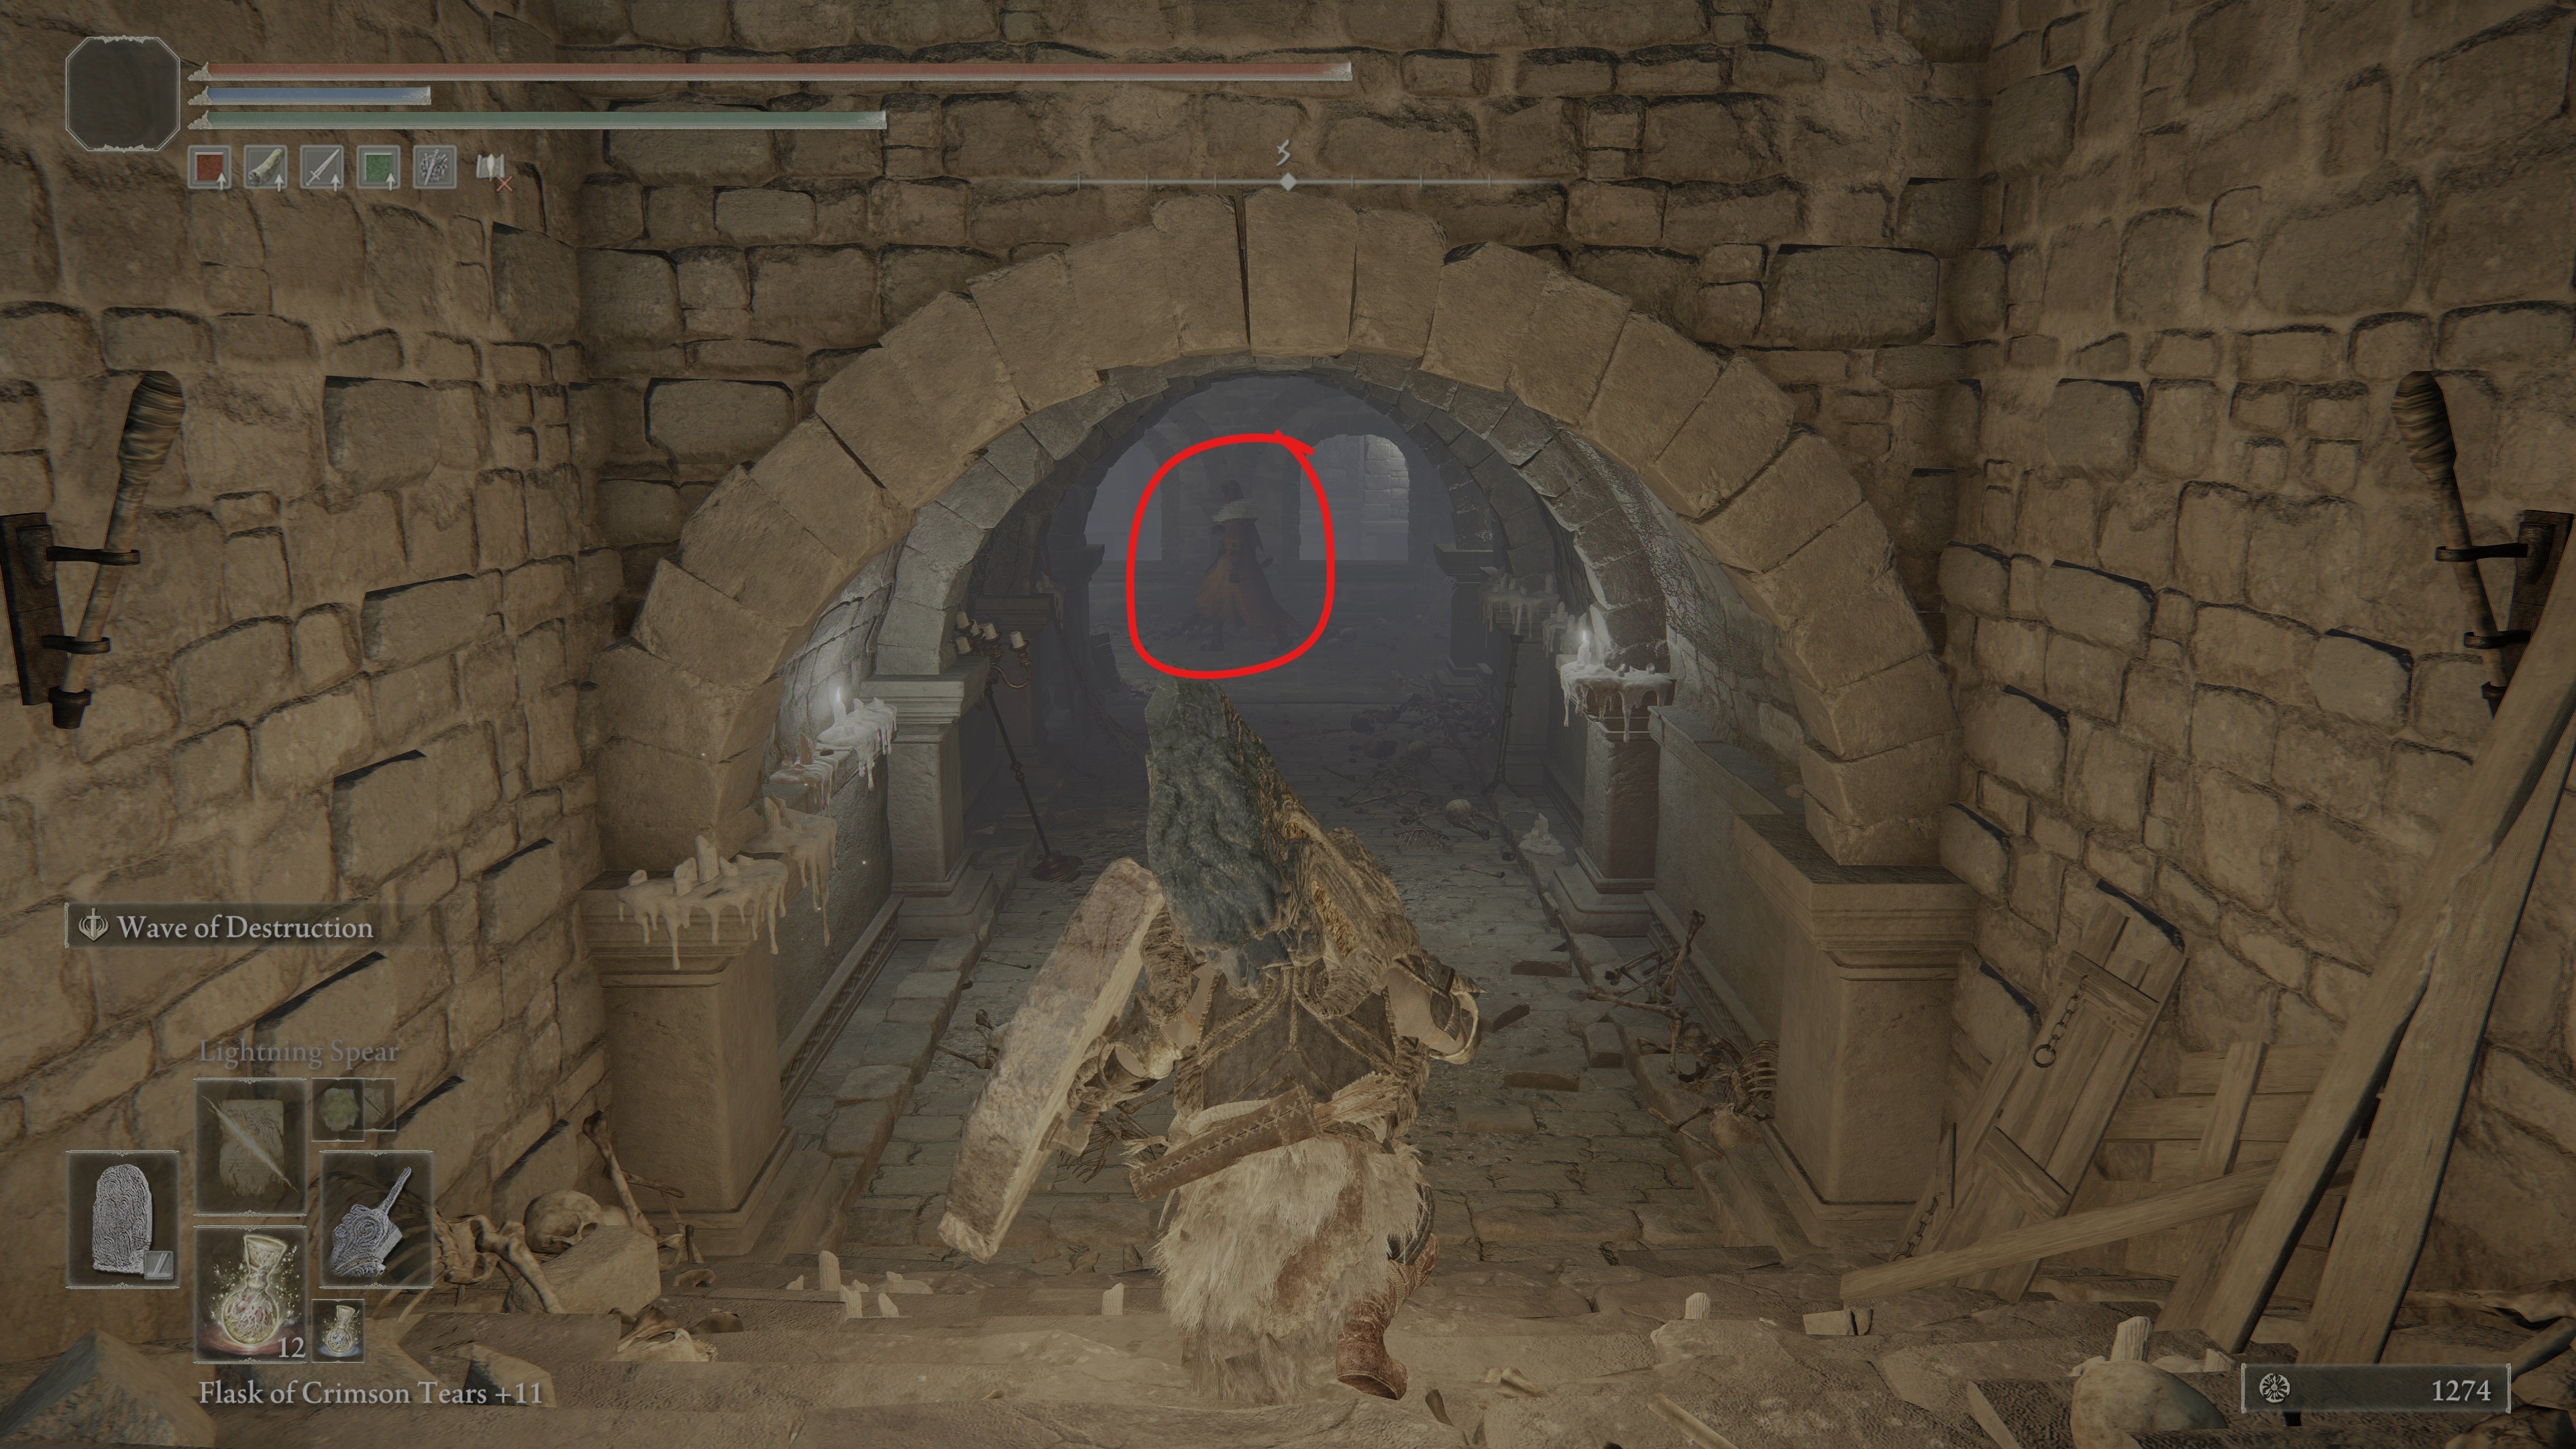
Kill the Fire Monk, and turn right. You'll see two archways, the one on the right has some pottery in front of it, but the one on the left (closest to the windows) is an illusory wall.
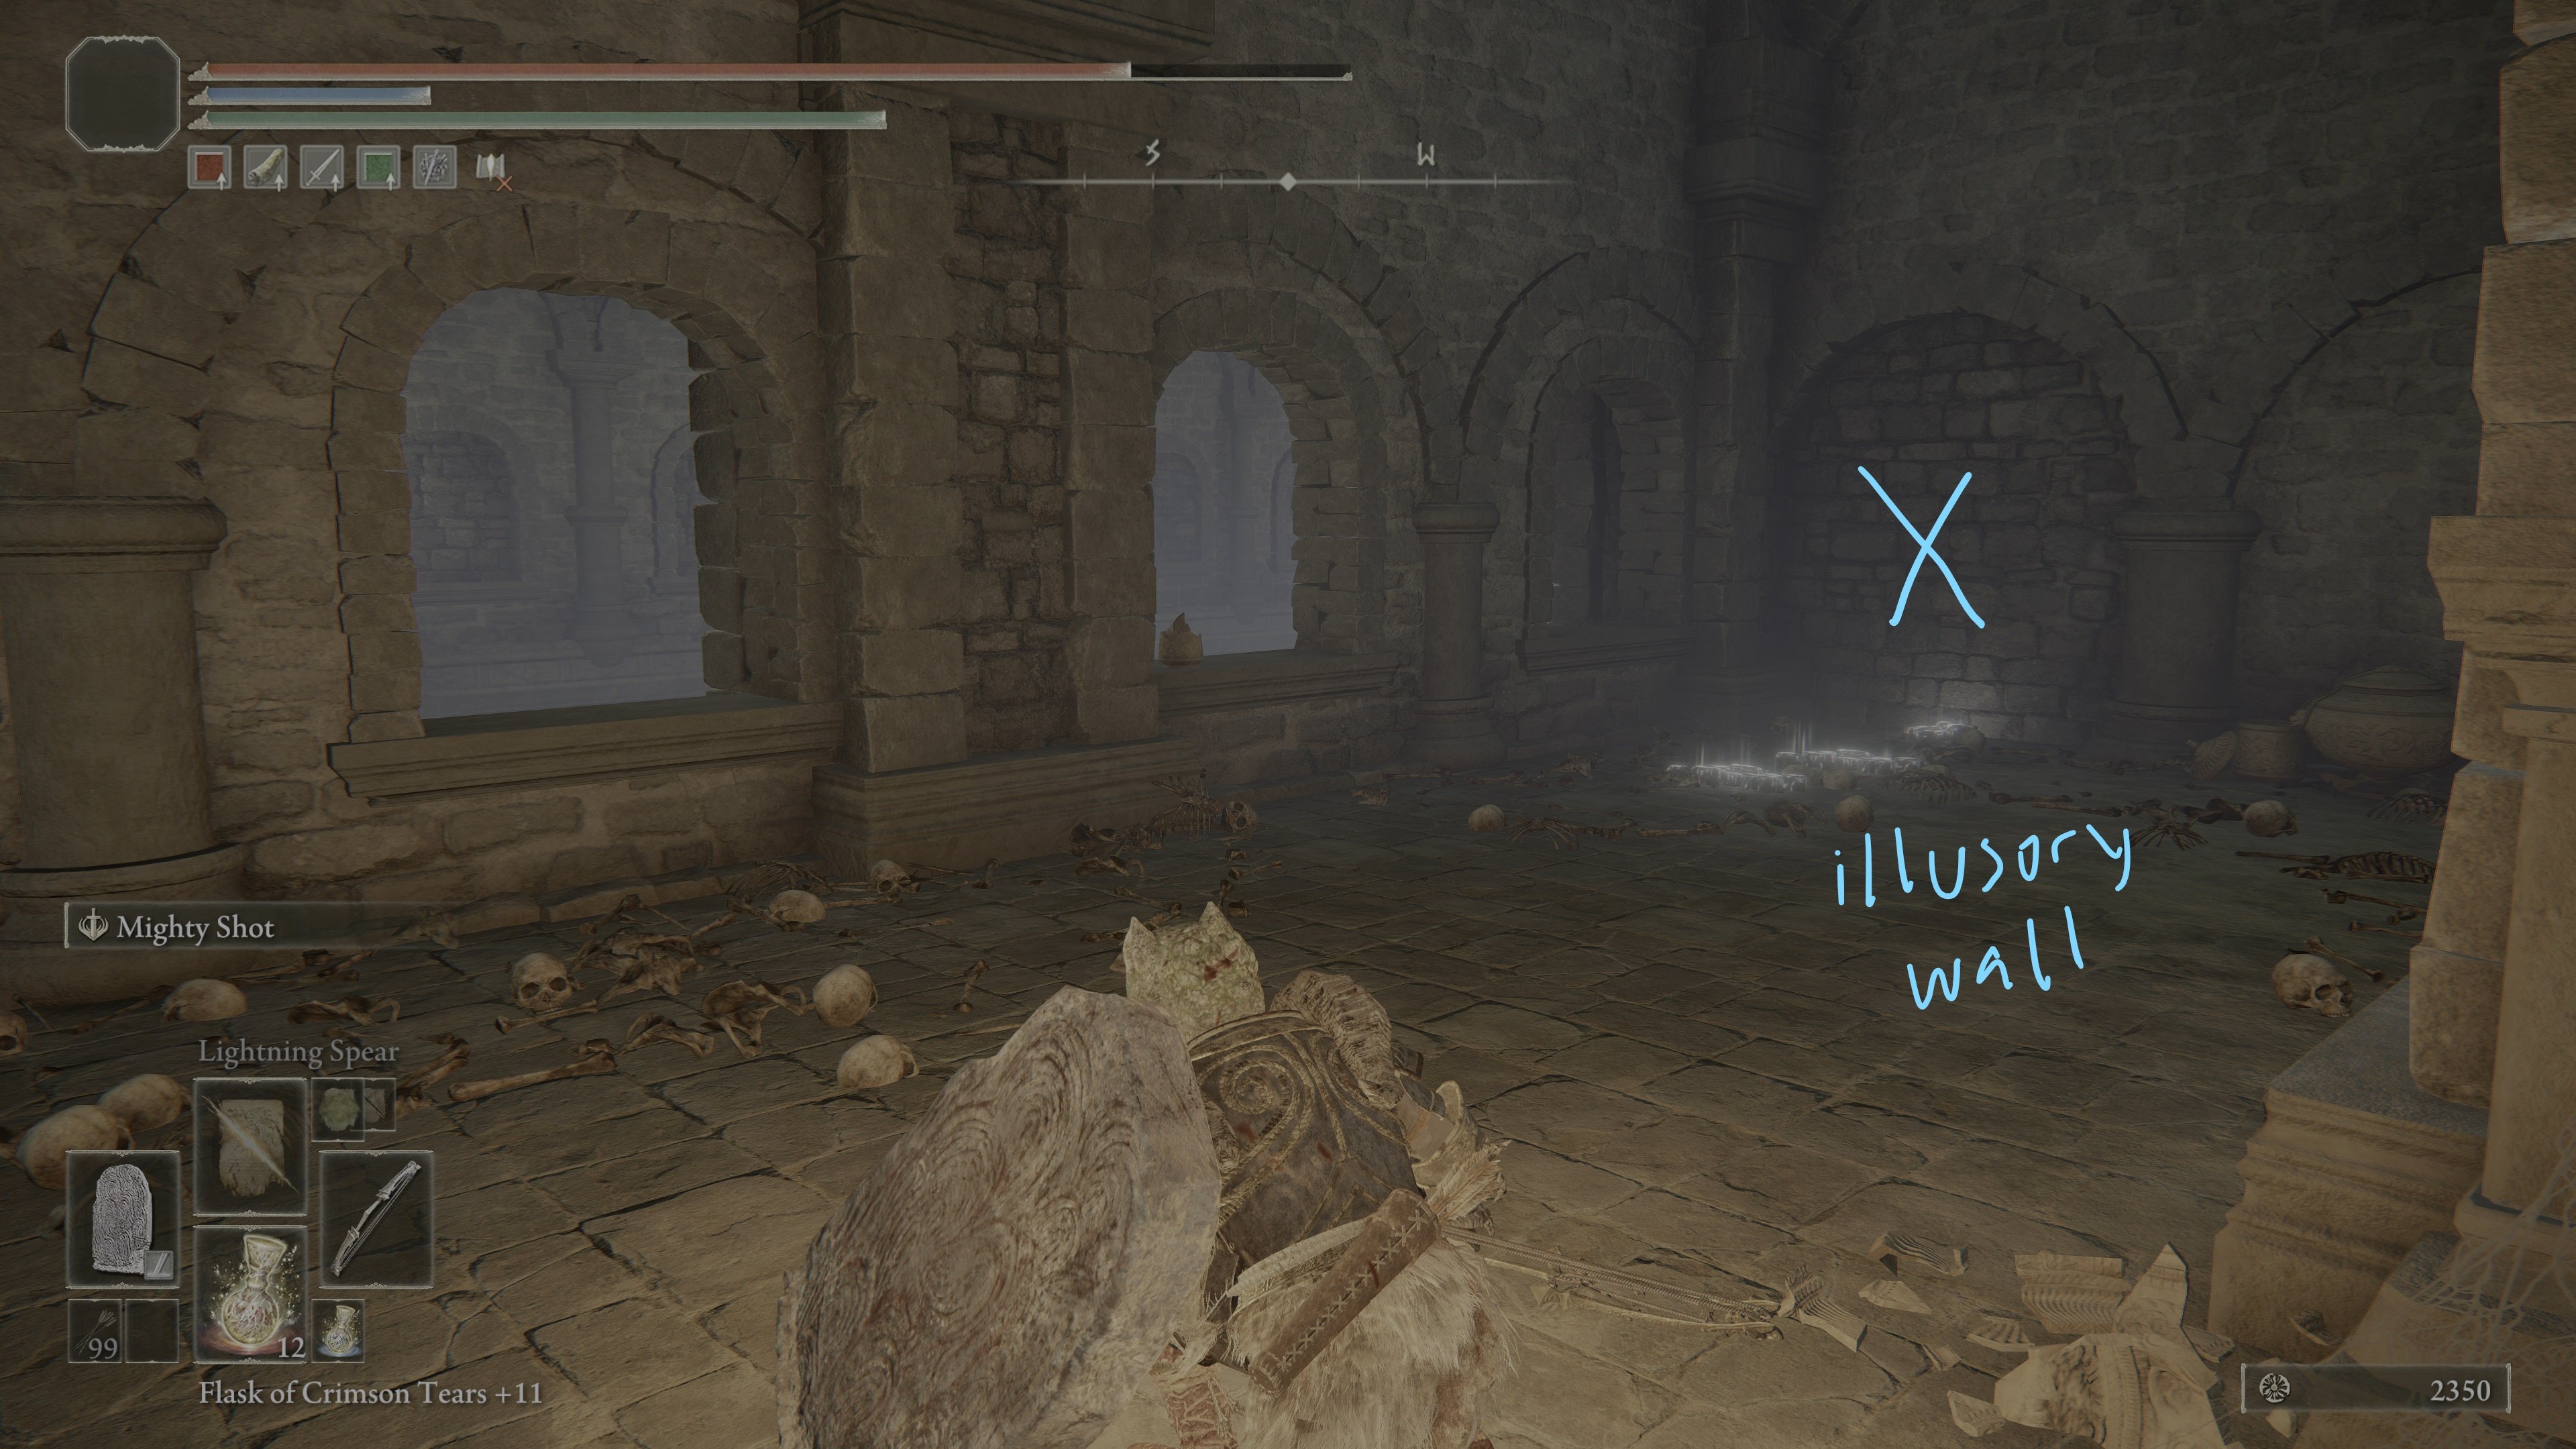
Opening the illusory wall reveals a long corridor. Proceed to the end of it, picking up a Golden Rune [11] about 3/4 of the way through, and when you reach the end, turn left and jump out of the window.
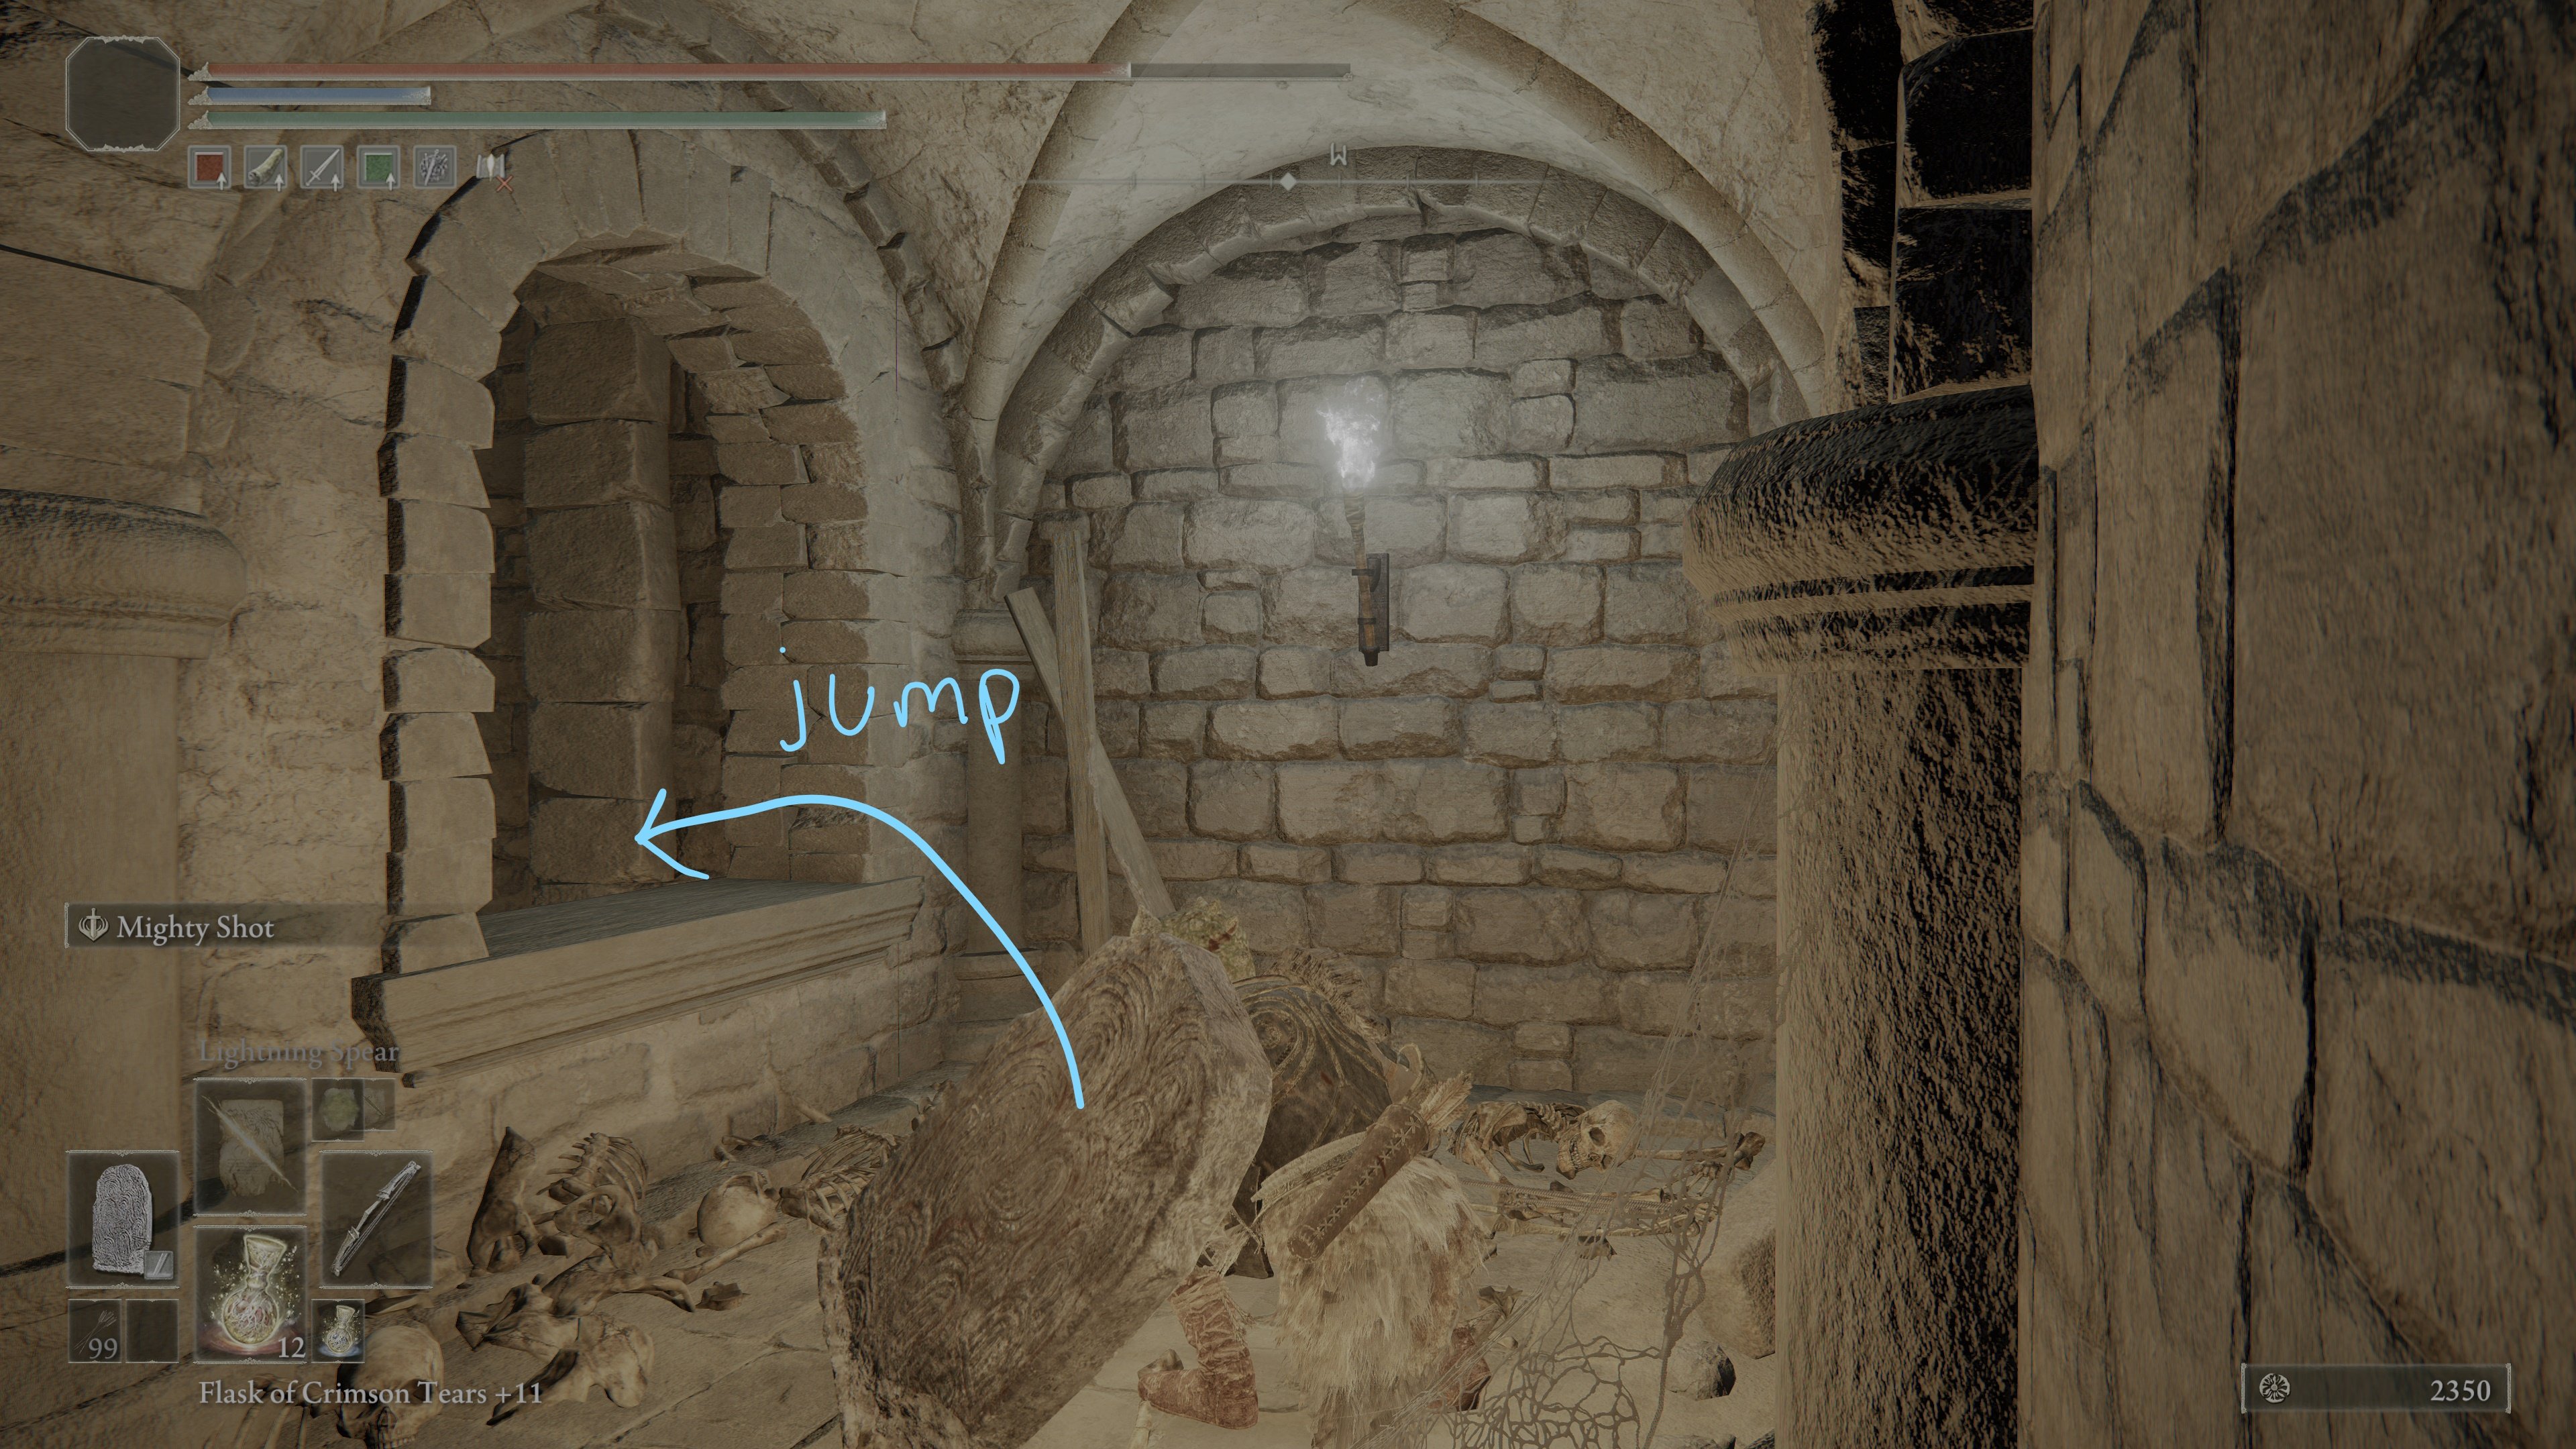
When you land, turn left. You'll see the floor seal discussed earlier in front of you, and on your right will be a small archway to walk through.
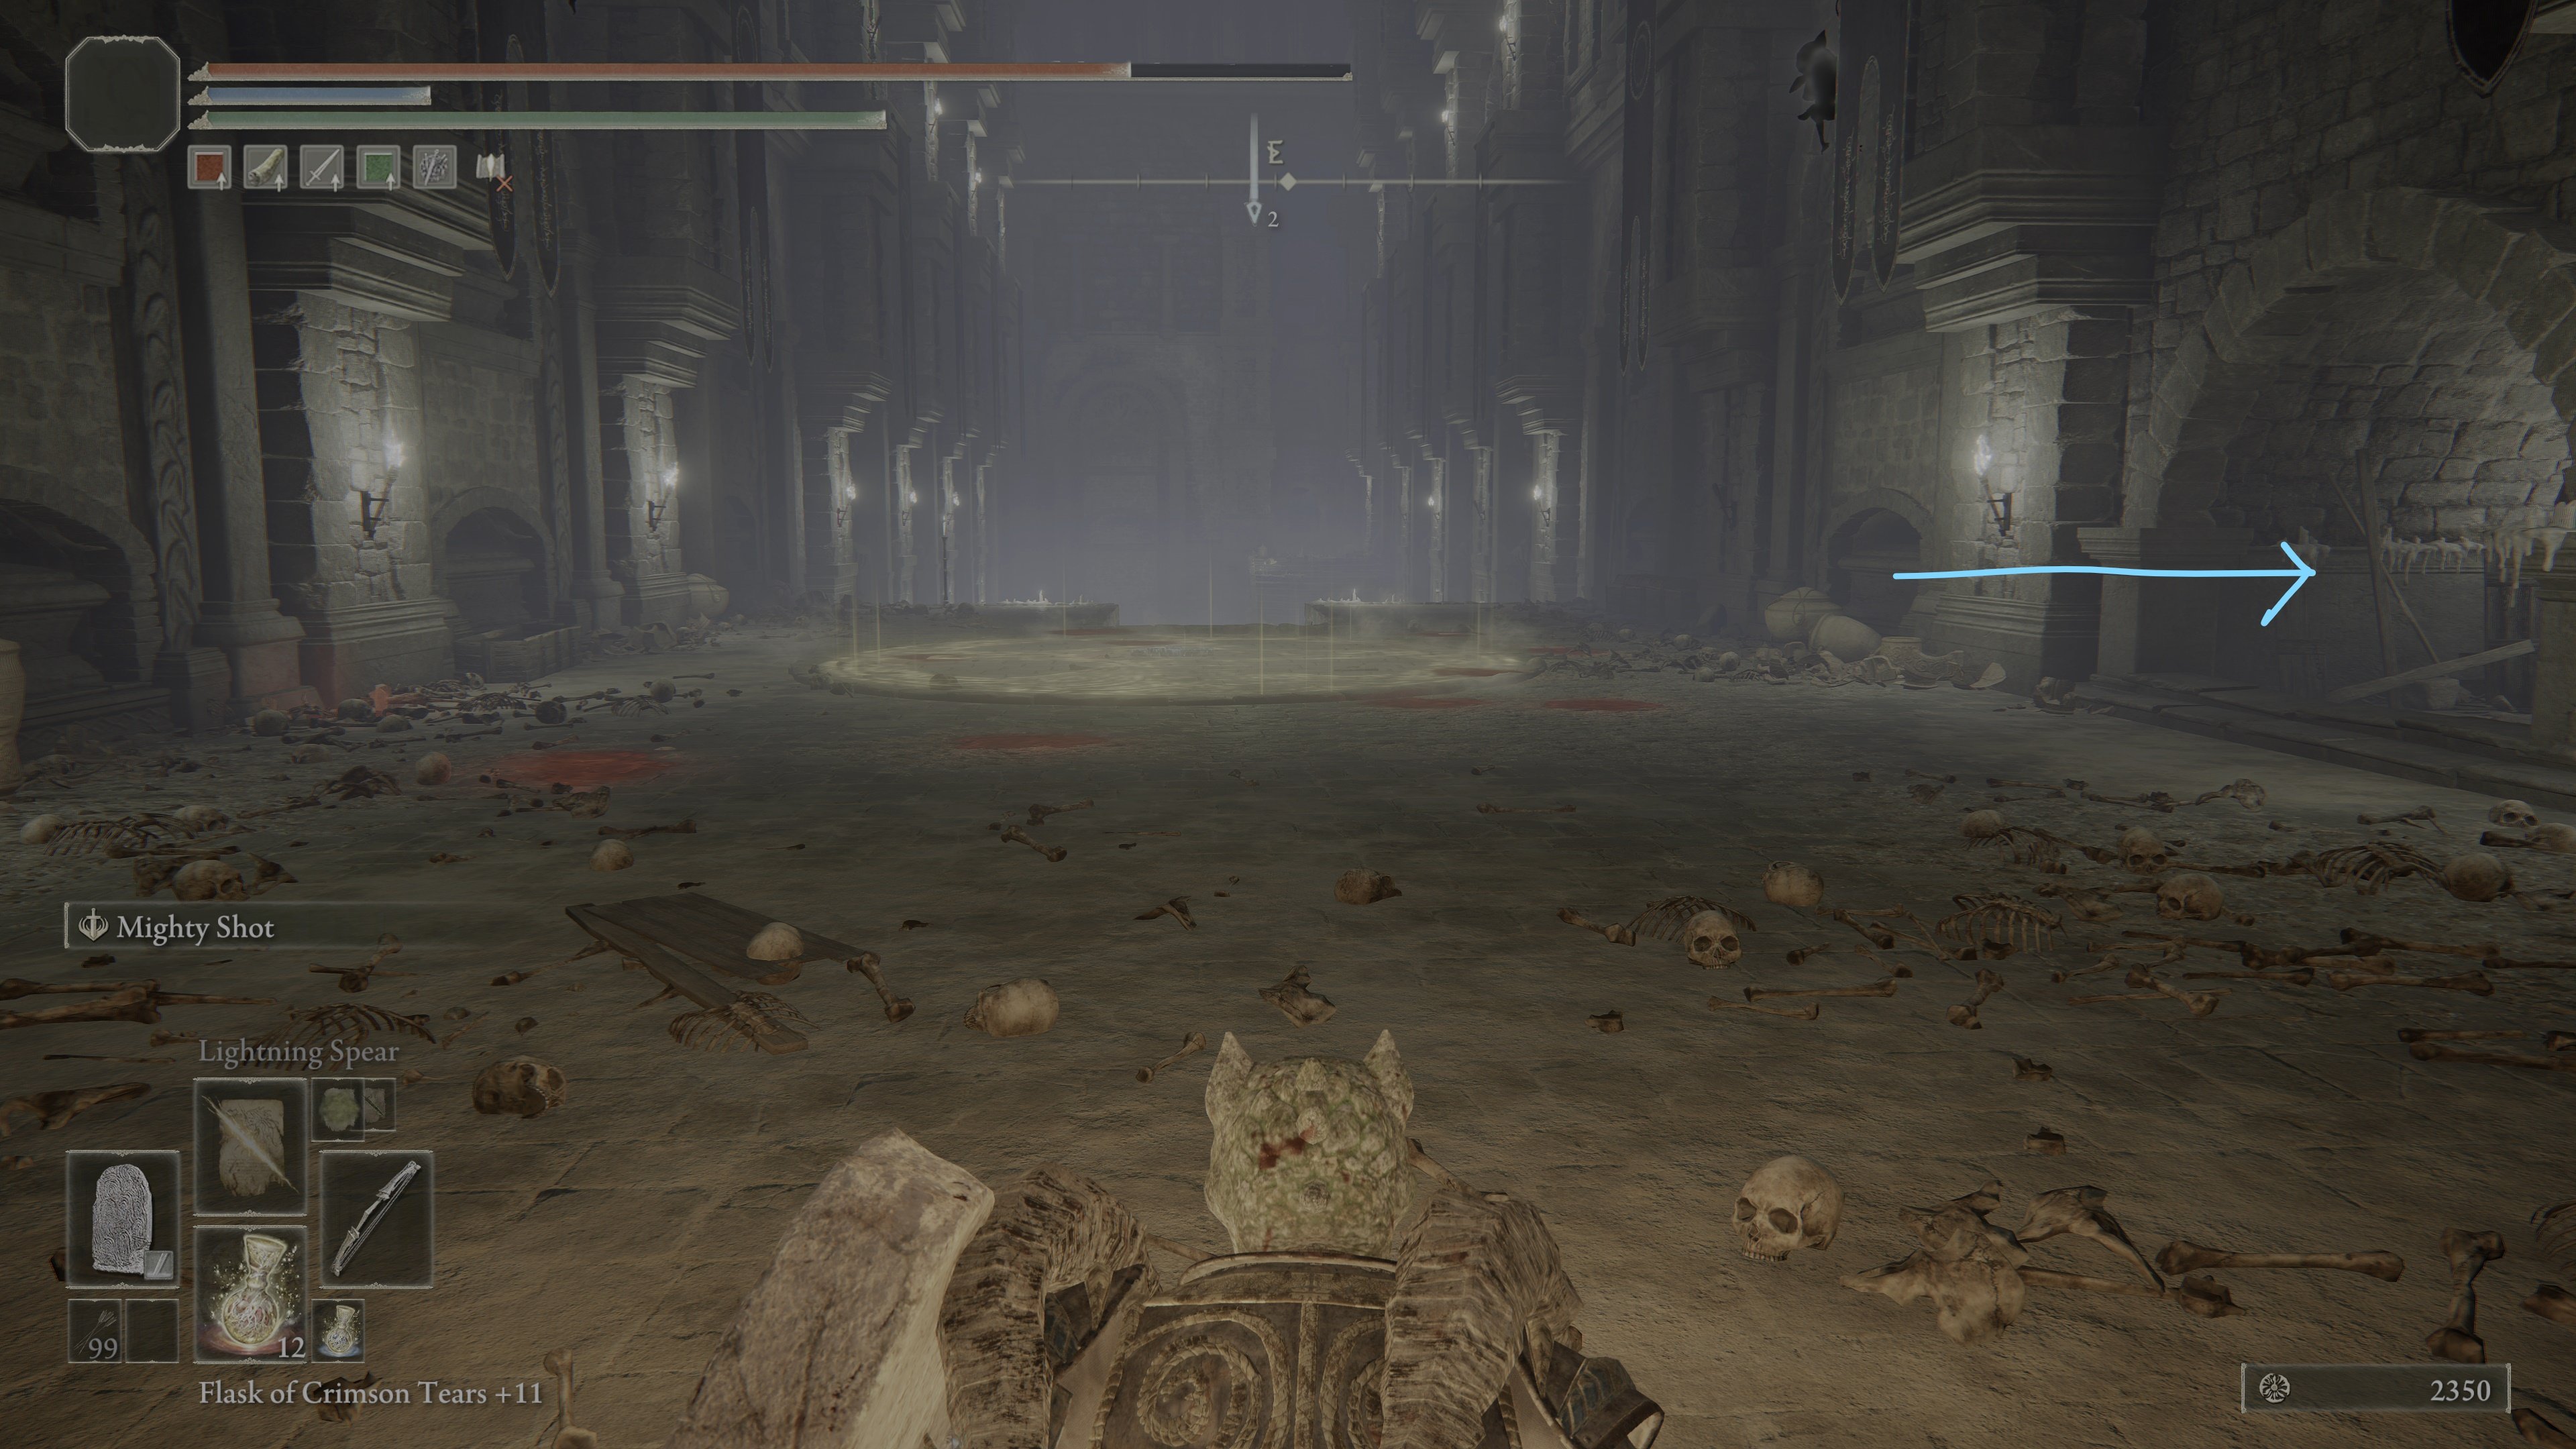
Enter it, but note that the perpendicular corridor will have a trap statue in it that spews flame.
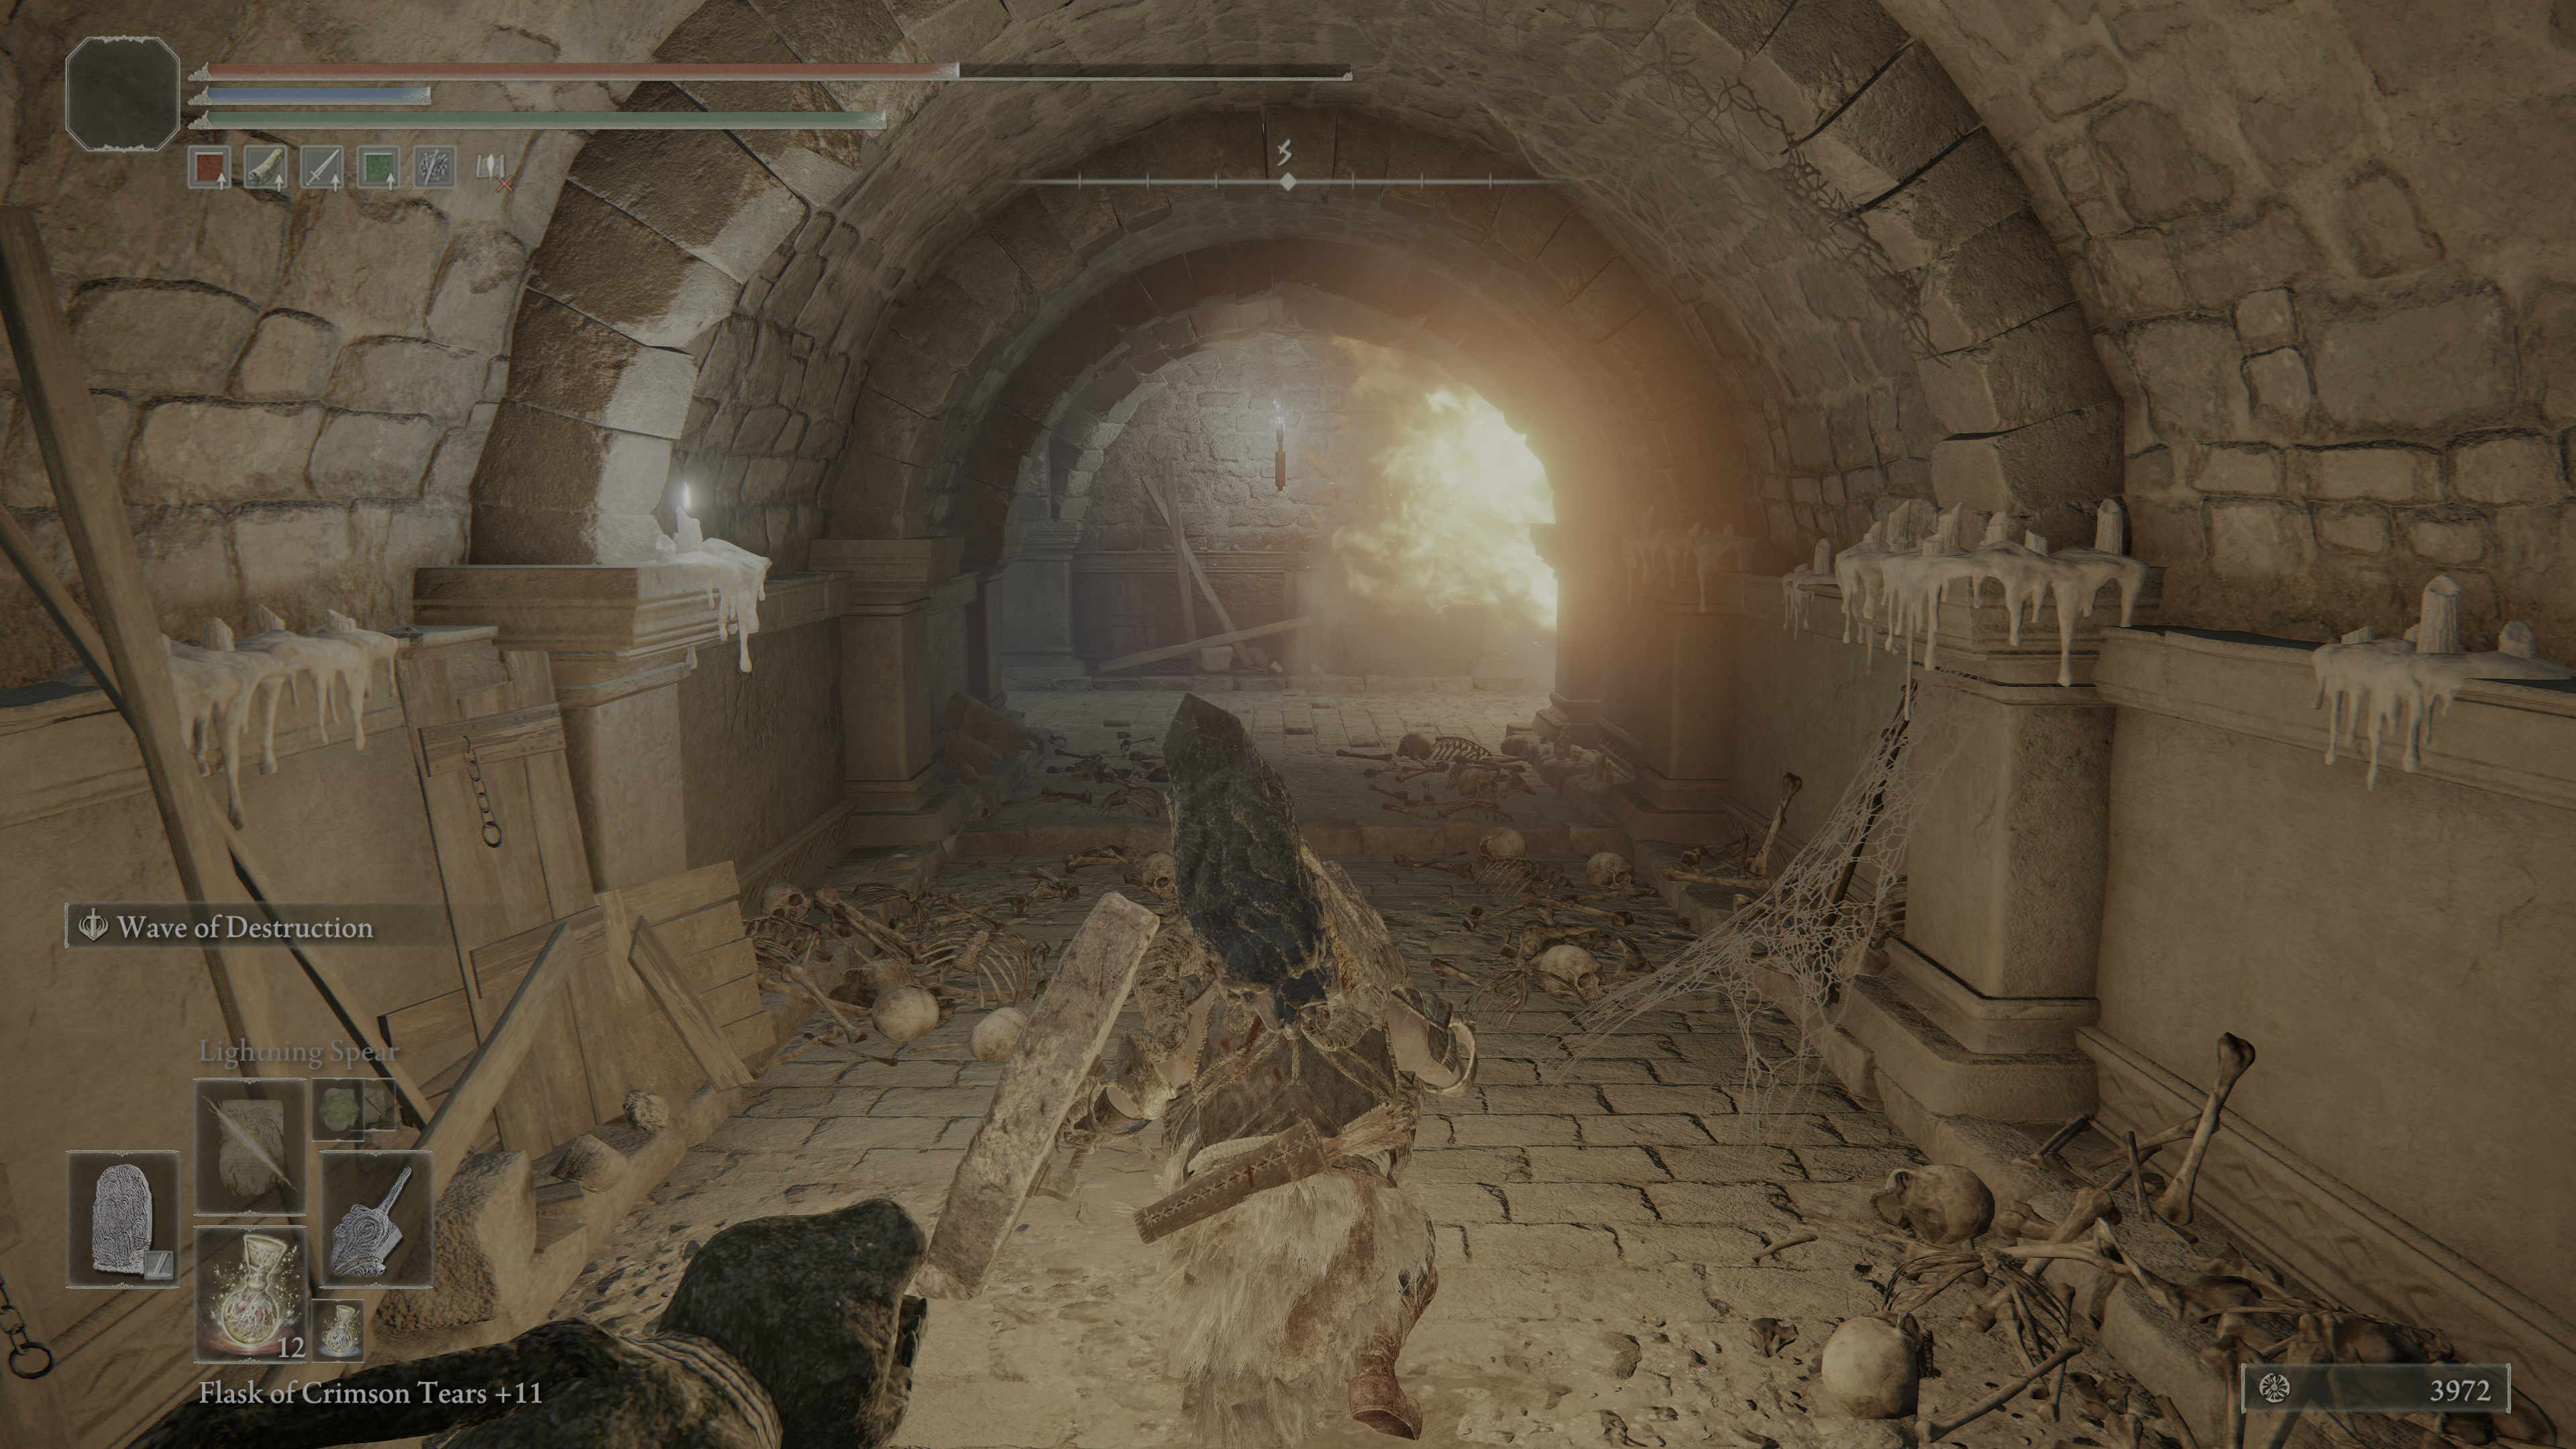
The statue spewing the flame is too far to reach from here, but what you can do is quickly run straight, then turn right, then turn again (basically making a U-shape) into a small alcove to take cover from the flame. A Fire Monk will be waiting in this alcove for you.
This alcove is close enough that you can then time your run to make it to the statue and hit it before the next flame cycle.
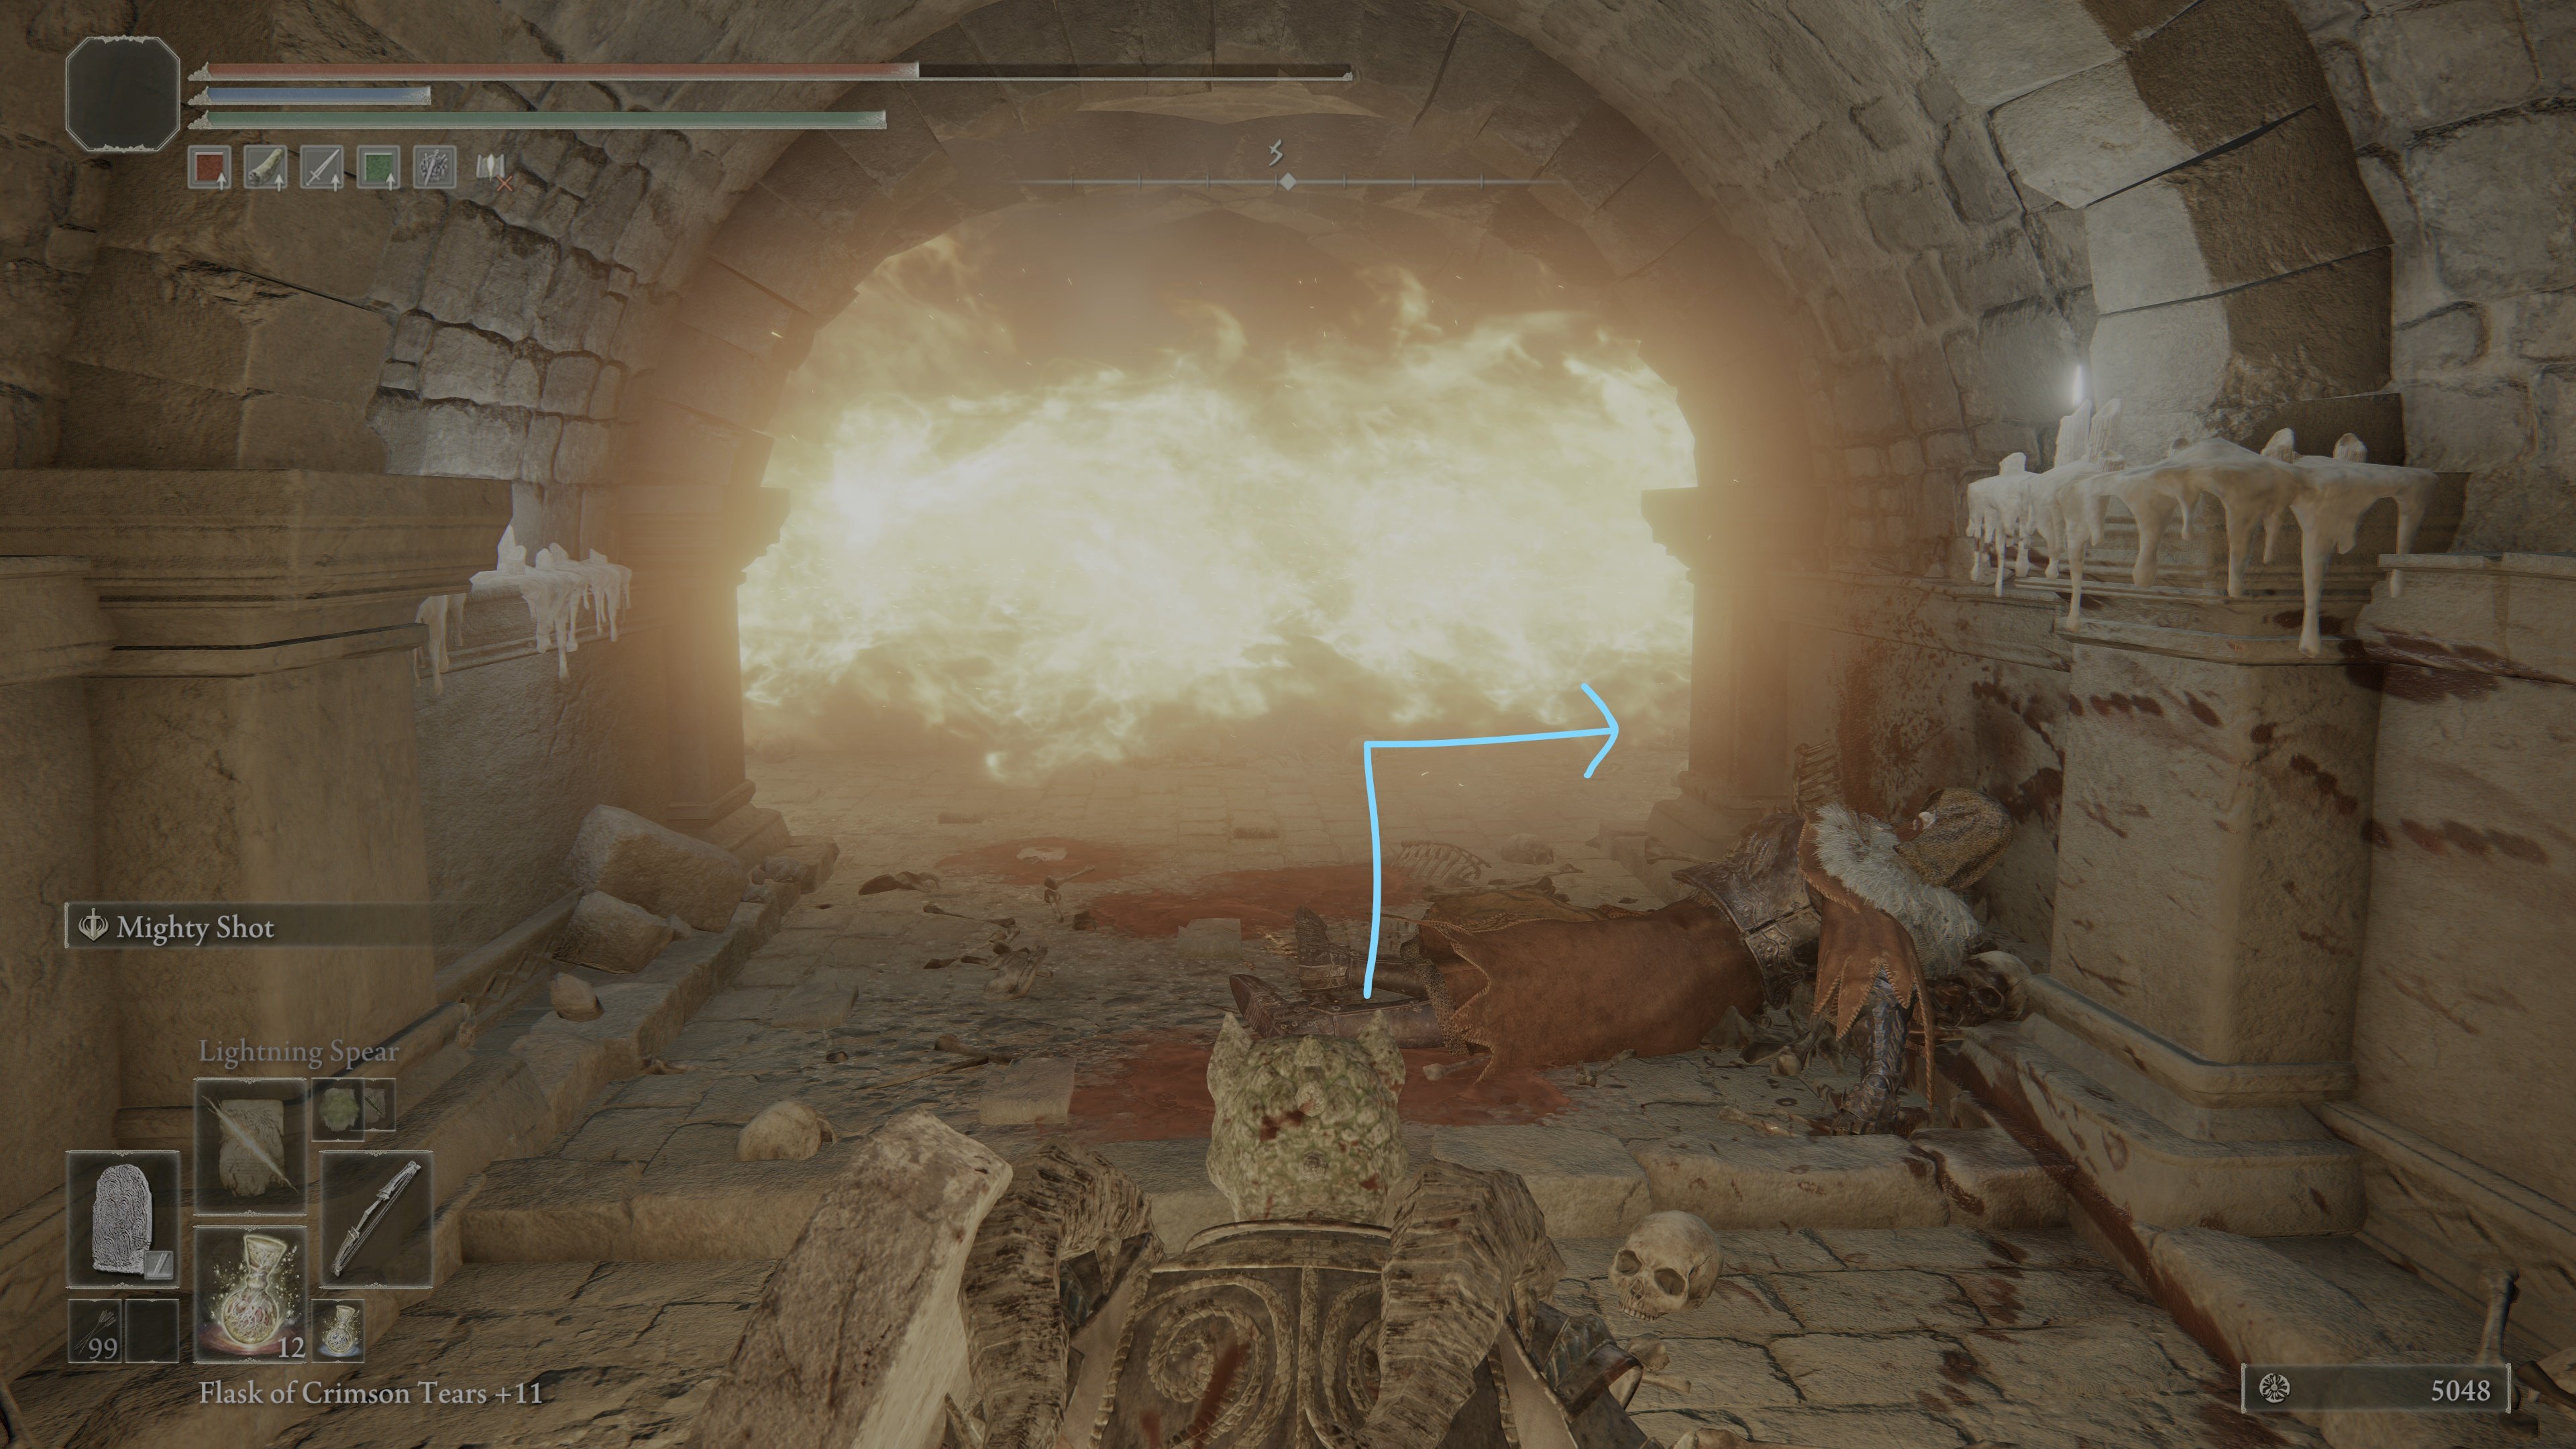
After turning off the flame-sprinkler, proceed up the stairs on your left.
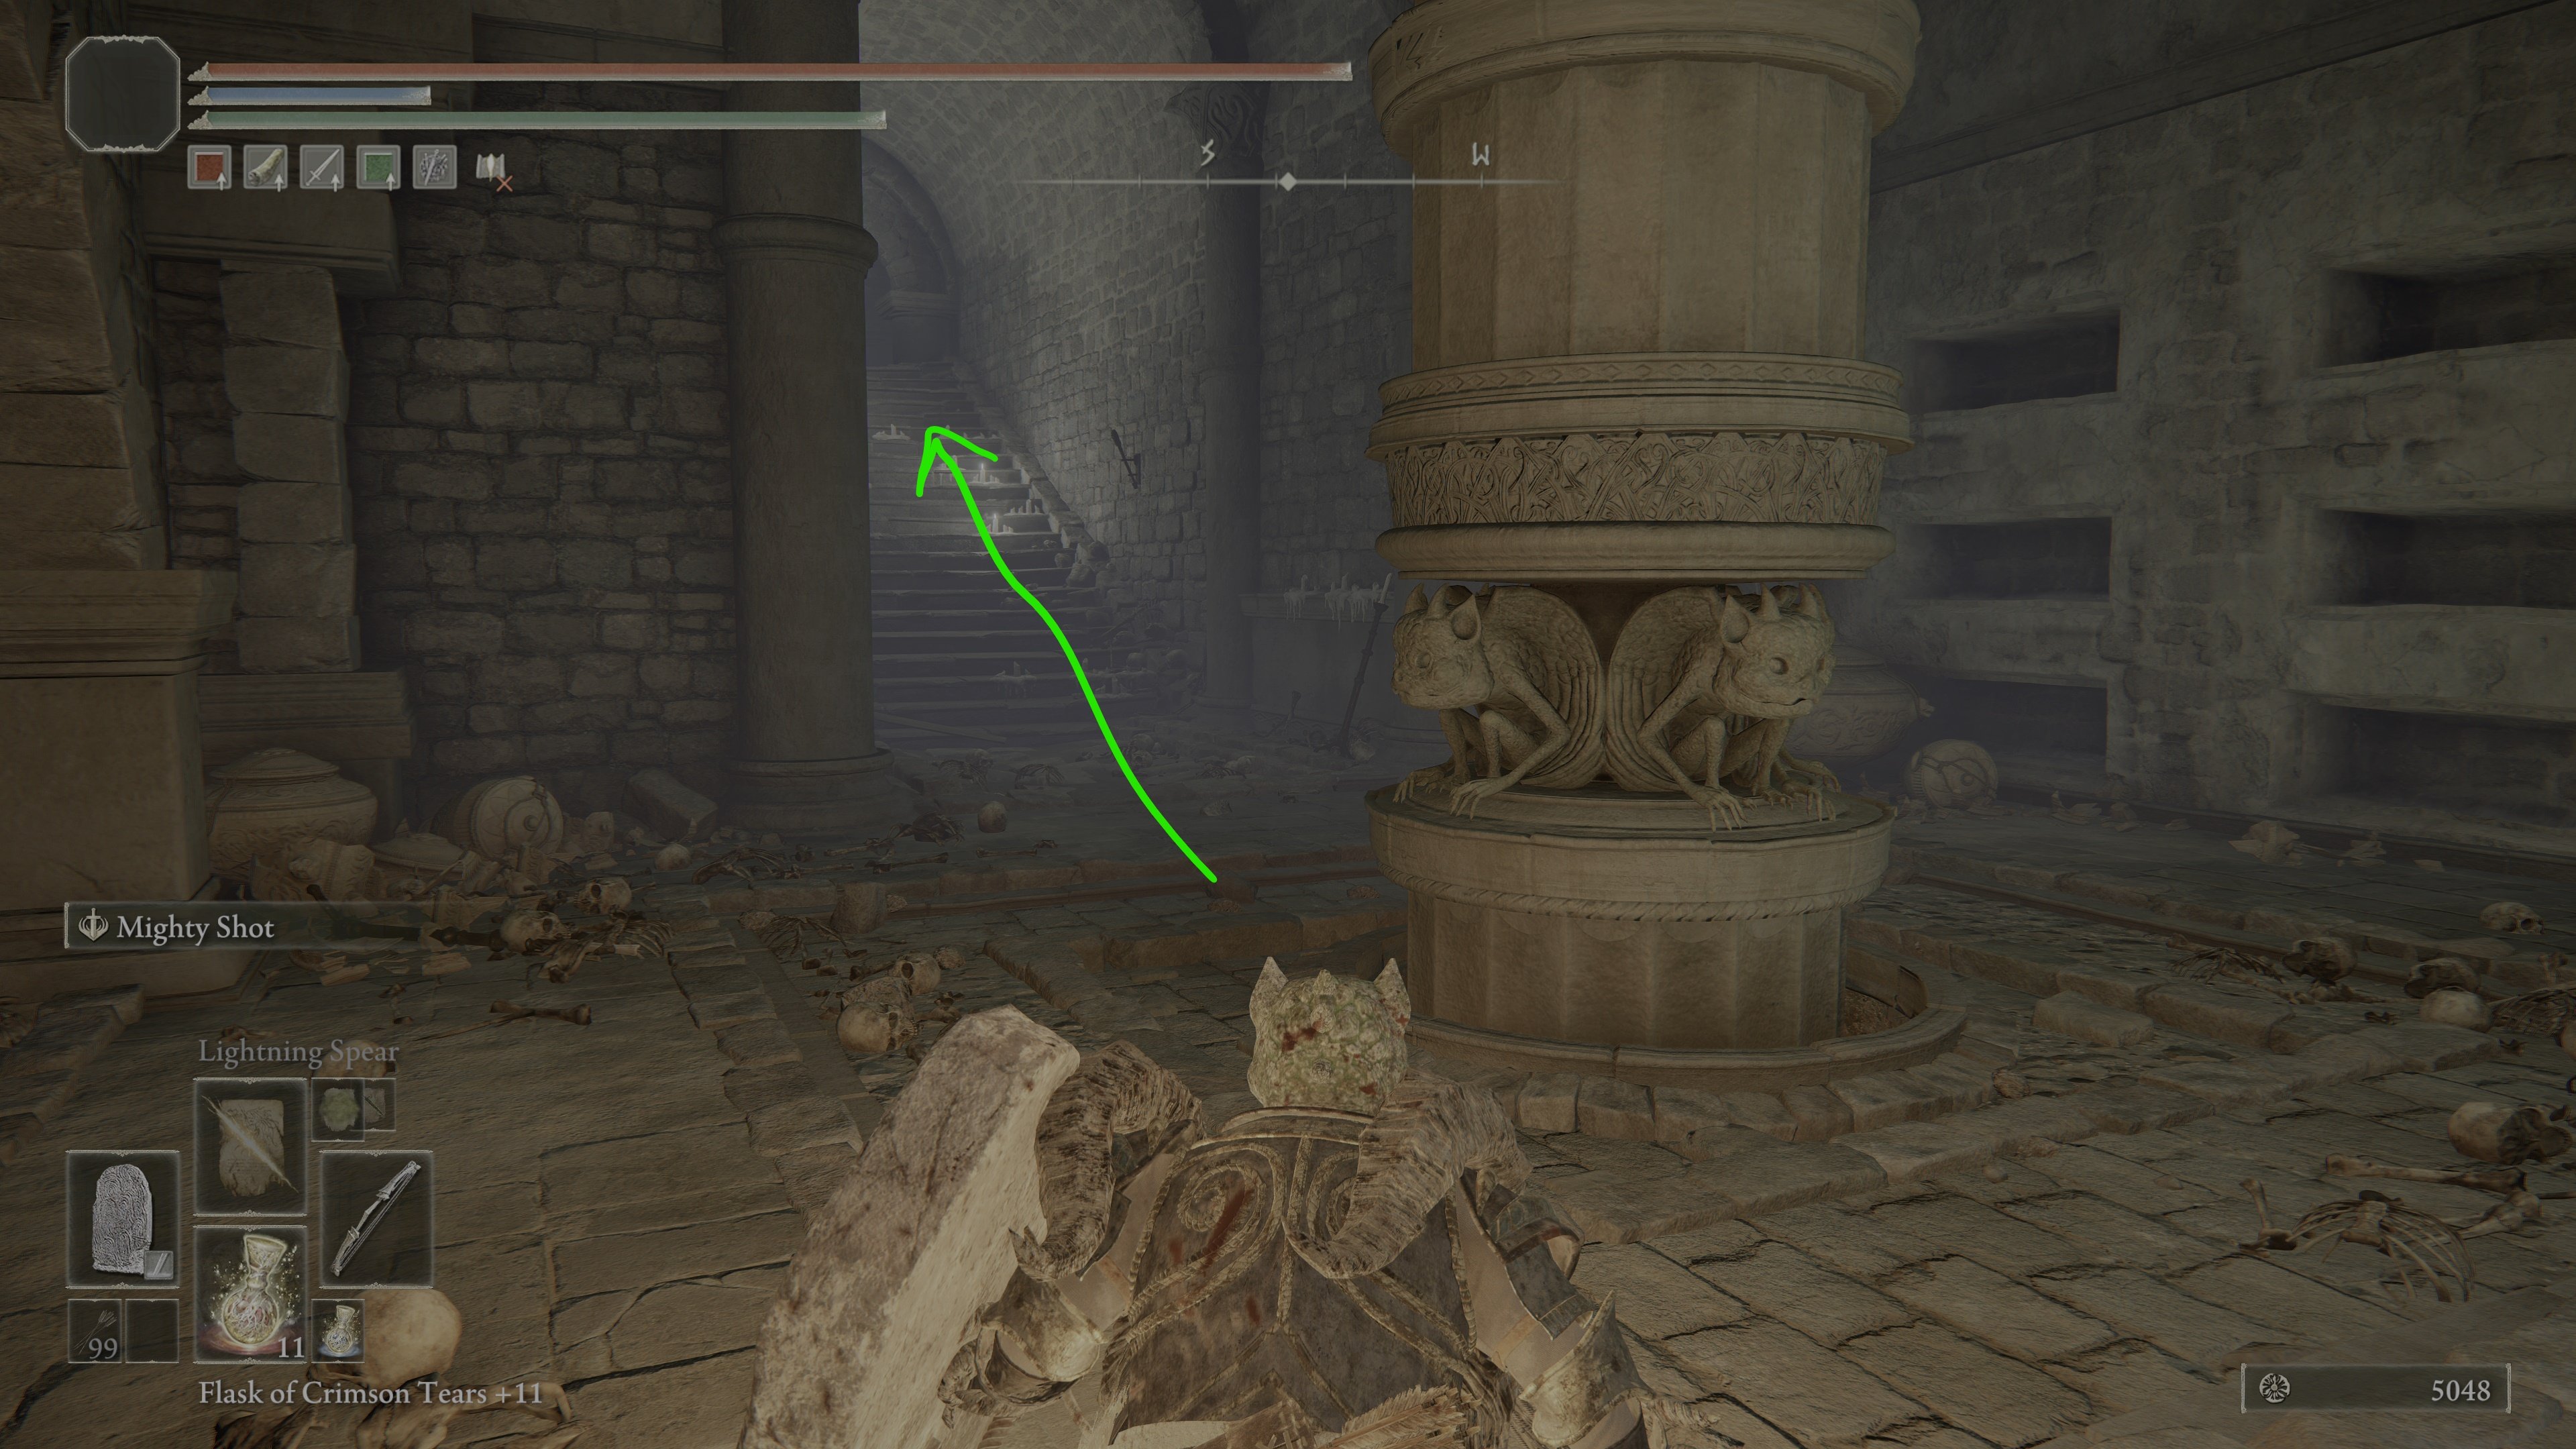
You'll encounter your 3rd flame monk here.
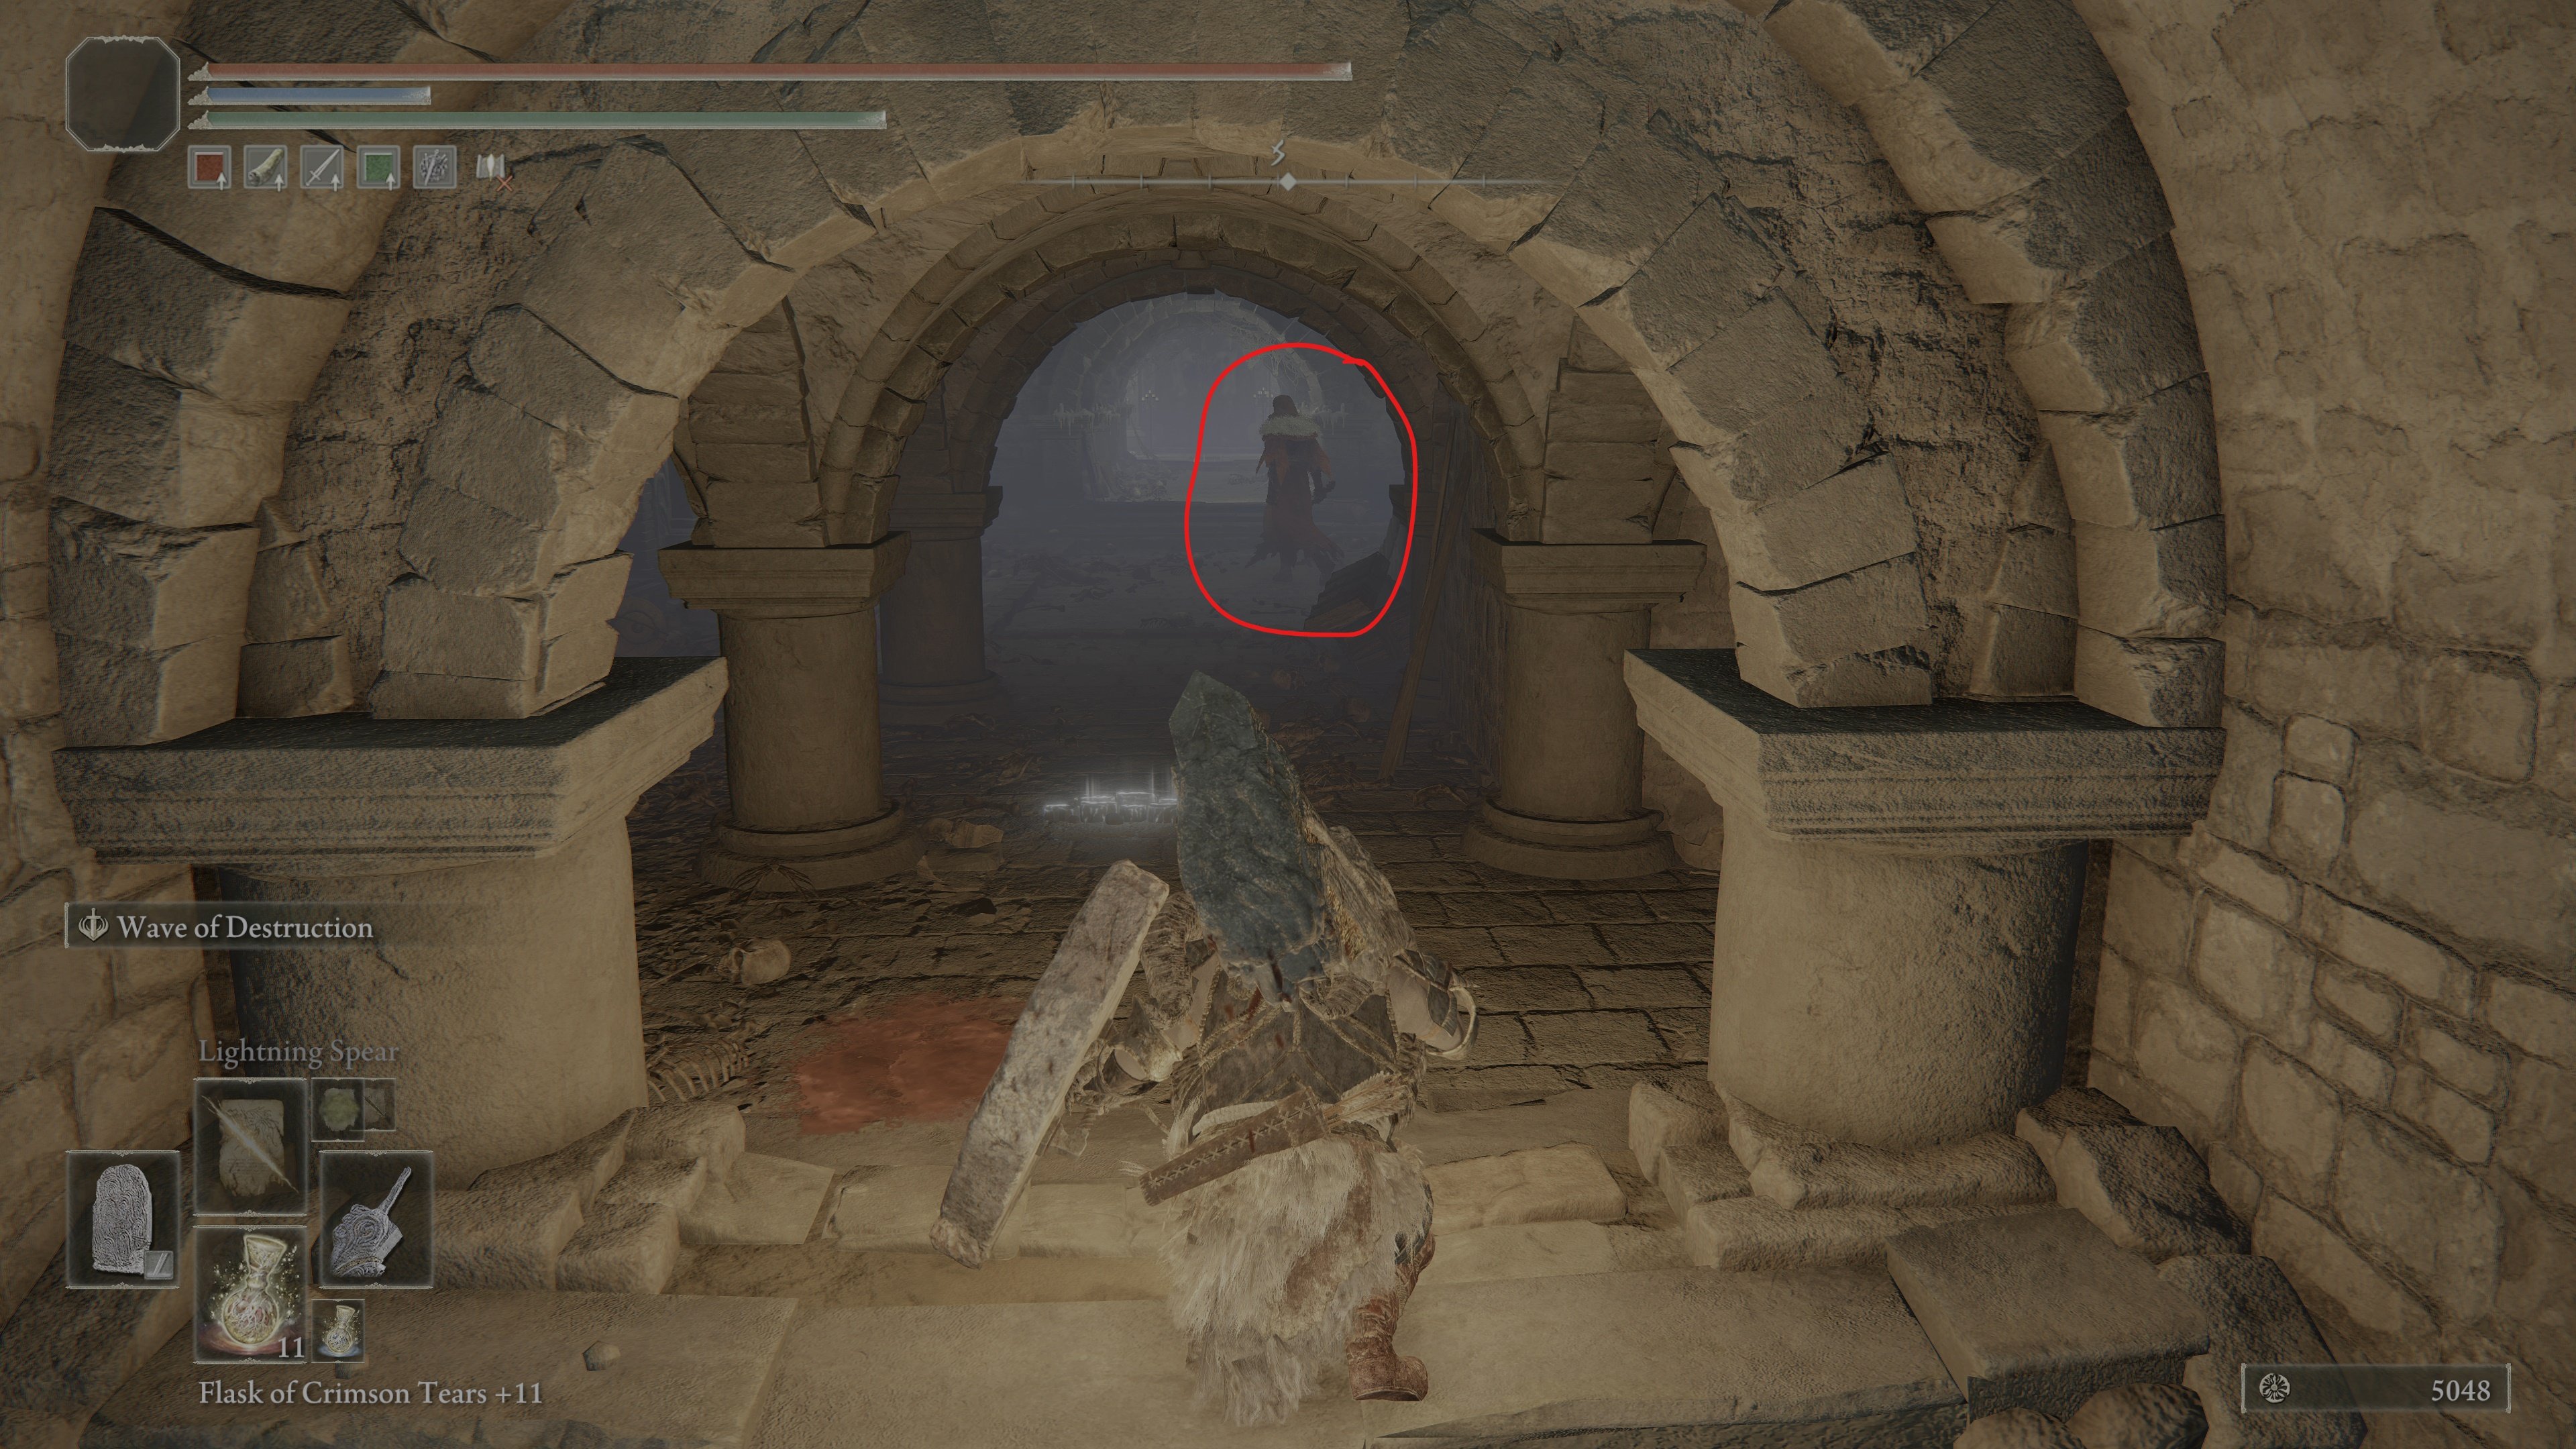
Around where the Flame Monk was standing is a set of stairs on your right, which lead in the direction opposite of you. Take these stairs up, and you'll find another room guarded by a Stonesword Key Imp statue. Regardless of whether or not you choose to enter, make sure to grab the Freezing Grease hanging off the ledge.
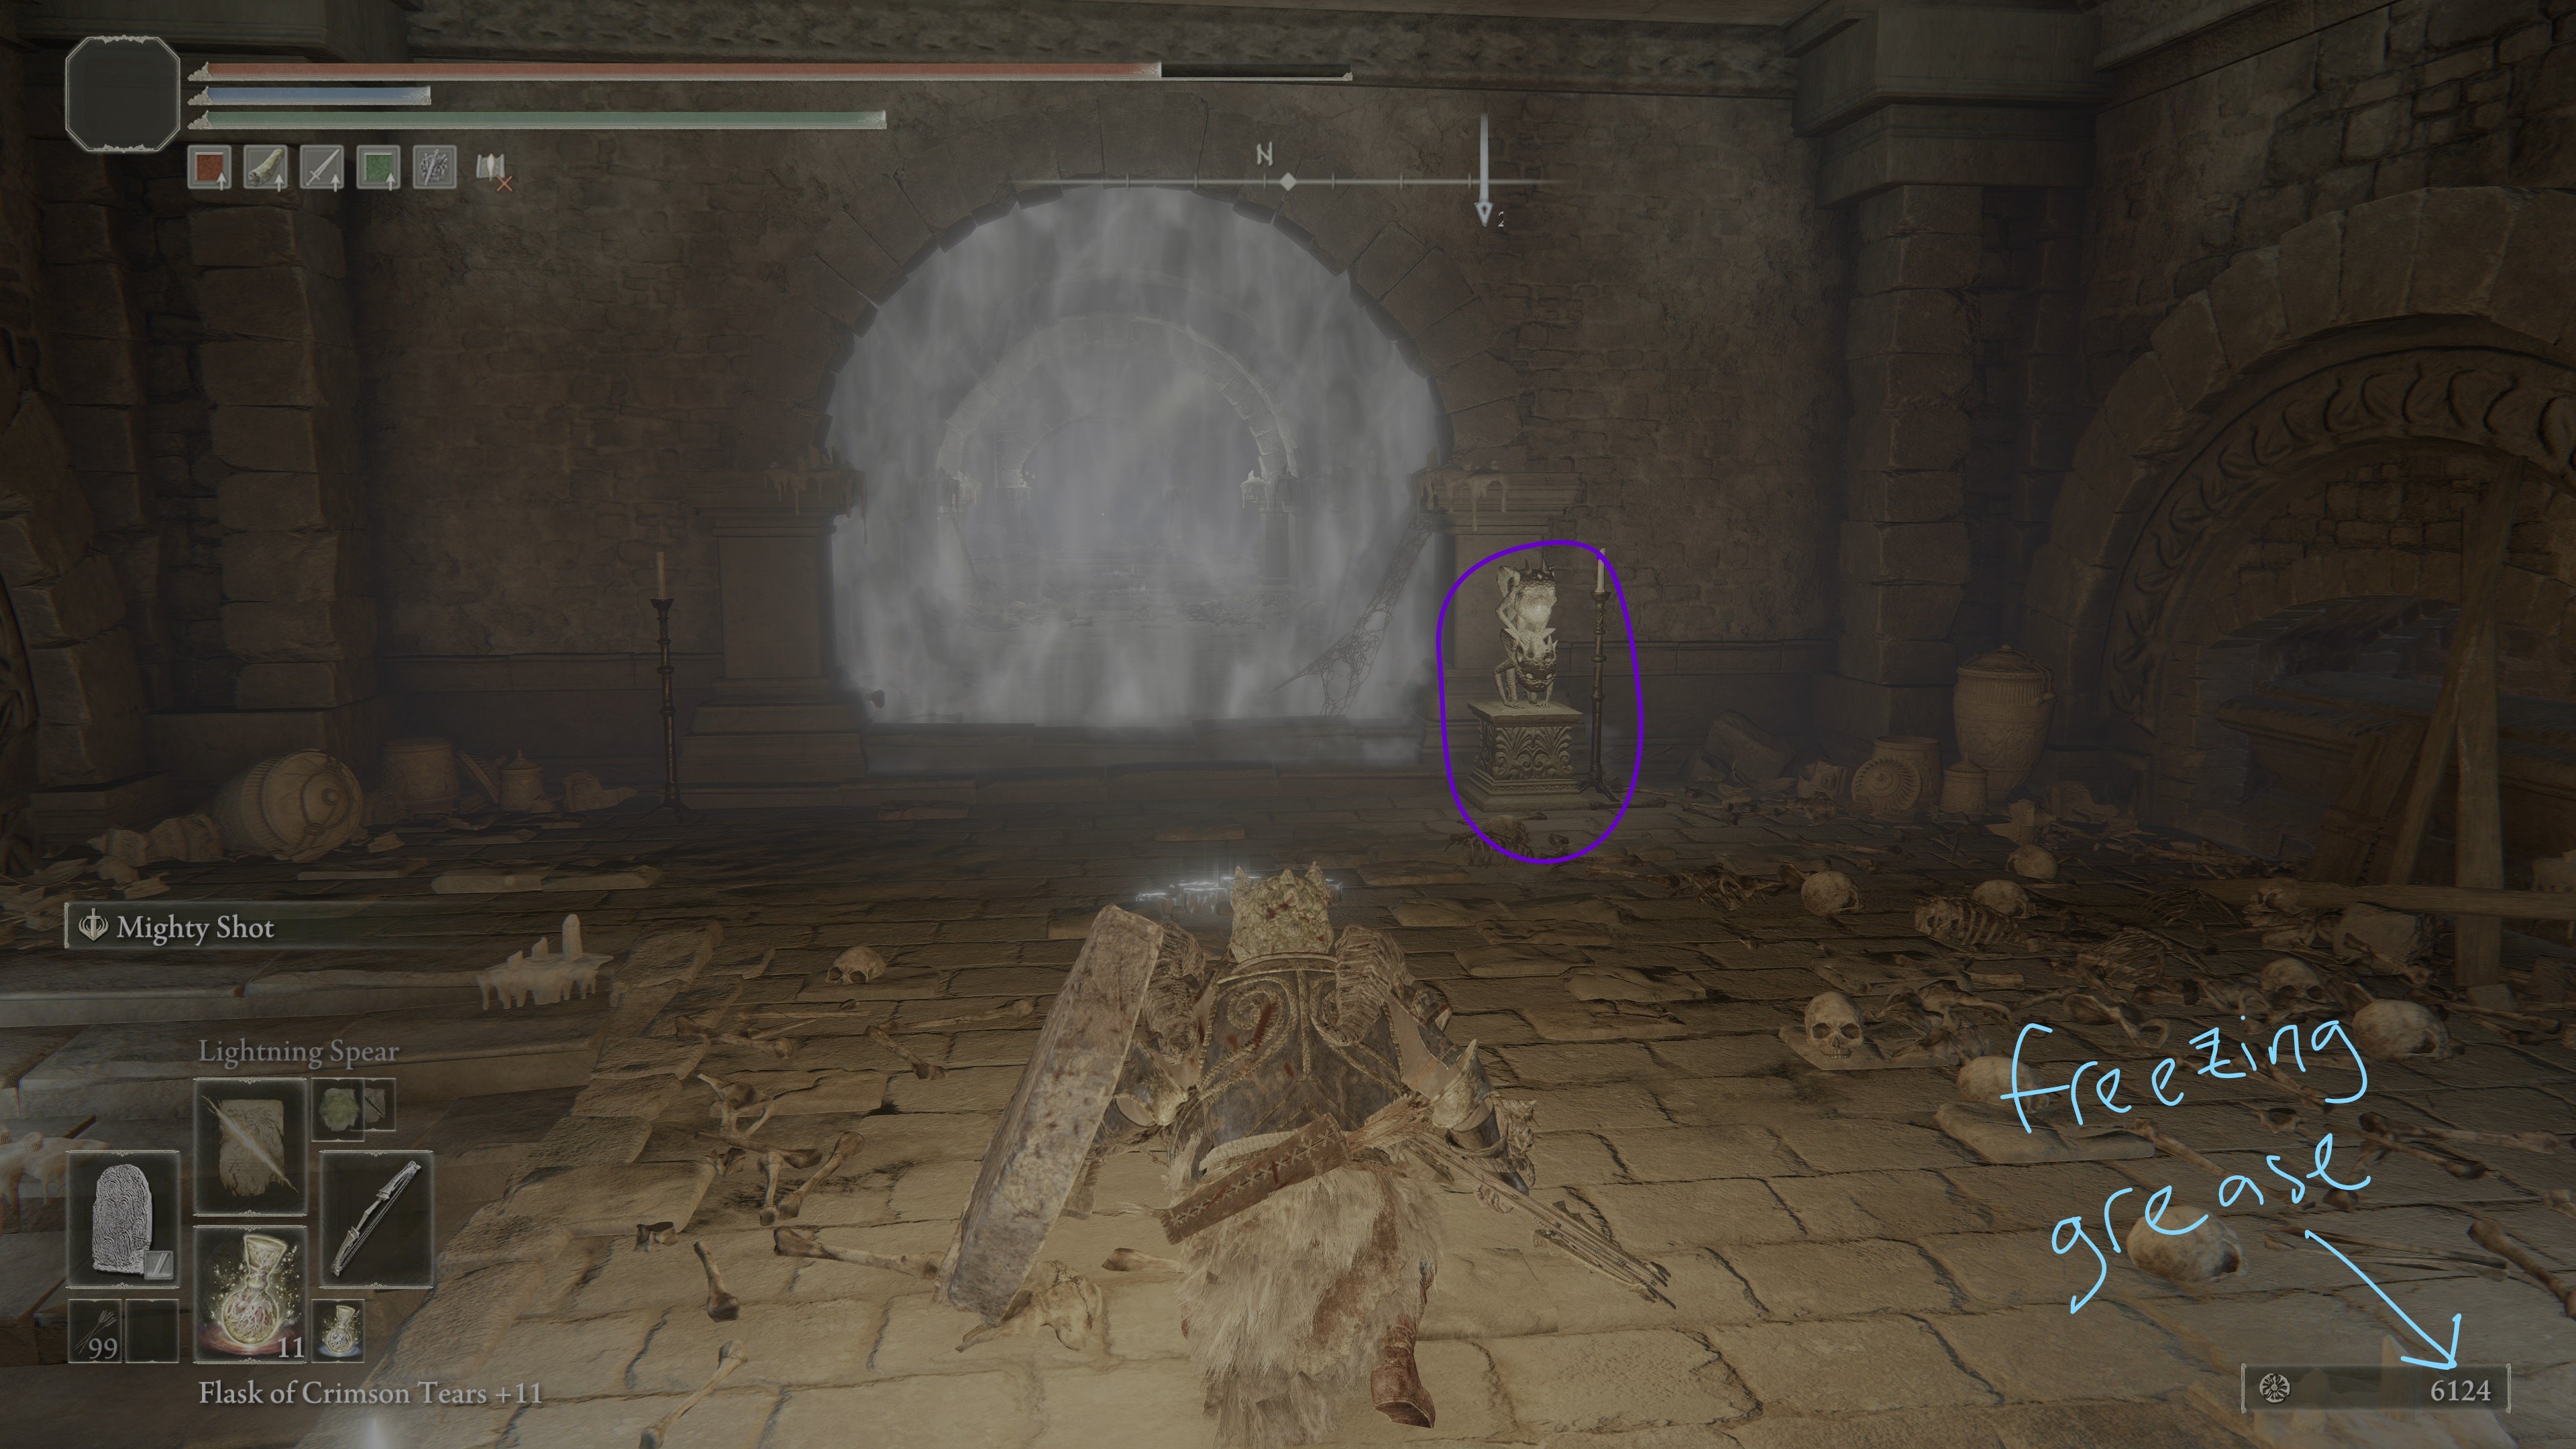
(Looking through the door, you can see some loot at the very back -- this is the Cranial Vessel Candlestand warhammer.)
In the room is a deactivated floor seal. Activate it by using a ranged attack on the trap pillar near the fire monk who ambushed you (one level below), to raise it and activate the seal. Past the seal are three invulnerable Imps guarding a corpse with the Cranial Vessel Candlestand warhammer. Alternatively, if you're fast and lazy, you can simply run in, grab the loot, and run back out.
Once you're done in this room, come back out the way you came in, and proceed back down the stairs and take the lift in the room in front of you.
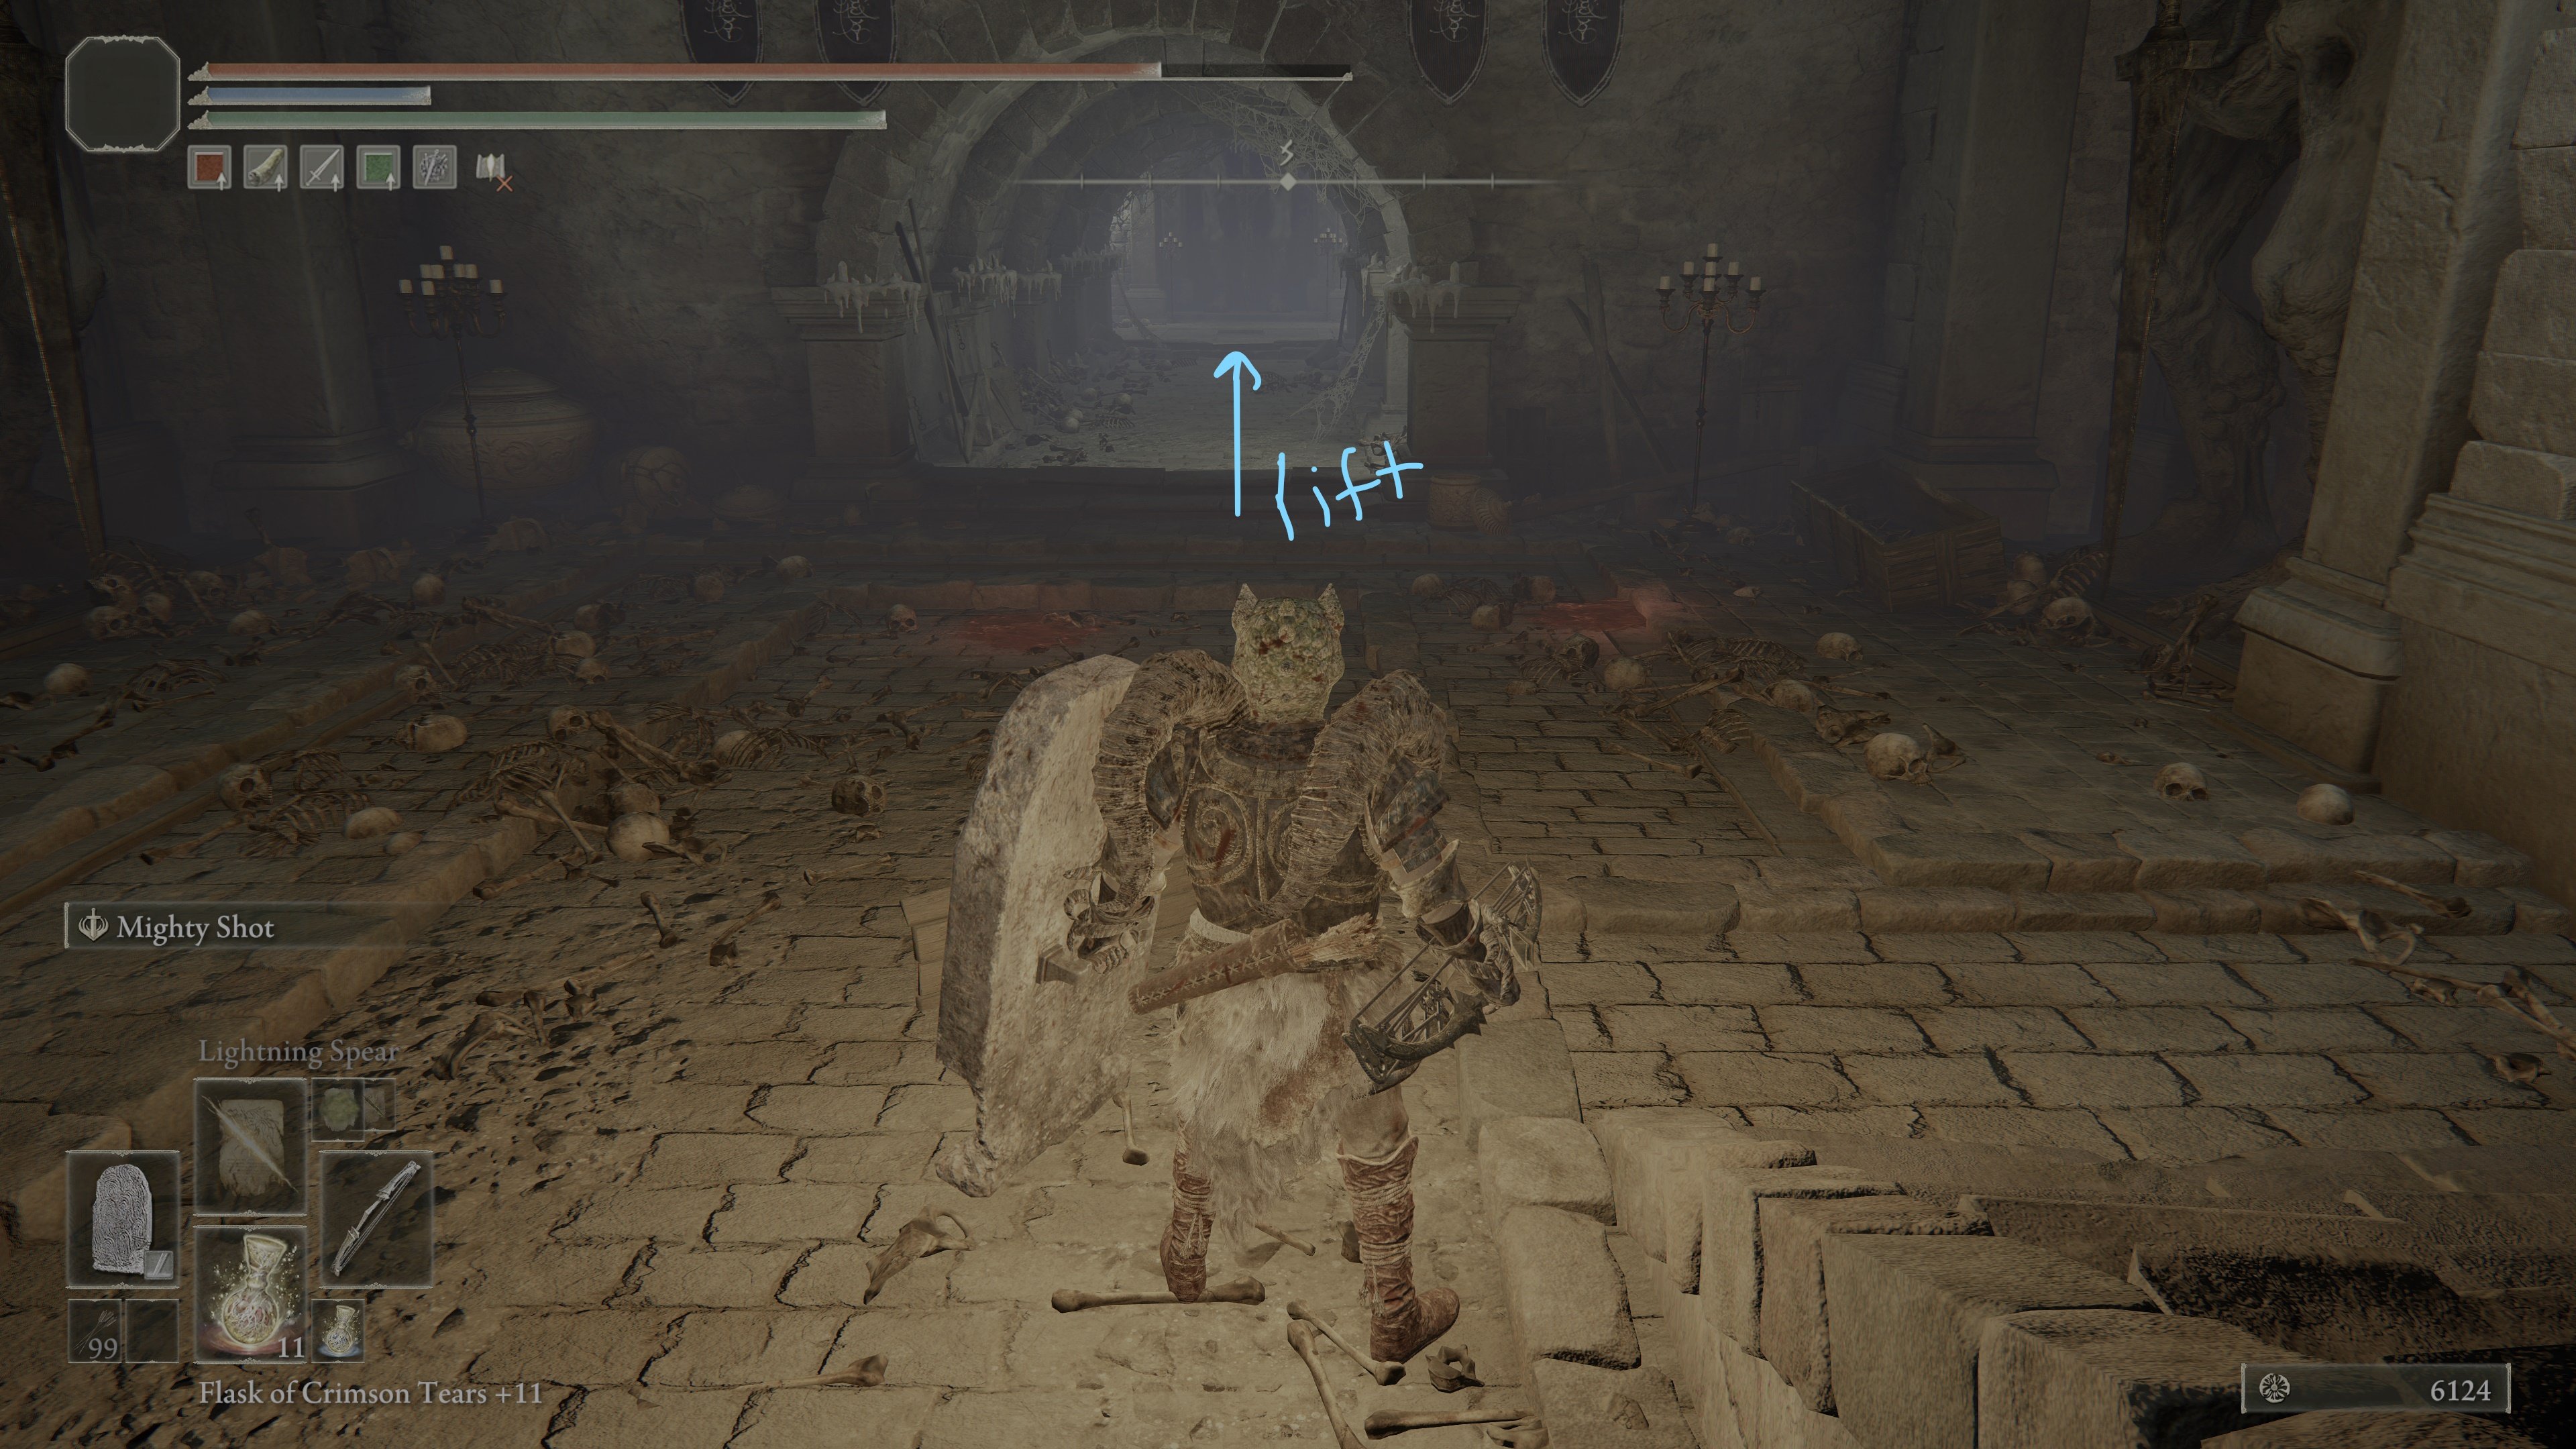
When that lift gets to the bottom, step on the button again to send it back up, but get off. This will activate the seal in front of the lift and reveal an alcove in the lift bottom (but not get into it yet).
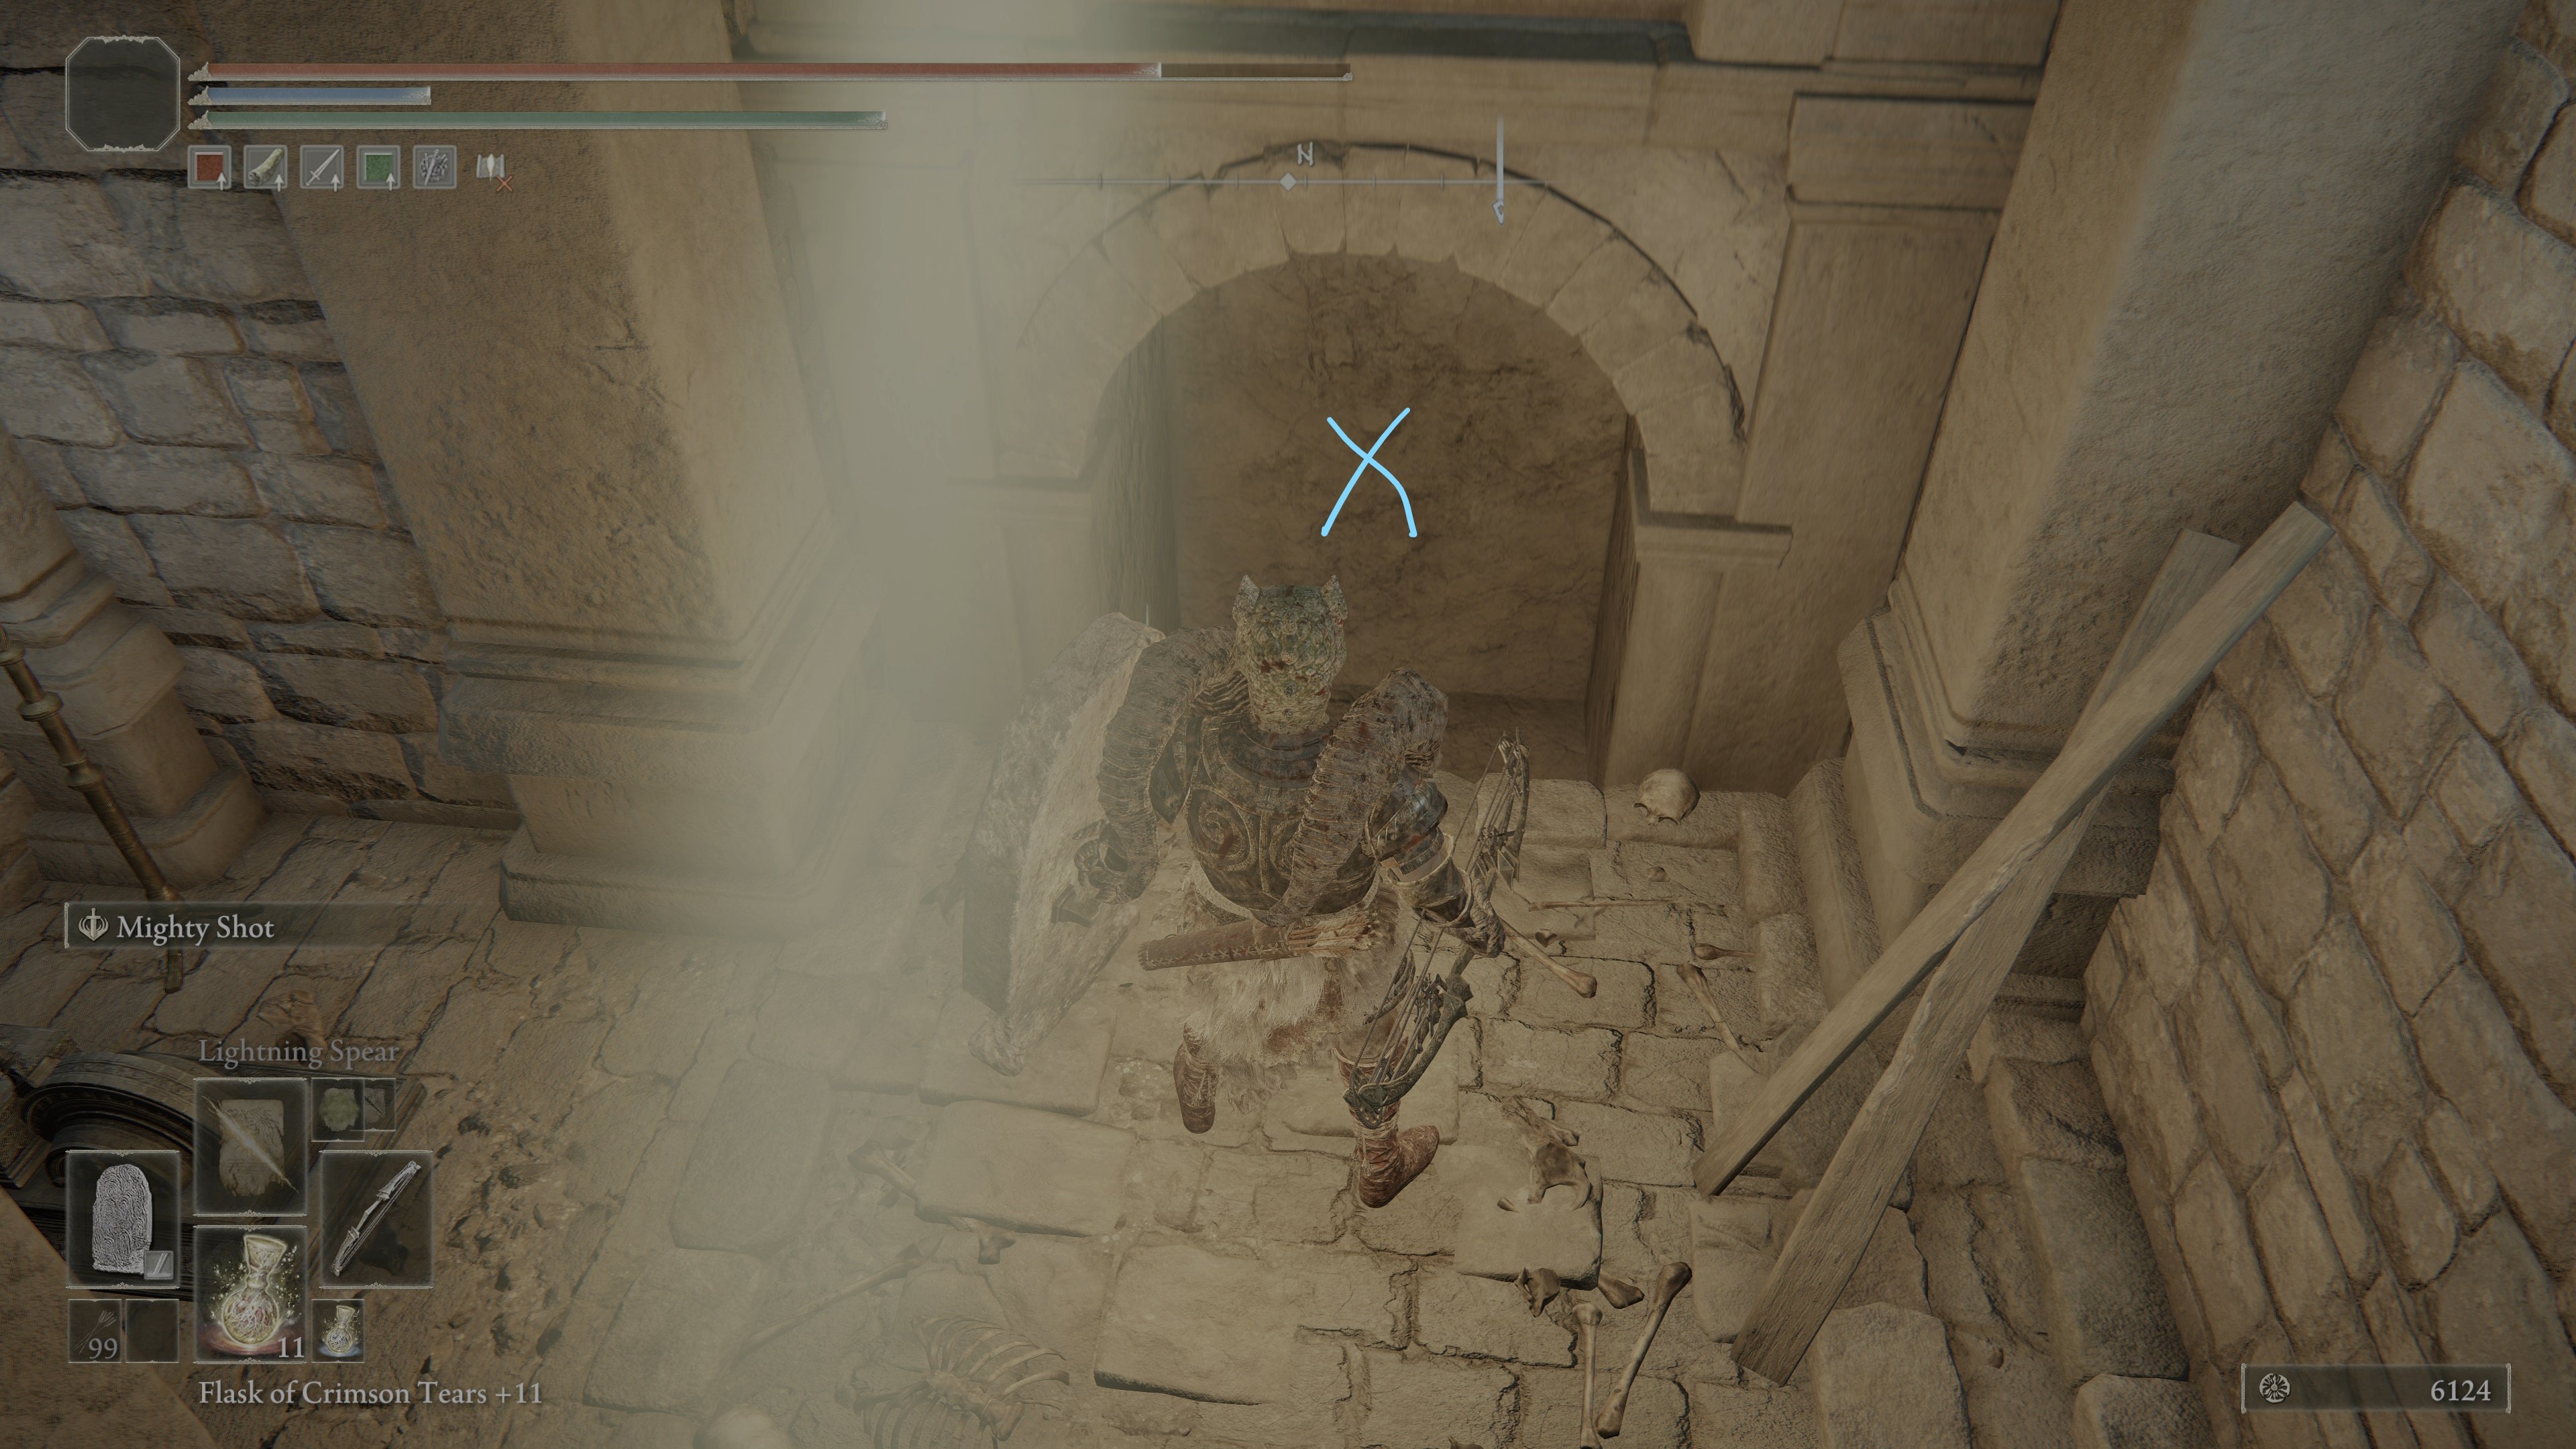
(This alcove is what you'll use to access the optional basement section later -- for now we will ignore it).
Stepping off the lift, you'll see a floor seal in front of you.
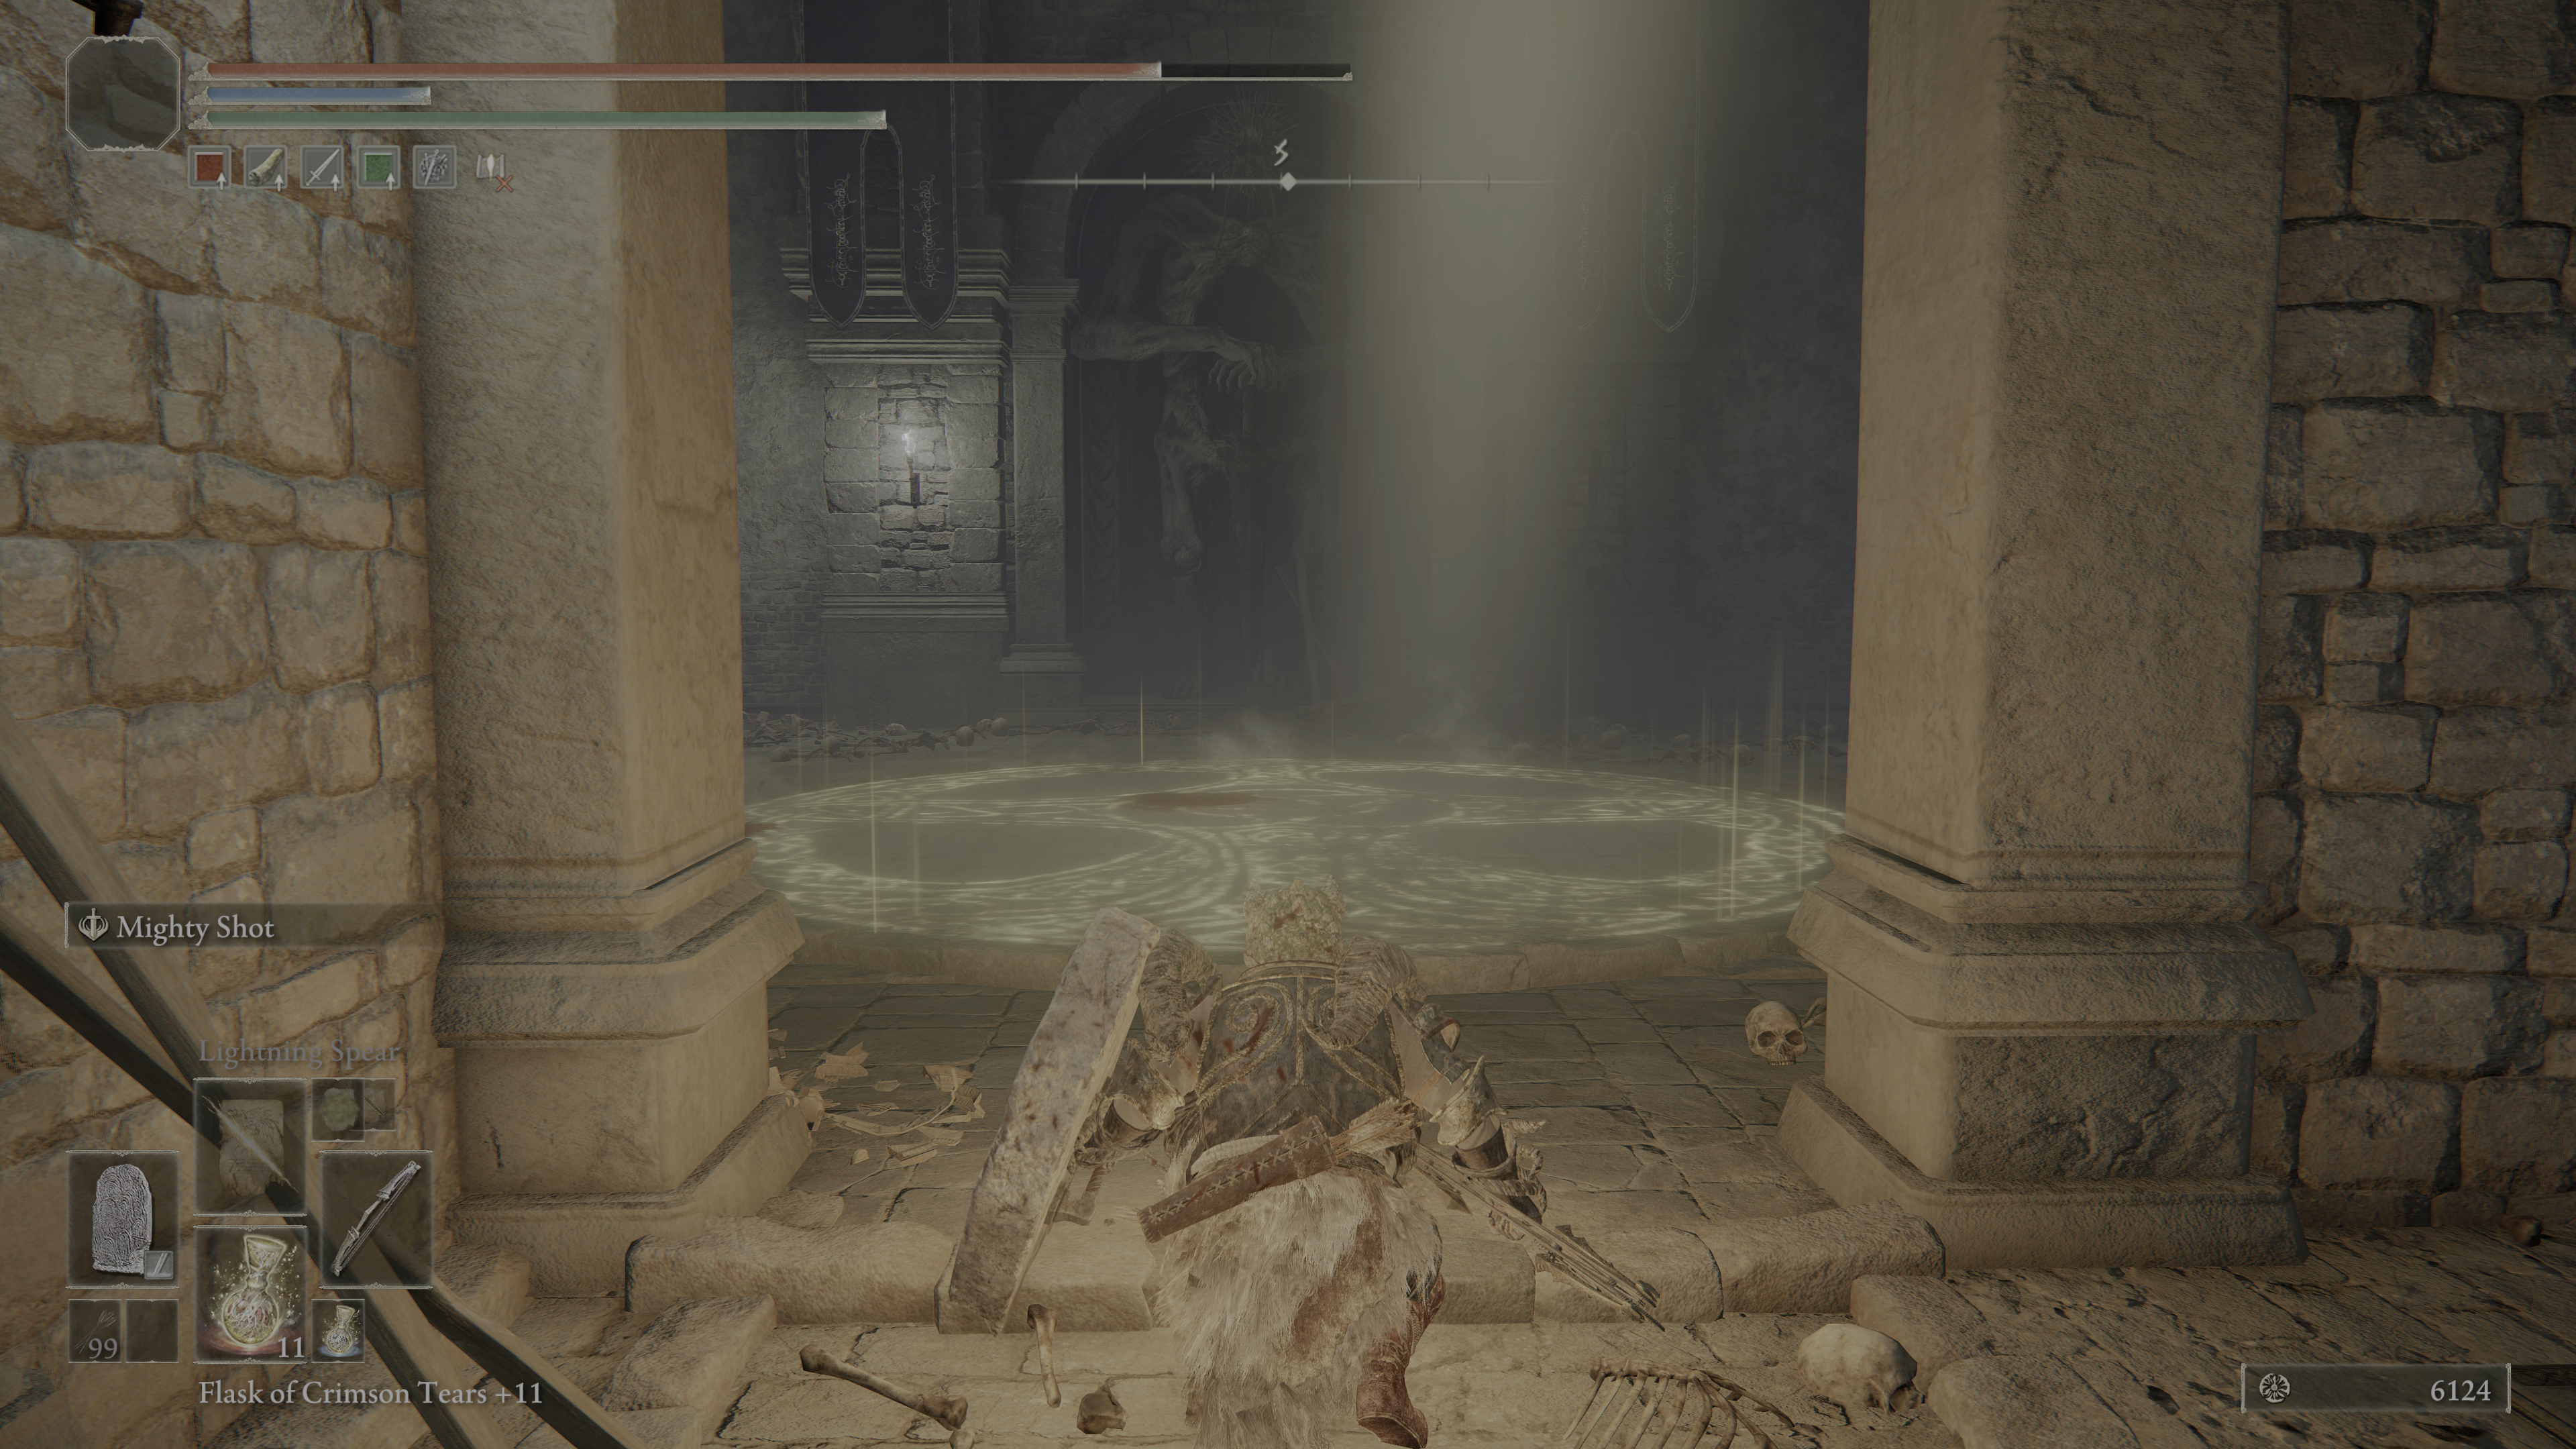
To the right will be a partially demolished staircase. Since the lower half of the stairset is missing, you can't go up it, so the only way you can go is left -- where there is a large vertical door with a lever on the right side of it.
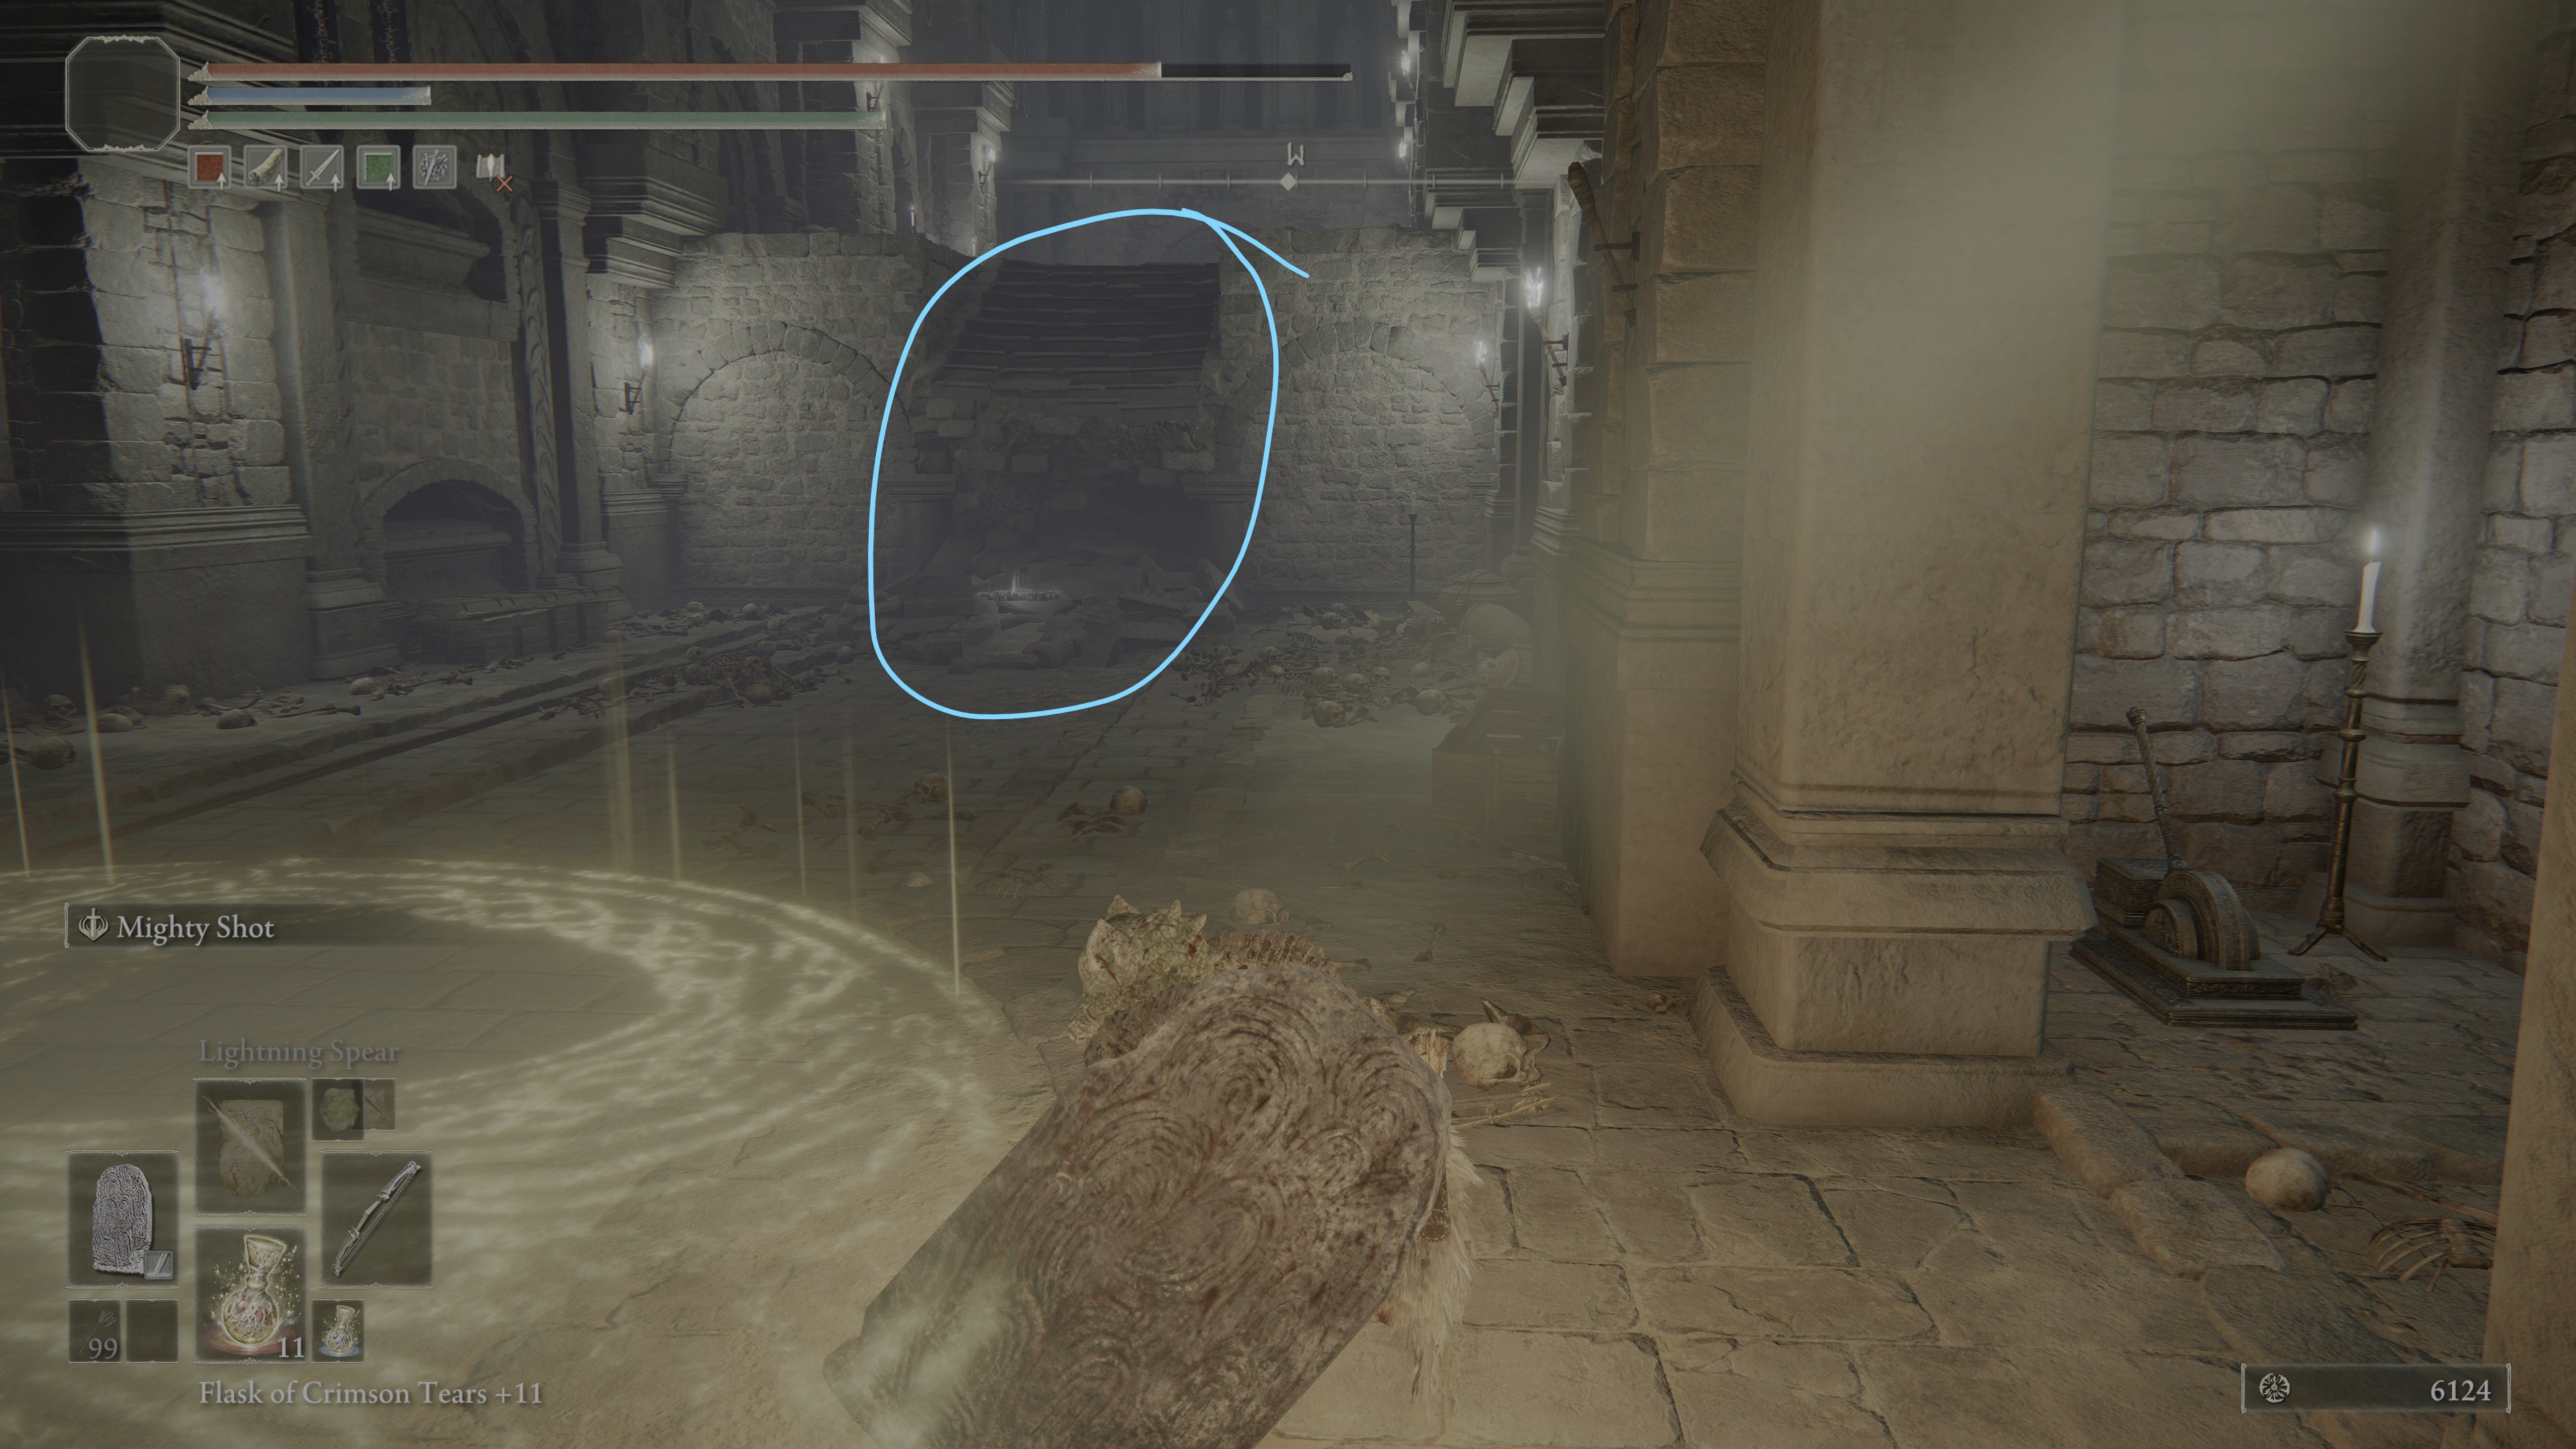
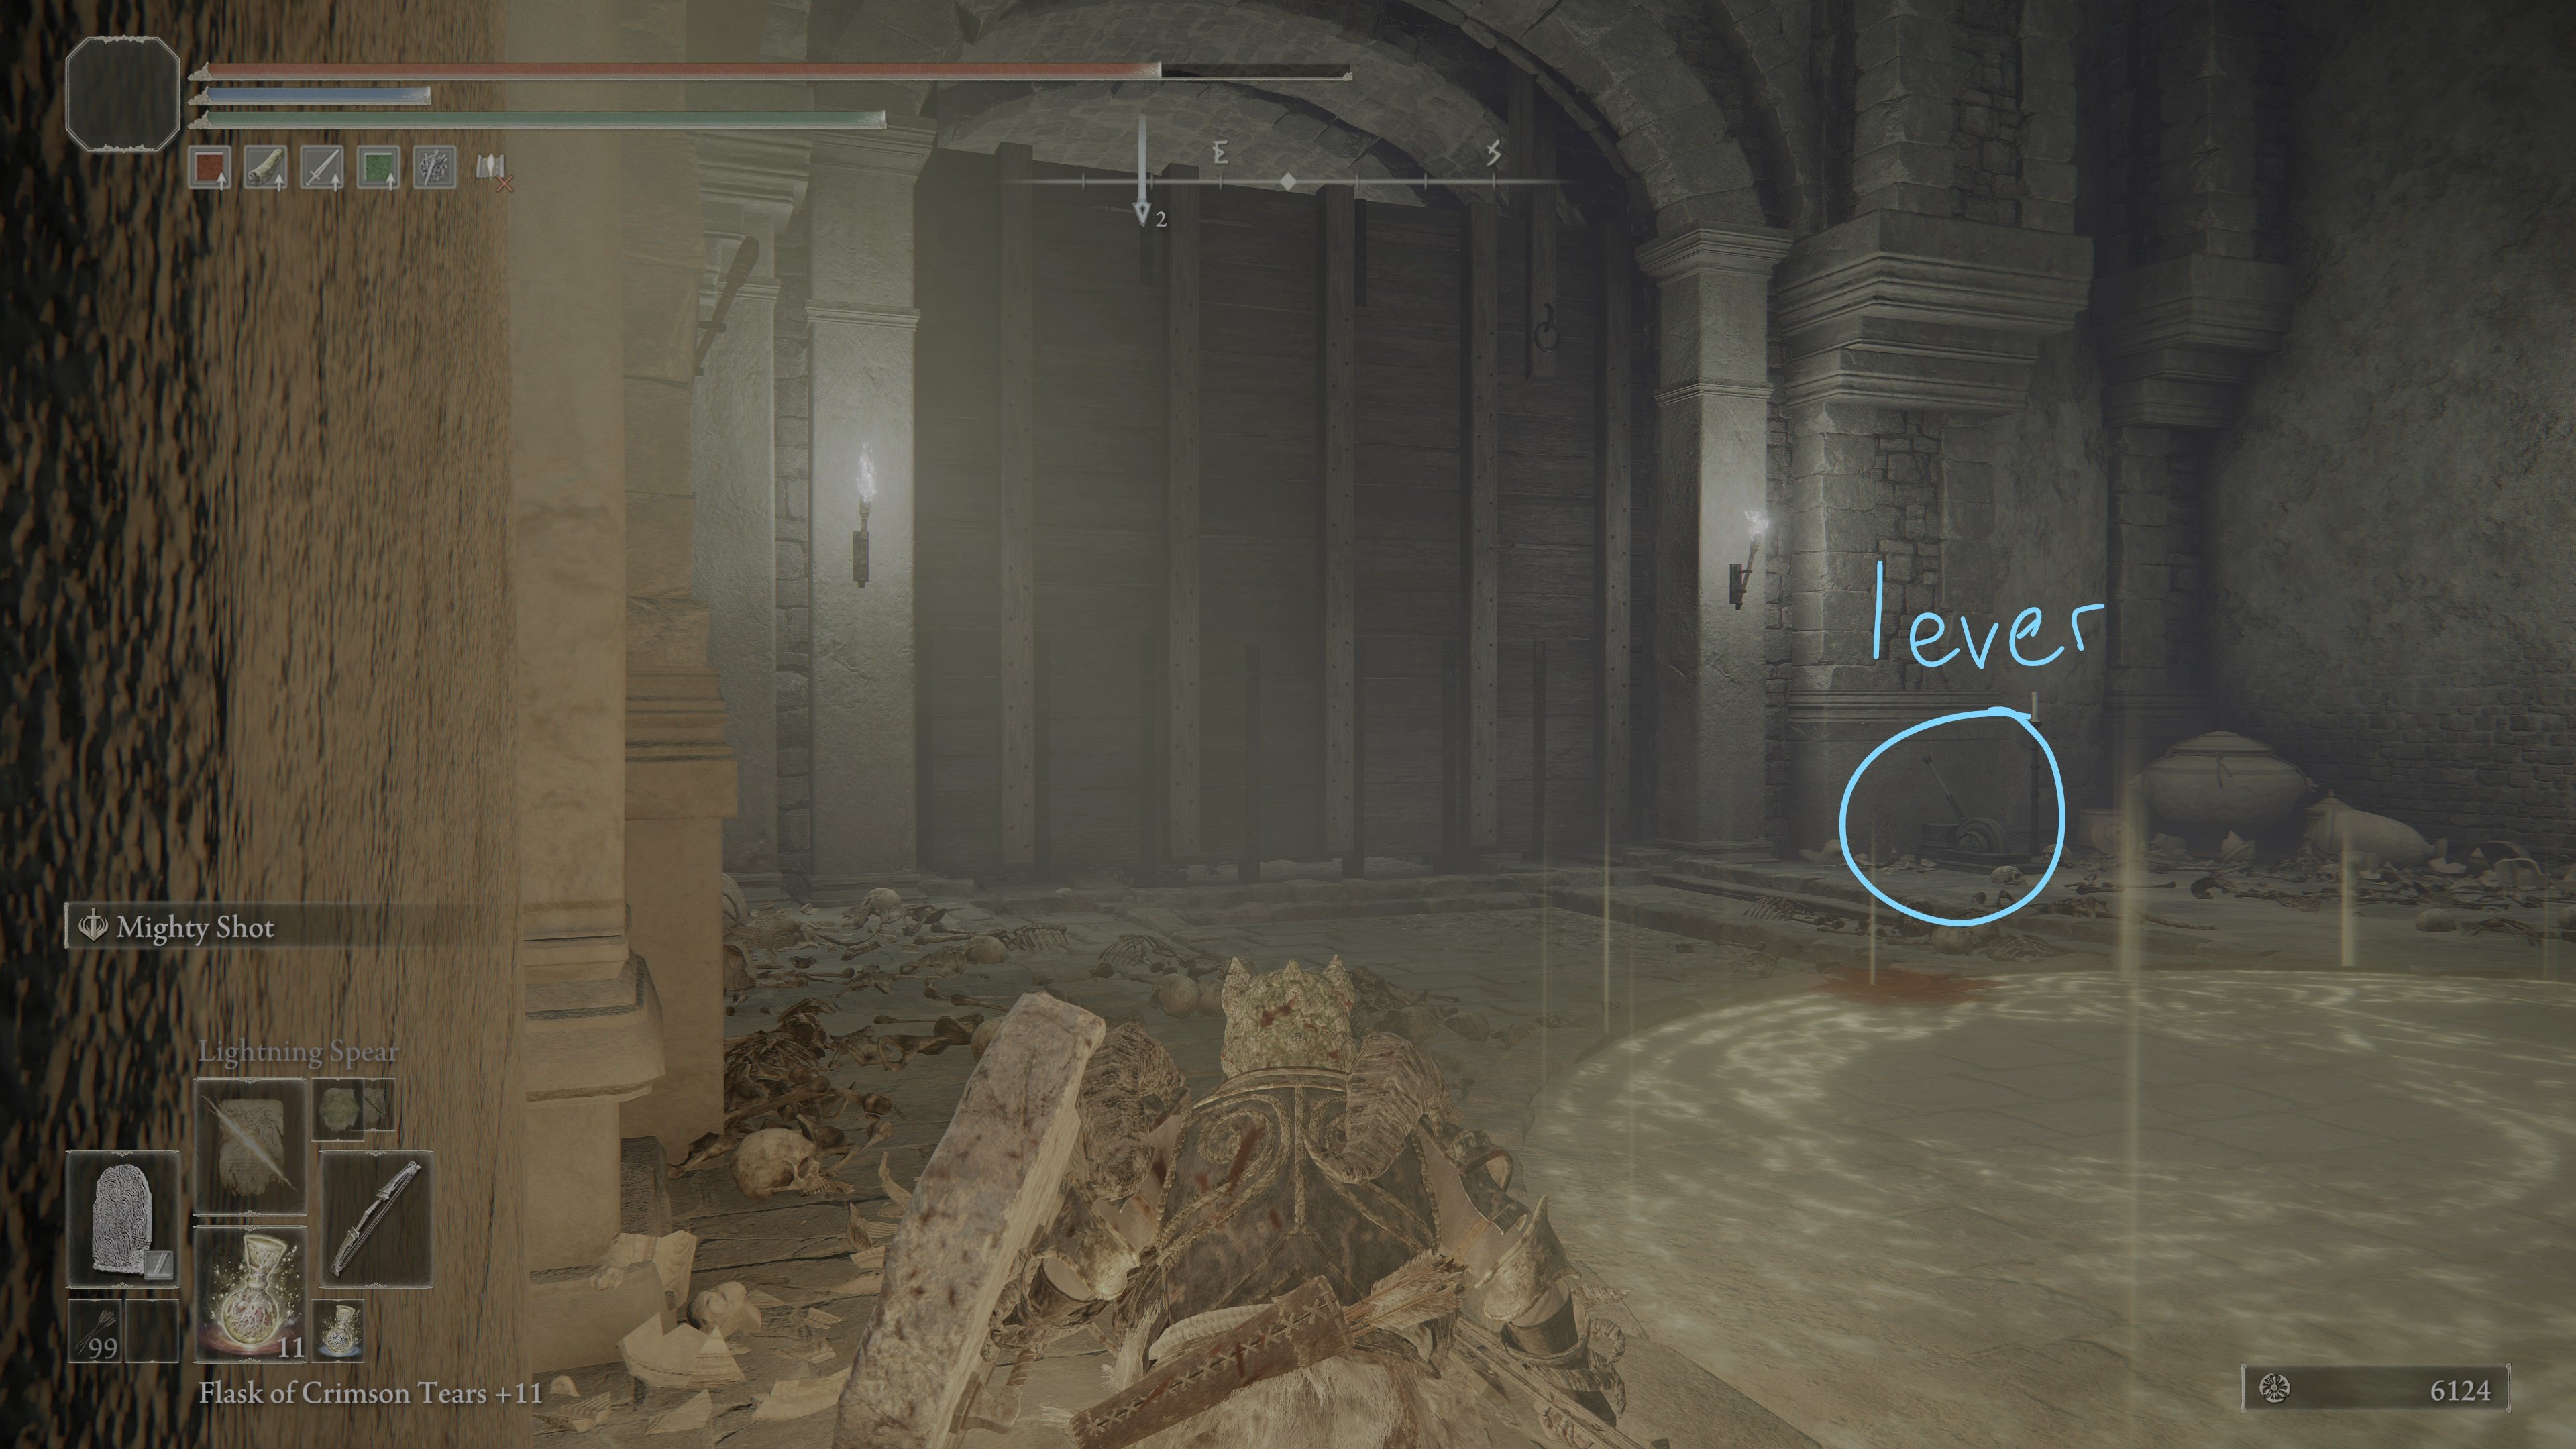
Once you open the door, you'll see a darkened Troll.
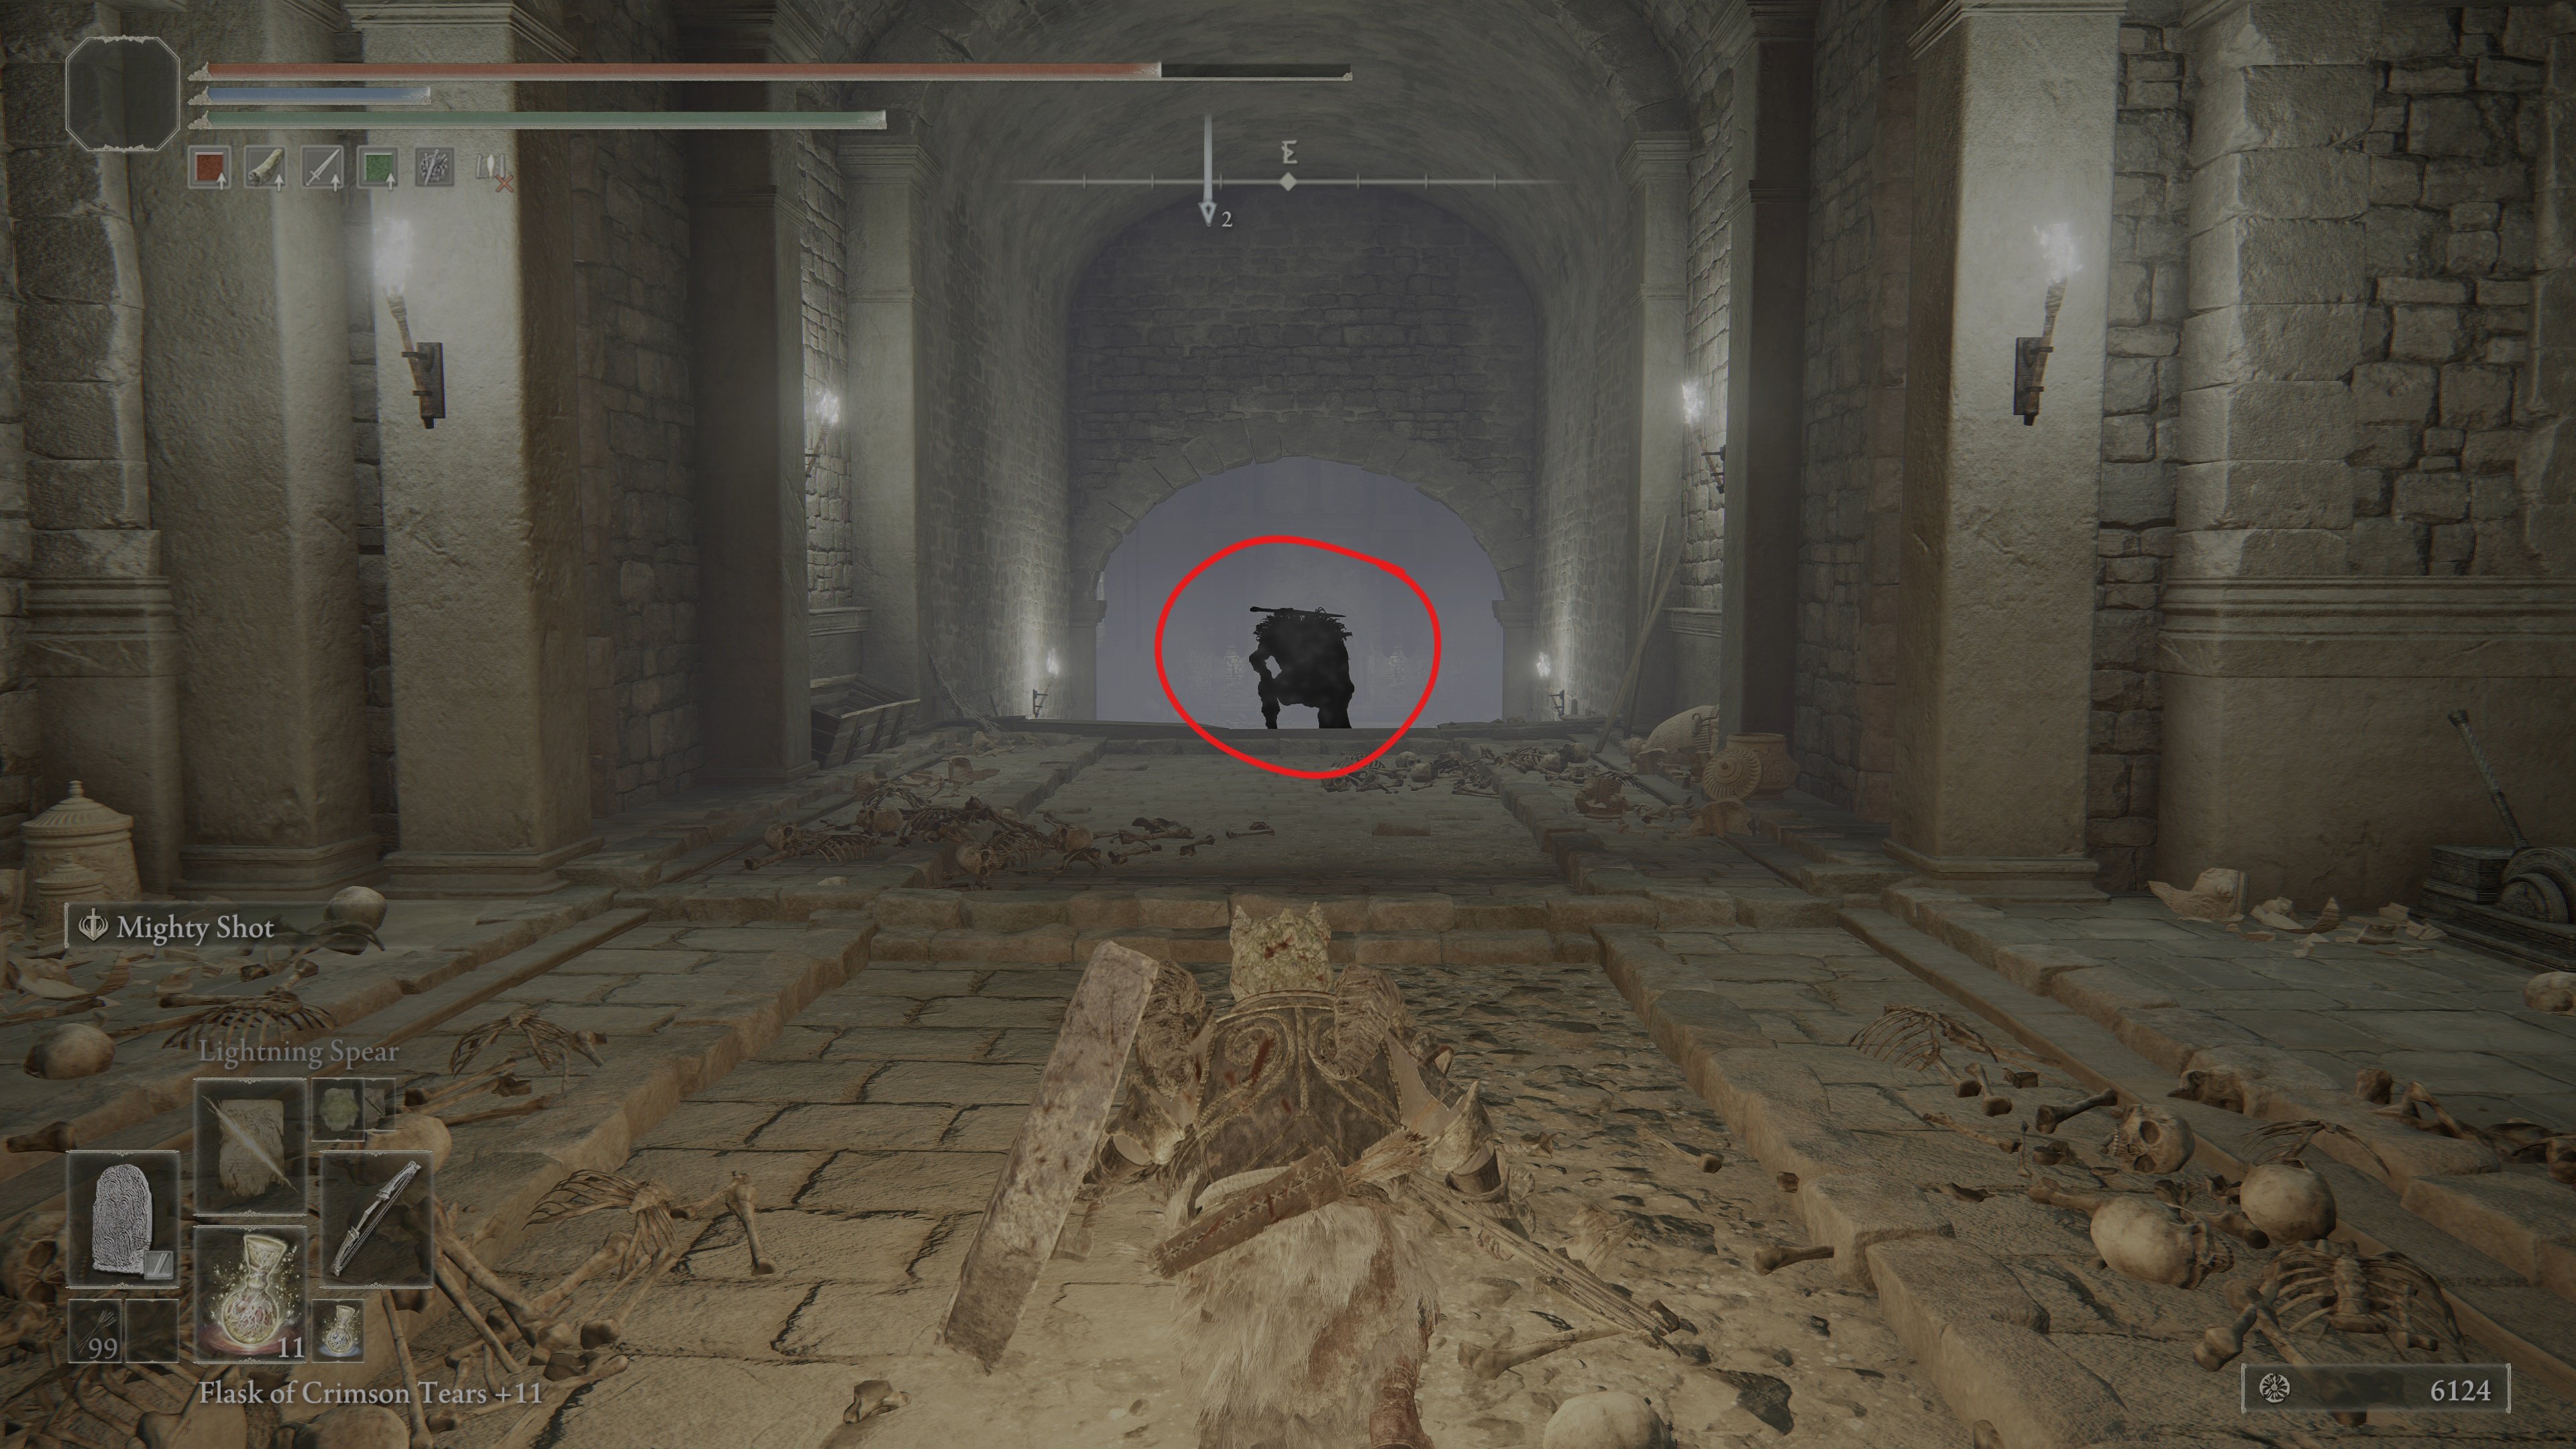
Lure the troll to the seal and fight it. Remember that since enemies in their darkened state are immune to damage, you cannot simply shoot an arrow to aggravate him, you must manually get close enough. This fight is not optional -- you must defeat the Troll to open the boss door.
After defeating the Troll, you'll get the message saying Somewhere, a heavy door has opened which lets you know that the door to the boss is now open.
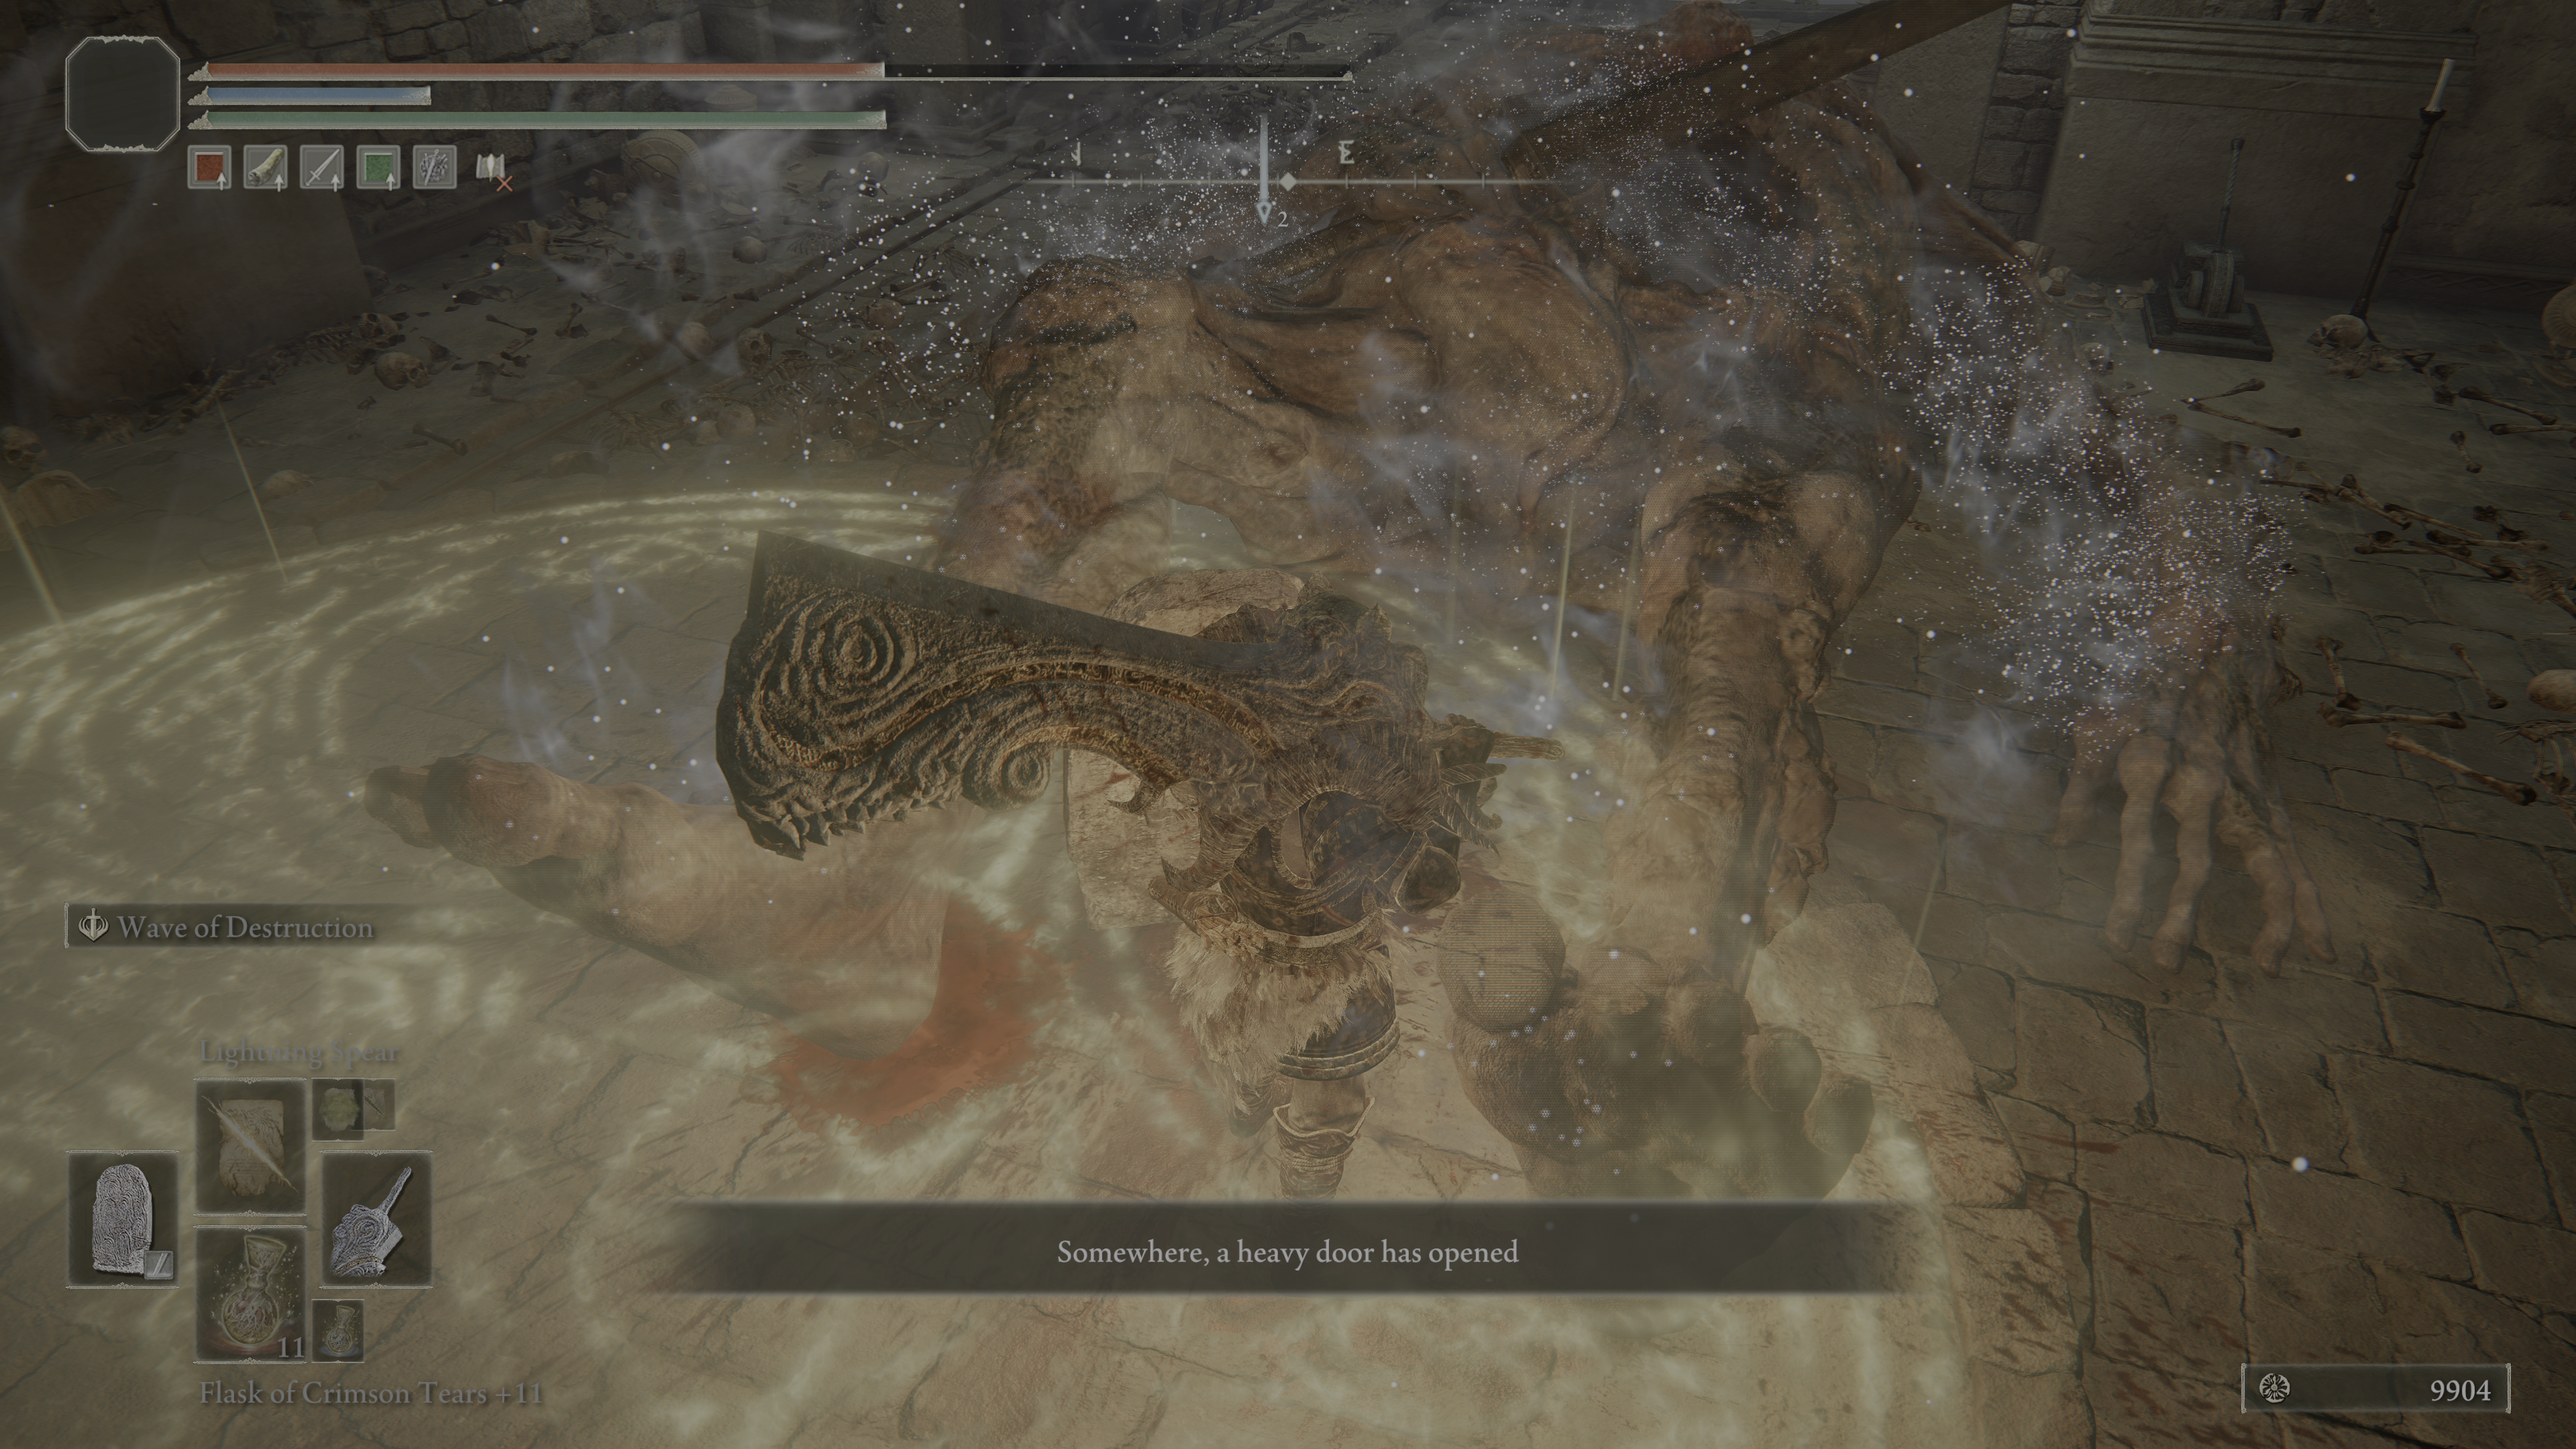
The door to the boss is just in front of where the troll you defeated was originally standing.
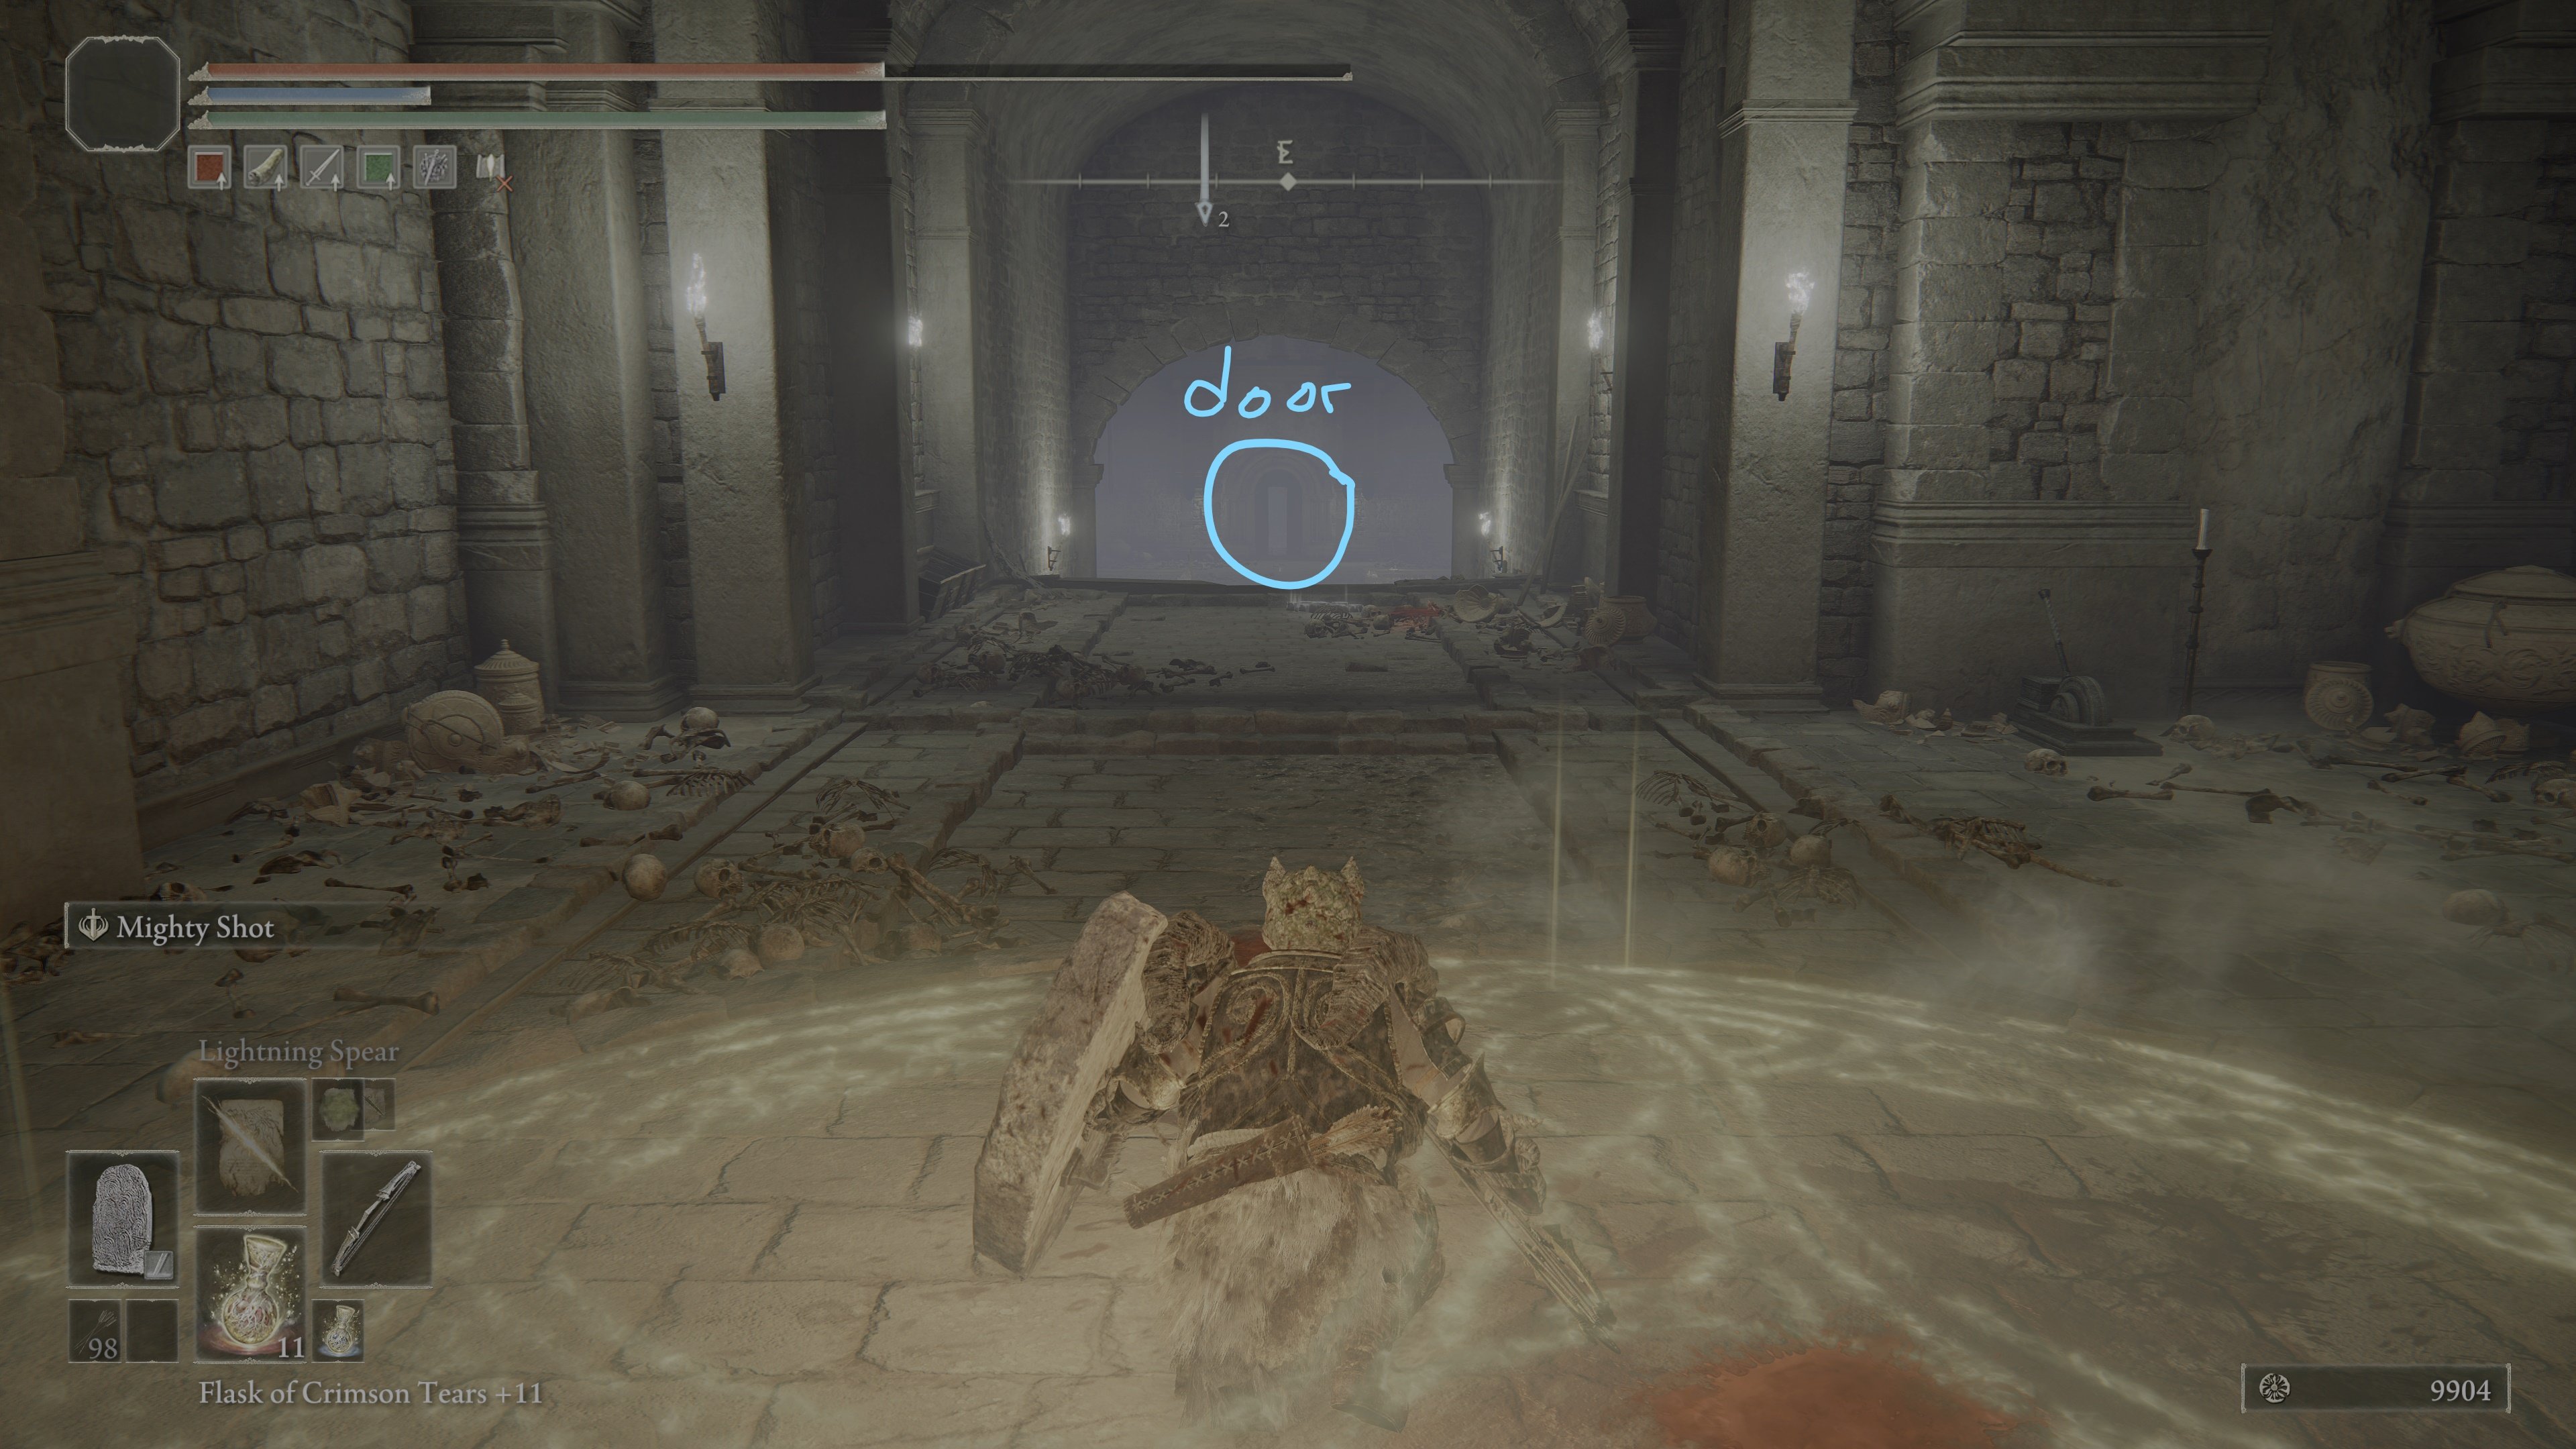
Inside the boss room, you'll find 2x Root Resin.
Boss Fight
The Ancient Hero of Zamor is the boss of the dungeon. He is susceptible to bleed, and is slow moving. A spirit summon is allowed in this boss fight. Defeating him yields the Zamor Curved Sword and the entire Zamor Armor Set.
The Basement Section
The basement section is optional. Before you go down go back to the elevator and activate it with the lever, in order to go down moving the seal statue to the basement (otherwise you won't be able to fight the two Watchdogs). Now you have three options to go to the basement:
- In the room where the Troll was initially, jump down to the basement, but beware of the Prelate. Afterwards you can go down a ladder or jump down a shaft. Both ways bring you to the hallway with the two Lesser Burial Watchdogs.
- When activating the elevator with the level so it moves down, quickly get into the alcove to ride down as well. You can now fight the two Lesser Burial Watchdogs.easier and one by one. Then go up the ladder to the left (when you enter the hallway from the elevator) to face the Prelate.
- As an alternative, though not recommended: In the room that you lured to the Troll to, it is possible to jump onto the candlestick on the right side of the collapsed stairs. This can only be tried once as the candlestick will break if you fail (jump from the heap of rubble in front of the stairs). You can then jump onto the collapsed staircase, allowing you to get up to the upper floor. You can proceed down the ladder to the double Lesser Burial Watchdog hallway. You will have to run past both watchdogs to lure them to the seal on the left side.
The Prelate is guarding a Great Grave Glovewort, and the Giant's Seal.
The two Lesser Burial Watchdogs are also invulnerable and can only be fought if you lowered the elevator (see above). The elevator and the seal is behind the watchdog on the right (when you enter the hallway from the Prelate). Note: You do not have to kill them. If you choose to, they can be baited into striking each other for massive damage. You can also run past both of them and quickly take the ladder back up.
To go back up, use the ladder besides one of the watchdogs (the one at the end of the hallway). You will end up above the broken stairs.
Elden Ring Giant-Conquering Hero's Grave Gallery and Notes
[other images go here]
 Anonymous
 Anonymous
The worst part of any FromSoftware game ever. That includes the Frigid Outskirts. That includes the Bed of Chaos. That includes every poison swamp. That includes the Consecrated Snowfield ! THIS IS WORSE ! I raged more at this than I did at Malenia, Godfrey, Radagon and Elden Beast combines !

 Anonymous
So here's a tip if you get to the watchdogs, pull both to the light circle and get out your cystal daggers and spam them on one. Run to safety and enjoy the show.

 Anonymous
 Anonymous
Just like every other dungeon with pillars that spit fire or frost, there is no need to dodge them or shoot them just use Margit's or Mohg's shackle. This is well documented but hardly ever mentioned on the wikis for dungeons that have these pillars. They work from a very long range and are by far the safest option.

 Anonymous
Incorrect info: the fire prelate can be avoided to get the seal and it's not a great glovewort

 Anonymous
To all those complaining about the troll and cats - God, put the ashes of the Phalanx in your weapon. 2-3 charges and almost any enemies and bosses are ready to crit.

 Anonymous
 Anonymous
 Anonymous
The walkthrough to get here would be a lot better if this started with "from the Giants' Gravepost site of grace". Was it really necessary to travel half the map?

This one was surprisingly one of the easier ones.. Again the biggest pain here might be the watchdogs of stone, but this time around you're blessed with a stun when they become vulnerable. After wailing at them during the initial stun, just guard counter them over and over until they get stunned and you can finish them off. Those things just have no real openings at all unfortunately..

 Anonymous
honestly **** the guy in the alcove by the first fire trap. i roll in and can't see **** because of the camera in the close quarters and he destroys me while i can't even see him

 Anonymous
 Anonymous
its like a crack whore, hated every second of my life while inside

I may be wrong, but this is possibly the only place in the entire game where you can find a Great Grave Glovewort still growing on the plant. Everywhere else in the game that I've seen so far, the flower is always already plucked and stored.
There must be something special to this place, and why one (and only one) still grows here.
 Anonymous
Another dungeon where the "boss" was the easiest part of it. :/

 Anonymous
You could just jump down on either side where the giant is standing in front of the boss door to do the basement level. Much easier that way

 Anonymous
Does anyone else see an item way up on top of the column to the right of the gate leading to the troll? I can see a light from the upper half of the room.

 Anonymous
When you use the lever to open the big gate to the troll, you need to lure him back to the lift, then make the lift go up while on it, the bottom of the lift has a light source to break the invulnerability. You can also ride the bottom of the lift down by activating the lever for the lift when it's up and getting in before it descends.

"By now the player would understand how the void creatures and light circles work so how can we add a curve-ball?"
"How about a void troll in close quarters who DOESN'T step into the circle, blocks the doorway, and then spams ranged attacks while invincible?"
This is not one of those clever "tricks" that makes me say "Well played." It's just obnoxious.
 Anonymous
This place is packed full of some of the most annoying game design choices in the whole game, and, yet, it still manages to be the least annoying hero's grave. That's how bad the others are.

Easy way to cheese the 2 "Lesser" Burial Watchdogs in the basement. Take the elevator down, circle around behind the elevator (and loot the Ghost Glovewort [9]). The watchdogs seem to be unable to access this area behind the elevator. Though it can poke it's sword through the elevator occasionally, you can block that with a shield with 100% physical. It more often does its slam attack when you hide behind the elevator, though, and this will not hit you if you are far back enough.
They will then give up after only 10 seconds or so, slowly turn around and start moving (slowly) back to their spawn. At this point you can sneak behind it and back stab, or charge attack it, then immediately run back behind the elevator again.
Tried someone else's suggestion of Flame of the Redmanes but it was getting blocked by something in the environment, so it didn't even hit the watchdog.
 Anonymous
If anyone is having issues with the troll after luring it to the gold sigil, flame dance on the giant's red braid or blackflame tornado, spinning strikes and stormcaller will all make short work of it if you can position yourself between its feet when you trigger them. As a spinning AoW each of them hits multiple times and between its feet they will hit both legs, the benefit of that is obvious.
Also, the barricade shield AoW even on a medium shield that is upgraded will block ALL the trolls attacks, including when it stamps down. It does insignificant stamina damage without getting anywhere near breaking your guard as long as the AoW is cast on the shield when it lands the hits. I tested this myself on the troll outside Godrick's boss area, so if anyone doubts a medium shield can block hits from a troll they can easily try it for themselves at the secluded cell grace.
 Anonymous
Margit or Mohg's shackle can raise or lower those fire or frost pillars without needing to get anywhere near them. But hitting the pillar with an arrow is the next best choice if you don't have the shackle

 Anonymous
For those who don't know this is the only location the monks flame blade can be farmed.

 Anonymous
Could have just said "start at the Giant's Gravepost site of grace" and done the walkthrough from there, would have saved me a lot of time.

 Anonymous
For the two lesser burial watchdogs in the basement.
The first can get stuck behind the elevator extremely easily. Then lure the second into the light and have them fight one another so that you'll only have to perform minor cleanup.
 Anonymous
A fun trick for the troll.
Lure it into the light and take the elevator down. Take the ladder up into the room with the prelate, and the troll will be targetable without having to directly engage.
 Anonymous
You do know that you can deactivate the flame pillars by hitting them, right? Like in any dungeon if you see a flame/frost spitting pillar, you can shoot it with an arrow, or plain hit it with anything if you're up close and they go down. You really don't need to time anything or hide in an alcove like this walk-through says, an arrow will do just fine.

 Anonymous
I didn't have too much trouble with the burial watchdog as a boss even the duo fight was easy thanks to the crystal darts one killed the other. This lesser enemy variation though is handing me my arse on a plate, at least as cancerous as the rune bears and giant crows.

 Anonymous
I killed the first lesser watchdog without too much trouble, but I got cocky and went to see if there was anything around there worth finding. I didn't forget the finger creeper in the gap and killed the troll easily enough, I had black flame ritual ready so I thought I couldn't go wrong. But there is a maybe medium sized finger creeper lower down from the troll near the sword memorial and it killed me even though I was spamming black flame ritual as much as I could.
I think I jinxed myself by being a smart arse, the three times I've tried that same lesser watchdog its proper hammered me.
 Anonymous
I got my first taste of the "lesser" burial watchdog yesterday in giant's mountaintop catacombs. They're about as fun and enjoyable to fight as the "lesser" rune bears are.

 Anonymous
 Anonymous
 Anonymous
how do you get the item in the rafters you can only see from the broken stairs?

When I asked for a Heros Grave with no Chariots, I *didnt* mean to make enemies invulnerable then.

 Anonymous
I think this is the only dungeon I've never completed. Too BS.

 Anonymous
Yes. The invincible Troll in close quarters that keeps spamming me with a ranged roar attack without coming into the circle to be vincible so he can stomp my ranged mage to death. Why didn't I think of this?

 Anonymous
That's exactly what the hero's grave dungeons needed to make them even more fun, invulnerable enemies? who the f**k on the development team thought that was a good idea?

 Anonymous
I think one of the cat statues at the bottom has a guaranteed greatsword drop

 Anonymous
Can this prelate drop his weapon? I know you get a guaranteed drop from one in Fort Laiid near Volcano Manor but was curious if either are farmable for a 2nd without doing NG+ or 2nd character

 Anonymous
Bad design, since you can get stuck in the basement with no way to fight the shadows.

 Anonymous
This place and the sainted hero grave in the Altus Plateau are two of the better catacomb side areas in the game, mostly because they’re actual puzzle dungeons that feel rewarding to go through and aren’t just a bunch of hallways with imps or instakill chariots

 Anonymous
Huh, seems the guide has been updated with photos since I last checked. Even though they used paint it appears the photos and guide are definitely much improved compared to how the full text guides usually are.

 Anonymous
As with all flame/ice pillars, using either Mohg's or Margit's shackle will help you to proc it at a safe distance, making progress in this dungeon much easier.

 Anonymous
Hidden path near start. No need for window jump trick. Simply go to that right most window and the wall has a hidden passage. I discovered it when using Mohg's bracelet to search for hidden passages due to its massive range. It hasa a large number of windows going well past the Watchdog and seal and in one of those windows is a Golden Rune [11]

 Anonymous
That fire prelate is probably the hardest thing to kill in the dungeon.

 Anonymous
Can't find Ghost Glovewort (9) , also not mentioned in the walkthrough, which would seem pretty important. I think it's a typo.

 Anonymous
So a normal pretend frost weapon can easily push 100+ frost status with cold infusion. But this legit frost sword has half of that? Fromsoft logic at its peak ladies and gentlemen.

 Anonymous
The instructions should say West-South-West, not South West, from Giant's Gravepost.

 Anonymous
These navigation instructions are weird. Why not start from Giant's Gravepot site of grace and skip the paragraph leading up to it?

 Anonymous
Compared to the other Chariot grave dungeons this place was a joy, not too large, very few trash mobs, simple mechanics and a fairly easy boss

 Anonymous
Honestly, I only came for the armor set and was thrilled not to see a chariot in this one.

 Anonymous
The troll is the real boss of this dungeon. Actual boss is a creampuff.

 Anonymous
Lol got the flame monk curved sword at my first try im blessed by pope emeritus

 Anonymous
No way to get rid of the door/gate that leads to the boss. It is mentioned NOWHERE what you have to do to open it. Worst Herograve by far and all of them are unneeded and unwanted garbage.

 Anonymous
Make SURE to follow the walkthrough. I sent the lift back up to activate the floor seal, but didn't go down it afterwards. Instead I kept going after defeating the troll and found you can jump down into the basement before the heavy metal doors.
Killed the Prelate and went down to where the lift would be with the two Watchdogs. There is no lever there. No way to get the elevator down, no way to get back up from either of the basement floors. Had to lose my runes and go back to the beginning of the dungeon.
 Anonymous
For me this isnt a Heros Grave, its like a catacomb but 5x larges and shittier

 Anonymous
 Anonymous
Do yourselves a favor and dont waste time fighting stupid dog statues

 Anonymous
I got a Watchdog’s Greatsword from one of the Lessar Burial Watchdog’s in the basement. The one closest to the golden floor seal but they probably all have a chance to drop it in this dungeon.

 Anonymous
It has 3-4 awesome weapons inside it that you can grab/farm, and all you have to deal with are 3 watchdogs that kill one another and a giant, with a prelate if you want the gear, short and sweet in my opinion, people just love to ***** really :D
Also, there is an illusory wall to the immediate right after the first fire monk, and also there seems to be an item really high up on a secondary level that appears unreachable, not sure about that one Fromsoft.
 Anonymous
When I got into this dungeon, there wasn't the lift for me, after trying to reload my save file, it got corrupted and now infinitely loads. Thank you Elden Ring!

 Anonymous
So this is a recycled dungeon design in which you have to kill recycled bosses as normal mobs (stone cat, troll) just to get to a boss that is a recycled trashmob from earlier in this area. I really love how different and new this all feels, totally not like an anime filler arc.

 Anonymous
Another dogshit dungeon just like all of the catacombs. Just pain in its purest form. The inclusion of the burial watchdogs is probably the worst part, they are unironically the worst enemies in the game. Might just be me since i play with greatswords, but i literally cant get a hit in without getting stepped on for 75% of my hp on ng+5. Who tf is the dude who keeps putting flying enemies into this game and why is he still on the team.
"you know what the players will enjoy, an enemy that literally doesnt stay on the ground so they cant hit him, its gonna be soooo much fun"
- some dude named Garry from fromsoft
 Anonymous
If you're like me, the hardest part of the dungeon was the big wooden barrier. There's a freaking lever right next to it on the right hand side. Just lure the impervious troll into the light and kill it to open the sealed boss door.
You don't have to kill any other thing in this dungeon except the troll to beat the boss. The prelate (chimney head) does have an equipment set though.
It was really refreshing to see a departure from the typical "run from chariot and then run some more", but it somehow managed to feel just as lack luster...but the Zamor Set is cool so I guess it was worth it aside from the easy +10 Glovewart

 Anonymous
 Anonymous
 Anonymous
This dungeon is not worth it unless you really, really want the +10 Glovewort. Though you can get those underground in lesser areas.

 Anonymous
the basement doesn't even seem necessary unless you want that great glovewort.

 Anonymous
 Anonymous
So it is possible to lock yourself in the basement, which wouldn't be a problem were it not for me losing all my runes in the process... What a cruel joke.

 Anonymous
To find the troll, you have to open the giant gate by pulling a lever near an unlit candlestick. I dunno why but I had a hell of a time seeing this lever, so I think others might too.

Yeah, I'm sorry, but personally, those cat statue things that levitate are harder than most of the bosses.

 Anonymous
"The Basement Section" is wrong. There is no need to have the watchdogs step in the light. You can run past both to the ladder at the end. The basement has nothing to do with revealing the light on the upper floor. That is simply tied to sending the elevator back up to the flamethrower area.

 Anonymous
This “Troll” doesn’t exist for me. I’ve done every single part of the dungeon, killed all three burial dogs, all imps, all three fire mages, the major fire mage, collected all items, tried all variations of the elevator up and down, and nothing causes the troll to appear. I don’t know if this is a bug, my save file is corrupt, or what, but this is by far, without a doubt, the worst designed dungeon in the entire the game.

 Anonymous
The most disappointing thing about the dungeon is that there seems to be no reward, no nothing, for clearing every single shadowy enemy in there, the optional ones included, afaik

 Anonymous
Worst dungeon I’ve ever experienced, also little to no reward

This dungeon is a nightmare for melee, these kangaroo f***ers are worse than the boss.

 Anonymous
The bit about jumping onto a candlestick to get up the stairs is unnecessary and bad advice lol. If you can pull it off, sure, it's a minor shortcut. But the way you're meant to get down there is jump off the bridge where the shadow giant is. You'll land near the prelate fire monk and the tunnels behind will lead you to the 2 burial watchdogs. You don't need them to step on the seal, just run to the ladder behind one of them. That also reminds me -- the guide says in the stonesword imp key room, the fire trap will lower when all 3 shadow imps step into the seal; that's not true. You must have hit the middle of the floor.

 Anonymous
You must get on the elevator down, then step on it and let it go up by itself.
Then, you can bring the troll to it, killing the troll unlocks the boss door.
 Anonymous
Smithing stone (7) drops from the Imps you need to lure into the light

 Anonymous
During the boss fightr, your mimic might clip through the floor. Happened to me 3 times in a row.

 Anonymous
Is it possible to get the Fire Monks sword that ambushes you near the fire trap?

For anyone talking about the object on top of a pillar. IT'S NOT AN OBJECT, check with the telescope from the top of the stairs and you'll see it doesn't have the moving mist from objects, it's just a non rendered piece of wall or an out-of-bounds part. Been checking the whole place and hidden walls to confirm and there is nothing to go up.

 Anonymous
Anyone figured out how to get the item that’s on top of the pillar? visible from the top of the broken stairs that overlook the boss door

 Anonymous
You can 100% turn on the trap and stand comfortably on the stairs between the two streams of fire then continue out. All it does is turn on a seal to kill the imp statues so it's not super critical but to say it makes the stairs impossible to pass is just incorrect.

 Anonymous
There is an item at the very top of the room with broken stairs. Does anyone knows how to get there?

 Anonymous
you can't go from below(ZAMOR RUINS)
you have to jump from right side of mountain(https://eldenring.wiki.fextralife.com/Interactive+map?id=3538&lat=-90.208&lng=155.640&zoom=8&code=mapA)
 Anonymous
you can't go from above(ZAMOR RUINS)
you have to jump from right side mountain(https://eldenring.wiki.fextralife.com/Interactive+map?id=3538&lat=-90.208&lng=155.640&zoom=8&code=mapA)
 Anonymous
i can't even find my way up there, i tried circling across the whole mountain and i have found no way up, heading west from the giant cave grace leads nowhere, the cliff has no stone outcrop for you to leap across

 Anonymous
 Anonymous
Is this dungeon located on top of the hill? Can't seem to find a way up.

 Anonymous
Who wrote this? Luring adds into the light doesn't change the seal for the troll. You raise the original lift back up to the 1st floor (beginning of the dungeon) which brings the seal from the basement 2 (2 watchdogs) up to basement 1 (troll) after killing the troll, just lower it again and either proceed to basement 2 to finish looting (with the light back down there) or stay in basement 1 to fight the boss.


F U Myazaki for this BS.
0
+10
-1